Zynq-7000 AP SoC Spectrum Analyzer part 3 - Accelerating Sfotware - Running ARM Library Tests Tech Tip
Zynq-7000 AP SoC Spectrum Analyzer part 3 - Accelerating Sfotware - Running ARM Library Tests Tech Tip
Document History
Table of Contents
| Date |
Version |
Author |
Description of Revisions |
||
| 5 September 2013 |
1.0 |
Faster Technology |
Initial posting |
||
| 26 February 2014 |
1.1 |
Faster Technology |
Update to 2013.4 release |
||
| 7 August 2014 |
1.2 |
Faster Technology |
Update to latest library revision |
||
| Date |
Author |
Comment |
|||
|---|---|---|---|---|---|
Description/Summary
In Tech Tip "Zynq Ne10 Library Tech Tip" a library of complex signal processing functions was obtained and built. This Tech Tip describes the process to build and execute on the ZC702 the tests that are supplied with the NE10 library and the subsequent results. This will demonstrate the ease with which externally sourced software can be built using Xilinx SDK and run on the ZC702. In addition, multiple methods for accessing and controlling the ZC702 will be shown, demonstrating the flexibility of the ZC702, the simple process of system debug and the speed of system development. A subset of the supplied tests will be used to indicate the level of performance improvement that might be possible using the NEON SIMD extension to the ARM processor in Zynq-7000 AP SoC Processing System (PS).
Implementation
| Implementation Details |
|
| Design Type |
PS Only |
| SW Type |
OSL Linux |
| CPUs |
1 CPU - standard ZC702 frequency |
| PS Features |
ARM processor and NEON SIMD engine |
| PL Cores |
None |
| Boards/Tools |
ZC702 |
| Xilinx Tools Version |
Vivado / SDK 2013.4 |
| Other Details |
Standard ZC702 setup for console terminal and Ethernet required |
| Files Provided |
|
| Ne10LibraryBuild.zip |
Saved workspace file set |
Step by Step Instructions
This Tech Tip uses the workspace that resulted from building the Ne10 library in the Tech Tip "Zynq Ne10Library Tech Tip". If that workspace is available, skip the instructions below to start SDK with the workspace already in place at the Workspace in Place heading below.
If the workspace is not available or if there is a question if it was completed properly, the referenced file "Ne10LibraryBuild.zip" can be used to create a known good starting point for this Tech Tip.
Restoring the Workspace
Download the zip file from the Ne10LibraryBuild.zip link.
Create an empty directory where you will be implementing this Tech Tip. To be consistent with the balance of these step by step instructions, the directory could be:
G:\ZC702fft\zc702-zvik-base-trd-rdf0286\sw
However, these steps to import a known workspace will work with any new folder of the user's choosing.
Start -> All Programs -> Xilinx Design Tools -> Vivado 2013.4 -> SDK -> Xilinx SDK 2013.4
In the Workspace Launcher, browse to and select ZC702fft\\zc702-zvik-base-trd-rdf0286\sw or the empty directory that you have created.

Click OK to continue.
When presented with the Welcome screen, click the x in the Welcome tab to close that screen

SDK will start with a blank Project Explorer pane
We can now import the saved workspace into SDK.
Select File -> Import or Right Click on the white space in the Project Explorer pane and select Import
The Import dialogue box will appear. Expand the General line and select Existing Projects into Workspace
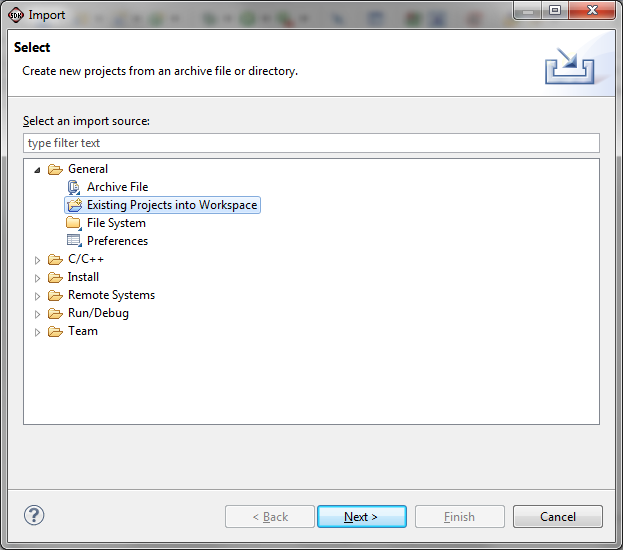
Click Next
Click the Select archive file button. Then click Browse to navigate to the saved workspace that you want to import and click Open. In our case, this is Ne10LibraryBuild.zip.
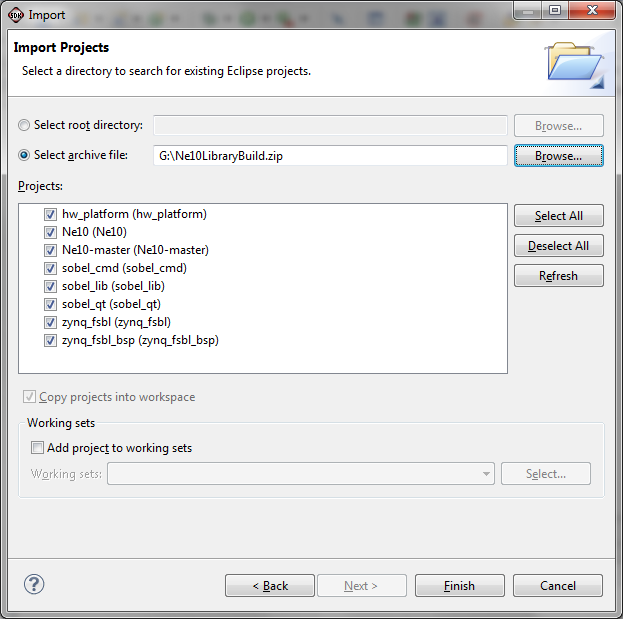
Click Finish
SDK will build the workspace automatically. Because SDK is already started and the workspace is in place, you can skip the following instructions to start SDK and go directly to
Workspace in Place
If you have not yet started SDK, do so by:
Start -> All Programs -> Xilinx Design Tools -> Vivado 2013.4 -> SDK -> Xilinx SDK 2013.4
In the Workspace Launcher, browse to and select ZC702fft\\zc702-zvik-base-trd-rdf0286\sw.
Click OK to continue.
When presented with the Welcome screen, click the x in the Welcome tab to close that screen
With SDK now running with the existing or re-loaded workspace, continue from here.
Because this is an existing built project, you should see something similar to the following. The key is to have the Ne10 project with the directories shown. If these are not present, return to the Zynq Building the Ne10 Library Tech Tip and build the library again, or use the instructions above to load the known workspace file set.
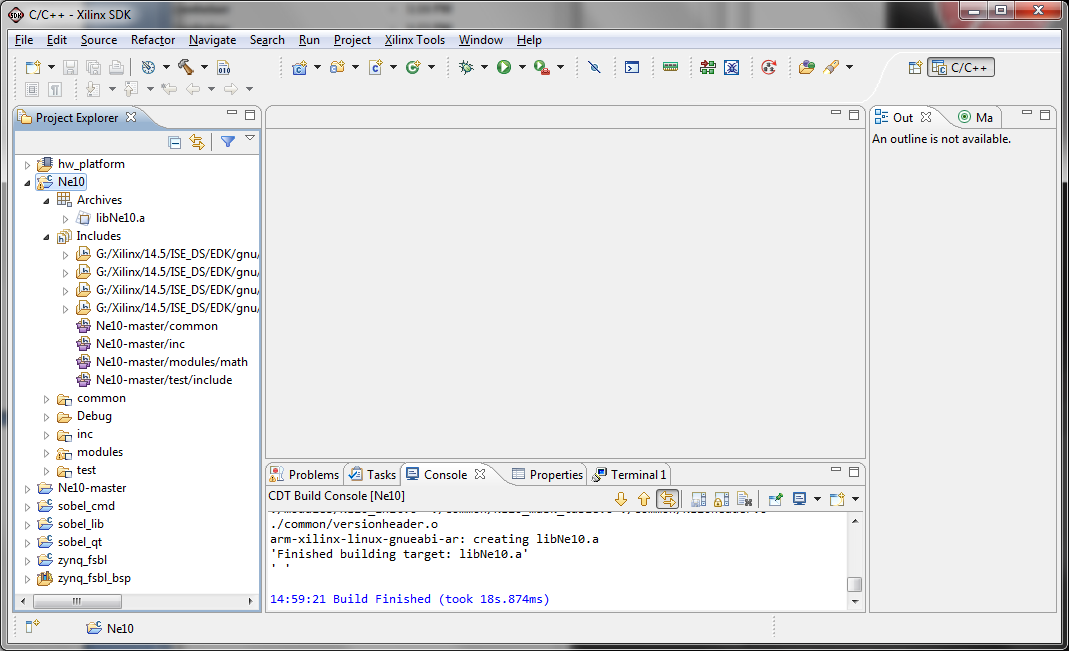
With the library in place, we build the standard test program that was supplied as part of the repository. A new project for the test program is created, the appropriate files from the repository are imported and then it is compiled into an executable program.
Select File -> New ->Project; expand the C/C++ group and select C Project.
Shortcut:
Right click on the white space in the Project Explorer pane. Then select New -> C Project.
In the Project name: box, give the project the name Ne10-test. Select the Project type: as Xilinx ARM Linux Executable by clicking on that option in the left column.
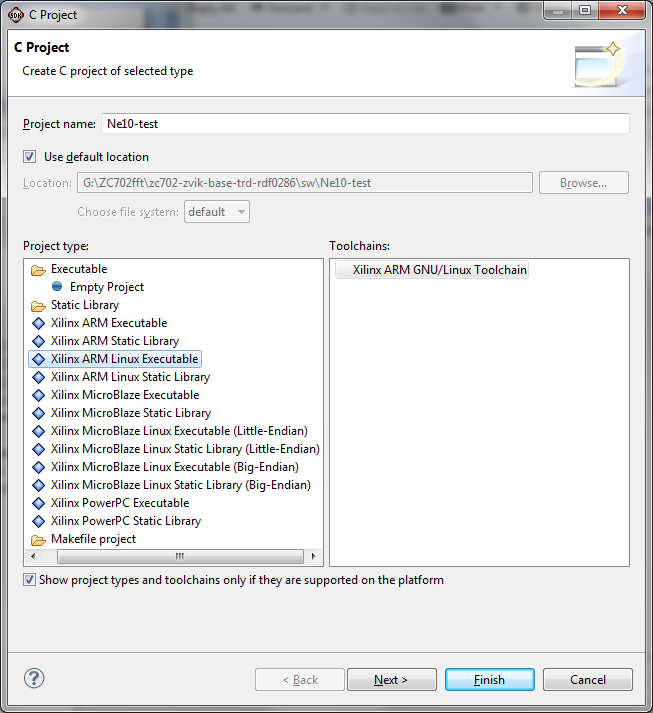
Click Next
Verify that both the Debug and Release Configurations: options are checked.

Click Advanced Settings.
We are now going to add the proper paths to library include files.
Expand the C/C++ General line in the left column and select the Paths and Symbols item. Be sure the Configuration: option is set to Release because we want to have the best performance. If desired, these settings can be applied to both debug and release configurations by selecting the All Configurations options as shown.
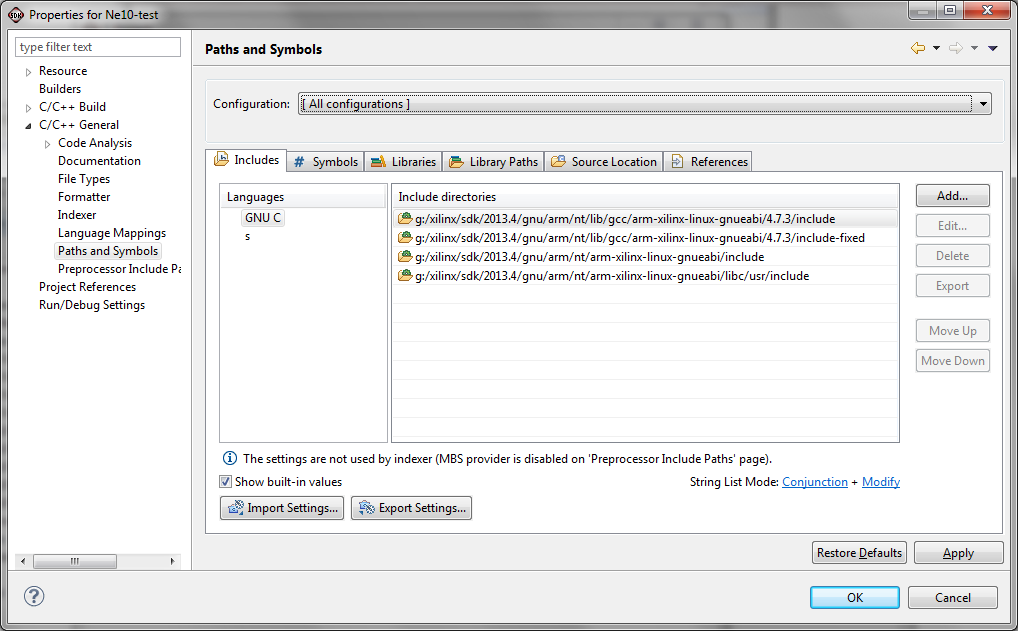
These steps are referred to as the Adding Paths steps and will be used several times
With the Includes tab selected, click Add in the right column
Check both of the options and then Click Workspace to select the directory to be added
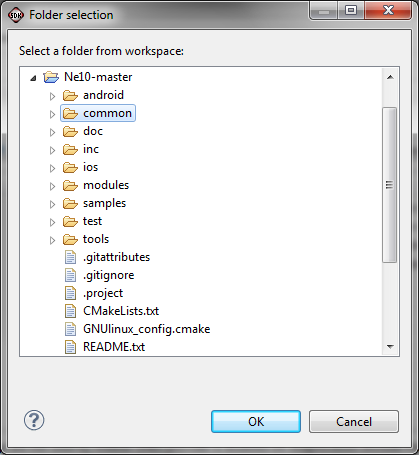
Select Ne10-master -> common and then click OK
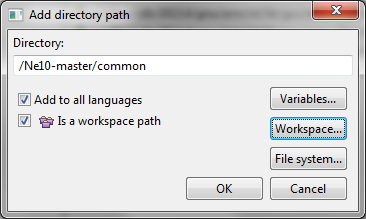
Click OK again to add this path to the Includes with the result as shown below

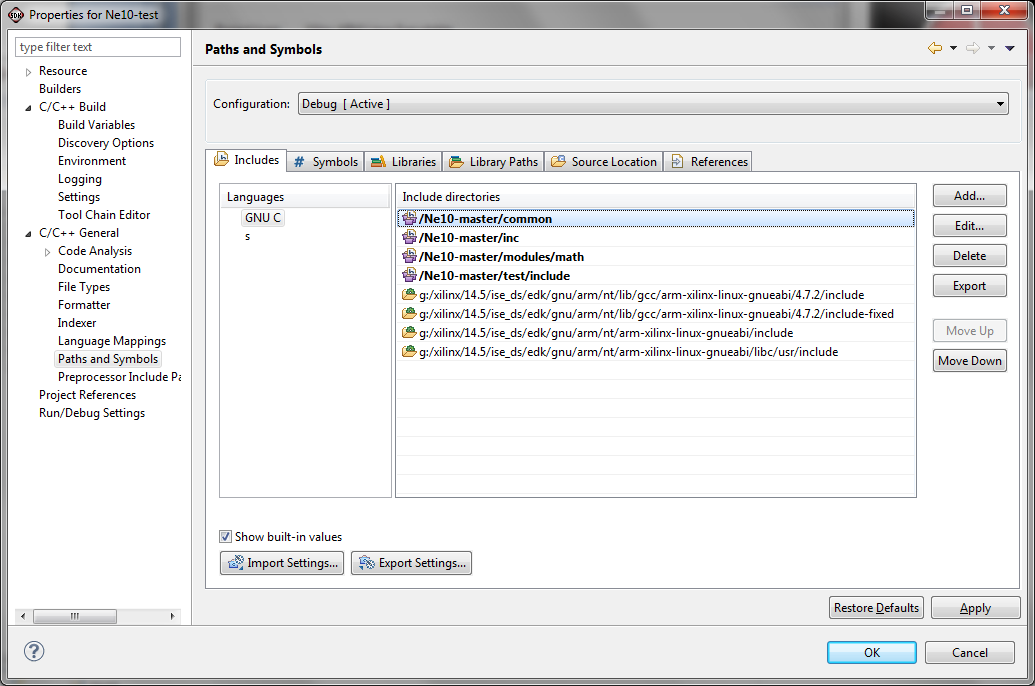
Using these same Adding Paths steps, add the following paths:
- Ne10-master / inc
- Ne10-master / modules / math
- Ne10-master / test / include
When completed you should have the following include directories set.
We now need to add some library paths for tools to find all of the required components.
In the left column of the Properties for Ne10-test, expand C/C++ build options, and select Settings. In the left portion of the right side of the window, under ARM Linux gcc linker, select Libraries.
At the top of the Libraries (-l) area, click on the add icon (looks like a sheet of paper with a plus sign on it).
In the text entry box, type Ne10 and click OK. Then do the same steps for Linux libraries "m" and "rt" resulting in the following
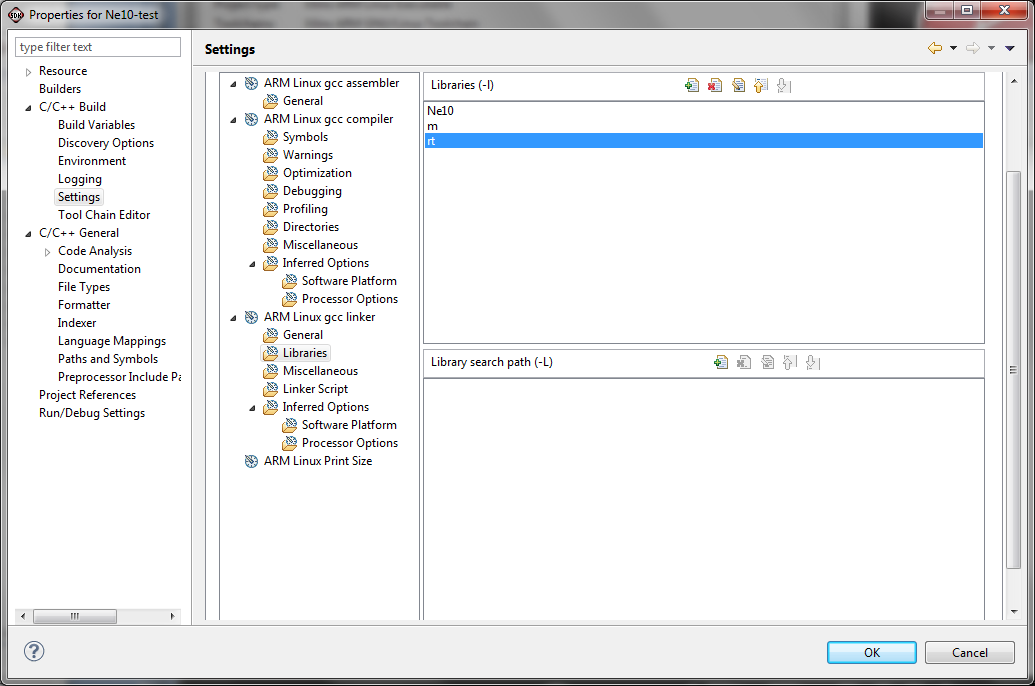
In the Library search path pane, click the add icon (the paper with the plus sign as before) to get a pop up window:
Click Workspace and then select Ne10/Release.

Click OK to return to the Settings window.
NOTE:
These same library paths should be added to the Release configuration also. If the Configuration: option box is not displayed at the top of the Settings window, expand the C/C++ General line and select the Paths and Symbols item. At the top of the window, the Configuration: option box should appear. From the drop down select Release. Then in the left column select the C/C++ Build / Settings item. In the list of Tool Settings, select the Libraries item under the ARM Linux gcc linker.
Using the Add steps used immediately prior for adding to the Debug configuration, add the following Libraries:
- Ne10
- m
- rt
Then add the Library search path (-L) Ne10/Release. You should then have the following:

NOTE:
If the original Configuration: box is set to All Configurations, this will force the Debug and Release build options to be identical. This is a simpler approach that can be changed later if different options are desired for the release build versus the debug build. In general, a release build will invoke a higher degree of compiler optimization for more efficient code while a debug release includes additional hooks to simplify analysis and debug of the code. This causes Release build code to usually operate faster than Debug build code.
Click Apply
Click OK to return to the Select Configurations screen.
Click Finish to complete this portion of the setup.
We now need to import the actual code for the tests. This follows a set of steps similar to the import of the code into the Ne10 library in the "Zynq Ne10 Library Tech Tip".
Right click on Ne10-test in the Project Explorer window, and select Import.
In the Select window that pops up, expand General and select File System then click Next.
Browse to the Ne10-master directory that is under "zc702-zvik-base-trd-rdf0286/sw.
WARNING:
Do NOT use the original file that was unzipped or copied into a higher level directory.
Select the modules/dsp/test and test/src directories to import.
CAUTION:
If the original source Ne10-master is selected, subsequent build steps will fail. If that occurs, delete the Ne10-master in the workspace and perform the import again, being sure to point to the Ne10-master under the /sw directory of the TRD.

Click Finish to perform the import.
The test software is now ready to be built.
NOTE:
To obtain the best execution performance, the compiler default options must be set to Release.
Right click on Ne10-test in the Project Explorer pane.
Select Build Configurations . Set Active > Release
Right click Ne10-test and select Build Project.
As before, there are a number of warnings. These can be ignored for now.

The test software can now be run on the ZC702.
There are several methods that can be used to run the test software on the ZC702. Among them are:
- Use the Remote System Explorer capability in SDK
- Copy the binary file to the SD card containing the TRD Linux system and execute from a remote terminal or from the local console
Since there are two tests that will be run, we will demonstrate each of the methods.
Running from Remote System Explorer
We will access the ZC702 over an Ethernet connection from the PC where SDK is running. The ZC702 has a default IP address of 192.168.1.10 so be sure your computer can reach that sub-net. Connect your ZC702 to your computer or network with an Ethernet cable.
The ZC702 must be set to boot from the SD-MMC card supplied with it. This contains the base TRD Linux system required to run this test software.
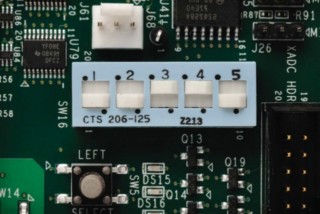
Set the boot select switches as shown below, then power on your ZC702.
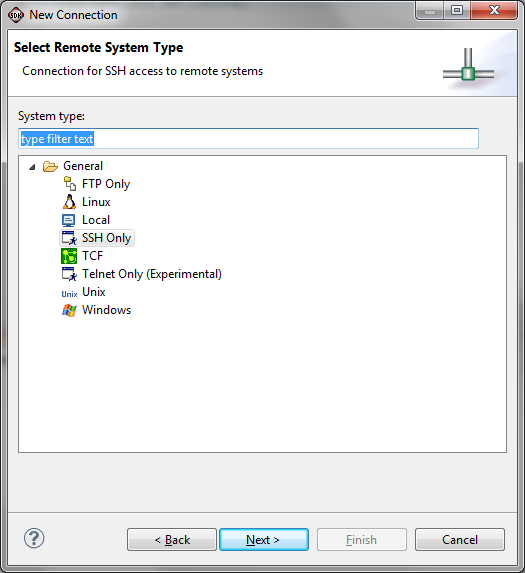
With the ZC702 running, we will set up a Remote System Explorer connection to the ZC702 board to allow us to download and run our program. Right click in the Project Explorer window, select New -> Other. In the pop up window, expand Remote System Explorer, highlight Connection.

Click Next.
In the next window, select SSH Only, and click Next.
Use the IP address of the ZC702 (192.168.1.10) as the Host name and Connection name. Fill in the description field if you wish - it is not required.
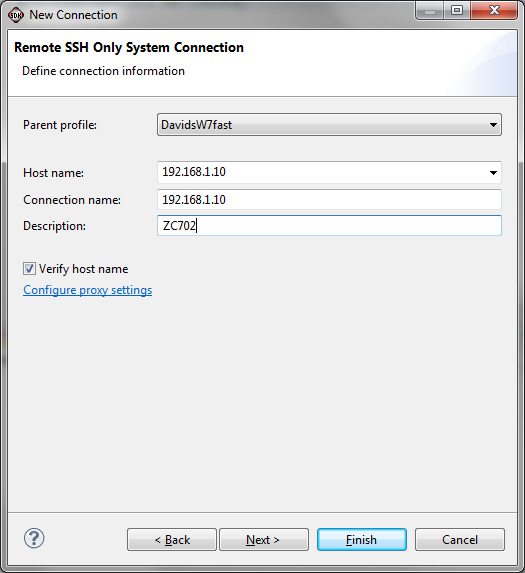
Click Finish.
NOTE:
Although the connection has been established, there is nothing showing. To view the connection, a new perspective must be started, replacing the current perspective. To do this,
Click Window -> Open Perspective -> Other
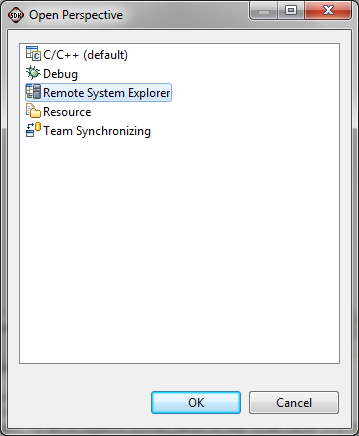
Then select Remote System Explorer and click OK.
The Remote System Explorer connection will be displayed.

Close this perspective by clicking
Window -> Close Perspective
With the connection established and the standard Project Explorer perspective displayed, we can now download and run the test program directly to the ZC702.
In the Project Explorer, right click on Ne10-test, then select Run As -> Run Configurations.
A new window will open to create, manage and run configurations.
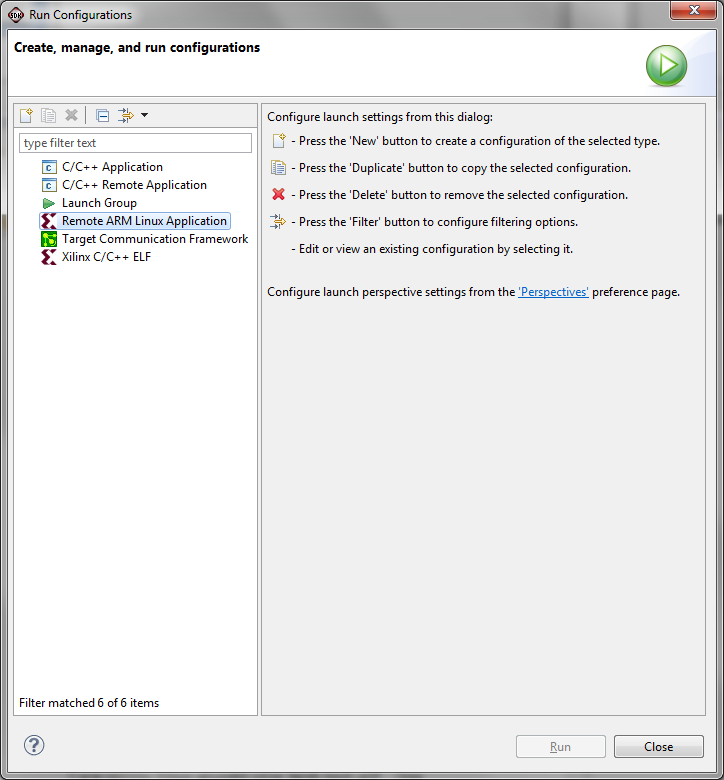
Create a new Remote ARM Linux Application by double clicking on "Remote ARM Linux Application" in the left column. (This can also be done by following the instructions in the main window for using the "New" button.)
Select the IP address of the ZC702 in the pull down Connection menu.
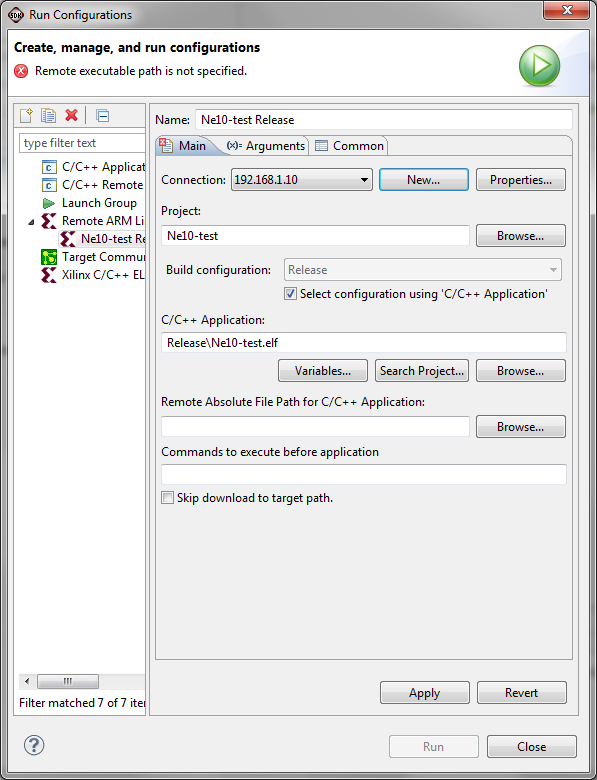
Then click on the Browse button next to the Remote Absolute File Path for C/C++ Application field .
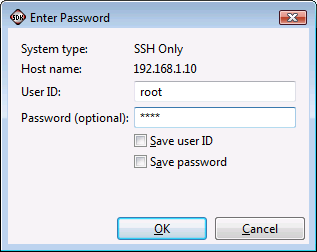
Expand the Root directory. Under the root directory select the tmp directory. If prompted for the User ID and Password, use root for both.

Click OK
Append /Ne10-test.elf to /tmp in the Remote Absolute File Path for C/C++ Applications field.
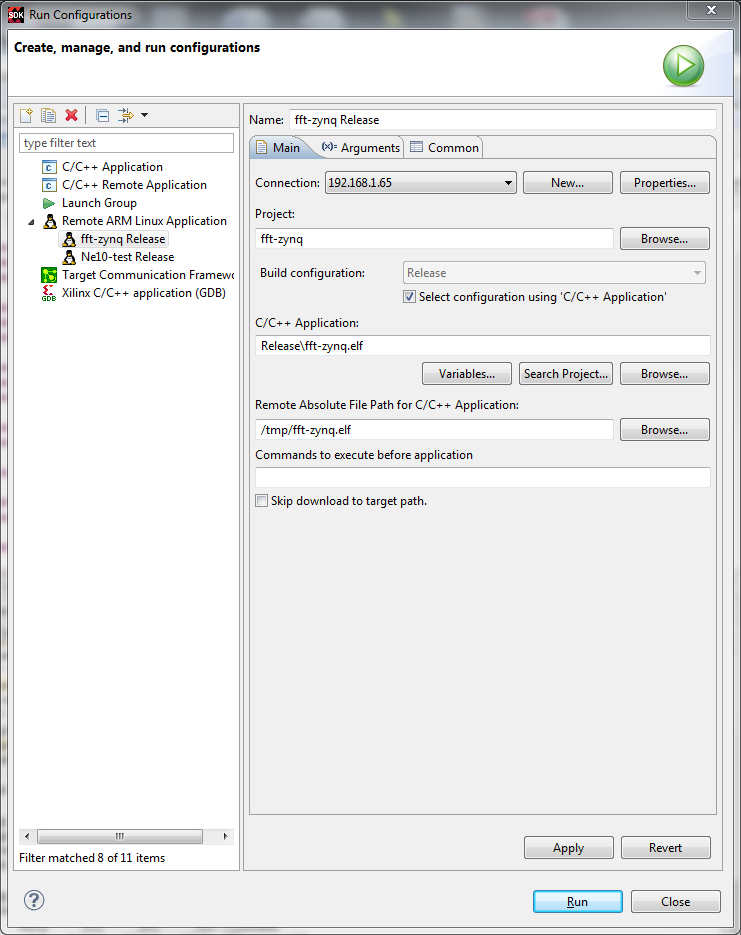
Click Apply, then click Run.
The test software will be downloaded to the ZC702 and then run. The results will show in the SDK Console window.

NOTE:
Once the Run Configuration has been set up, SDK will remember this configuration, simplifying subsequent tests in the same environment.
This first test is a regression test that checks the code in the library for correct results so any mistakes that are made in optimizations, etc. will be caught. It is using the open source SEATEST project that implements an xUnit style of Test Driven Development.
The SEATEST project is hosted at https://code.google.com/p/seatest/
Additional information about xUnit testing can be found at http://en.wikipedia.org/wiki/XUnit
At the conclusion of this test with all of the runs passing, we can conclude that the desired fft portion of the library has been properly built and is operating as designed.
The second test that we will run is a performance comparison between running these same complex functions on the ARM processor itself and then running with optimizations to use the NEON SIMD engine. This test is included in the Ne10 library and is selectively compiled based on the presence or absence of a special symbol. To run the performance test we need to define the PERFORMANCE_TEST symbol.
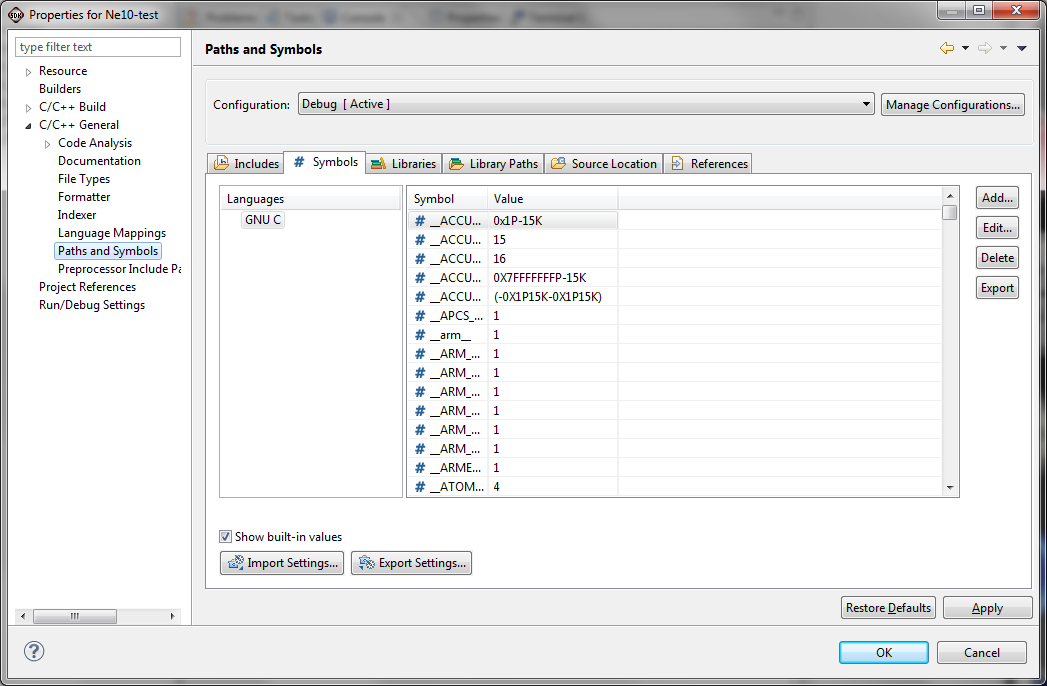
Right click on Ne10-test and select Properties.
Expand the C/C++ General line in the left column and then select the Paths and Symbols entry.
Select the #Symbols tab by clicking on it.
Click the Add button on the right side and enter PERFORMANCE_TEST as the symbol name. There is no value required so leave that entry blank.
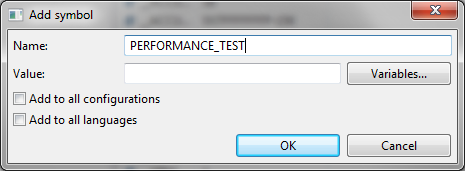
Click the Add to all configurations check box then Click OK.
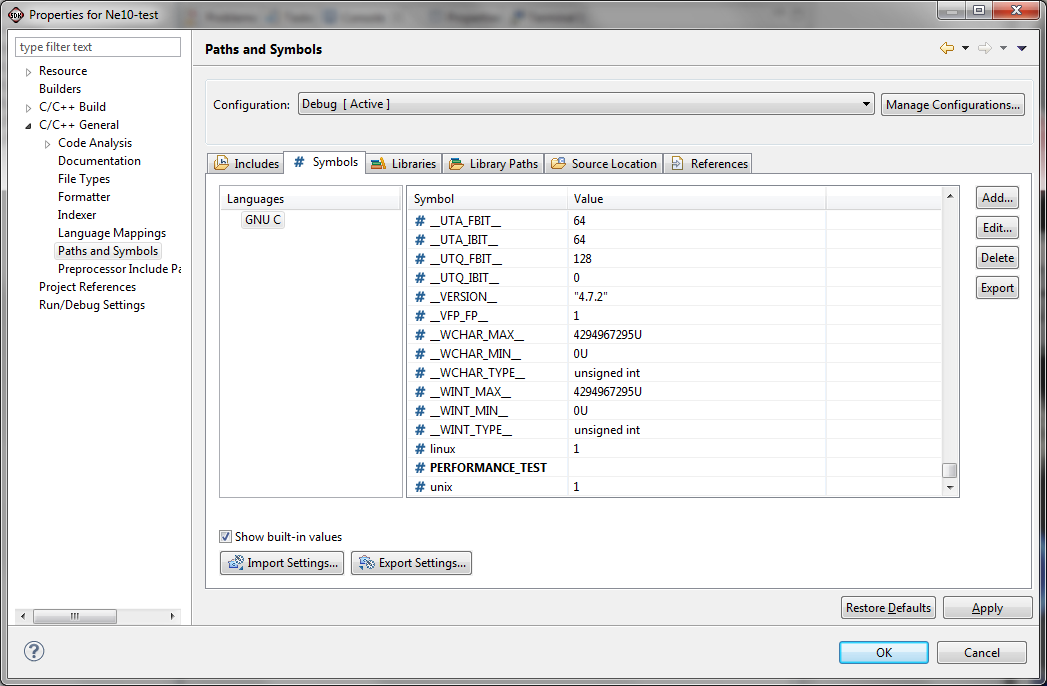
The Add Symbol window closes revealing the Paths and Symbols window. If you scroll to the end of the list, you will see the PERFORMANCE_TEST symbol.
Click Apply
If an information box relating to changes in the paths or symbols appears, click Yes to accept it.
Click OK.
With the symbol in place, the test software must be rebuilt.
Right click on Ne10-test in the Project Explorer and select Build Project. As before, there will be several warnings that we can ignore for now.
The revised test program can now be run. We can use the same process just described to run it with the SDK Remote System Explorer. As noted earlier, the setup steps do not need to be performed again. Simply right click Ne10-test in the Project Explorer, select Run As -> Run Configurations. Then select the previously created Ne10-test configuration, and click Run.
The results will be displayed in the Console window of SDK as shown below.
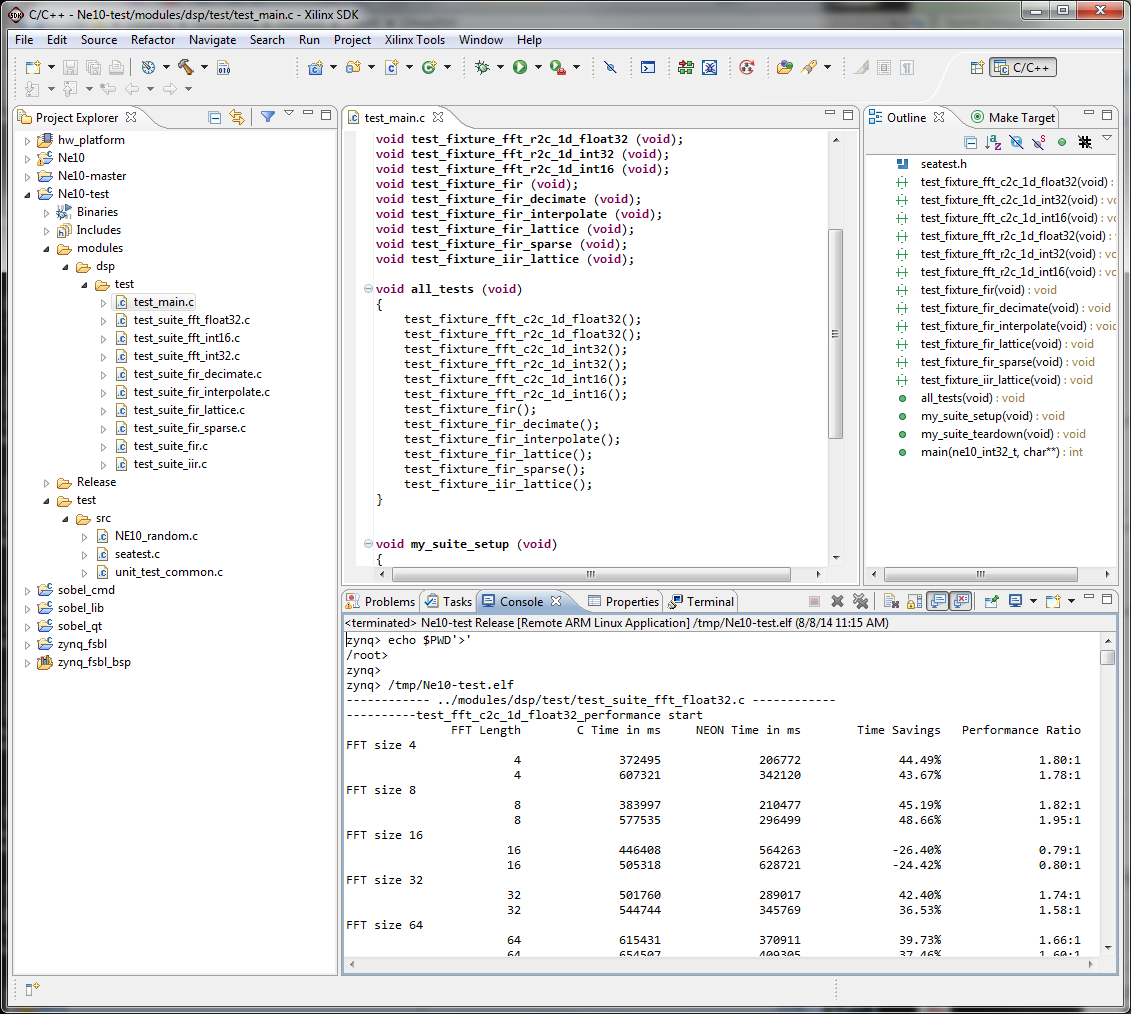
The unexpected slower results for NEON with the FFT size of 16 is not understood at this time. The other performance improvements vary with each execution run depending on the other operations within Linux during the tests.
An alternative method is to add the test program to the SD-MMC card that contains the base TRD, and then execute it from the console on the ZC702. Files that are added to the root of the SD-MMC card are copied to the /mnt directory when the TRD boots up.
In SDK, expand the line Ne10-test in Project Explorer, then expand the Binaries sub-directory. You should have a file Ne10-test.elf as the only item in the Binaries sub-directory.

Power off the ZC702 and remove the SD-MMC card from the ZC702 and insert it into an appropriate media reader on your computer.
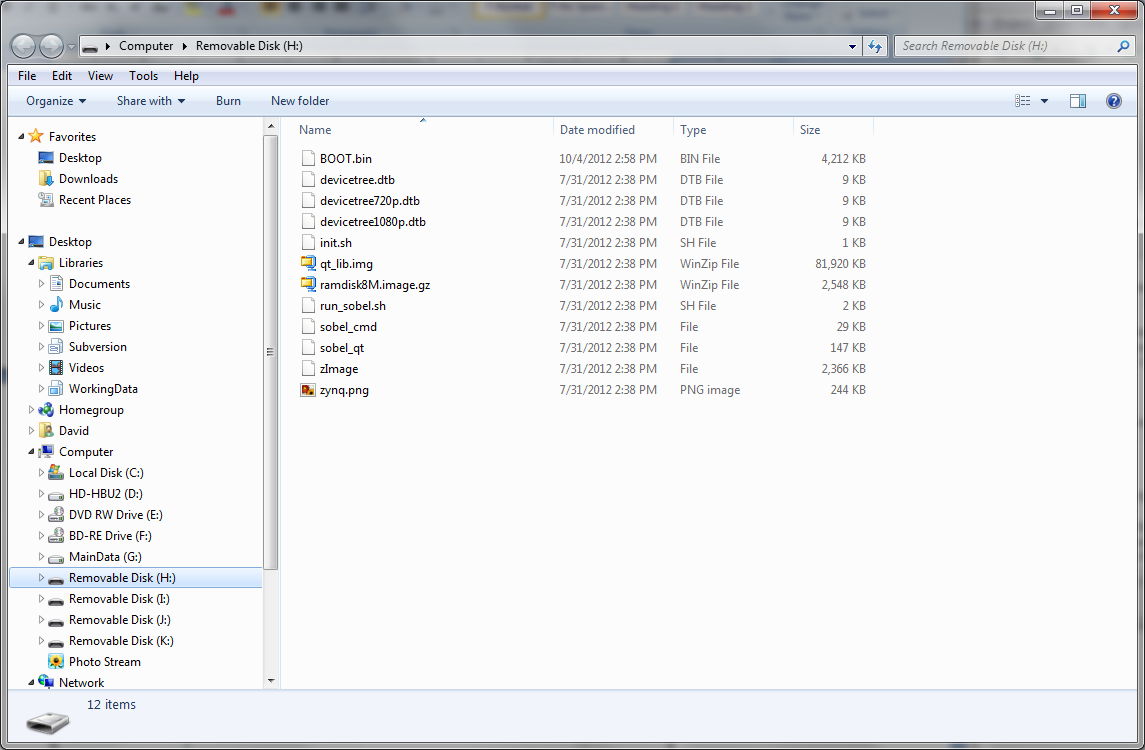
Using standard Windows Explorer, navigate to the SD-MMC card to show its contents. The default should be the following showing the root of the SD-MMC card image.
Use standard Windows copy / paste methods to copy the Ne10-test.elf file to the root of the SD-MMC card. In the SDK window, right click on the Ne10-test.elf file and select Copy. Then in the Windows Explorer window for the SD-MMC card, right click and select Paste.
Eject the SD-MMC card from your computer, re-insert it in the ZC702 and power on the ZC702.
After the ZC702 boots up, use the instructions in UG926_Z7_ZC702_Eval_Kit to establish a terminal connection to the ZC702.
Exit out of the QT window system if the terminal window does not respond to commands.
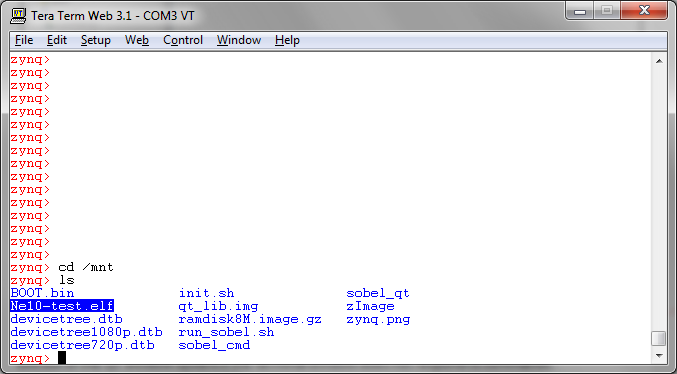
Change to the /mnt directory and verify that Ne10-test.elf is there (cd /mnt).
Attempting to execute Ne10-test from here will fail because the standard execution path does not include the /mnt directory. There are at least three ways to resolve this:
- change the path variable to include the /mnt directory
- from the /mnt directory, type ./Ne10-test.elf and the program will execute in place
- copy the Ne10-test.elf to the /bin directory which is in the execution path by default.
We used the latter of these two; at the prompt type
cp Ne10-test.elf /bin
Then change to the /bin directory to verify that it is there using ls to list the files (if you are unfamiliar with Linux, the commands to enter can be seen on the next screen).

We can now execute the test from the terminal window.
Type Ne10-test.elf and then Return. The tests should run and provide the following results in the terminal window. There will be some variability in the reported numbers.
zynq> /mnt/Ne10-test.elf
------------ ../modules/dsp/test/test_suite_fft_float32.c ------------
----------test_fft_c2c_1d_float32_performance start
FFT Length C Time in ms NEON Time in ms Time Savings Performance Ratio
FFT size 4
4 372495 206772 44.49% 1.80:1
4 607321 342120 43.67% 1.78:1
FFT size 8
8 383997 210477 45.19% 1.82:1
8 577535 296499 48.66% 1.95:1
FFT size 16
16 446408 564263 -26.40% 0.79:1
16 505318 628721 -24.42% 0.80:1
FFT size 32
32 501760 289017 42.40% 1.74:1
32 544744 345769 36.53% 1.58:1
FFT size 64
64 615431 370911 39.73% 1.66:1
64 654507 409305 37.46% 1.60:1
FFT size 128
128 689013 381877 44.58% 1.80:1
128 721527 411498 42.97% 1.75:1
FFT size 256
256 810260 474554 41.43% 1.71:1
256 841926 500433 40.56% 1.68:1
FFT size 512
512 888117 496101 44.14% 1.79:1
512 919820 518939 43.58% 1.77:1
FFT size 1024
1024 1059886 643946 39.24% 1.65:1
1024 1089248 667023 38.76% 1.63:1
FFT size 2048
2048 1322545 807881 38.91% 1.64:1
2048 1351723 829300 38.65% 1.63:1
FFT size 4096
4096 1682285 1002986 40.38% 1.68:1
4096 1709786 1024699 40.07% 1.67:1
FFT size 8192
8192 1968223 1108215 43.69% 1.78:1
8192 1979670 1130002 42.92% 1.75:1
FFT size 16384
16384 2176230 1245277 42.78% 1.75:1
16384 2197684 1265645 42.41% 1.74:1
FFT size 32768
32768 2634841 1670396 36.60% 1.58:1
32768 2652186 1686211 36.42% 1.57:1
1 run 0 failed
------------ ../modules/dsp/test/test_suite_fft_float32.c ------------
----------test_fft_r2c_1d_float32_performance start
FFT Length C Time in ms NEON Time in ms Time Savings Performance Ratio
FFT size 8
8 357971 372274 -4.00% 0.96:1
8 460731 402226 12.70% 1.15:1
FFT size 16
16 346340 349584 -0.94% 0.99:1
16 430428 362044 15.89% 1.19:1
FFT size 32
32 377785 465099 -23.11% 0.81:1
32 396623 478905 -20.75% 0.83:1
FFT size 64
64 393047 309200 21.33% 1.27:1
64 413968 326415 21.15% 1.27:1
FFT size 128
128 453062 339539 25.06% 1.33:1
128 466813 351870 24.62% 1.33:1
FFT size 256
256 485208 340128 29.90% 1.43:1
256 500488 349769 30.11% 1.43:1
FFT size 512
512 546587 383536 29.83% 1.43:1
512 560725 392310 30.04% 1.43:1
FFT size 1024
1024 583470 424585 27.23% 1.37:1
1024 599488 442095 26.25% 1.36:1
FFT size 2048
2048 688552 507603 26.28% 1.36:1
2048 717453 546385 23.84% 1.31:1
FFT size 4096
4096 857482 599599 30.07% 1.43:1
4096 881353 617146 29.98% 1.43:1
FFT size 8192
8192 1000609 733950 26.65% 1.36:1
8192 1038412 731204 29.58% 1.42:1
FFT size 16384
16384 1122593 783735 30.19% 1.43:1
16384 1139402 783533 31.23% 1.45:1
FFT size 32768
32768 1246826 965366 22.57% 1.29:1
32768 1340220 972555 27.43% 1.38:1
1 run 0 failed
------------- ../modules/dsp/test/test_suite_fft_int32.c -------------
----------test_fft_c2c_1d_int32_performance start
FFT Length C Time in ms NEON Time in ms Time Savings Performance Ratio
FFT size 4
4 12220 5604 54.14% 2.18:1
4 10433 6396 38.69% 1.63:1
4 12442 6893 44.60% 1.81:1
4 12663 6857 45.85% 1.85:1
FFT size 8
8 13806 7815 43.39% 1.77:1
8 13677 7778 43.13% 1.76:1
8 17584 8534 51.47% 2.06:1
8 17049 8295 51.35% 2.06:1
FFT size 16
16 19428 15022 22.68% 1.29:1
16 18561 14138 23.83% 1.31:1
16 23114 14967 35.25% 1.54:1
16 23630 14303 39.47% 1.65:1
FFT size 32
32 23575 7391 68.65% 3.19:1
32 23003 7373 67.95% 3.12:1
32 29233 7631 73.90% 3.83:1
32 29012 7613 73.76% 3.81:1
FFT size 64
64 29731 9677 67.45% 3.07:1
64 30855 9695 68.58% 3.18:1
64 36662 9787 73.30% 3.75:1
64 38468 9787 74.56% 3.93:1
FFT size 128
128 34505 9714 71.85% 3.55:1
128 35482 9714 72.62% 3.65:1
128 43021 9990 76.78% 4.31:1
128 44367 9990 77.48% 4.44:1
FFT size 256
256 40717 12386 69.58% 3.29:1
256 43445 12405 71.45% 3.50:1
256 50817 12534 75.34% 4.05:1
256 54043 12534 76.81% 4.31:1
FFT size 512
512 45877 12718 72.28% 3.61:1
512 48071 12755 73.47% 3.77:1
512 57434 13050 77.28% 4.40:1
512 60770 13069 78.49% 4.65:1
FFT size 1024
1024 52366 15741 69.94% 3.33:1
1024 56531 15834 71.99% 3.57:1
1024 65692 15944 75.73% 4.12:1
1024 69969 15999 77.13% 4.37:1
FFT size 2048
2048 61324 20810 66.07% 2.95:1
2048 65674 20367 68.99% 3.22:1
2048 77323 21344 72.40% 3.62:1
2048 81507 20810 74.47% 3.92:1
FFT size 4096
4096 69342 24828 64.19% 2.79:1
4096 75111 25916 65.50% 2.90:1
4096 85894 25086 70.79% 3.42:1
4096 91626 25915 71.72% 3.54:1
FFT size 8192
8192 76254 26819 64.83% 2.84:1
8192 81691 27851 65.91% 2.93:1
8192 97653 27206 72.14% 3.59:1
8192 102778 28293 72.47% 3.63:1
FFT size 16384
16384 83294 30727 63.11% 2.71:1
16384 89857 31390 65.07% 2.86:1
16384 102243 31795 68.90% 3.22:1
16384 108842 31445 71.11% 3.46:1
FFT size 32768
32768 88898 37584 57.72% 2.37:1
32768 94336 38099 59.61% 2.48:1
32768 111809 37934 66.07% 2.95:1
32768 117578 38358 67.38% 3.07:1
1 run 0 failed
------------- ../modules/dsp/test/test_suite_fft_int32.c -------------
----------test_fft_r2c_1d_int32_performance start
FFT Length C Time in ms NEON Time in ms Time Savings Performance Ratio
FFT size 8
8 10045 10359 -3.13% 0.97:1
8 11354 9658 14.94% 1.18:1
8 12110 11760 2.89% 1.03:1
8 11963 10027 16.18% 1.19:1
FFT size 16
16 11097 9252 16.63% 1.20:1
16 11281 8866 21.41% 1.27:1
16 13400 9529 28.89% 1.41:1
16 13161 9271 29.56% 1.42:1
FFT size 32
32 13308 11778 11.50% 1.13:1
32 12976 11281 13.06% 1.15:1
32 15889 11925 24.95% 1.33:1
32 15704 11557 26.41% 1.36:1
FFT size 64
64 15483 7594 50.95% 2.04:1
64 14765 7483 49.32% 1.97:1
64 18745 7797 58.40% 2.40:1
64 18396 7778 57.72% 2.37:1
FFT size 128
128 18413 8516 53.75% 2.16:1
128 18340 8442 53.97% 2.17:1
128 22524 8829 60.80% 2.55:1
128 22671 8608 62.03% 2.63:1
FFT size 256
256 20773 8405 59.54% 2.47:1
256 20607 8350 59.48% 2.47:1
256 25768 8645 66.45% 2.98:1
256 25547 8608 66.31% 2.97:1
FFT size 512
512 23851 9714 59.27% 2.46:1
512 24662 9658 60.84% 2.55:1
512 29510 9880 66.52% 2.99:1
512 30413 9825 67.69% 3.10:1
FFT size 1024
1024 26395 9917 62.43% 2.66:1
1024 26930 9898 63.25% 2.72:1
1024 32901 10193 69.02% 3.23:1
1024 33326 10156 69.53% 3.28:1
FFT size 2048
2048 30930 12755 58.76% 2.42:1
2048 32515 13308 59.07% 2.44:1
2048 38063 12939 66.01% 2.94:1
2048 39666 13492 65.99% 2.94:1
FFT size 4096
4096 35003 14912 57.40% 2.35:1
4096 36570 14966 59.08% 2.44:1
4096 44440 15114 65.99% 2.94:1
4096 44680 15261 65.84% 2.93:1
FFT size 8192
8192 38541 18101 53.03% 2.13:1
8192 40974 18027 56.00% 2.27:1
8192 47039 18137 61.44% 2.59:1
8192 49528 18026 63.60% 2.75:1
FFT size 16384
16384 42855 19999 53.33% 2.14:1
16384 45453 19317 57.50% 2.35:1
16384 54301 19833 63.48% 2.74:1
16384 56956 19611 65.57% 2.90:1
FFT size 32768
32768 43573 22561 48.22% 1.93:1
32768 46836 21879 53.29% 2.14:1
32768 52753 21806 58.66% 2.42:1
32768 56052 22137 60.51% 2.53:1
1 run 0 failed
------------- ../modules/dsp/test/test_suite_fft_int16.c -------------
----------test_fft_c2c_1d_int16_performance start
FFT Length C Time in ms NEON Time in ms Time Savings Performance Ratio
FFT size 4
4 11981 4129 65.54% 2.90:1
4 14027 4368 68.86% 3.21:1
4 14580 4313 70.42% 3.38:1
4 16976 4055 76.11% 4.19:1
FFT size 8
8 15004 8036 46.44% 1.87:1
8 16018 7742 51.67% 2.07:1
8 19003 8018 57.81% 2.37:1
8 20109 7576 62.33% 2.65:1
FFT size 16
16 18358 5143 71.98% 3.57:1
16 17842 5124 71.28% 3.48:1
16 24202 5327 77.99% 4.54:1
16 23501 5143 78.12% 4.57:1
FFT size 32
32 22635 4055 82.09% 5.58:1
32 21898 3926 82.07% 5.58:1
32 30007 4037 86.55% 7.43:1
32 28625 4037 85.90% 7.09:1
FFT size 64
64 27261 4977 81.74% 5.48:1
64 26192 4958 81.07% 5.28:1
64 36329 5014 86.20% 7.25:1
64 34191 4995 85.39% 6.85:1
FFT size 128
128 31979 4701 85.30% 6.80:1
128 30431 4701 84.55% 6.47:1
128 42468 4866 88.54% 8.73:1
128 39961 4847 87.87% 8.24:1
FFT size 256
256 36643 6175 83.15% 5.93:1
256 34819 5990 82.80% 5.81:1
256 49030 6045 87.67% 8.11:1
256 46191 6064 86.87% 7.62:1
FFT size 512
512 41381 5972 85.57% 6.93:1
512 39666 5991 84.90% 6.62:1
512 55997 6322 88.71% 8.86:1
512 51961 6137 88.19% 8.47:1
FFT size 1024
1024 46504 7281 84.34% 6.39:1
1024 43979 7299 83.40% 6.03:1
1024 62227 7391 88.12% 8.42:1
1024 58117 7557 87.00% 7.69:1
FFT size 2048
2048 51610 7520 85.43% 6.86:1
2048 49564 7520 84.83% 6.59:1
2048 69212 7852 88.66% 8.81:1
2048 65268 7686 88.22% 8.49:1
FFT size 4096
4096 58245 11281 80.63% 5.16:1
4096 55628 11281 79.72% 4.93:1
4096 77230 11557 85.04% 6.68:1
4096 72530 11391 84.29% 6.37:1
1 run 0 failed
------------- ../modules/dsp/test/test_suite_fft_int16.c -------------
----------test_fft_r2c_1d_int16_performance start
FFT Length C Time in ms NEON Time in ms Time Savings Performance Ratio
FFT size 8
8 10635 9179 13.69% 1.16:1
8 10801 8461 21.66% 1.28:1
8 13640 10083 26.08% 1.35:1
8 13843 8829 36.22% 1.57:1
FFT size 16
16 11520 8995 21.92% 1.28:1
16 11465 8626 24.76% 1.33:1
16 14635 10303 29.60% 1.42:1
16 13953 9013 35.40% 1.55:1
FFT size 32
32 12940 5235 59.54% 2.47:1
32 12128 5014 58.66% 2.42:1
32 17013 5364 68.47% 3.17:1
32 15427 5180 66.42% 2.98:1
FFT size 64
64 14857 4165 71.97% 3.57:1
64 13935 4036 71.04% 3.45:1
64 19446 4461 77.06% 4.36:1
64 17879 4203 76.49% 4.25:1
FFT size 128
128 17050 4497 73.62% 3.79:1
128 15962 4369 72.63% 3.65:1
128 22579 4516 80.00% 5.00:1
128 20773 4442 78.62% 4.68:1
FFT size 256
256 19243 4221 78.06% 4.56:1
256 18082 4129 77.17% 4.38:1
256 25547 4313 83.12% 5.92:1
256 23593 4295 81.80% 5.49:1
FFT size 512
512 21640 4792 77.86% 4.52:1
512 20276 4737 76.64% 4.28:1
512 29031 4866 83.24% 5.97:1
512 26451 4829 81.74% 5.48:1
FFT size 1024
1024 23980 4755 80.17% 5.04:1
1024 22597 4719 79.12% 4.79:1
1024 32145 4866 84.86% 6.61:1
1024 29381 4847 83.50% 6.06:1
FFT size 2048
2048 26616 5677 78.67% 4.69:1
2048 24976 5474 78.08% 4.56:1
2048 35390 5567 84.27% 6.36:1
2048 32699 5566 82.98% 5.87:1
FFT size 4096
4096 29639 6248 78.92% 4.74:1
4096 28146 6414 77.21% 4.39:1
4096 39371 6396 83.75% 6.16:1
4096 36440 6525 82.09% 5.58:1
1 run 0 failed
---------------- ../modules/dsp/test/test_suite_fir.c ----------------
---------- test_fir_case0 start
FIR Length&Taps C Time in ms NEON Time in ms Time Savings Performance Ratio
32 144416 157890 -9.33% 0.91:1
3 34468 38008 -10.27% 0.91:1
7 50504 54375 -7.66% 0.93:1
---------- test_fir_case0 end
1 run 0 failed
----------- ../modules/dsp/test/test_suite_fir_decimate.c ------------
---------- test_fir_decimate_case0 start
FIR Length&Taps C Time in ms NEON Time in ms Time Savings Performance Ratio
7 65858 32496 50.66% 2.03:1
32 114446 51186 55.27% 2.24:1
32 119809 56218 53.08% 2.13:1
---------- test_fir_decimate_case0 end
1 run 0 failed
---------- ../modules/dsp/test/test_suite_fir_interpolate.c ----------
---------- test_fir_interpolate_case0 start
FIR Length&Taps C Time in ms NEON Time in ms Time Savings Performance Ratio
27 135273 106722 21.11% 1.27:1
32 159217 103110 35.24% 1.54:1
27 128785 101635 21.08% 1.27:1
32 152858 98575 35.51% 1.55:1
---------- test_fir_interpolate_case0 end
1 run 0 failed
------------ ../modules/dsp/test/test_suite_fir_lattice.c ------------
---------- test_fir_lattice_case0 start
FIR Length&Taps C Time in ms NEON Time in ms Time Savings Performance Ratio
3 48218 84088 -74.39% 0.57:1
1 20810 17400 16.39% 1.20:1
3 46781 82097 -75.49% 0.57:1
1 19372 16257 16.08% 1.19:1
---------- test_fir_lattice_case0 end
1 run 0 failed
------------ ../modules/dsp/test/test_suite_fir_sparse.c -------------
---------- test_fir_sparse_case0 start
FIR Length&Taps C Time in ms NEON Time in ms Time Savings Performance Ratio
5 303817 263174 13.38% 1.15:1
5 193372 92271 52.28% 2.10:1
5 251691 199178 20.86% 1.26:1
---------- test_fir_sparse_case0 end
1 run 0 failed
---------------- ../modules/dsp/test/test_suite_iir.c ----------------
---------- test_iir_lattice_case0 start
IIR Length&Taps C Time in ms NEON Time in ms Time Savings Performance Ratio
9 552007 630638 -14.24% 0.88:1
9 461209 551712 -19.62% 0.84:1
33 1534827 1349787 12.06% 1.14:1
---------- test_iir_lattice_case0 end
1 run 0 failed
====
SEATEST v0.5 ============================ALL TESTS PASSED
12 tests run
in 112161982 micro-s
==============================================
zynq>zynq> exit
The default terminal window may not be wide enough to show each line without automatically wrapping to the next line. To solve this, the terminal window should be set to size automatically to the window size.
On the teraterm window, Click Setup -> Terminal and then click the box Term size = win size.
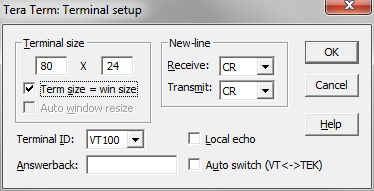
Click OK.
You can now drag the corner of the terminal window to make it any size desired. If the window size is changed, all of the current text is erased. Simply hit Return to get a command prompt and continue. Any Ne10-test run will need to be executed again so make sure the window size is larger enough to capture full lines.
Expected Results
The performance test runs each of the listed filters a large number of times, first on the ARM processor alone and then the same number of times with the NEON SIMD engine enabled. For each of these runs, the time to execute the actual calculations (any system overhead is subtracted out before showing the results) is shown in the "C Time" and "NEON Time" column respectively. The Time Savings and Performance Ratio are calculated from these measured times.
With an average performance improvement of approximately 1.7, this clearly indicates that using the NEON in compute intensive applications is well worth the effort to optimize for it. Having the NEON SIMD engine included in the Zynq-7000 AP SOC enables the development of high performance SOC systems.
Saving the workspace
For ease of completing subsequent Tech Tips that use this completed build, it is wise to save the workspace so it can be restored later as a known starting point. Because only the /sw portion of the base TRD was modified, only that portion needs to be saved. If you choose to do this,
Select File -> Export or right click in the Project Explorer pane white space and select Export.
In the Export dialogue box, expand General and select Archive file.
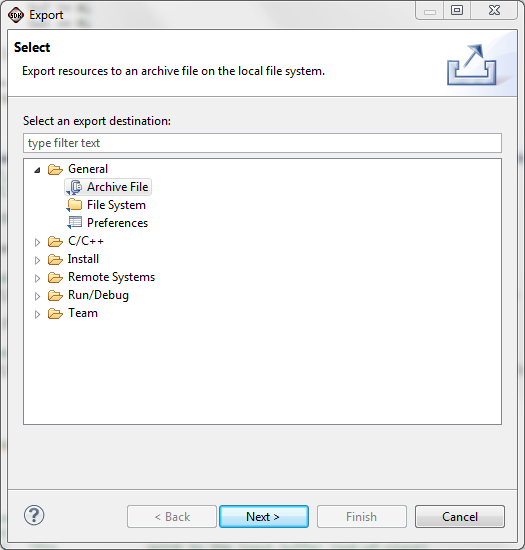
Click Next
The Export Archive dialogue will appear.
Click the Browse button and navigate to where you want to save the workspace and then create an appropriate file in which to save the workspace. In our case we are saving this as Ne10TestBuild.zip.
Be sure the "Save in zip format" is selected unless you are on a Linux system in which case you might select the tar format.
Click Select All to export all of the items in the workspace
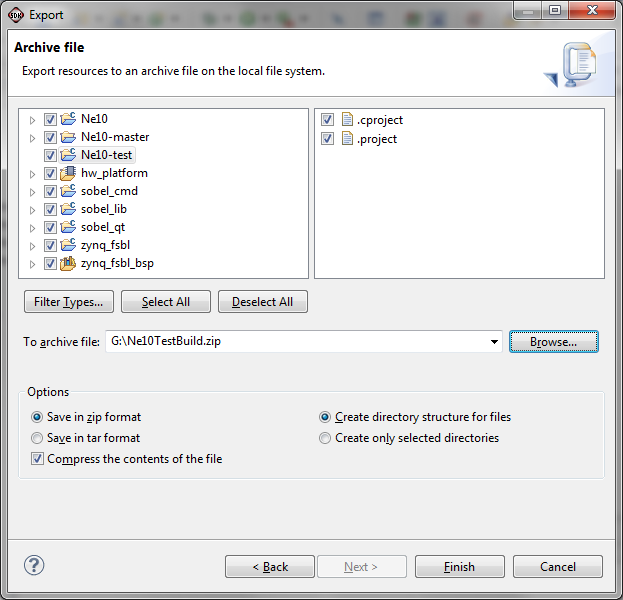
Then click Finish
The workspace will be saved in the specified archive file for later use.
Conclusions:
Inclusion of the SIMD engine in the PS of the Zynq-7000 AP SoC provides a simple means of achieving faster execution of compute intensive tasks. As this is a standard extension for the ARM family of processors, software from the vast ecosystem of the ARM community can be readily used, accelerating time to system development and time to market.
Multiple means of accessing and controlling the ZC702 enable users to choose the best method for their specific development environment. This flexibility accelerates debug and enables more rapid system development and deployment.
© Copyright 2019 - 2022 Xilinx Inc. Privacy Policy