Zynq-7000 AP SoC Boot - Programmable Logic Configuration via Ethernet Tech Tip
Zynq-7000 AP SoC Boot - Programmable Logic Configuration via Ethernet Tech Tip
Zynq-7000 AP SoC Tech Tip
Table of Contents
Document History
| Date |
Version |
Author |
Description of Revisions |
| 4/24/2013 |
1.0 |
Simon Tam |
Initial release |
Description/Summary
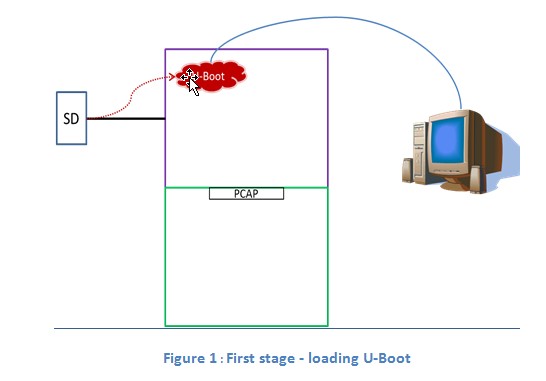
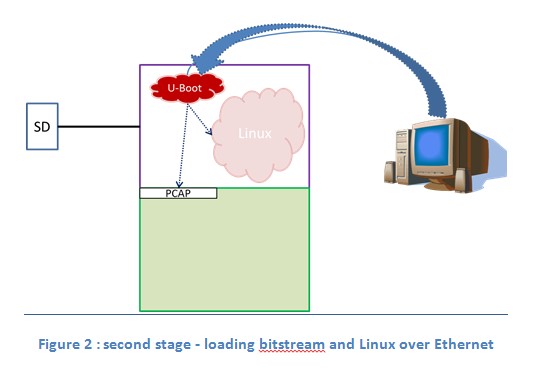
This technical tip explains the methodology to load a PL bitstream and code images over an Ethernet connection prior to any user design and application running. This method helps to reduce the PROM size since the PL bitfile and application images do not need to be stored in the PROM. Furthermore it can reduce the burden of updating multiple deployed systems. All target systems can get updated from a server providing the latest user design revision.The process consists of two steps. A bootloader is loaded from the primary boot source. In this example, U-Boot is the bootloader and loaded from a SD memory card which is the primary boot source. Subsequently U-Boot loads the user design PL bitfile, Linux and other images from a server over a shared Ethernet connection. Once loaded, U-Boot hands over the execution to Linux.
Implementation
| Implementation Details |
|||
| Design Type |
PS Only |
||
| SW Type |
U-Boot |
||
| CPUs |
1 CPU at any supported frequency |
||
| PS Features |
GEM, DDR |
||
| PL Cores |
none |
||
| Boards/Tools |
ZC702 |
||
| Xilinx Tools Version |
SDK 14.4 |
||
| Other Details |
Server, switch |
||
| Address Map |
|||
| Base_Address |
Size |
Interface |
|
| PCAP 1 |
0xFFFFFFFF |
1 |
|
| GEM |
0XE000B000 |
4K |
IOP |
| Files Provided |
|
| PL_config_over_Ethernet_BOOT |
|
Block Diagram

Step by Step Instructions
Preparing for the PL bitfile
1. Before using the PL bitfile it needs to be converted because of PCAP byte swapping requirement. Promgen can perform the byte swapping task. The promgen command and options are shown below:
promgen -w -b -p bin -o <user_design_binfile> -u 0 <user_design_bitfile> -data_width 32
- <user_design_bitfile> is the user PL design bitfile and usually has .bit extension.
- <user_design_binfile> is the output file and has .bin extension. This file will be sent to the target from the server. Therefore it should be stored in the TFTP server directory.
Preparing U_Boot
2. Configure and build U-boot to copy files from a TFTP server and to send it to PCAP and memory. This example uses SD memory card as the primary boot source. This methodology can apply to other primary boot sources (QSPI, NAND, NOR, etc.) as well.
2.1. Retrieve the latest U-Boot from the Xilinx Git repository. For more information about Xilinx Zynq U-Boot refer to http://wiki.xilinx.com/zynq-uboot.
git clone git://github.com/Xilinx/u-boot-xlnx.git
<u-boot-xlnx root directory>\include\configs\zynq_common.h
Original definition
"sdboot=echo Copying Linux from SD to RAM...;" \
"mmcinfo;" \
"fatload mmc 0 0x3000000 ${kernel_image};" \
"fatload mmc 0 0x2A00000 ${devicetree_image};" \
"fatload mmc 0 0x2000000 ${ramdisk_image};" \
"bootm 0x3000000 0x2000000 0x2A00000\0"
"sdboot=echo Configure PL and booting Linux from TFTP...;"\
"mmcinfo;" \
"fpga info 0;"\
"tftp 0x1000000 system.bin;" \
"fpga load 0 0x1000000 3dbafc;" \
"tftp 0x3000000 ${kernel_image};" \
"tftp 0x2A00000 ${devicetree_image};" \
"tftp 0x2000000 ${ramdisk_image};" \
"bootm 0x3000000 0x2000000 0x2A00000\0" \
3. Set up target and TFTP server IP addresses
3.1. Change the following parameters in zynq_common.h if you want different IP addresses. CONFIG_IPADDR is the target default IP address
#define CONFIG_IPADDR 192.168.0.99
#define CONFIG_SERVERIP 192.168.0.101
4.1 Go to the U-Boot directory
> cd <u-boot-xlnx root directory>
> Make zynq_zc70x_config
> Make
The resulting file is a ELF file called “u-boot”. Note there is no .elf extension on the file.
Preparing BOOT.bin
5. Create a BOOT.bin file that combines the First Stage Boot Loader (FSBL) and u-boot.bin. Copy it to a SD memory card so the FSBL and U-Boot will be loaded during initial power up.
5.1. In SDK, select Xilinx Tools > Create Boot Image to open the Create Zynq Boot Image wizard.
5.2. Add zynq_fsbl_0.elf first and then the u-boot.elf.
5.3. Provide the output folder path in the Output folder field.
5.4. Click Create Image. SDK generates the u-boot.bin file in the specified folder.
5.5. Rename u-boot.bin to BOOT.bin.
5.6. Copy BOOT.bin to the target SD card.

Preparing the TFTP server
6. A TFTP server must share the same network subnet with the target board. The TFTP server IP address must match the IP address defined by CONFIG_SERVERIP shown above. TFTP server monitors port 67 for incoming packets. The TFTP server in this example is haneWin DHCP server which also has TFTP server capability built in.
Running the demo
7.1. Start up the TFTP server on a host.
- If you are using a Windows server, ensure the Windows firewall is turned off. Otherwise TFTP server will not work since the firewall filters out all FTP packets.
7.2. Connect the server and a ZC702 board on the same Ethernet network
7.3. Plug in the SD card.
7.4. Set switch SW16 to 00110 positions.
7.5. Connect USB UART USB port (J17) to a host.
7.6. Open a terminal such as TeraTerm. Set the following settings:
- Baud rate: 115200
- Data bits: 8
- Parity: none
- Stop bit: 1
- Flow control: none
7.7. Turn on the ZC702 demoboard.
Expected Results
U-Boot runs initially. After it communicates and negotiates with the TFTP server it retrieves the bitfile, Linux image, device tree, and ramdisk image over the Ethernet. The following is the excerpt of the print out during bitfile transfer from the server.
…
Xilinx Device
Descriptor @ 0x3ffb93f4
Family: Zynq PL
Interface type: Device configuration interface (Zynq)
Device Size: 4045564 bytes
Cookie: 0x0 (0)
No Device Function Table.
Trying to set up GEM link...
Phy ID: 01410E40
Resetting PHY...
PHY reset complete.
Waiting for PHY to complete auto-negotiation...
Link is now at 1000Mbps!
Using zynq_gem device
TFTP from server 192.168.0.101; our IP address is 192.168.0.99
Filename 'system.bin'.
Load address: 0x1000000
Loading: T #################################################################
#################################################################
#################################################################
#################################################################
################
done
Bytes transferred = 4045564 (3dbafc hex)
Using zynq_gem deviceTFTP from server 192.168.0.101; our IP address is 192.168.0.99Filename 'uImage'.Load address: 0x3000000Loading:
Loading: #################################################################
#################################################################
########################################################
done
Bytes transferred = 2725400 (299618 hex)
Using zynq_gem device
TFTP from server 192.168.0.101; our IP address is 192.168.0.99
Filename 'devicetree.dtb'.
Load address: 0x2a00000
Loading: #
done
Bytes transferred = 4342 (10f6 hex)
Using zynq_gem device
TFTP from server 192.168.0.101; our IP address is 192.168.0.99
Filename 'uramdisk.image.gz'.
Load address: 0x2000000
Loading: #################################################################
#################################################################
#################################################################
#################################################################
#################################################################
#################################
done
Bytes transferred = 5252253 (50249d hex)
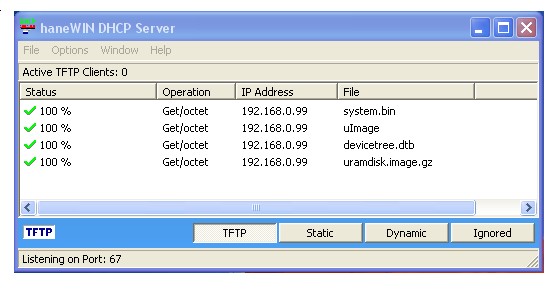
After the file transfers are completed the TFTP server should show the following:
© Copyright 2019 - 2022 Xilinx Inc. Privacy Policy