Using the AXI4 VIP as a master to read and write to an AXI4-Lite slave interface
This page is outdated and in the archive state. For updated related content, please reference the following:
This page show how to use the AXI4 VIP as a master to simulate read and write operation into a memory.
Table of Contents
Create the project
Open Vivado 2017.2 and create a new project (the target language of the project needs to be Verilog to use all the features of the VIP). Create a new block design (BD) and add an AXI4 Verification IP configured as Master with an AXI4-Lite Interface.Make the port aclk and aresetn of the VIP external.
Add an AXI BRAM controller and configure it for AXI4-Lite protocol
Connect the AXI BRAM and the AXI VIP together and then click on Run Connection Automation. Select everything and click ok.
In the Address Editor tab, click on auto assign address to give an address to the AXI BRAM IP. In this case, the base address assigned is 0xC000_0000.
Save the BD and generate the output products and the wrapper for the BD.
Create the test bench for the design
Create a new simulation source file of type systemVerilog (the VIP only works with systemVerilog).Edit the file as following:
1. Add the required packages as mentioned in the VIP GUI:
import axi_vip_v1_0_2_pkg::*;
import design_1_axi_vip_0_0_pkg::*;
2. Declare the test bench signals:
bit aclk = 0;
bit aresetn=0;
xil_axi_ulong     addr1=32'hC0000000, addr2 = 32'hC0000004;
xil_axi_prot_t  prot = 0;
bit [31:0]     data_wr1=32'h01234567,data_wr2=32'h89ABCDEF;
bit [31:0]     data_rd1,data_rd2;
xil_axi_resp_t     resp;
3. Instantiate the BD:
design_1_wrapper DUT
(
    . aclk (aclk),
    .aresetn(aresetn)
);
4. Declare the agent for the VIP (one agent for one AXI VIP has to be declared). We want the VIP to act as a Master. Thus the type of the agent will be <component_name>_mst_t
// Declare agent
design_1_axi_vip_0_0_mst_t      master_agent;
5.Create a procedural block with the following:
- Create a new agent and pass the hierarchy path of IF correctly into the new function
- Set a tag for agents for easy debug
- set print out verbosity level for the agent
- Start the agent
initial begin
    //Create an agent
    master_agent = new("master vip agent",DUT.design_1_i.axi_vip_0.inst.IF);

    // set tag for agents for easy debug
    master_agent.set_agent_tag("Master VIP");

    // set print out verbosity level.
    master_agent.set_verbosity(400);

    //Start the agent
    master_agent.start_master();

    #50ns
    aresetn = 1;
end
6. Use the tasks AXI4LITE_READ_BURST and AXI4LITE_WRITE_BURST to send read and write commands
    #20ns
    master_agent.AXI4LITE_WRITE_BURST(addr1,prot,data_wr1,resp);

    #20ns
    master_agent.AXI4LITE_WRITE_BURST(addr2,prot,data_wr2,resp);

    #70ns
    master_agent.AXI4LITE_READ_BURST(addr1,prot,data_rd1,resp);

    #20ns
    master_agent.AXI4LITE_READ_BURST(addr2,prot,data_rd2,resp);
7. Check that the write and read operations were successful (data match)
    #200ns
    if((data_wr1 == data_rd1)&&&&(data_wr2 == data_rd2))
        $display("Data match, test succeeded");
    else
        $display("Data do not match, test failed");

    $finish;
Run the simulation
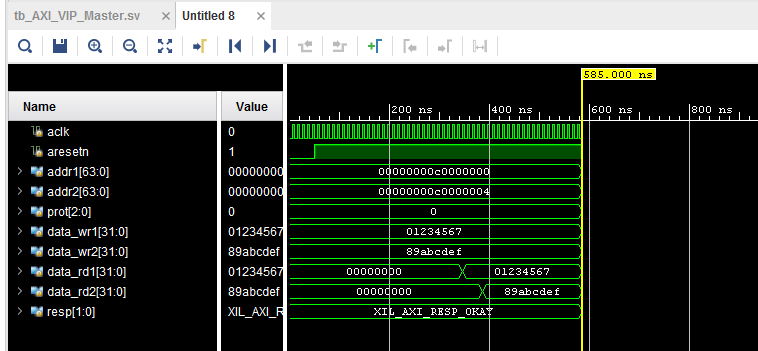
Launch the simulation. We can see that the write and read operations were successful in the waveform window (data_wr1 matches data_rd1 and data_wr2 matches data_rd2)And in the console (message “Data match, test succeeded” printed)
© Copyright 2019 - 2022 Xilinx Inc. Privacy Policy


