Zynq Ultrascale Plus Restart Solution Getting Started 2018.3
- Chris Althouse (Unlicensed)
- Terry O'Neal (Unlicensed)
- pallav (Unlicensed)
If you need access to the 2017.4 BSP or the 2017.4 version of this wiki page, please contact your Xilinx FAE for assistance.
Table of Contents
Introduction
Zynq UltraScale+ MPSOC supports various type of reset from the simplest system reset to the much more complicated subsystem restart. In any system or subsystem which has a processor component and a programmable logic component, reset must entail both reset to the hardware as well as software. Reset to the hardware includes resetting of the processor, all peripherals associated with the system/subsystem, cleaning up of the memory as needed, and making sure that the interconnect is in a clean state, capable of routing traffic. Reset to the software results in the processor starting from the reset vector. However, designer must make sure that valid and clean code for system/subsystem is located at the reset vector in order to bring the system back to a clean running state.
Resets for Zynq UltraScale+ are broadly divided into two categories, full system resets and subsystem restarts. Full system resets include Power On Reset (POR), system-reset and PS-only-reset. Subsystem restarts include APU subsystems and RPU subsystem restarts. A subsystem in Zynq UltraScale+ is composed of all of the components of a particular operating system. This page describes an example of how to design a project with multiple subsystems in it, and how to cleanly reset each one.
Subsystem Steps
The following steps describe how to implement subsystem restart. For more details on any of these steps, refer to UG1137 Software Developer's Guide, Chapter 12. Refer to the next section for a detailed example.
- Define the subsystem using the isolation configuration menu in Vivado and export to hdf.
- Prepare Petalinux project with following changes w.r.t default 2018.3 bsp
- Modify device tree source file (dts) of Linux to exclude PL IPs that are not part of APU subsystem.
- Add rpu_firmware application binaries
- Add remoteproc.dtsi to allow remoteproc to load the rpu binaries
- Add pmu-fw and ATF flags to enable warm restart, recovery, escalation
- Add pmu-fw code patches to idle PL peripheral for given master
- For RPU subsystem restart, make PM aware rpu applications. Make linker script inline with remoteproc.dtsi
- Build using Petalinux.
Note: If none of the peripheral idling, recovery or escalation features are needed then there is no requirement to define the subsystem in isolation configuration.
PS only and System restart can be triggered from Linux directly. Though APU subsystem restart without peripheral idling is not recommended and can have adverse effect.
An Example
The following figure shows the example design described by this document. It consists of an APU subsystem, RPU subsystem, and miscellaneous PL connections. It was built from the Xilinx ZCU102 Board Support Package (BSP) hardware design, and enhanced to have more hardware components added and isolation enabled.
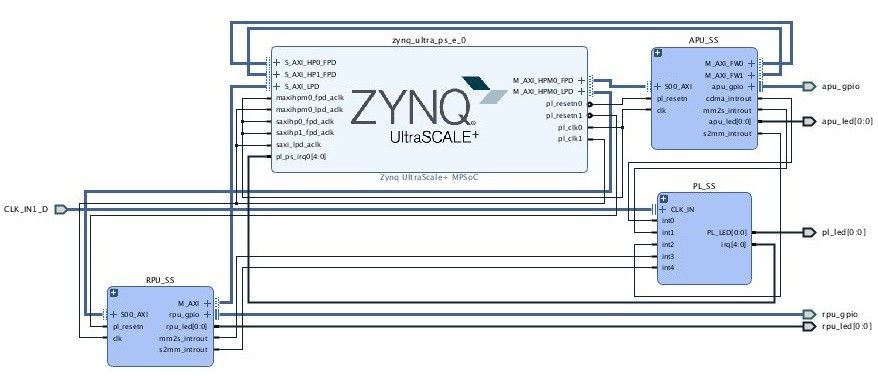
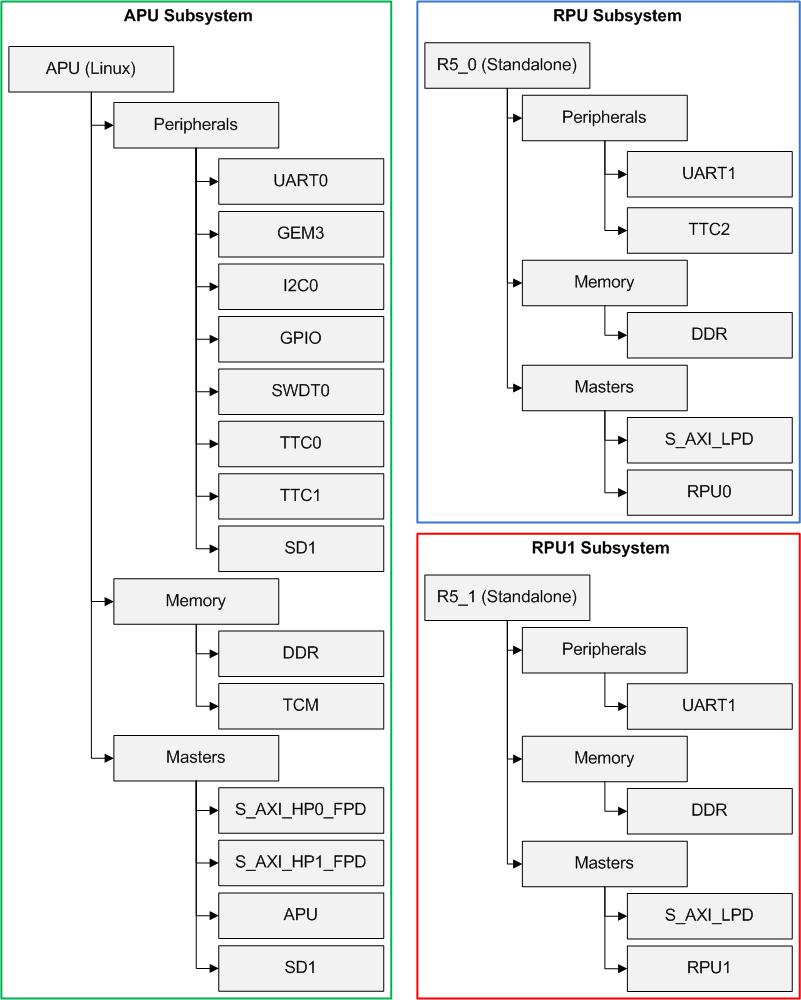
The APU Subsystem (APU_SS) consists of slaves and masters as shown below.
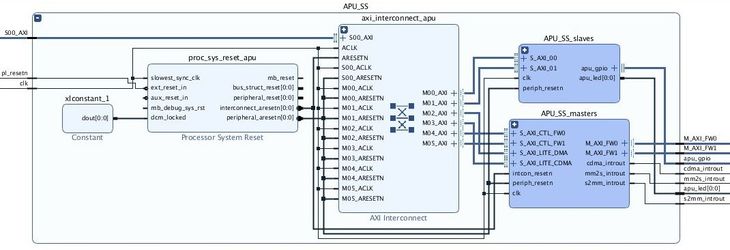
The APU masters consist of an AXI CDMA and an AXI DMA, each with their own interconnect and firewall as shown below.

APU slaves consist of a BRAM controller, GPIO, and a blinking LED using pl_clk0 from Zynq UltraScale+ MPSoC.

The RPU subsystem also consists of masters and slaves as shown below.
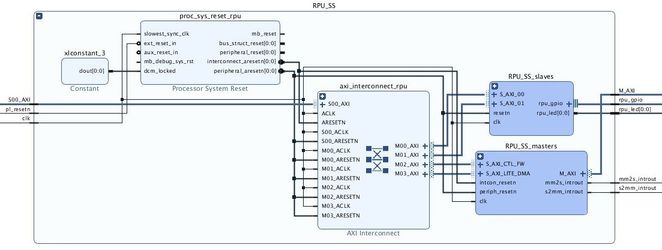
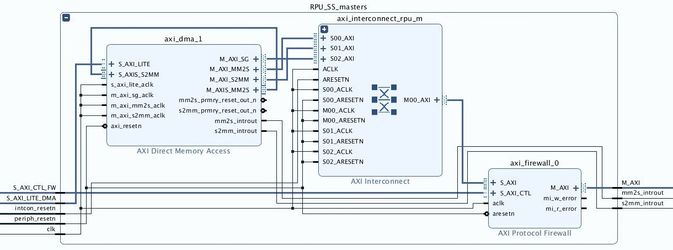
The RPU masters block contains an AXI DMA with an interconnect and a firewall as shown below.
The RPU slaves block contains a BRAM controller, AXI GPIO, and blinking LED as shown below.

The PL subsystem has a blinking LED on its own independent board clock, and miscellaneous logic.

- A hardware design file (hdf) which defines three subsystems, APU (including APU_secure), RPU and RPU1. PMU Firmware subsystem is included by default. Details on subsystems can be found here.
- The hdf also contains PL components added to APU and RPU subsystems, including some DMAs to demonstrate how to idle a PL master.
- Note: Custom hooks are needed to idle the PL masters of the given subsystem. Refer to the UG1137 Software Developer's Guide, Chapter 12 for description of what is required.
- Recovery with healthy bit escalation scheme.
- Recovery and escalation are enabled with build flags in pmu recipe and warm restart flag in ATF.
- Includes application (wdt-heartbeat) to provide heartbeats to the FPD wdt.
- Enable XMPU / XPPU based configuration only for DDR and OCM with flag in FSBL recipe. No XMPU / XPPU protection for any other components.
- Helper script (installed through mpsrm-init) to facilitate setting /unsetting of healthy bit, and starting/stopping of wdt-heartbeat application.
- RPU application support. Application recipe to copy prebuild RPU application for r5-0 and r5-1 in the /lib/firmware directory of the rootfs
- Note: The device-tree changes needed for the R5 application are not needed in meta-user as the default device tree generated with rpu subsystem will generate the necessary overlay.
Download Package
Click the zip icon below to download the package for the example design.
The zip has following directories:
hardware : Contains prebuilt hdf file and project sources to rebuild Vivado project.
ready_to_test: Contains boot image and kernel image, which can be loaded on SD card to test without building the example design.
software: Contains the meta-user patch layer for Petalinux and SDK projects for RPU firmware.
Following is the complete directory tree of the package:

Below table describes various directories of the package. For more details on the need for modification/addition refer to Zynq Ultrascale Plus Restart Solution,
| Top Directory | Sub Directory | Description |
|---|---|---|
| hardware | sdk_export | Contains pre-built hdf file for the hardware design |
| sources | Contains Tcl and xdc files that can be used for regenerating Vivado project | |
| ready_to_test | - | Contains pre-built boot image (BOOT.bin) and kernel image (image.ub) files |
| software | petalinux-patches/meta-user | Contains the meta-user directory than can be patched over the Petalinux project with default BSP Following are new/modified recipes in meta-user layer:
|
| rpu-sdk-project | Contains the SDK projects for building rpu applications. Following SDK projects are provided.
To build these project just import all of them (with copy option checked) in xsdk workspace and it builds automatically. |
Building Petalinux Project with new hardware
- Download the default 2018.3 ZCU102 BSP from the Xilinx web page and save to your working directory.
Create new project from the default BSP.
# Create the Petalinux project from the BSP
$ petalinux-create -t project -s xilinx-zcu102-v2018.3-final.bsp -n my_project
Change working directory to newly created Petalinux project directory.
$ cd my_project
Configure Petalinux to use new hardware hdf (pre-built/newly created).
# Point Petalinux to the new hardware, which is provided in the zip file, so that the appropriate drivers are included in the Petalinux build.
# Use this path if using hardware from the example package
$ petalinux-config --oldconfig --get-hw-description=</path/to/package>/hardware/sdk_export/

# If using hardware from another source, point to that location instead of the package location
$ petalinux-config --oldconfig --get-hw-description=</path/to/hdf>/
Copy (overwrite) meta-user directory from the package to project-spec.
# Add / modify meta-user recipes as needed for the example.
$ cp -r </path/to/package>/software/petalinux-patch/meta-user  project-spec/
(optional) Copy newly created RPU firmware images. Default images are already present.
# Copy R5 Images
$ cp </path/to/sdk/workspace>/r50_app/Debug/r50_app.elf  project-spec/meta-user/recipes-apps/rpu-firmware/files/data/r50_app
$ cp </path/to/sdk/workspace>/r51_app/Debug/r51_app.elf  project-spec/meta-user/recipes-apps/rpu-firmware/files/data/r51_app
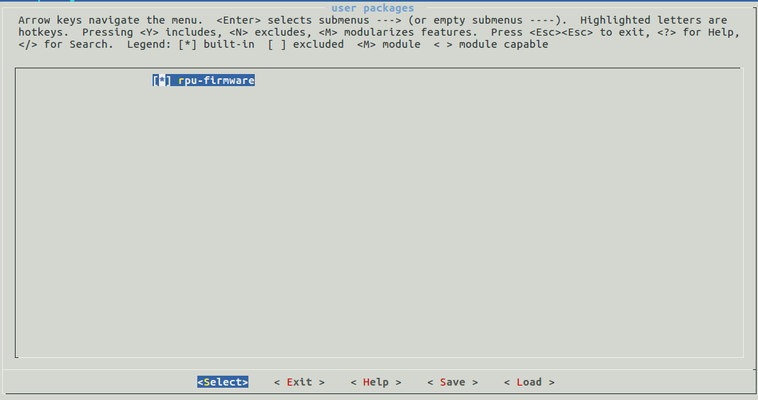
Add rpu-firmware to rootfs
$ petalinux-config -c rootfs
# enable user-packages > rpu-firmware

Build the petalinux project
# Build all the petalinux components
$ petalinux-build
This will generate <plnx-root>/images/linux/image.ub file which is kernel image (along with dtb and rootfs).
Generate the BOOT image.
# Create BOOT.BIN for sd boot (Add --force flag if BOOT.BIN already exist)
$ petalinux-package --boot --fsbl --pmufw --fpga --atf --uboot
This will generate <plnx-root>/images/linux/BOOT.BIN
Copy image.ub and BOOT.BIN to the sd card.
For more information:
- See MPSoC Petalinux Software Development
- Please refer to UG 1144 Petalinux Reference Guide for more details on Petalinux project, how to build and use the packaged images.
How To Run
To run the design, load the SD card with images mentioned above and boot the zcu102 board with sd boot mode.
To log in, use root as login and password.
xilinx-zcu102-2018-3 login: root
Password: root
Following commands can be executed from Linux prompt to perform various subsystem resets.
APU only Subsystem reboot:
$ set_reboot apu
$ reboot
$ set_reboot ps
$ reboot
$ set_reboot sys
$ reboot
Running DMA's test modules from Linux
# Running Axi CDMA test from Linux
$ modprobe cdmatest
# Running Axi DMA test from Linux
$ modprobe axidmatest
Note: If firewall IP is being used for blocking traffic from PL, firewall IP should be cleared to allow traffic start again.
To do so, write 0x1 to MI Unblock Control Register of firewall IP on particular PL path before starting the traffic again.
In this example design, we are blocking the traffic from APU subsystem's axi dma traffic through the Axi Firewall IP.
Hence after APU only or PS only reboot, 0x1 should be written to AXI Firewall BaseAddress + 0x8 before starting the Axi DMA operation.
Command line solution is :
# Unblock the Axi Firewall 1 traffic (related to APU's Axi DMA) by writing 0x1 to  (AXI_Firewall_1_BaseAddress  + MI Unblock Control Register)
$ devmem 0xA0004008 32 0x1

# Running Axi DMA test from Linux
$ modprobe axidmatest
Accessing APU subsystem's BRAM from Linux
# Accessing BRAM : devmem <bram address>
$ devmem 0xA0000000
0x00000000
$ devmem 0xA0000000 32 0x123456
$ devmem 0xA0000000
0x00123456
One can observe BRAM contents not changing across APU only and PS only reboot.
To start rpu0 application:
$ echo r50_app  >  /sys/class/remoteproc/remoteproc0/firmware
$ echo start > /sys/class/remoteproc/remoteproc0/state
$ echo r51_app  >  /sys/class/remoteproc/remoteproc1/firmware
$ echo start > /sys/class/remoteproc/remoteproc1/state
$ echo stop > /sys/class/remoteproc/remoteproc0/state
$ echo stop > /sys/class/remoteproc/remoteproc1/state
Recovery and Escalations
In many use cases, recovery and escalation are turned on as they are critical for getting back into a healthy state when the system is hung. This example design also has them enabled.
Normal Healthy System
In a recovery enabled system, after Linux boots up it needs to perform the following to mark itself healthy and alive.
- Set the Healthy bit
- Start watchdog application as daemon to kick the WDT
The watchdog-init script enabled in the example design does both of these tasks after Linux boot-up process.
Following are the description of various argument that watchdog-int script (available at /etc/init.d/watchdog-init) can take
# Description:       This script runs the daemon for providing heartbeat
#                    to FPD wdt, failing which PMU will trigger restart
#                    escalation. This script also mark the current boot
#                    as healthy by setting healthy bit.
#             Following arguments can be passed to this script:
#            start --> Set the healthy bit and start wdt heartbeats
#            stop --> Stop wdt heartbeats (Note: this gracefully shutdowns the wdt and disable the recovery)
#            restart --> stop followed by start
#            set_healthy -> mark healthy status as true
#            unset_healthy -> mark healthy status as false
#            start_hb --> start wdt heartbeats
#            stop_hb    --> stop wdt heartbeats (Note: this gracefully shutdowns the wdt and disable the recovery)
Example to explicitly set healthy bit:
$ /etc/init.d/watchdog-init set_healthy
How to Build Example Design Hardware
The following steps can be used to generate the hardware description file (HDF) used in this example.
Copy sources from the package to a working directory, then open the project in Vivado using the provided Tcl script:
$ cp </path/to/package>/hardware/sources/* </path/to/working/directory>/.
$ vivado -source create_warm_restart.tcl
When the script finishes, you should see components in your block design for MPSOC, APU_SS, RPU_SS, and PL_SS. You should also have a constraint file added under the Sources tab. You can double-click the Zynq UltraScale+ MPSOC component, click on the box for Switch to Advanced Mode, then click on Isolation Configuration to see how the subsystems are configured.
Click on Generate Bitstream using the link under Flow Navigator, saving the block design when prompted.
When the bitstream is ready, go to File → Export → Export Hardware and select Include Bitstream. Use the default location for the exported hardware. Then go to File → Launch SDK using the default location and workspace to finish creating the HDF needed for building Petalinux. Follow the steps for Building Petalinux Project with new hardware (Step 4) to use this new hardware in the Petalinux image.
Related content
© Copyright 2019 - 2022 Xilinx Inc. Privacy Policy