Zynq UltraScale+ FSBL
This page provides details on building and customizing the FSBL for Zynq UltraScale+ MPSoC, and important notes on the FSBL. All the information is presented in the format of FAQs.
Table of Contents
What is FSBL?
FSBL is loaded into OCM and handed off by CSU BootROM after authenticating and/or decrypting (as required) FSBL.
How to create FSBL from Vitis?
- Launch VITIS with the below command: vitis
- Provide path where VITIS workspace and project need to be created. With this VITIS workspace will be created
- (Optional step) To work with local repos, Select "Xilinx" (ALT - x) -> Repositories. Against Local Repositories, click on "New..." and provide path of the local repo
- Select File-->New-->Application Project to open "New Project" window, provide name for FSBL project
- In the “Platform” section, click on “Create a new platform from hardware (XSA)” and select pre-defined hardware platform for ZynqMP (e.g. zcu102).
- Alternatively, to create a new/custom platform from a .xsa file, click on “+”, browse and select the XSA file and a new hardware platform is created.
- In the "Domain" window, select the processor psu_cortexa53_0/psu_cortexr5_0, OS as standalone and Language as C
- Click Next and select "Zynq MP FSBL"
- Click "Finish" to generate the A53/R5 FSBL. This populates the FSBL code and also builds it (along with BSP)
- Debug prints in FSBL are now disabled by default (except for FSBL banner). To enable debug prints, define symbol: FSBL_DEBUG_INFO
- In VITIS this can be done by: right click on FSBL application project -> select “C/C++ Build Settings” -> “Tool Settings” tab -> Symbols (under ARM v8 gcc compiler)
- Click on Add (+) icon and Enter Value: FSBL_DEBUG_INFO, click on "OK" to close the "Enter Value" screen
- In case any of the source files (FSBL or BSP) need to be modified, browse the file, make the change and save the file, build the project. elf file will be present in the Debug/Release folder of FSBL project.
What are various levels of debug prints in FSBL?
FSBL supports four levels of debug prints:| Type or prints | Purpose | Enabled by defining.. in FSBL code | Alternative way of enabling by defining symbol.. |
| ALWAYS | Used for prints, which should be always enabled (e.g. FSBL banner) | FSBL_PRINT_VAL to (1U) | FSBL_PRINT |
| DEBUG GENERAL | To print errors and basic general information | FSBL_DEBUG_VAL to (1U) | FSBL_DEBUG |
| DEBUG INFO | To have more prints with format specifiers, in addition to basic general information | FSBL_DEBUG_INFO_VAL to (1U) | FSBL_DEBUG_INFO |
| DEBUG DETAILED | To have more detailed prints, in addition to above prints | FSBL_DEBUG_DETAILED_VAL to (1U) | FSBL_DEBUG_DETAILED |
On what all processor cores can FSBL run on?
FSBL can only be run from A53_0 (AArch32 and AArch64), R5_0, R5_LockstepWhat part of OCM is used by FSBL?
OCM region used by FSBL: 0xFFFC0000 – 0xFFFE9FFF. The last 512 bytes of this region is used by FSBL to share the handoff parameters corresponding to applications ATF hands off. FSBL fully uses this OCM region and, in fact, in certain designs and when certain features need to enabled, the current footprint of FSBL doesn't fit in this available OCM. For details, search for "footprint" in this wiki.ATF uses the rest of OCM i.e. from 0xFFFEA000 to 0xFFFFFFFF. Please note that the current implementation of APU-only restart assumes that FSBL "resides" in OCM even after its execution is complete. This is since, in such scenarios, PMUFW hands off to (already existing) FSBL without actually restarting.
Hence, OCM is completely used between FSBL and ATF and with the available APU-only restart mechanism, no other application can reuse it.
How is xfsbl_translation_table.S different from translation_table.S of BSP?
xfsbl_translation_table.S is a copy of file translation_table.S (of A53). The difference is that the FSBL’s copy of this file marks DDR region as reserved. This is to avoid speculative access to DDR before it is initialized. Once the DDR initialization is done in FSBL, memory attributes for DDR region is changed to “Memory” so that it is cacheable.What ECC initialization is done by FSBL?
TCM ECC Initialization: When FSBL runs on R5, TCM ECC is always initialized. Also, when FSBL loads application targeted on R5, the corresponding TCM's ECC is initialized. When FSBL runs on A53, by default, TCM ECC is not initialized as this also involves powering up of RPU. In such cases, TCM ECC Initialization can be performed by defining FSBL_A53_TCM_ECC_EXCLUDE_VAL to 0 in xfsbl_config.h.DDR ECC Initialization: Done in FSBL if ECC for DDR is enabled in design.
I’m unable to build FSBL due to size issues, how can I reduce its footprint?
FSBL provides option to enable/disable certain features from building. By selectively disabling certain features as mentioned in below table, code size can be reduced. These flags are defined in xfsbl_config.h of FSBL.| FLAG | default value | Meaning of default setting / Notes | Significant impact on FSBL size? |
| FSBL_NAND_EXCLUDE_VAL | (0U) | NAND Boot mode related code is included (if NAND is present in design) | Yes |
| FSBL_QSPI_EXCLUDE_VAL | (0U) | QSPI Boot mode related code is included (if QSPI is present in design) | Yes |
| FSBL_SD_EXCLUDE_VAL | (0U) | SD Boot mode related code is included (if SD is present in design) | Yes |
| FSBL_SECURE_EXCLUDE_VAL | (0U) | Secure features (Authenctication and decryption) are enabled | Yes |
| FSBL_BS_EXCLUDE_VAL | (0U) | PL Bitstream load capability is enabled | Yes |
| FSBL_SHA2_EXCLUDE_VAL | (1U) | SHA2 is not supported | Yes |
| FSBL_EARLY_HANDOFF_EXCLUDE_VAL | (1U) | This flag/feature is not fully supported and hence is not recommended to change this setting | No |
| FSBL_WDT_EXCLUDE_VAL | (0U) | Watchdod timer feature is included | No |
| FSBL_PERF_EXCLUDE_VAL | (1U) | Performance prints are not shown by default | No |
| FSBL_A53_TCM_ECC_EXCLUDE_VAL | (1U) | TCM ECC is not initialized for A53 ALWAYS. Changing this flag will result in TCM ECC being initialized always. | No |
| FSBL_PL_CLEAR_EXCLUDE_VAL | (1U) | PL Initialization/clearing will be done ONLY when the boot image has PL bitstream. Changing this will result in PL Initialization/clearing to be done ALWAYS during FSBL Initialization | No |
| FSBL_USB_EXCLUDE_VAL | (1U) | USB Slave boot mode support is disabled | Yes |
| FSBL_PROT_BYPASS_EXCLUDE_VAL | (1U) | By default (from 2018.1), complete XMPU/XPPU configuration is done. Changing this flag will result in FSBL bypassing XPPU and FPD XMPU configuration and isolation/protection feature will be just limited to OCM slave. | No |
| FSBL_PARTITION_LOAD_EXCLUDE_VAL | (0U) | By default FSBL loads all the partitions in the image, if this macro is been set, FSBL skips the partitions loading and will run the way it runs in JTAG boot mode. | |
| FSBL_FORCE_ENC_EXCLUDE_VAL | (0U) | By default FSBL forces encryption of all the partitions when ENC_ONLY bit is blown, but if this macro is been set encryption can be optional for all the partitions loaded by FSBL, however it is compulsory for FSBL partition. | |
| FSBL_UNPROVISIONED_AUTH_SIGN_EXCLUDE_VAL | (1U) | By default the code to load authenticated partitions as non-secure when RSA_EN eFUSE is not programmed is excluded. If changed to "0", an authenticated image can boot as non-secure when RSA_EN eFUSE is not programmed. |
Are there any other ways by which FSBL footprint can be further reduced?
Debug prints: By default only FSBL banner is printed. If more debug prints are enabled, these will result in use of more memory.Drivers Asserts: Asserts are used within all Xilinx drivers and can be turned off on a system-wide basis by defining, at compile time, the NDEBUG identifier (adding –DNDEBUG against extra_compiler_flags of drivers). This will help further reduce FSBL footprint.
I’m unable to debug FSBL in Vitis. Any change in optimizations used by FSBL?
Starting in 2019.2, the FSBL will be built with –Os and LTO optimizations by default in VITIS. This prevents the view of C code in the debugger.
To be able to view the C code during debug, these are few options:
- Disable Optimization flags AND exclude unused FSBL code.
- In the "Miscellaneous" Section of FSBL app, remove highlighted options below.

- In the "Miscellaneous" Section of FSBL app, remove highlighted options below.
This would make the FSBL too big to be able to fit in OCM and proceed with debug. Make sure that EXCLUDE flags options are enabled in "xfsbl_config.h" if a feature is not used and can be excluded. If that doesn't free up enough space, the second option (of reducing optimization) can be looked at and followed.
- Reduce/Change the level of Optimization.
- Modify the flags to remove "-Os -flto -ffat-lto-objects" and include only "-O1" (optimization for code size and execution time) instead.
- If doing the above doesn't work and "-O1" is still difficult to debug, modify flags to remove "-Os -flto -ffat-lto-objects" and include "-Og" instead. "-Og" stands for Optimized Debug Experience. To be used along with this, some of the optimization flags can be tried manually. "-Og -finline-functions-called-once" is known to have worked.
REFERENCE: For more info on optimization: https://gcc.gnu.org/onlinedocs/gcc-8.2.0/gcc/Optimize-Options.html#Optimize-Options
IMPORTANT NOTE: The following zynqmp_fsbl_bsp flag need to be changed to FALSE after removing or reducing the optimization (either of the three methods above).
This will avoid turning back-on of the FSBL BSP optimization during rebuilding.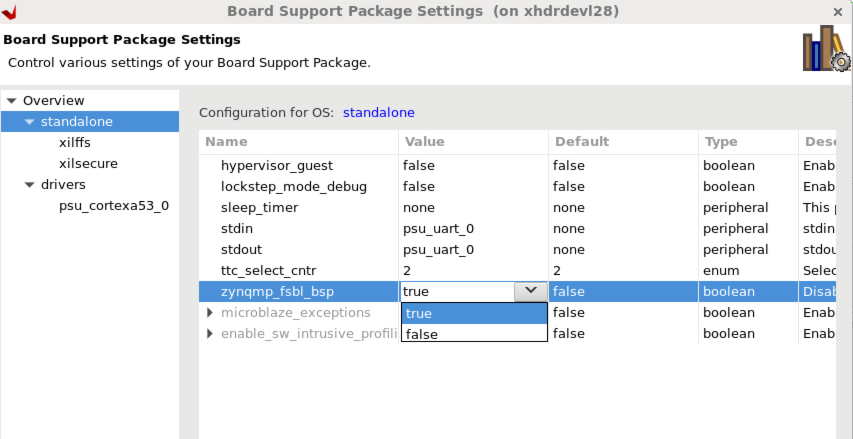
What are the memory regions and registers reserved for FSBL?
Following are the memory regions and registers reserved for FSBL:
- DDR region - 0x100000U (XFSBL_DDR_TEMP_ADDRESS) → This is the address in DDR where bitstream will be copied temporarily.
- DDR region - 0x4000000U (XFSBL_DDR_TEMP_BUFFER_ADDRESS) - This is the address in DDR where boot image will be copied in USB boot mode.
- 0xFFD80034 (PMU_GLOBAL_GLOBAL_GEN_STORAGE2) → Since 2018.1 if POS is enabled, FSBL waits till PMU has finished resuming by polling this register. Users are free to use this register after reset so it can still be considered as "reserved for customers".
- 0xFFD80038 (PMU_GLOBAL_GLOBAL_GEN_STORAGE3) → Since 2018.1 if POS is enabled, PMU waits till FSBL has finished reading the boot type. This additional handshake step is required in boot scenarios where FSBL is started by CSU. PFW must wait for CSU to trigger FSBL start otherwise there may be race condition where PFW is trying to restore state of processor as part of resume from Power Off Suspend sequence while CSU is trying to run FSBL on that same processor. Users are free to use this register after reset so it can still be considered as "reserved for customers".
- 0xFFD80040 (PMU_GLOBAL_GLOBAL_GEN_STORAGE4 - bits 1 and 2) → Since 2018.3, these bits are used to know the status of RPU 0 and RPU 1 usage which will be updated by FSBL. Based on this information, PMU will decide whether to shutdown the unused RPU cores or not.
- 0XFFD80040 (PMU_GLOBAL_GLOBAL_GEN_STORAGE4 - bit 16) → Written by PMUFW, FSBL uses this register to know if reset is APU only reset.
- 0XFFD80044 (PMU_GLOBAL_GLOBAL_GEN_STORAGE5 - bit 0) → Written by FSBL, PMU Firmware uses this register to know if FSBL has completed its execution. Since 2018.1, this check is performed to initialize and start the CSU WDT timer when ENABLE_WDT macro is defined.
- 0XFFD80044 (PMU_GLOBAL_GLOBAL_GEN_STORAGE5 - bits 1 and 2) → Written by FSBL. PMU Firmware uses these bits to know if FSBL is running on which processor. 01: APU, 10: RPU0, 11: RPU LS
- 0XFFD80048 (PMU_GLOBAL_GLOBAL_GEN_STORAGE6) -> FSBL writes to this register the address from where ATF can read the details of partitions to which ATF has to handoff
- 0XFFD80060 (PMU_GLOBAL_PERS_GLOB_GEN_STORAGE4) → For error reporting in FSBL
- 0xFFD8006C (PMU_GLOBAL_PERS_GLOBAL_GEN_STORAGE7 - bit 4) → Since 2018.3, FSBL is using this bit to indicate DDR clock ready.
PMU Firmware also uses few general storage registers. Please refer to this link in PMU Firmware wiki for the list of registers reserved for PMU Firmware
Is there any order in which I have to specify bitstream in BIF file (for boot image creation)?
Yes, from 2017.1 release. Bitstream should be loaded before ATF is loaded. The reason is FSBL uses the OCM region which is reserved for ATF for holding a temporary buffer in the case where bitstream is present in .BIN file. Because of this, if bitstream is loaded after ATF, FSBL will overwrite the ATF image with its temporary buffer, corrupting ATF image. Hence, bitstream should be positioned in .BIF before ATF and preferably immediately after FSBL and PMUFW.I could see that USB boot mode support is added in FSBL but is disabled by default. Why?
USB boot mode support increases the footprint of FSBL further (by ~10KB). Since it is intended mostly during initial development phase, its support is disabled by default to conserve OCM space. Please refer “I’m unable to build FSBL due to size issues, how can I reduce its footprint” section for details on how to reduce memory foot print of FSBL.What board specific configuration is done in FSBL?
FSBL should be generic and ideally should be free from any board specific configuration. However, for the ease of development, certain board specific initialization is done in XFsbl_BoardInit() in which below are done:| Feature applicability board wise | ZCU102 | ZCU106 |
| GT configuration for ZCU102 board | Yes | No |
| Reset to GEM | Yes | Yes |
| Enabling FMC ADJ | Yes | Yes |
| USB reset (CRL_APB_BOOT_PIN_CTRL) | Yes | Yes |
| PCIe reset (GPIO_DATA_1 register) | Yes | No |
What is early handoff and does FSBL support this?
FSBL loads the partitions one after other and once loading of all partitions is complete, handing off to CPUs of corresponding partitions is done by FSBL. Early handoff is a scenario where a partition is handed off immediately after its loading into memory. This feature can be useful when an (e.g. RPU) application needs to be started as early as possible after its loading.This feature (for R5 partitions) was supported by FSBL in earlier releases. The corresponding code in FSBL is still present but this feature is no more being supported in FSBL. This is since, Isolation will be enabled in FSBL while handing off (first/early). This can create problem when loading of further partitions (accessing of memory, CSU).
What are various handoffs supported (between AArch32, AArch64, different cores)?
Below table shows various combinations of handoffs supported in FSBL:| FSBL | Application | Processor cores | Execution address |
| 64-bit | 64-bit | All (i.e. A53-0, A53-1, A53-2, A53-3) | Any address |
| 64-bit | 32-bit | A53-1, A53-2, A53-3 | 0x0 |
| 32-bit | 32-bit | A53-0 | Any address |
| 32-bit | 32-bit | A53-1, A53-2, A53-3 | 0x0 |
| 32-bit | 64-bit | A53-1, A53-2, A53-3 | Any address |
What are the various hooks provided in FSBL code?
Hooks are functions which can be defined by users. FSBL provides blank functions, and calls them from certain strategic locations. Below are the hooks available currently:| Hook purpose/location | Hook function name |
| Before PL bitstream loading | XFsbl_HookBeforeBSDownload() |
| After PL bitstream loading | XFsbl_HookAfterBSDownload() |
| Before (the first) Handoff (to any application) | XFsbl_HookBeforeHandoff() |
| Before fallback | XFsbl_HookBeforeFallback() |
| To add more initialization code, in addition to that in psu_init or to replace psu_init with custom initialization | XFsbl_HookPsuInit(() |
How boot time measurements can be done in FSBL?
Boot time (or performance) measurement is a way to measure time taken to complete certain time consuming activities (e.g. partition copy, authentication, decryption etc). In addition, overall time taken by FSBL (measured from after psu_init completion to completion of all partitions/bitstream loading) is also provided. This feature can be enabled by defining macro FSBL_PERF_EXCLUDE_VAL (in xfsbl_config.h) to 0. Debug prints should not be enabled when pWhat is Secondary Boot mode?
PMU FW. The secondary boot mode is the boot device used by FSBL to load all the other partitions. The supported secondary boot modes are QSPI24, QSPI32, SD0, eMMC, SD1,
SD1-ls, NAND and USB. By default, secondary boot device is the same as primary boot device unless explicitly mentioned using boot_device param in the bif file.
"bootgen -bif_help boot_device" will list all the secondary boot options.
What are the peripherals/IPs required for FSBL?
CSUDMA, ADMA_0 and any one instance of IPI are required IPs for FSBL. In addition, for ZCU102 and ZCU106 boards, I2C0 is needed for board-specific configuration done in FSBL. Hence these IPs are required in design and also should be not isolated from the processor for which FSBL is being created.Revision History
What's new in 2021.2 release?
- Added Winbond flash support to ZynqMP FSBL
- Added MultiDie read support for Micron 2Gb flash part
- Fixed logical issue in Secondary boot mode
What's new in 2021.1 release?
- Fixed secure boot issue in USB boot mode
- Added FSBL_UNPROVISIONED_AUTH_SIGN_EXCLUDE_VAL macro to xfsbl_config.h, if this macro is set to 0 (set to 1 by default), authenticated images would boot as non secure images if RSA_EN is not programmed
- Added XFSBL_PL_LOAD_FROM_OCM macro to xfsbl_config.h, if this macro is enabled (disabled by default), bitstream would get loaded from OCM even if DDR is present in design
What's new in 2020.2 release?
- Removed SHA2 related references from sw_apps and sw_services
- Removed checksum related code out of secure code
- Fixed issue in USB boot mode
What's new in 2020.1 release?
- FSBL updates PMU GLOBAL register to indicate PL configuration
- Update the status of FSBL image encryption in bit 3 of PMU_GLOBAL_GLOBAL_GEN_STORAGE5
- Added support for ZCU216 and ZCU208 boards
- FSBL considers high DDR addresses for R5
- Added Macronix 2G flash support to FSBL
What's new in 2019.2 release?
- Added support for RPU only subsystem restart case
What's new in 2019.1 release?
- Added dual parallel configuration support and QPI support for 24bit qspi boot mode for Macronix flash parts
- AES engine and SHA engine are reset during FSBL initialization
- Zeroize PL upon error in decryption
- Removed sha2 support from FSBL
- Always select EEPROM lower page for reading SPD data
- Dynamic DDR configuration is strictly based upon the design for all boards including ZCU102 and ZCU106
- Added support for armclang compiler
- Removed disabling of the WDT error before exiting FSBL to avoid overwriting of the PMU settings
- Updated PMU with FSBL running status using bits 1 and 2 from PMU global general-purpose register 5
- DDR end address is not fixed at 2GB but derived from Vivado
- Using XilPM XPm_SetConfiguration API instead of using direct IPI calls for communicating with PMUFW.
What's new in 2018.2 release?
- Added ability to read FMC EEPROM and set VADJ voltage for ZCU104 boards
- Added support for enhanced user fuses revocation for secure boot
What's new in 2018.1 release?
- Isolation fully enabled in FSBL
- Added support for NIST-SHA3 padding
- Added Boot header authentication
- Forcing encryption for all partitions when ENC_ONLY eFUSE bit is set
- Fixed AES KEY and IV re-use vulneribility issue
- Added support to exclude partition loading
- Added warning prints in case PMU-FW is not running
- Added support for Macronix 1.8V flash
- Added support to make FSBL wait for PMU to detect boot type
What's new in 2017.4 release?
- Added functionality in FSBL to distinguish EV devices from EG devices
What's new in 2017.3 release?
- Secondary boot mode support added
- Supported secondary boot modes: QSPI24, QSPI32, SD0, SD1, eMMC, SD1-LS, USB, NAND.
- QSPI 1-bit and 2-bit support added
Related Links
- PMU Firmware : http://www.wiki.xilinx.com/PMU+Firmware
1) XFSBL_PL_PWRUP_WAIT_MICROSEC macro added to provide wait time for PL to power up. The default value is zero but customers can set it as per their requirements.
© Copyright 2019 - 2022 Xilinx Inc. Privacy Policy