Zynq UltraScale+ PS-PCIe Linux Configuration
The page is deprecated and is only being retained as a reference. The ZCU112 board mentioned below is not publicly available.
Please refer to the following Answer Records for more info on using PS-PCIe:
AR72076 : Example design with PL-PCIe Root Port in ZCU106 and PS-PCIe Endpoint in UltraZed
AR71493: PetaLinux Image Generation and System Example Design with ZCU102 PS-PCIe as Root Complex and ZC706 as Endpoint
This page provides an overview of configuring a PCIe host (in this case, a ZCU102 using PS-PCIe in root port mode) for communicating with a Zynq UltraScale+MPSoC PS-PCIe controller configured as a PCIe endpoint. In the example below, Linux is running on the ZCU102 host, and a pre-built bare-metal application is running on the endpoint.
Table of Contents
Configure the ZCU102 PetaLinux Project
The following steps describe the process for configuring the kernel to include support for accessing the PS-PCIe Endpoint DMA controller:
- Run settings.sh for PetaLinux Build Environment setup from the installed directory.bash>source <path-to-installed-PetaLinux>/settings.sh
- Create new project using sample PetaLinux Project from Latest BSPs for ZU+ MPSoC. bash>petalinux-create -t project -n ps_pcie_dma -s /proj/petalinux/petalinux-v2017.2_bsps_daily_latest/xilinx-zcu102-v2017.2-final.bsp
This command creates a new PetaLinux project folder from a default template. PetaLinux project is created under folder name ps_pcie_dma. - Change the directory into your newly created PetaLinux project.bash> cd ps_pcie_dma.
Enter petalinux-config command and select Linux Components Selection.
bash> petalinux-config
This launches the top system configuration menu.
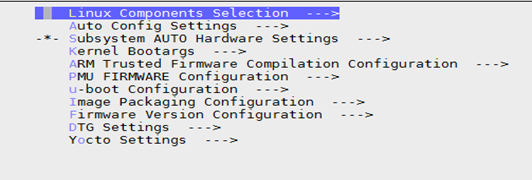
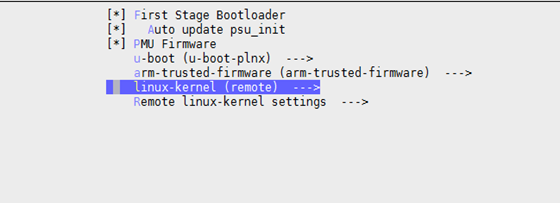
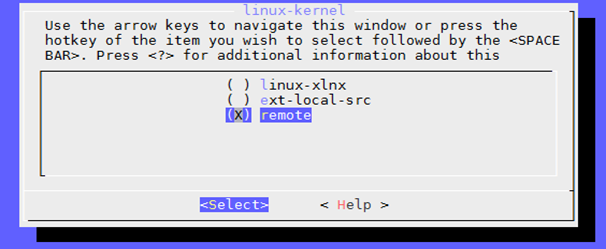
In Linux Components Selection select linux-kernel remote. In Remote linux kernel settings give linux kernel git path and commit id as master.
Please observe the following screenshots.
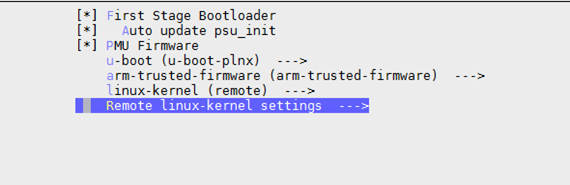


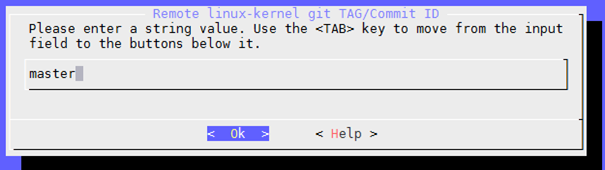

After Configuring Linux Kernel Components selection settings. Save the changes and exit from the menu.
5. Run PetaLinux kernel configuration command to select DMA Engine Support and Xilinx PS PCIe DMA. In Xilinx DMA Engine select test client Enable.
bash> petalinux-config -c kernel
This launches the Linux kernel configuration menu.
Select Device Drivers Component from the kernel configuration window. In Device Driver Component Select DMA Engine support.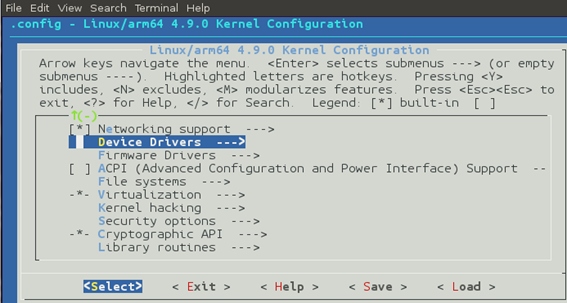
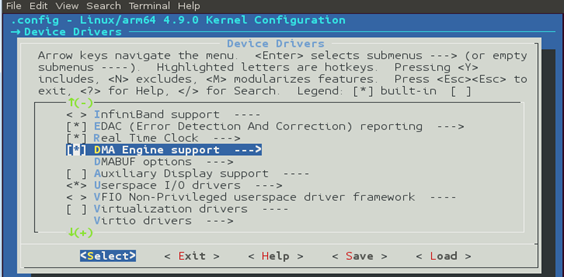
In DMA Engine Support. Select Xilinx DMA Engines, and Select Xilinx PS PCIe DMA Support.
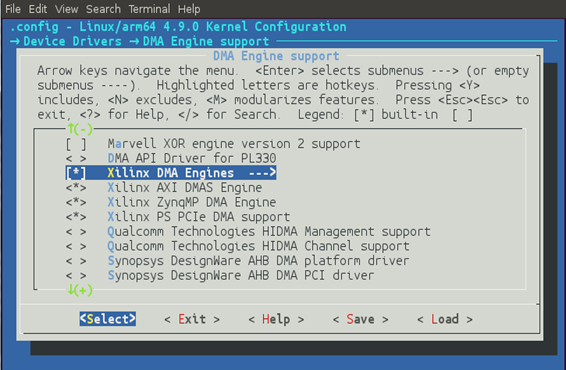
In Xilinx DMA Engines, Select Xilinx PS PCIe DMA test client.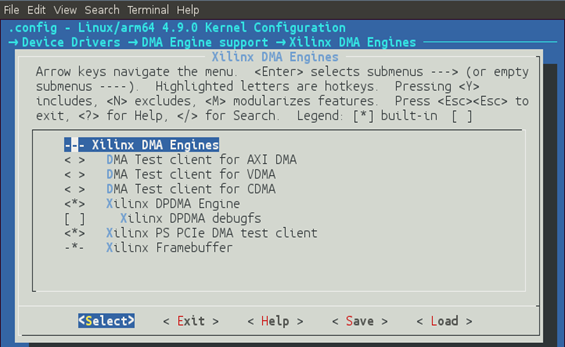
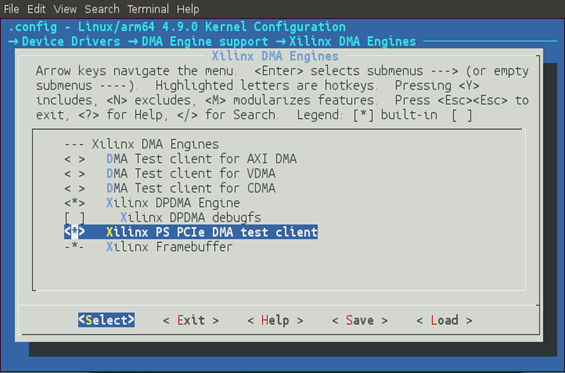
After selecting the Xilinx DMA components save the configuration file and then exit from menu.
6. After Configuring the PetaLinux kernel, give PetaLinux build command to build the system image.
bash> petalinux-build
The Linux software images are generated in the images/linux subdirectory of your PetaLinux project.
7. Once PetaLinux build command executed successful. Generate Boot Image BOOT.BIN using PetaLinux package command.
bash> petalinux-package --boot --fsbl images/linux/zynqmp_fsbl.elf --fpga images/linux/download.bit --pmufw images/l inux/pmufw.elf --u-boot images/linux/u-boot.elf
Create the Endpoint DMA Test Application
In order to communicate with the endpoint, we need a host application that will use the PCIe EP driver to move date to/from the endpoint.
- In PetaLinux project directory i.e. in ps_pcie_dma directory create application simple-test, to include this into part of PetaLinux is explained in following steps.
bash> petalinux-create -t apps --template c --name simple-test –enable - Download source files simple-test.c and header file common_include.h from attachments and copy it into the below path in PetaLinux project directory bash> cp simple-test.c project-spec/meta-user/recipes-apps/simple-test/files/ bash> cp common_include.h project-spec/meta-user/recipes-apps/simple-test/files/
- Open Makefile and add target clean to the Makefile showed in below path. Target clean is highlighted in red below. Press <TAB> key before clean command.
bash> vi project-spec/meta-user/recipes-apps/simple-test/files/Makefile
| APP = simple-test # Add any other object files to this list below APP_OBJS = simple-test.o all: build build: $(APP) $(APP): $(APP_OBJS) $(CC) $(LDFLAGS) -o $@ $(APP_OBJS) $(LDLIBS) clean: <Press TAB key> rm -f $(APP_OBJS) $(APP) |
4. Include header file common_include.h in simple-test.bb file. Changes are highlighted in red. The simple-test.bb should look like.
bash> vi project-spec/meta-user/recipes-apps/simple-test/simple-test.bb
5. Give PetaLinux build command to build the application as part of rootfs
bash> petalinux-build
Create the PIO Test Application
In order to demonstrate PIO mode, we create another application in the PetaLinux project.
- In PetaLinux project directory i.e. in ps_pcie_dma directory create application pio-test, to include this into part of PetaLinux is explained in following steps
bash> petalinux-create -t apps --template c --name pio-test –enable
2. Download source files pio-test.c and header file common_include.h from attachments and copy it into the below path in PetaLinux project directory.
bash> cp pio-test.c project-spec/meta-user/recipes-apps/pio-test/files/
bash> cp common_include.h project-spec/meta-user/recipes-apps/pio-test/files/
3. Open Makefile and add target clean to the Makefile showed in below path.
Target clean is highlighted in red below. Press <TAB> key before clean command.
bash> vi project-spec/meta-user/recipes-apps/pio-test/files/Makefile
| APP = pio-test # Add any other object files to this list below APP_OBJS = pio-test.o all: build $(APP): $(APP_OBJS) $(CC) $(LDFLAGS) -o $@ $(APP_OBJS) $(LDLIBS) clean:<Press TAB key> rm -f $(APP_OBJS) $(APP) |
4. Include header file common_include.h in pio-test.bb file. Changes are highlighted in red. The pio-test.bb should look like.
bash> vi project-spec/meta-user/recipes-apps/pio-test/pio-test.bb
| ## This file is the pio-test recipe.# SUMMARY = "Simple pio-test application"SECTION = "PETALINUX/apps"LICENSE = "MIT"LIC_FILES_CHKSUM ="file://${COMMON_LICENSE_DIR}/MIT;md5=0835ade698e0bcf8506ecda2f7b4f302" SRC_URI = "file://pio-test.c \file://common_include.h \ file://Makefile \" S = "${WORKDIR}" do_compile() {oe_runmake} do_install() {install -d ${D}${bindir}install -m 0755 pio-test ${D}${bindir}} |
5. Give PetaLinux build command to build the application as part of rootfs
bash> petalinux-build
PetaLinux Build Images Location for PS PCIe End Point DMA. image.ub with (simple-test and pio-test apps) and BOOT.BIN are located in PetaLinux project directory in images/Linux
Booting the Hardware
- Two Boards are needed in this demonstration. ZCU102 (root port) and ZCU112 (endpoint) boards.On ZCU112 End Point (copy BOOT.BIN from attachment above into SDcard)
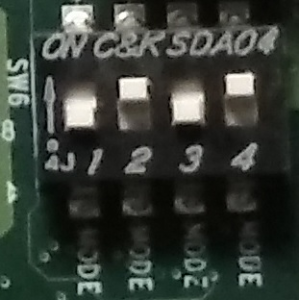
- Set the boot mode pins of ZCU112 to SD boot mode as shown in the picture below
3. Place the ZCU112 board on the PCIe slot of host machine(ZCU102 or x86).
ZCU102 board with SD boot.
4. On Host machine (ZCU102)
To test EndPoint DMA use SDCard with the image.ub (simple-test and pio-test apps) and BOOT.BIN build from PS PCIe End Point DMA build steps.
Set the boot mode settings in DIP switch on host ZCU102 board to SDCard.
Mode switch SW6 should be set to boot from SD card.
Use the following switch settings:
SW6.1: ON
SW6.2: OFF
SW6.3: OFF
SW6.4: OFF
Running the simple-test application
This section describes the steps for running the simple-application on the ZCU102 to exercise the PS-PICe endpoint DMA.
1. Follow steps in
ZCU102 common booting steps to test PS PCIe EP DMA and Root Port DMA.
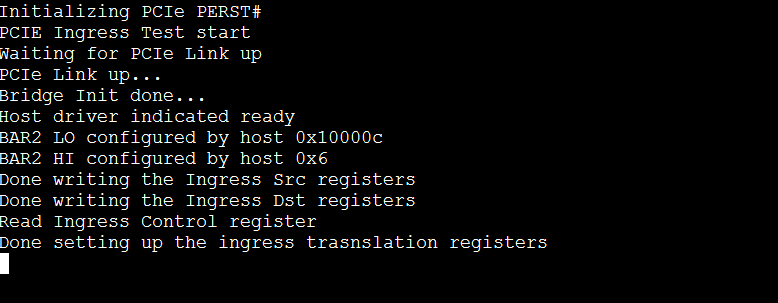
2. ZCU112 board switch on power and execute SD boot. The following prints will be seen on console for ZCU112.
3. Power On Host machine (ZCU102)
After boot up check whether end point is enumerated using lspci utility.
4. Execute synchronous dma transfers application after providing command line parameters.
simple-test -c 0 -a 0x100000 -l 1024 -d s2c -b 0simple-test -c 1 -a 0x100000 -l 1024 -d c2s -b 0-c
option specifies channel number
-a
option specifies end point address
-l
option specifies packet length
-d
option specifies transfer direction. It can be either s2c or c2s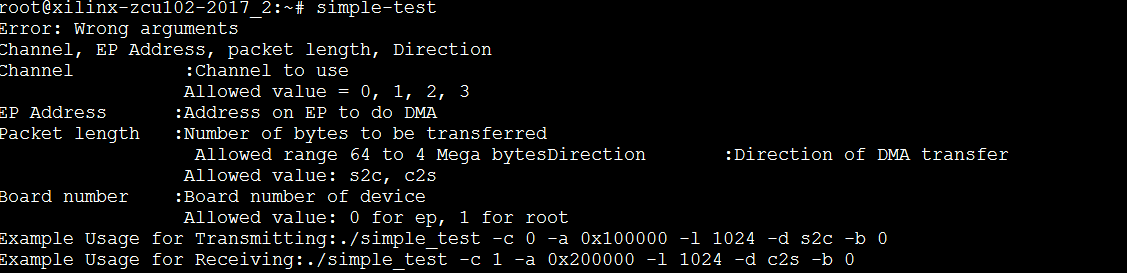

© Copyright 2019 - 2022 Xilinx Inc. Privacy Policy