/
XAPP1082 - Zynq-7000 Ethernet Performance
XAPP1082 - Zynq-7000 Ethernet Performance
- Confluence Wiki Admin (Unlicensed)
- Terry O'Neal (Unlicensed)
Owned by Confluence Wiki Admin (Unlicensed)
Last updated: Nov 25, 2019 by Terry O'Neal (Unlicensed)
Table of Contents
1. Introduction
The focus of this application note is on Ethernet peripherals in the Zynq®-7000 SoC. This application note describes using the processing system (PS) based gigabit Ethernet MAC (GEM) through the extended multiplexed I/O (EMIO) interface with the 1000BASE-X physical interface using high-speed serial transceivers in programmable logic (PL). This application note also describes the implementation of PL-based Ethernet supporting jumbo frames.The designs provided with this application note enable the use of multiple Ethernet ports, and provide kernel-mode Linux device drivers. In addition, this document includes Ethernet performance measurements with and without checksum offload support enabled.
This page discusses the following-
- Hardware and software design build steps
- Understanding & Benchmarking Ethernet performance
The design details (block diagrams) are provided in XAPP1082
2. XAPP1082 v 4.0
XAPP1082 v4.0 introduces:-
- SGMII support to PS-EMIO and PL-Ethernet designs
- Supports Vivado 2017.4 (IPI Design)
- Petalinux 2017.4 SDK
- macb driver support
- Xilinx PHY driver supports for 1000Base-X and SGMII
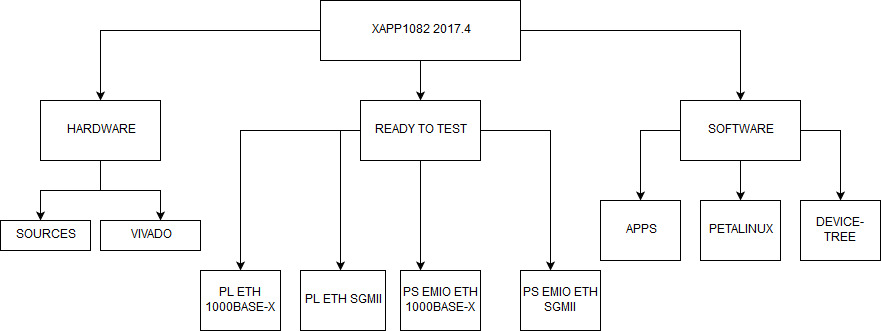
Four designs are described in this application note. The designs support Vivado IP Integrator tool flow.
a) PS Ethernet (GEM1) that is connected to a 1000BASE-X physical interface in PL through an EMIO interface.
b) PL Ethernet implemented as soft logic in PL and connected to the 1000BASE-X physical interface in PL.
c) PS Ethernet (GEM1) that is connected to a SGMII physical interface in PL through an EMIO interface.
d) PL Ethernet implemented as soft logic in PL and connected to the SGMII physical interface in PL.
The steps for building designs "a" and "b" mentioned above, are same as in "Vivado" section of XAPP v3.0.
The steps for building designs "c" and "d" are mentioned below.
Building PS-EMIO design in SGMII mode
To rebuild the hardware design, execute the following (after setting up Vivado environment).1. Open a Linux terminal or Vivado tcl shell in windows
2. Navigate to hardware/vivado/scripts/ps_emio_eth for PS EMIO Ethernet design
$ vivado -source ps_emio_eth_sgmii.tcl
Rest of the steps remain same as covered in section XAPP v3.0.
Building PL Ethernet design in SGMII mode
To rebuild the hardware design, execute the following (after setting up Vivado environment).- Open a Linux terminal or Vivado tcl shell in windows
- Navigate to hardware/vivado/scripts/pl_eth for PL Ethernet design
Rest of the steps remain same as covered in section XAPP v3.0.
2.1 PetaLinux Installation
Prerequisites
This section lists the requirements for the PetaLinux Tools Installation
- Download Petalinux 2017.4 SDK software from Xilinx website download section.
- Refer to section 3.4 for PetaLinux installation instructions.
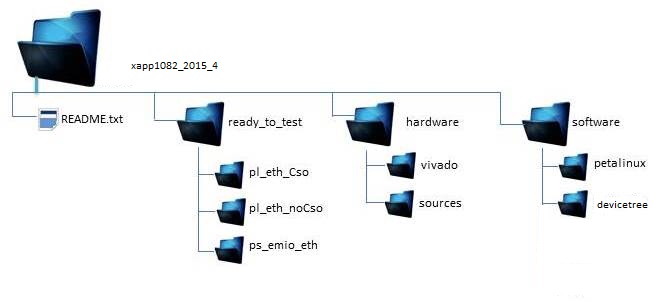
2.2 Directory structure
The XAPP1082 4.0 is released with the source code, Xilinx Vivado and Petalinux projects and an SD card image that enables the user to run the demonstration.
It also includes the binaries necessary to configure and boot the Zynq-7000 SoC board.
This wiki page assumes the user has already downloaded the XAPP package and extracted its contents to the XAPP home
directory referred to as XAPP_HOME in this wiki.
2.3 PS-EMIO Ethernet
2.3.1 PS-EMIO BSP installation for 1000Base-X
PS-EMIO Ethernet project provides installable BSP, which includes all necessary design sources and configuration files, including pre-built and tested hardware and software images, ready for download to your board or for booting in the QEMU system simulation environment.2.3.1.1 Create PS EMIO Ethernet project from PetaLinux BSP
Run petalinux-create command on the consolepetalinux-create -t project -s <path-to-bsp>
bash> cd $PETALINUX
bash> petalinux-create -t project -s $XAPP_HOME/software/petalinux/bsp/xapp1082_ps_emio_eth_1000x.bsp
2.3.1.2 Configure PetaLinux
bash> cd xapp1082_ps_emio_eth
bash> petalinux-config
It will download the remote kernel and checkout xilinx-v2017.4 tag.
NOTE: Above step may take a longer time depending on the network bandwidth.
2.3.1.3 Configure the kernel
Check the Xilinx PHY driver from kernel configurationbash> petalinux-config -c kernel
<*> Drivers for xilinx PHYs
Save the changes and exit.
2.3.1.4 Apply FSBL patch
Refer to the AR 66006 for configuring the SFP and SI5324 using I2C in FSBL.Also user can copy the files present in fsbl_patch_files folder to configure the clock and SFP.
bash> cd components/bootloader/zynq_fsbl
bash> cp -f $XAPP_HOME/software/petalinux/fsbl_patch_files/* .
bash> cd -
2.4.1.5 Modifications to system-user.dtsi
For PS EMIO 1000BASE-X ETHERNET,Modify the system-user.dtsi by navigating to the the file using 'vi project-spec/meta-user/recipes-bsp/device-tree/files/system-user.dtsi',
/include/ "system-conf.dtsi"
/ {
};
&gem1 {
local-mac-address = [00 0a 35 00 00 01];
phy-mode = "rgmii-id";
status = "okay";
xlnx,ptp-enet-clock = <0x69f6bcb>;
phy-handle = <&phy1>;
phy1: phy@1 {
compatible = "Xilinx PCS/PMA PHY";
device_type = "ethernet-phy";
xlnx,phy-type = <5>;
reg = <1>;
};
};
Save and exit.
2.3.1.6 Build
Build images using PetaLinuxbash> petalinux-build -v
2.3.1.7 Create Zynq Boot image (BOOT.bin)
bash> cd images/linux
bash> petalinux-package --boot --fsbl zynq_fsbl.elf --fpga ps_emio_sfp.bit --u-boot (1000base-x)
2.3.1.8 SD Images
SD Deployable binaries:-a) BOOT.bin
b) image.ub
Copy BOOT.BIN and image.ub from $PETALINUX/ xapp1082_ps_emio_eth_1000x/images/linux to SD partition and run the setup.
2.3.2 PS-EMIO BSP installation for SGMII
PS-EMIO Ethernet project provides installable BSP which includes all necessary design sources and configuration files, including pre-built and tested hardware and software images, ready for download to your board or for booting in the QEMU system simulation environment.The design supports with the auto-negotiation for speeds of 10/100/1000 Mbps and full duplex mode.
2.3.2.1 Create PS EMIO Ethernet project from PetaLinux BSP
Run petalinux-create command on the command consolepetalinux-create -t project -s <path-to-bsp>
bash> cd $PETALINUX
bash> petalinux-create -t project -s $XAPP_HOME/software/petalinux/bsp/xapp1082_ps_emio_eth_sgmii.bsp
2.3.2.2 Configure Petalinux
bash> cd xapp1082_ps_emio_eth
bash> petalinux-config
It will download the remote kernel and checkout xilinx-v2017.4 tag.
NOTE: Above step may take a longer time depending on the network bandwidth.
2.3.2.3 Configure the kernel
Check the Xilinx PHY driver from kernel configurationbash> petalinux-config -c kernel
<*> Drivers for xilinx PHYs
Save the changes and exit.
2.3.2.4 Apply FSBL patch
Refer to the AR 66006 for configuring the SFP and SI5324 using I2C in FSBL.Also user can copy the files present in fsbl_patch_files folder to configure the clock and SFP.
bash> cd components/bootloader/zynq_fsbl
bash> cp -f $XAPP_HOME/software/petalinux/fsbl_patch_files/* .
bash> cd -
2.4.2.5 Modifications to system-user.dtsi
For PS EMIO SGMII ETHERNET,Modify the system-user.dtsi by navigating to the the file using 'vi project-spec/meta-user/recipes-bsp/device-tree/files/system-user.dtsi',
/include/ "system-conf.dtsi"
/ {
};
&gem1 {
local-mac-address = [00 0a 35 00 00 01];
phy-mode = "rgmii-id";
status = "okay";
xlnx,ptp-enet-clock = <0x69f6bcb>;
phy-handle = <&phy1>;
phy1: phy@1 {
compatible = "Xilinx PCS/PMA PHY";
device_type = "ethernet-phy";
xlnx,phy-type = <4>;
reg = <1>;
};
};
Save and exit.
2.3.2.6 Build
Build images using PetaLinuxbash> petalinux-build -v
2.3.2.7 Create Zynq Boot image (BOOT.bin)
bash> cd images/linux
bash> petalinux-package --boot --fsbl zynq_fsbl.elf --fpga ps_emio_sfp,bit --u-boot (sgmii)
2.3.2.8 SD Images
SD Deployable binaries:-a) BOOT.bin
b) image.ub
Copy BOOT.BIN and image.ub from $PETALINUX/ xapp1082_ps_emio_eth_sgmii/images/linux to SD partition and run the setup.
2.4 PL Ethernet
2.4.1 PL Ethernet BSP installation for 1000Base-X
PL Ethernet project provides installable BSP which includes all necessary design sources and configuration files, including pre-built and tested hardware and software images, ready for download to your board or for booting in the QEMU system simulation environment.NOTE : Check-sum offload in enabled in the default configuration.
2.4.1.1 Create PL Ethernet project from petalinux installable BSP
Run petalinux-create command on the command console:petalinux-create -t project -s <path-to-bsp>
bash> cd $PETALINUX
bash> petalinux-create -t project -s $XAPP_HOME/software/petalinux/bsp/xapp1082_pl_eth_cso_1000x.bsp
2.4.1.2 Configure petalinux
bash> cd xapp1082_pl_eth_1000x
bash> petalinux-config
It will download the remote kernel and checkout xilinx-v2017.4 tag.
NOTE: Above step may take a longer time depending on the network bandwidth.
2.4.1.3 Configure the kernel
bash> petalinux-config -c kernel
Device Drivers> Network device support > PHY Device support and infrastructure >
<*> Drivers for xilinx PHYs
Device Drivers> DMA Engine Support> Xilinx DMA Engines >
<> Xilinx AXI DMA Engine
Save the changes and exit.
2.4.1.4 Apply FSBL patch
Refer to the AR 66006 for configuring the SFP and SI5324 using I2C in FSBLAlso user can copy the files present in fsbl_patch_files folder to configure the clock and SFP for SGMII.
bash> cd components/bootloader/zynq_fsbl
bash> cp -f $XAPP_HOME/software/petalinux/fsbl_patch_files/* .
bash> cd -
2.4.1.5 Modifications to system-user.dtsi
For PL ETHERNET 1000base-x,
Modify the system-user.dtsi by navigating to the the file using 'vi project-spec/meta-user/recipes-bsp/device-tree/files/system-user.dtsi',
/include/ "system-conf.dtsi"
/ {
};
&axi_ethernet {
local-mac-address = [00 0a 35 00 1e 52];
};
Save and exit.
2.4.1.6 Build
Build all images using PetaLinuxbash> petalinux-build -v
2.4.1.7 Create Zynq Boot image (BOOT.bin)
bash> cd images/linux
bash> petalinux-package --boot --fsbl zynq_fsbl.elf --fpga pl_eth_sfp.bit --u-boot (1000base-x)
2.4.1.8 SD Images
SD Deployable binaries:-a) BOOT.bin
b) image.ub
Copy BOOT.BIN and image.ub from $PETALINUX/ xapp1082_pl_eth_1000x/images/linux to SD partition and run the setup.
Note: Instructions on Petalinux BSP creation (rather Petalinux flow from scratch) is provided in Appendix1 below.
2.4.2 PL Ethernet BSP installation for SGMII
PL Ethernet project provides installable BSP which includes all necessary design sources and configuration files, including pre-built and tested hardware and software images, ready for download to your board or for booting in the QEMU system simulation environment.The design supports with the auto-negotiation for speeds of 10/100/1000 Mbps and full duplex mode.
NOTE : Check-sum offload in enabled in the default configuration.
2.4.2.1 Create PL Ethernet project from PetaLinux installable BSP
Run petalinux-create command on the command console:petalinux-create -t project -s <path-to-bsp>
bash> cd $PETALINUX
bash> petalinux-create -t project -s $XAPP_HOME/software/petalinux/bsp/xapp1082_pl_eth_cso_sgmii.bsp
2.4.2.2 Configure Petalinux
bash> cd xapp1082_pl_eth_sgmii
bash> petalinux-config
NOTE: Above step may take a longer time depending on the network bandwidth.
2.4.2.3 Configure the kernel
bash> petalinux-config -c kernel
Device Drivers> Network device support > PHY Device support and infrastructure >
<*> Drivers for xilinx PHYs
Device Drivers> DMA Engine Support> Xilinx DMA Engines >
<> Xilinx AXI DMA Engine
Save the changes and exit.
2.4.2.4 Apply FSBL patch
Refer to the AR 66006 for configuring the SFP and SI5324 using I2C in FSBLAlso user can copy the files present in fsbl_patch_files folder to configure the clock and SFP.
bash> cd components/bootloader/zynq_fsbl
bash> cp -f $XAPP_HOME/software/petalinux/fsbl_patch_files/* .
bash> cd -
2.4.2.5 Modifications to system-user.dtsi
For PL ETHERNET SGMII,Modify the system-user.dtsi by navigating to the the file using 'vi project-spec/meta-user/recipes-bsp/device-tree/files/system-user.dtsi',
/include/ "system-conf.dtsi"
/ {
};
&axi_ethernet {
local-mac-address = [00 0a 35 00 1e 52];
};
Save and exit.
2.4.2.6 Build
Build all images using PetaLinuxbash> petalinux-build -v
2.4.2.7 Create Zynq Boot image (BOOT.bin)
bash> cd images/linux
bash> petalinux-package --boot --fsbl zynq_fsbl.elf --fpga pl_eth_sfp.bit (sgmii)
2.4.2.7 SD Images
SD Deployable binaries:-a) BOOT.bin
b) image.ub
Copy BOOT.BIN and image.ub from $PETALINUX/ xapp1082_pl_eth_sgmii/images/linux to SD partition and run the setup.
Note: Instructions on PetaLinux BSP creation (rather PetaLinux flow from scratch) is provided in Appendix1 below.
2.5 Test Instructions
In the version 4.0, kernel builds the required drivers statically.So, drivers are already inserted as part of the kernel booting.Refer the section 3.7 to use the ifconfig utility for configuring the interface eth1 for PS EMIO and PL Ethernet.
3. XAPP1082 v3.0
XAPP1082 v3.0 introduces:-- Supports Vivado 2014.4 (IPI Design)
- PetaLinux 2014.4 SDK
3.1 Prerequisites
- PetaLinux 2014.4 SDK
- A Linux development PC with the distributed version control system Git installed. For more information, refer to Using Git and to UG821: Xilinx Zynq-7000 EPP Software Developers Guide.
- Other system utilities like make (3.82 or higher) and corkscrew if accessing git behind a firewall.
3.2 Directory structure
The XAPP1082 v3.0 is released with the source code, Xilinx Vivado and Petalinux projects and an SD card image that enables the user to run the demonstration.It also includes the binaries necessary to configure and boot the Zynq-7000 SoC board.
This wiki page assumes the user has already downloaded the XAPP package and extracted its contents to the XAPP home
directory referred to as XAPP_HOME in this wiki.
3.3 Vivado
Two designs are described in this application note. The designs support Vivado IP Integrator tool flow.a) PS Ethernet (GEM1) that is connected to a 1000BASE-X physical interface in PL through an EMIO interface.
b) PL Ethernet implemented as soft logic in PL and connected to the 1000BASE-X physical interface in PL.
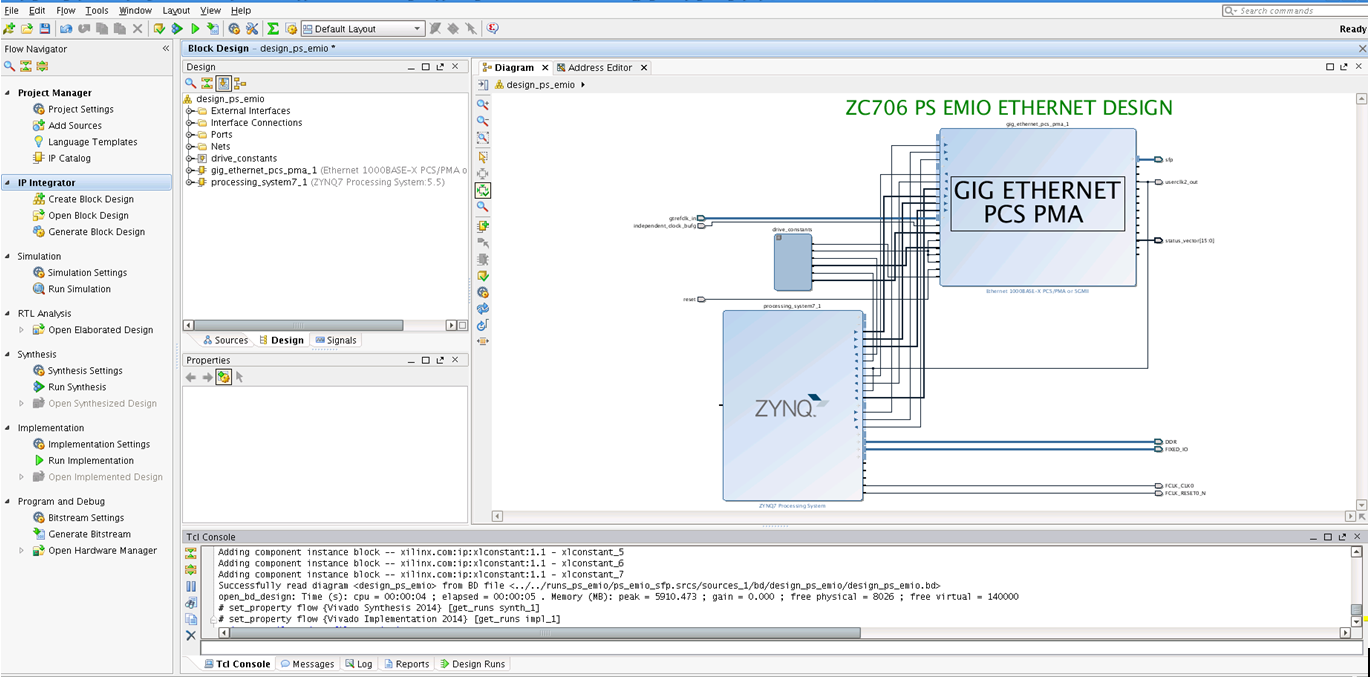
Building PS-EMIO design
To rebuild the hardware design, execute the following (after setting up Vivado environment).1. Open a Linux terminal or Vivado tcl shell in windows
2. Navigate to hardware/vivado/scripts/ps_emio_eth for PS EMIO Ethernet design
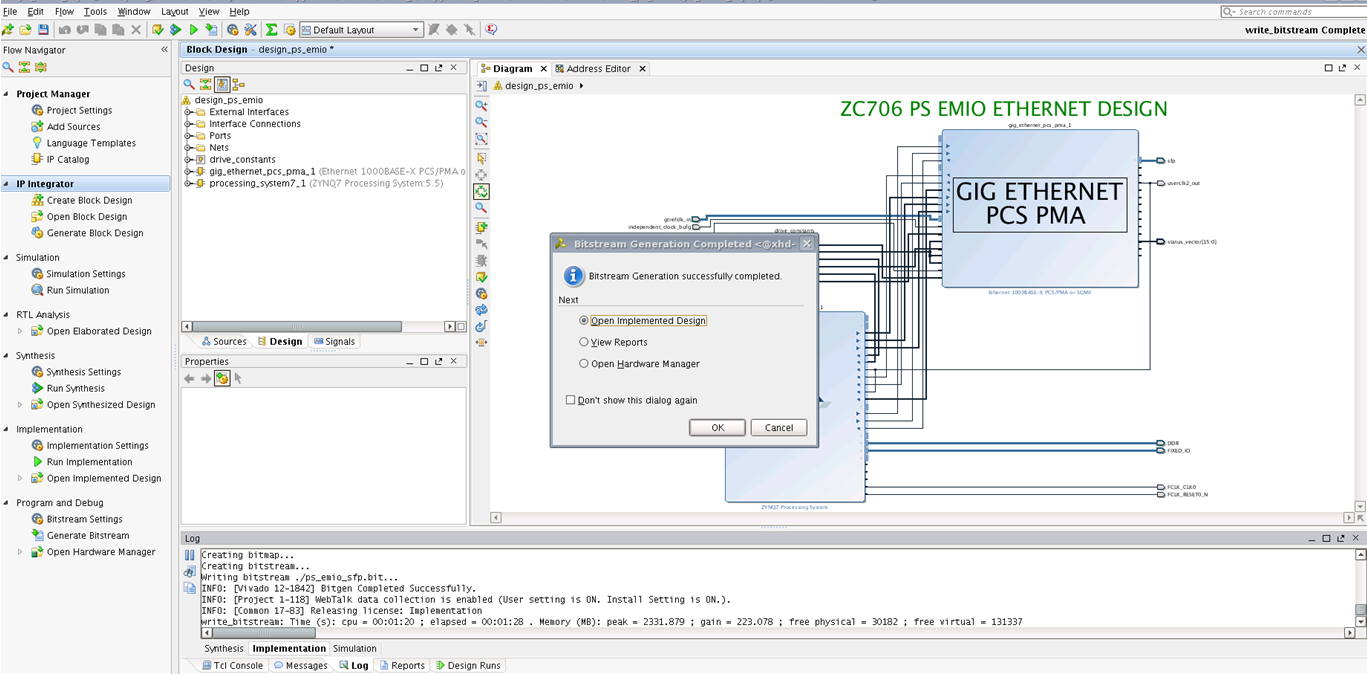
$ vivado -source ps_emio_eth.tcl
This step creates the project and opens the Vivado IDE with the design loaded (See below Figure). Relevant constraints file is also associated with the design.
3. In the Flow Navigator Panel, click on 'Generate Bitstream' to implement the design and get a bitstream (see below Figure).
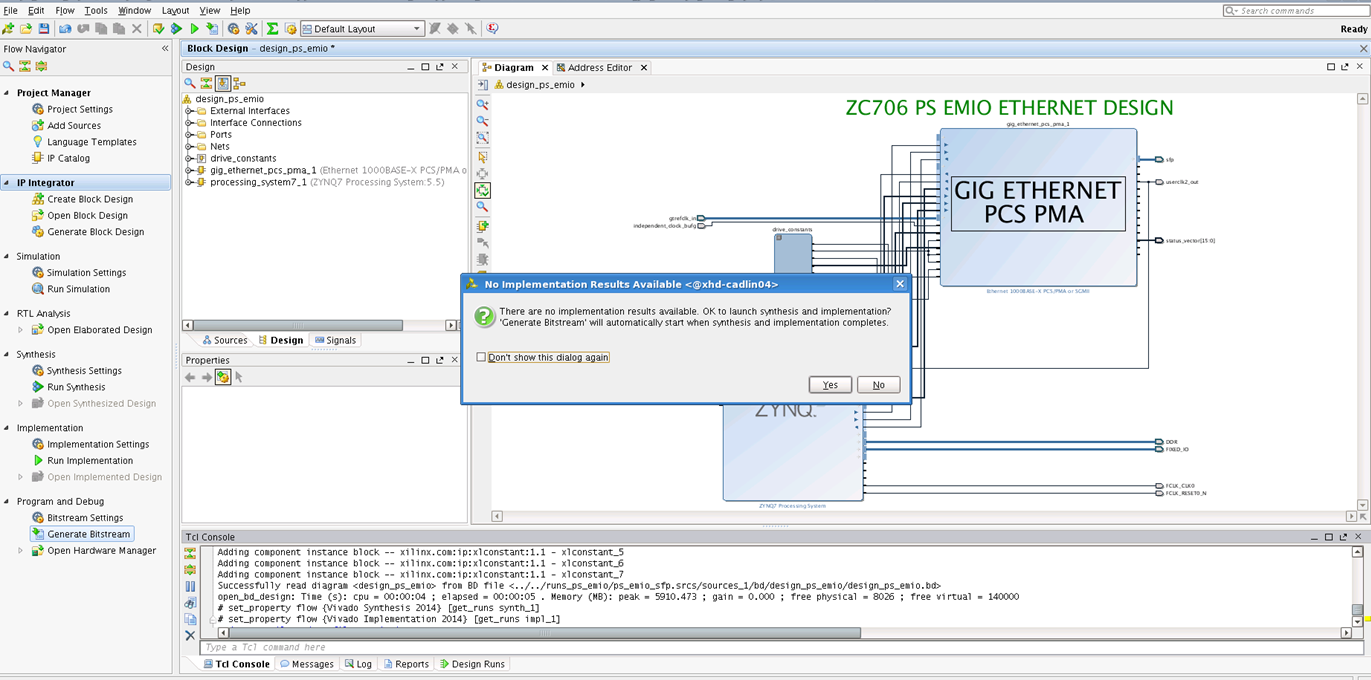
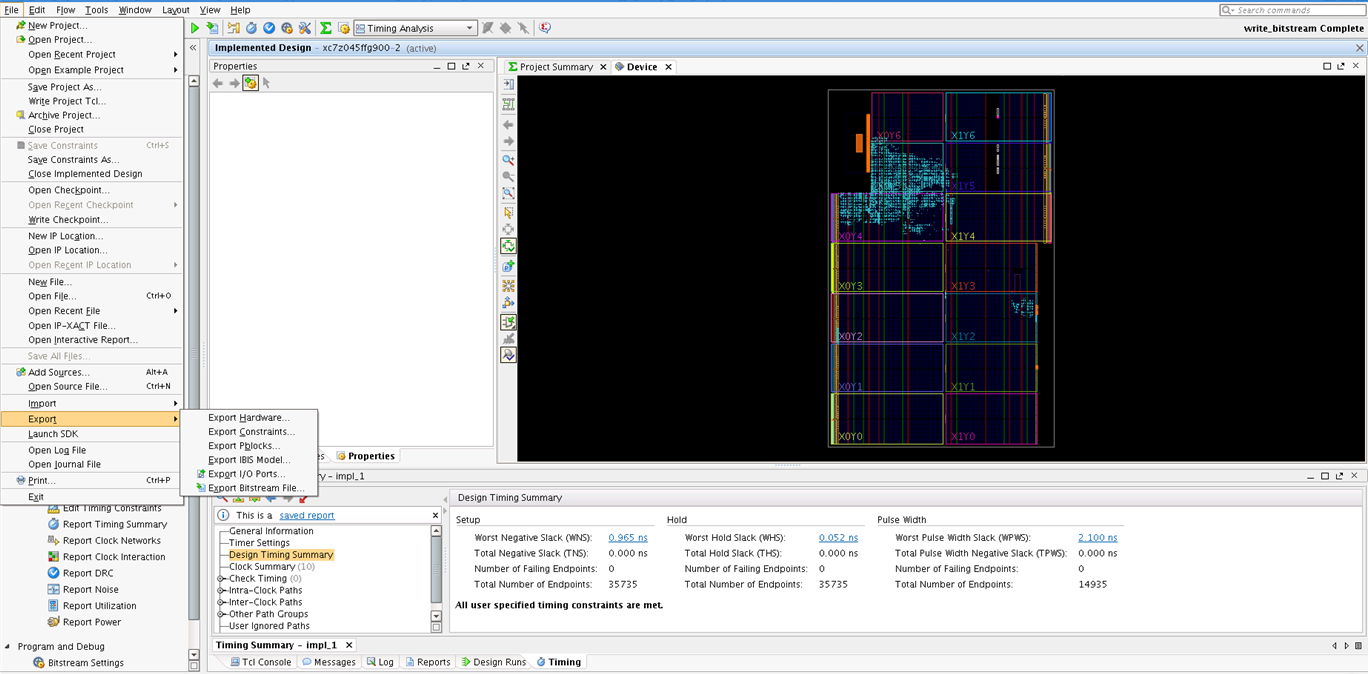
4. On completion of bitstream generation, open the implemented design (see below Figure).
5. Click on File --> Export --> Export Hardware to SDK (see below Figure)

6. Choose "Include bitstream" option, and click OK (see below Figure)
7. You can choose to launch SDK (File --> Launch SDK) so that hardware platform is already loaded into SDK.
Building PL Ethernet design
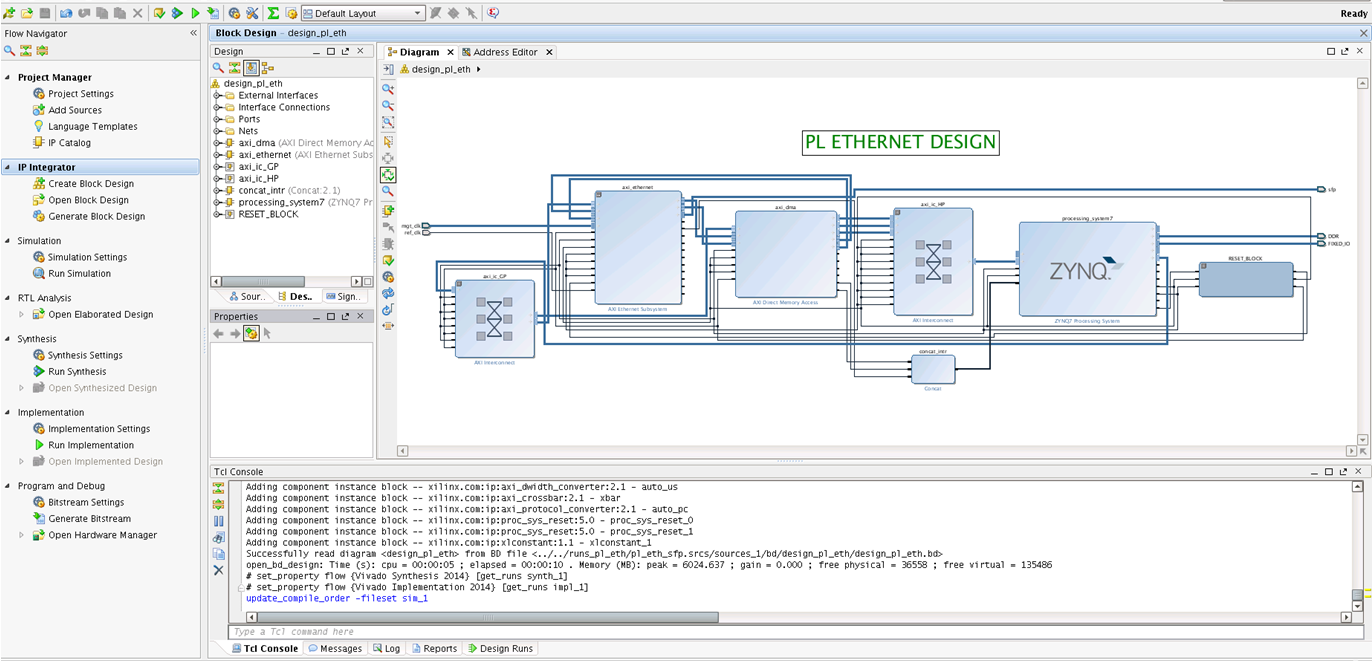
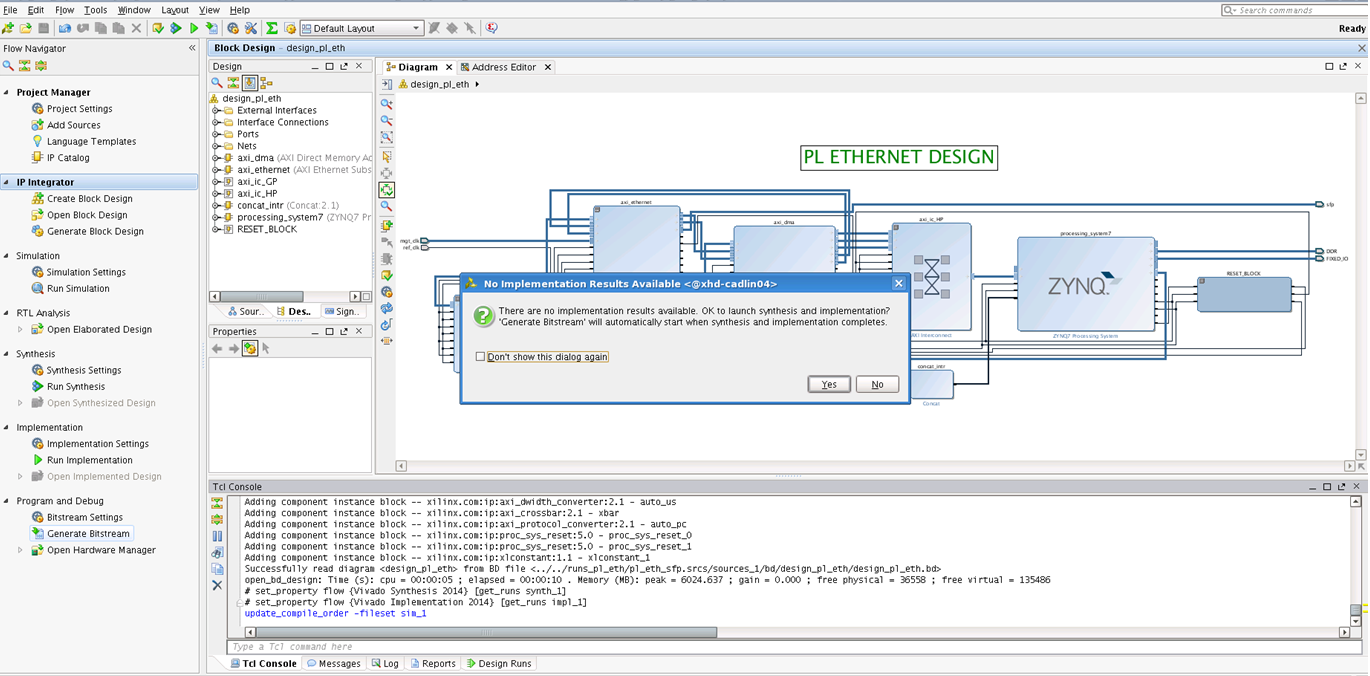
To rebuild the hardware design, execute the following (after setting up Vivado environment).- Open a Linux terminal or Vivado tcl shell in windows
- Navigate to hardware/vivado/scripts/pl_eth for PL Ethernet design
This step creates the project and opens the Vivado IDE with the design loaded (see below Figure). Relevant constraints file is also associated with the design.
3. In the Flow Navigator Panel, click on 'Generate Bitstream' to implement the design and get a bitstream.
4. On completion of bitstream generation, open the implemented design (see below Figure).

5. Click on File --> Export --> Export Hardware to SDK (see below Figure)
6. Choose "Include bitstream" option, and click OK.
7. You can choose to launch SDK (File --> Launch SDK) so that hardware platform is already loaded into SDK.
, multiple selections available,
Related content
Zynq Ethernet Performance 2015.4
Zynq Ethernet Performance 2015.4
More like this
Zynq Ethernet Performance 2016.2
Zynq Ethernet Performance 2016.2
More like this
Zynq Ethernet Performance 2016.1
Zynq Ethernet Performance 2016.1
More like this
Zynq-7000 AP SoC Performance – Gigabit Ethernet achieving the best performance
Zynq-7000 AP SoC Performance – Gigabit Ethernet achieving the best performance
More like this
Zynq-7000 AP SoC Benchmarking & debugging - Ethernet Tech Tip
Zynq-7000 AP SoC Benchmarking & debugging - Ethernet Tech Tip
More like this
Zynq Ultrascale Fixed Link PS Ethernet Demo
Zynq Ultrascale Fixed Link PS Ethernet Demo
Read with this
© Copyright 2019 - 2022 Xilinx Inc. Privacy Policy