Zynq-7000 AP SoC SATA part 4 – Ready to Run NAS Design Example Benchmarking
Zynq-7000 AP SoC SATA part 4 – Ready to Run NAS Design Example Benchmarking
- Ben Levinsky (Unlicensed)
Owned by Ben Levinsky (Unlicensed)
Sept 26, 2018
Zynq-7000 AP SoC SATA part 4 – Ready to Run NAS Design Example Benchmarking
Zynq SSE - NAS Benchmarks for the Avnet Mini-ITX
Table of Contents
Network-Attached Storage (NAS) is a file-level data storage connected to a computer net- work, typically via Eth
ernet transporting TCP/IP and/or UDP communication.
MLE’s Zynq SATA Storage Extension (Zynq SSE) is a fully integrated and pre-validated system stack comprising 3rd-party SATA Host Controller and DMA IP cores from ASICS World Services, a storage micro-architecture from MLE, Xilinx PetaLinux, and an Open Source SATA Host Controller Linux kernel driver, also from MLE. Zynq SSE utilizes the Xilinx GTX Multi Gigabit Transceivers to deliver SATA I (1.5 Gbps), SATA II (3.0 Gbps), or SATA III (6 Gbps) connectivity. When combined with Zynq’s networking capabilities this effectively leads to a demonstration of Networked Storage, or NAS. This Technical Tip shows how to setup the Zynq SSE to demonstrate NAS functionality. After going through the steps described herein, you will have a working Linux System run- ning on the Zynq with an attached SATA HDD or SSD, making files stored on the attached disk available to other networked clients.
Team MLE has spent significant efforts to try and test all aspects of Zynq SSE. However, if you feel that you encounter something not right, or if you do have any questions, please do not hesitate to contact us. The best way to contact MLE is to fill out the Contact Request Form at
http://MLEcorp.com/ZynqSSE
Implementation
| Implementation Details | |
| Design Type | PS + PL |
| SW Type | Linux (Petalinux) |
| CPUs | 2 CPUs 700 MHz |
| PS Features | DDR, USB, UART, ETHERNET |
| PL Cores | ASICS.WS SATA IP |
| Boards/Tools | Avnet Mini ITX Z045 |
| Xilinx Tools Version | Vivado 2014.1, PETALINUX 2013-2 |
| Other Details | SATA SSD(including Cable and Power Supply), SD-Card |
| Address Map | |||
| Base Address | Size | Interface | |
| SATA IP | 0x41000000 | 4K | S AXI |
| DMA IP | 0x41010000 | 4K | S AXI, M AXI |
| Files Provided | |
| BOOT.bin | Compilation of Bitstream, FSBL and U-Boot |
| Image.ub | Linux Ramdisk Image |
Step by Step Instructions
Hardware needed:
- Avnet Mini ITX Z045 Board (including Power supply) Link
- Micro USB Cable for USB Console
- Supported SSD (for Example Samsung 840)
- Power Supply for SSD
- Micro SD Card (2 GB or bigger)
- Ethernet Cable to connect Host PC and Avnet ITX board
- PC for UART console
Software Assembly:
1. Format the SD Card using FAT32 File system
2. Put image.ub and BOOT.bin into the root directory of the SD Card
Hardware Assembly:
- Insert the SD Card into the Avnet Mini ITX board’s SD Slot
- Connect the micro USB cable to the UART port of the Avnet Mini ITX board and the USB Port of your PC
- Connect the Ethernet port of the host pc to the ethernet port of the Avnet MINI ITX
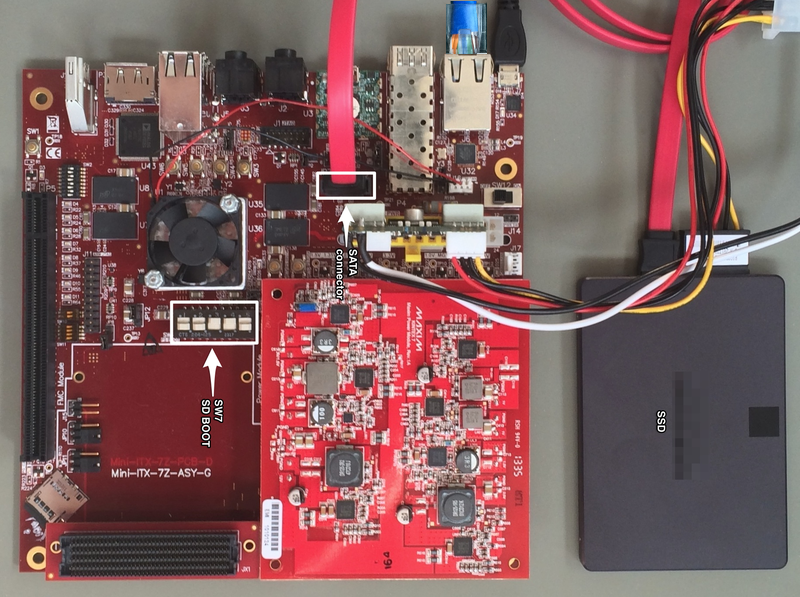
- Connect the SSD to the SATA connector on the Avnet Mini ITX board using the SATA Cable.
- Connect the SSD to power
- Switch the Avnet Mini ITX board’s SW7 to SD Boot mode (as shown in picture)
- Connect the Avnet Mini ITX board to the Power Supply
Startup:
- Switch on the Avnet Mini ITX board
- On the PC open a Serial Terminal on the new serial port using the settings 115200 Baud 8N1
- After some time you should see a screen similar to the screenshot in the Expected Results.
- Login using
• Login:root
• Password: root - configure the ethernet port on the host PC to have an IP address of 10.89.231.1 and a subnet mask of 255.255.255.0
- The ZYNQ-board has an pre-supplied IP of 10.89.231.200
- now connect to the ZYNQ-board using an FTP program and start transferring data to it
LED Description
Status LEDs can be found next to the PCIe connector. The associated meanings can be seen in the following table and in the Image below.

Figure 1: Location of the User LEDs on the Avnet Mini ITXBoard
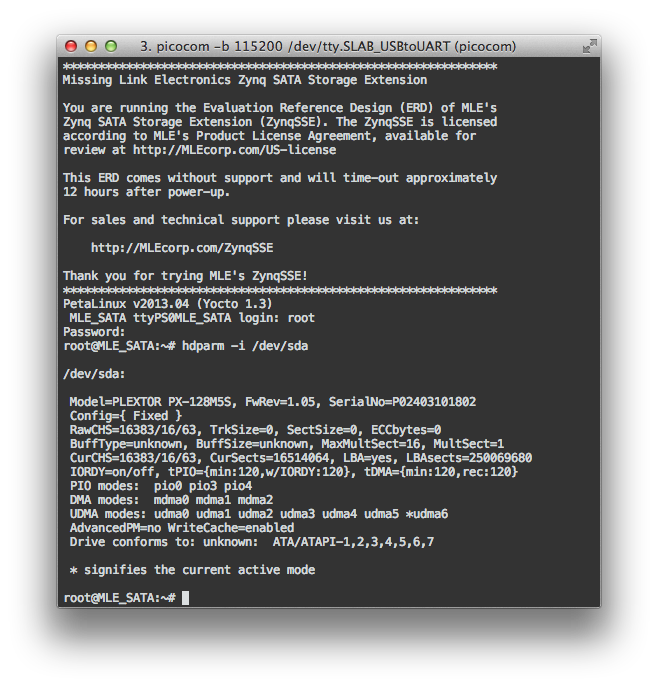
Expected Results
As a result you should be having a running Linux system on the Zynq board. The UART Console output should be similar to the screenshot below.Also you will have file-system access to the attached SSD using FTP, and by this evaluate and test the Zynq Sata Storage extension.
The Evaluation Reference Design (ERD) of the Zynq SSE comprises a hardware license management which allows to run full SATA functionality for up to 12 hours after power-up. After approximately 12 hours the evaluation expires, which is indicated by illuminating the LED ’timeout’. You will also notice that the Linux kernel driver informs you of having lost the SATA link to the SSD/HDD.
| D7 | Timeout LED, indicates the Timeout of the IP core. |
| D6 | Gen3 Link, indicates 6 GBit/s connection |
| D5 | Gen2 Link, indicates 3 GBit/s connection |
| D4 | Linkup and Activity, Led will light up on Linkup and will go dark during data transfers |
Performance
The Performance has been measured with the standard FTP program which is coming with every linux distribution and is in the region of 30-40 MB/s in both directions.To measure it, create a 1GB test file using:
dd if=/dev/zero of=./testfile.dd count=1024 bs=1024k
ftp 10.89.231.200
put testfile.dd
get testfile.dd
Example
This is an Example of the above.$ ftp 10.89.231.200 [17:57:43] Connected to 10.89.231.200. 220 Operation successful Name (10.89.231.200:christian): root 230 Operation successful Remote system type is UNIX. Using binary mode to transfer files. ftp> put ./testfile.dd local: ./testfile.dd remote: ./testfile.dd 229 EPSV ok (|||50663|) 150 Ok to send data 100% |*******************************************| 1024 MiB 36.42 MiB/s 00:00 ETA 226 Operation successful 1073741824 bytes sent in 00:28 (36.37 MiB/s) ftp> get testfile.dd local: testfile.dd remote: testfile.dd 229 EPSV ok (|||40913|) 150 Opening BINARY connection for testfile.dd (1073741824 bytes) 100% |*******************************************| 1024 MiB 30.35 MiB/s 00:00 ETA 226 Operation successful 1073741824 bytes received in 00:33 (30.35 MiB/s) Can't parse time `19700001000244'. ftp>
, multiple selections available,
Related content
Zynq-7000 AP SoC SATA part 2 – Ready to Run Design Example Benchmarking
Zynq-7000 AP SoC SATA part 2 – Ready to Run Design Example Benchmarking
More like this
Zynq-7000 AP SoC SATA part 3 – Ready to Run NAS Design Example Setup
Zynq-7000 AP SoC SATA part 3 – Ready to Run NAS Design Example Setup
More like this
Zynq-7000 AP SoC SATA part 1 – Ready to Run Design Example Setup
Zynq-7000 AP SoC SATA part 1 – Ready to Run Design Example Setup
More like this
Zynq-7000 AP SoC SATA part 5 – Building the Design Example
Zynq-7000 AP SoC SATA part 5 – Building the Design Example
More like this
Zynq-7000 AP SoC SATA part 1 - Ready to Run Design Example Setup
Zynq-7000 AP SoC SATA part 1 - Ready to Run Design Example Setup
More like this
Zynq-7000 AP SoC Peripherals, IP & Drivers
Zynq-7000 AP SoC Peripherals, IP & Drivers
More like this
© Copyright 2019 - 2022 Xilinx Inc. Privacy Policy