Zynq Ultrascale+ MPSoC Security Features
- Confluence Wiki Admin (Unlicensed)
- Mohan Marutirao Dhanawade (Unlicensed)
- vnsldurg (Unlicensed)
Table of Contents
Introduction
ZynqMP SoC provides hardware accelerators to implement integrity, confidentiality, and authentication in system. The Configuration Security Unit (CSU) is ZynqMP’s functional block that provides interfaces required to implement the secure system. Figure 1 shows block diagram of CSU. CSU contains two main blocks - Security Processor Block (SPB) and Crypto Interface Block (CIB).
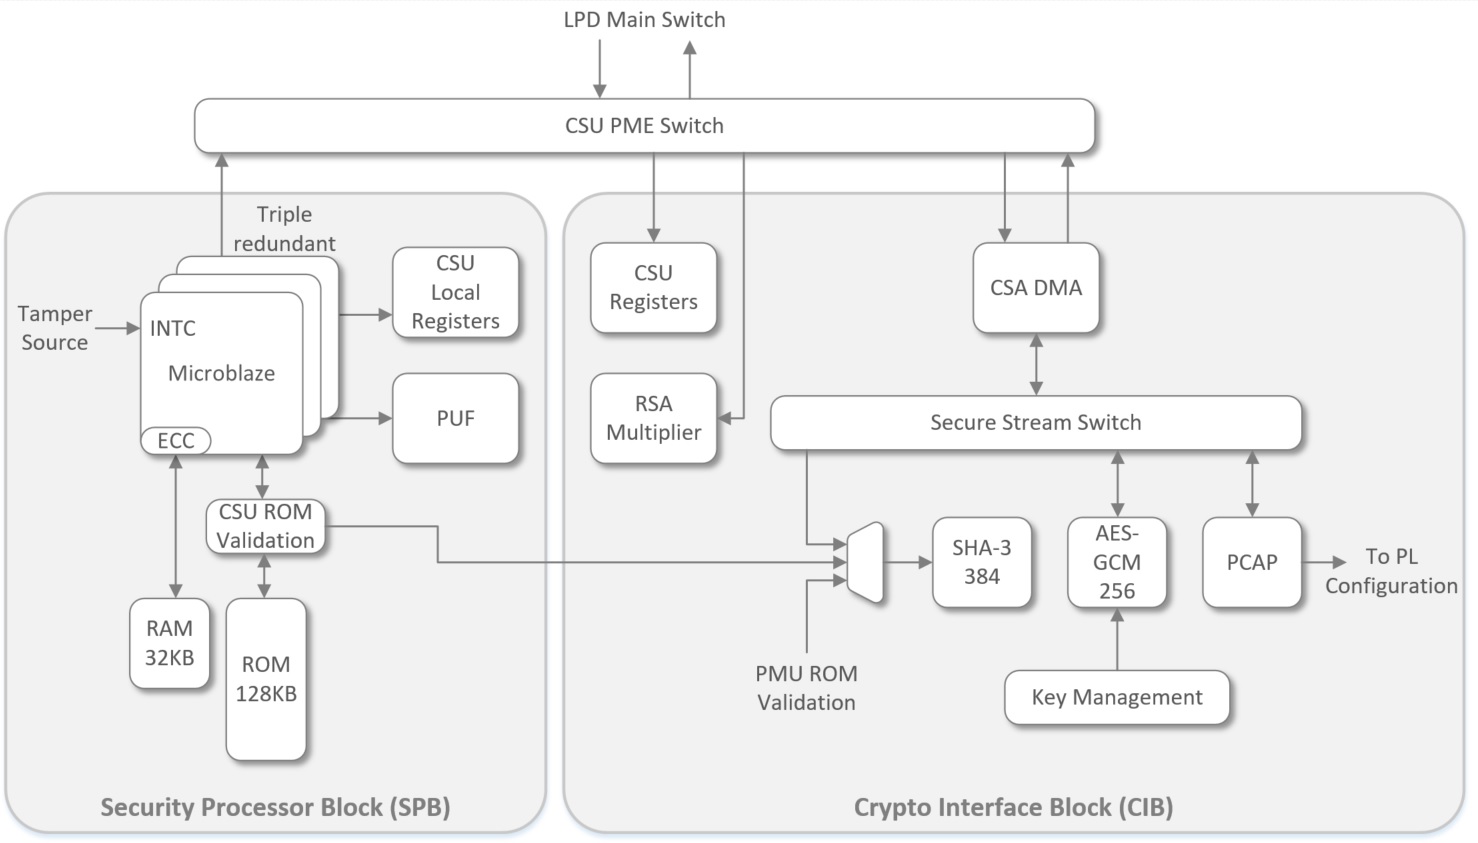
Figure 1: Configuration Security Unit Architecture
SPB contains triple redundant Microblaze controller for performing boot operation. It also contains 128-KB associated ROM for storing CSU firmware and protected by SHA-3 integrity check, 32-KB private RAM for storing secure data of CSU firmware, Physically Unclonable Functional (PUF) block to generate unique Key Encryption Key (KEK) and necessary control and status registers required to support secure operation.
CIB contains cryptography engines for AES-GCM, SHA-3, RSA along with DMA and Processor Configuration Access Port (PCAP interfaces).
Bootgen
Bootgen is a tool provided by Xilinx to create loadable images and also artifacts required to generate it. This tool comes in two forms: GUI based and command line. Refer Bootgen User Guide (UG1283) for detailed description of the tool. Following sections gives information on how to create different type of images using command line bootgen tool.
Generating RSA Key pair
bootgen -generate_keys pem -arch zynqmp -image <path_to_bif_file>
The above command generates the authentication keys - RSA key pair in “.pem” format. User should provide path to the output key files in .bif file provided as input to bootgen command. Following is the bif file template for creating RSA keys.
generate_pem:
{
   [pskfile] <path_to_primary_secret_key_file>
   [sskfile] <path_to_secondary_secret_key_file>
}
In case only PSK/SSK is required, user can drop the line of non required key from .bif file. For example if only PSK is required, user can remove 4th line of [sskfile] from above .bif file and bootgen generates only PSK on execution.
Generating SHA-3 hash of Primary Public Key (PPK)
bootgen –image <path_to_bif_file> –arch zynqmp –w –o <output_img_file> –efuseppkbits <path_to_sha_txt_file>
The above command generates 384-bits of SHA-3 hash of the PPK in file specified by efuseppkbits parameter. Bootgen tool use PSK file to generate associated PPK and calculate SHA-3 hash of it. Following is the bif file template for generating the SHA-3 hash of PPK.
generate_hash_ppk:
{
   [pskfile] <path_to_primary_secrete_key_file>
   [sskfile] <path_to_secondary_secrete_key_file>
   [ bootloader,
     destination_cpu = <destination_cpu>,
     authentication = rsa
   ] <path_to_fsbl_binary_file>
}
Generating image
bootgen –image <path_to_bif_file> –arch zynqmp –o <path_to_image_file> –p <part_#>
The above command generates the output image using output image parameters and input image files specified in bif file. Following sections provide few bif templates for creating different type of images. -p option should be only used when user want bootgen to create keys for encryption of images.
Secure Boot
Secure boot is ensuring the system only runs the boot firmware downloaded by end user and ensuring also the modified/maliciously downloaded boot firmware won’t execute on system startup.
The secure boot is accomplished by using the hardware root of trust boot mechanism, which also provides a way to encrypt all of the boot or configuration files. This architecture provides the required confidentiality, integrity, and authentication to host the most secure of applications. An alternative to the hardware root of trust is the encrypt only secure boot, which is a boot mechanism that does not utilize asymmetric authentication but requires that all configuration loaded must be encrypted and authenticated using AES-GCM.
The Zynq UltraScale+ MPSoC hardware root of trust is based on the RSA-4096 asymmetric authentication algorithm in conjunction with SHA-3/384. There are two key pairs used in the Zynq UltraScale+ MPSoC, and consequently two public key types: the primary public key (PPK) and the secondary public key (SPK).
As shown in Figure 2, the secure boot process starts by determining which PPK to use and then validating the PPK integrity. Since the public key is stored in the boot image in external memory, it be must assumed that an adversary could tamper with it. Consequently, the CSU reads the public key from external memory, calculates its cryptographic checksum using the SHA-3/384 engine, and then compares it to the value stored in eFUSEs. If they match, the integrity of the public key has been validated and the boot can continue.
The secondary public key, and its associated ID, are then read, stored in on-chip memory (OCM), and authenticated using the PPK. Once the SPK and SPK ID have been authenticated, the CSU checks the ID that was bound to the SPK in the boot image to the ID that is stored in eFUSEs. If the IDs match, the SPK is valid and the boot continues.
The SPK is then used to verify the authenticity of the entirety of the boot image. The CSU authenticates the FSBL, and optionally the PMUFW, while in internal memory. If encrypted, the CSU also performs the decryption.
Refer chapter 11 and 12 of Zynq UltraScale+ Device Technical Reference Manual (UG1085) to understand different boot modes and features available for secure, encrypted and normal boot.
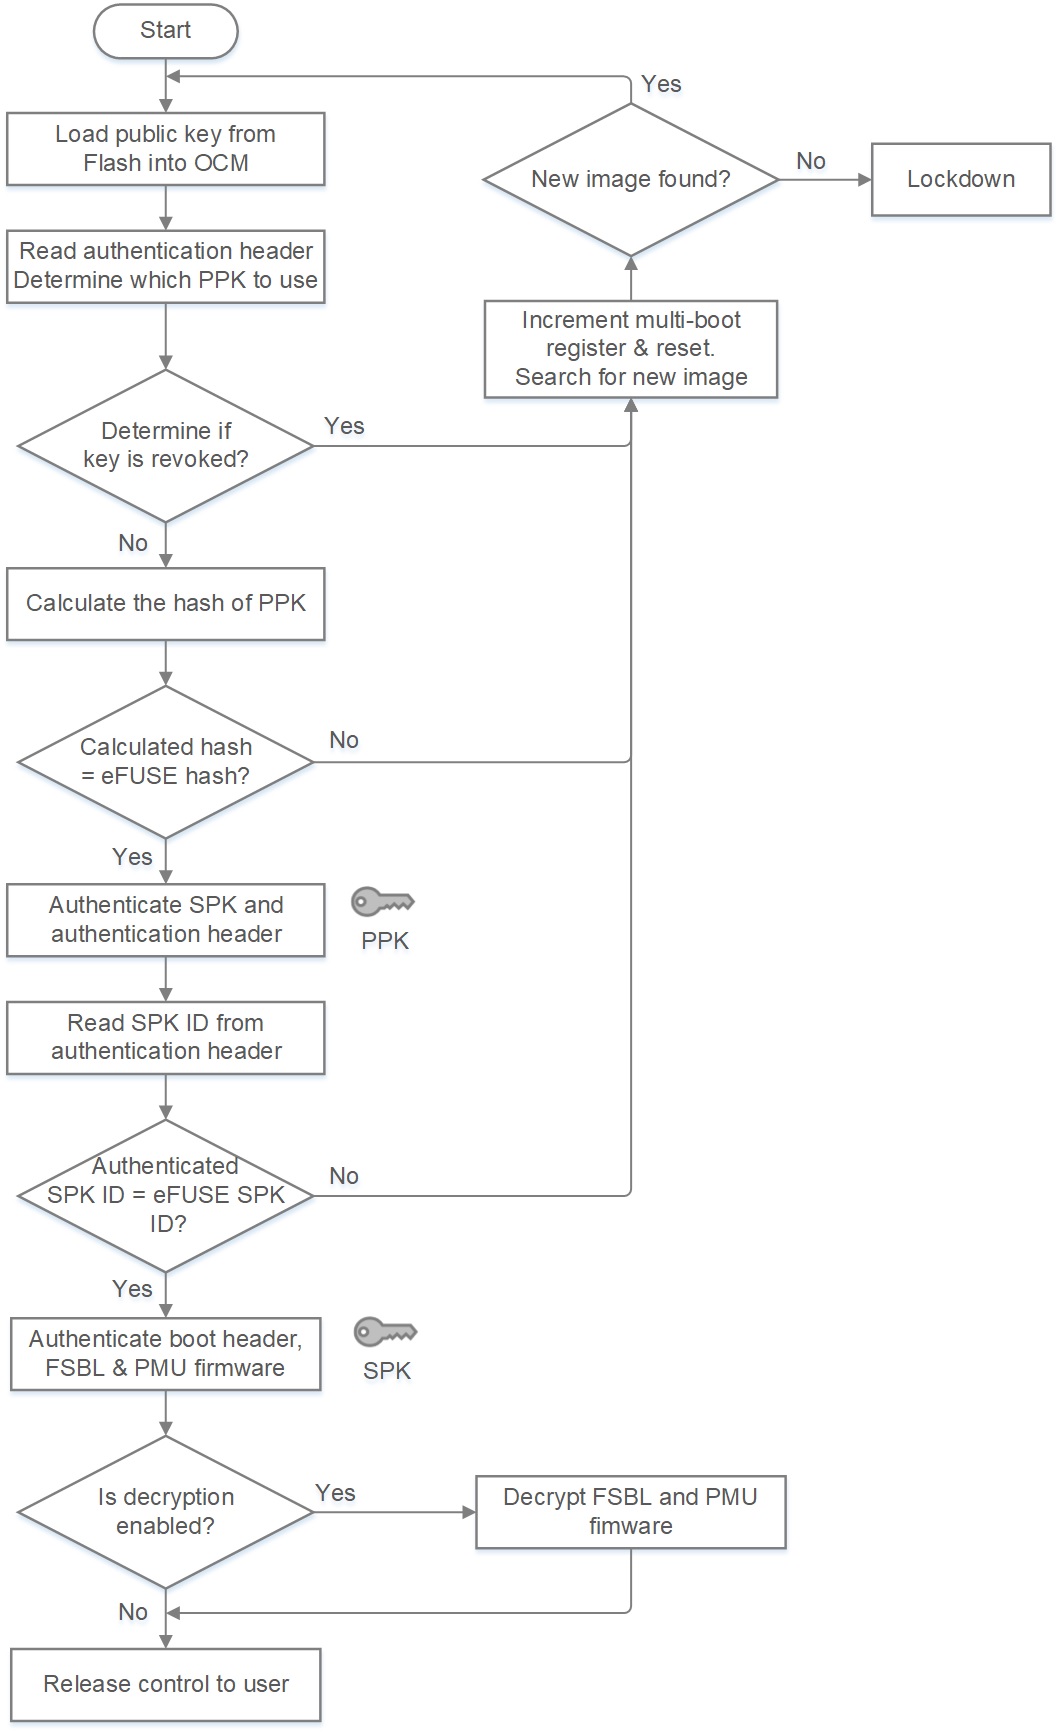
Figure 2: Secure boot process using PPK and SPK
Creating Authenticated Secure Boot Image with primary RSA keys
ZynqMP SoC uses 4096-bit RSA to authenticate the boot image. Following are the steps to create authenticated image.
- Generate RSA key pair using bootgen - Refer bootgen section above.
- Generate SHA-3 hash of Primary Public Key (PPK) created in step 1 using bootgen - Refer bootgen section above.
Generate the authenticated boot image using bootgen and the below bif file template.
boot_img: { [auth_params] ppk_select = <0/1> [pskfile]<path_to_primary_secret_key_file> [sskfile]<path_to_secondary_secret_key_file> // Bootloader [ bootloader, destination_cpu = a53-0, authentication = rsa ] <path_to_fsbl_elf_file> // PMU FW - Loaded by FSBL [ destination_cpu = pmu, authentication = rsa ] <path_to_pmufw_elf_file> // ATF [ destination_cpu = a53-0, exception_level = el-3, trustzone = secure, authentication = rsa ] <path_to_atf_elf_file> //U-boot [ destination_cpu = a53-0, exception_level = el-2, authentication = rsa ] <path_to_uboot_elf_file> }- Enable RSA authentication by setting “RSA_EN” eFUSEs. Refer Programming BBRAM and eFUSEs Application Note (XAPP1319) for eFUSE programming.
Write SHA-3 hash of PPK created in step 2 to PPK0 hash eFUSEs.
Caution:
Once RSA authentication is enabled, ZynqMP SoC only allows RSA authenticated image (created using secret key of the key pair whose public key hash is stored in eFUSE) to boot.
- Load the boot image to any of the configured/selected boot device(SD/QSPI/NAND) and boot.
Info:
There is option for user to revoke PPK once by writing to PPK0_INVLD / PPK1_INVLD eFUSEs. eFUSE has provision of storing the hash of two PPKs. Refer Zynq UltraScale+ Device Technical Reference Manual (UG1085) & Programming BBRAM and eFUSEs Application Note (XAPP1319) for further details.
Note:
Xilinx recommends programming valid digests into both PPK digest eFUSEs.
Creating Authenticated Secure Boot Image with secondary RSA keys
We have only 2 registers in eFUSE to store the hash value of primary public key, so effectively we can revoke primary public key only once i.e. we can revoke first primary public key and use second primary public key. To overcome this ZynqMP provides secondary key mechanism. It helps as follow:
- Provides second level of defense if first authentication mechanism gets compromised
- User can revoke secondary public key more than 2 times
- User can use different keys for authenticate each or group of partitions, enhancing security posture of the end system.
Standard secondary RSA key revocation:
Each secondary public key (SPK) is associated with ID called as SPK_ID. ZynqMP provides 32-bit eFUSE register called SPK_ID to hold the SPK_ID associated with SPK. When the user changes this SPK_ID, SPK associated with that SPK_ID gets revoked. If the user manages SPK_IDs properly, the user can revoke maximum 32 SPKs. The FSBL must use Standard SPK revocation, all other partitions can either use the Standard or Enhanced revocation method.
While building image, use spk-select = spk-efuse in bif file for partition that plan to use standard secondary RSA key revocation method.
Enhanced secondary RSA key revocation:
ZynqMP provides enhanced secondary RSA key revocation mechanism which allows the user to revoke up to 256 SPKs. ZynqMP provides 256 User eFUSEs that the user can allocate for this purpose., and Each eFUSE bit is associated with one SPK. If any User eFUSE is set to 1 by the user, its corresponding SPK is considered as revoked.
While building image, use spk-select = user-efuse in bif file for partition that plan to use enhanced secondary RSA key revocation method.
Refer section RSA Secondary Public Key(SPK) Revocation and the Technical Reference Manual for more information.
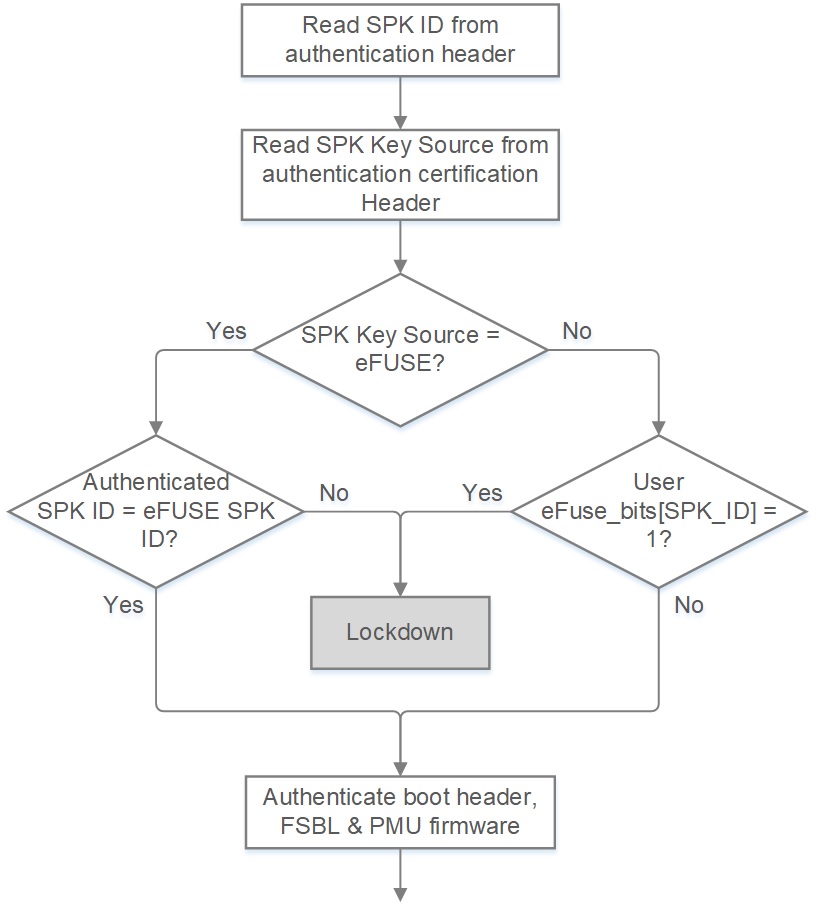
Figure 3: Use of SPK_ID for SPK Revocation
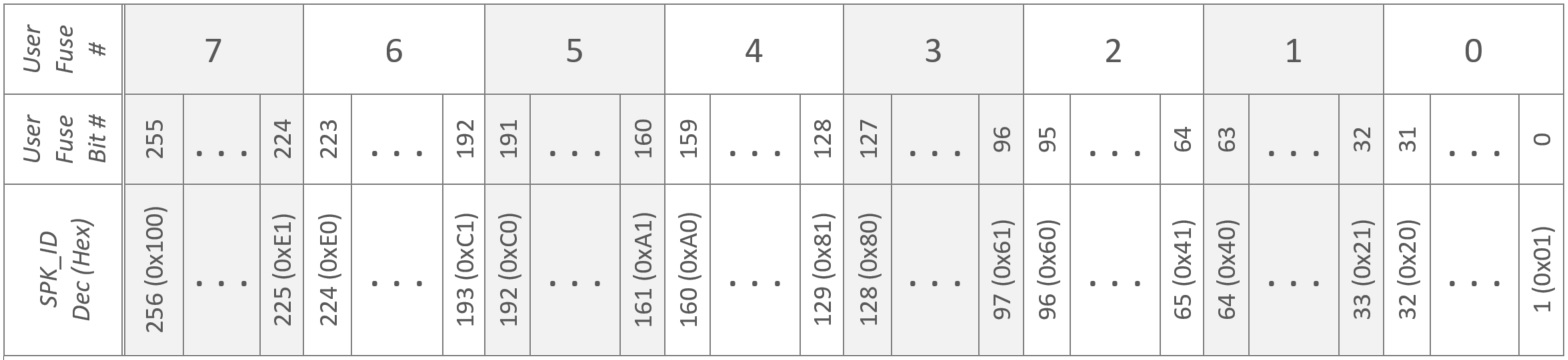
Figure 4: Mapping of SPK_ID in BIF configuration to user fuse bits in eFUSE
Info:
This revocation feature is supported for all the software components which are not loaded by BootROM.
Following are the steps to create authenticated image using secondary keys.
- Generate RSA key pair using bootgen.
- We generated one secondary key (SSK) in step 1. If more SSK’s are required, repeat step 1 to create SSK keys.
Generate the authenticated boot image using bootgen and the below bif file template. Below template assumes bootloader and u-boot is authenticated using key provided by [sskfile] tag and this key is validated against SPK_ID stored in eFUSE; PMU FW and ATF images are authenticated using key provided by sskfile and this key is validated against SPK_ID bitmap stored in USER_eFUSE.
Make sure to command bootgen to generate hash of PPK using command line parameter –efuseppkbits <path_to_sha_txt_file> while generating the image.
boot_img: { [auth_params] ppk_select = <0/1> [pskfile] <path_to_primary_secret_key_file> [sskfile] <path_to_secondary_secret_key_file> // FSBL – Loaded by BootROM signed by SSK provided by global [sskfile] tag // Default spk_select = spk-efuse [ bootloader, destination_cpu = a53-0, authentication = rsa, ] <path_to_fsbl_elf_file> // PMU FW - Loaded by FSBL, signed by SSK provided by below local sskfile tag [ destination_cpu = pmu, authentication = rsa, spk_select = user-efuse, spk_id = <spk_id_of_second_secondary_secret_key>, sskfile = <path_to_second_secondary_secret_key_file> ] <path_to_pmufw_elf_file> // ATF - Loaded by FSBL, signed by SSK provided by below local sskfile tag [ destination_cpu = a53-0, exception_level = el-3, trustzone = secure, authentication = rsa, spk_select = user-efuse, spk_id = <spk_id_of_third_secondary_secret_key>, sskfile = <path_to_third_secondary_secret_key_file> ] <path_to_atf_elf_file> // U-boot - Loaded by FSBL, signed by SSK provided by global [sskfile] tag // Default spk_select = spk-efuse [ destination_cpu = a53-0, exception_level = el-2, authentication = rsa ] <path_to_uboot_elf_file> }- Enable RSA authentication by setting “RSA_EN” eFUSEs. Refer Programming BBRAM and eFUSEs Application Note (XAPP1319) for eFUSE programming.
Write SHA-3 hash of PPK created in step 3 to PPK0 hash eFUSEs.
Caution:
Once RSA authentication is enabled, ZynqMP SoC only allows RSA authenticated image (created using secret key of the key pair whose public key hash is stored in eFUSE) to boot.
Load the boot image to any of the configured/selected boot device(SD/QSPI/NAND) and boot.
Info:
- when spk_select is selected as user-efuse, valid range of SPK ID is 1 to 256
- when spk_select is selected as spk-efuse, SPK ID can be any 32-bit value including 0 (which should match with programmed eFUSE SPK_ID)
Refer Zynq UltraScale+ Device Technical Reference Manual (UG1085) – Chapter 12 and Tamper resist designs (XAPP1098) for more information.
Bootheader Authentication
It is possible to validate the authentication process without programming key hash to eFUSE. In this mode RSA authentication of the boot image is done excluding the verification of PPK hash and SPK ID. Once authentication process is validated, user can program the eFUSE keys and use appropriate BIF files to generate the image.
- Generate RSA key pair using bootgen - Refer bootgen section above.
- Generate SHA-3 hash of Primary Public Key (PPK) created in step 1 using bootgen - Refer bootgen section above.
Generate the authenticated boot image using bootgen and the below bif file template.
boot_img: { [fsbl_config] bh_auth_enable [auth_params] ppk_select = <0/1> [pskfile]<path_to_primary_secret_key_file> [sskfile]<path_to_secondary_secret_key_file> // Bootloader [ bootloader, destination_cpu = a53-0, authentication = rsa ] <path_to_fsbl_elf_file> // PMU FW - Loaded by FSBL [ destination_cpu = pmu, authentication = rsa ] <path_to_pmufw_elf_file> // ATF [ destination_cpu = a53-0, exception_level = el-3, trustzone = secure, authentication = rsa ] <path_to_atf_elf_file> //U-boot [ destination_cpu = a53-0, exception_level = el-2, authentication = rsa ] <path_to_uboot_elf_file> }- Load the boot image to any of the configured/selected boot device(SD/QSPI/NAND) and boot.
RSA Secondary Public Key(SPK) Revocation
Legacy Mode
The Legacy mode uses SPK_ID stored in eFUSE to check if key is revoked. The SPK_ID in eFUSE is compared bit-by-bit with the SPK ID provided in image. It ID matches, the eFUSE key is considered to be valid. BootROM uses only legacy mode to validate the SPK, so only way to revoke the RSA Key used for FSBL authentication is using legacy mode. Following is the procedure to revoke the SPK in legacy mode
Assume that following bif file is used to generate authenticated image and SPK_ID = 0x0000000F.
boot_img:
{
   [auth_params] ppk_select = <0/1>
   [pskfile] <path_to_primary_secret_key_file>
   [sskfile] <path_to_secondary_secret_key_file>

   // FSBL – Loaded by BootROM signed by SSK provided by global [sskfile] tag
   // Default spk_select = spk-efuse
   [ bootloader,
     destination_cpu = a53-0,
     spk_select = spk-efuse,
     spk_id = 0x000000F,
     authentication = rsa,
   ] <path_to_fsbl_elf_file>

   // PMU FW - Loaded by FSBL, signed by SSK provided by below local sskfile tag
   [ destination_cpu = pmu,
     authentication = rsa,
     spk_select = user-efuse,
     spk_id = <spk_id_of_second_secondary_secret_key>,
     sskfile = <path_to_second_secondary_secret_key_file>
   ] <path_to_pmufw_elf_file>

   // ATF - Loaded by FSBL, signed by SSK provided by below local sskfile tag
   [ destination_cpu = a53-0,
     exception_level = el-3,
     trustzone = secure,
     authentication = rsa,
     spk_select = user-efuse,
     spk_id = <spk_id_of_third_secondary_secret_key>,
     sskfile = <path_to_third_secondary_secret_key_file>
   ] <path_to_atf_elf_file>

   // U-boot - Loaded by FSBL, signed by SSK provided by global [sskfile] tag
   // Default spk_select = spk-efuse
   [ destination_cpu = a53-0,
     exception_level = el-2,
     authentication = rsa
   ] <path_to_uboot_elf_file>
}
Program eFUSE SPK_ID register with new SPK ID. Refer Zynq UltraScale+ Device Technical Reference Manual (UG1085) & Programming BBRAM and eFUSEs Application Note (XAPP1319) for further details.
Note
Note that eFUSE bits can be programmed to change it from 0 to 1, but not vice-versa.
Use new SPK ID for generating image using bootgen. Update the above bif file with new SPK ID (assume new SPK_ID = 0x0000001F) to generate image.
boot_img:
{
   [auth_params] ppk_select = <0/1>
   [pskfile] <path_to_primary_secret_key_file>
   [sskfile] <path_to_new_secondary_secret_key_file>

   // FSBL – Loaded by BootROM signed by SSK provided by global [sskfile] tag
   // Default spk_select = spk-efuse
   [ bootloader,
     destination_cpu = a53-0,
     spk_select = spk-efuse,
     spk_id = 0x0000001F,
     authentication = rsa,
   ] <path_to_fsbl_elf_file>

   // PMU FW - Loaded by FSBL, signed by SSK provided by below local sskfile tag
   [ destination_cpu = pmu,
     authentication = rsa,
     spk_select = user-efuse,
     spk_id = <spk_id_of_second_secondary_secret_key>,
     sskfile = <path_to_second_secondary_secret_key_file>
   ] <path_to_pmufw_elf_file>

   // ATF - Loaded by FSBL, signed by SSK provided by below local sskfile tag
   [ destination_cpu = a53-0,
     exception_level = el-3,
     trustzone = secure,
     authentication = rsa,
     spk_select = user-efuse,
     spk_id = <spk_id_of_third_secondary_secret_key>,
     sskfile = <path_to_third_secondary_secret_key_file>
   ] <path_to_atf_elf_file>

   // U-boot - Loaded by FSBL, signed by SSK provided by global [sskfile] tag
   // Default spk_select = spk-efuse
   [ destination_cpu = a53-0,
     exception_level = el-2,
     authentication = rsa
   ] <path_to_uboot_elf_file>
}
Enhanced Mode
Enhanced mode uses User eFUSEs to hold bitmap of revoked SPK ID. As shown in figure 4, SPK_ID provided in image is used as bit number in User eFUSE register and that bit is checked for revocation. Value 1 in the bit indicates SPK is revoked. Following is the procedure to revoke SPK using enhance mode.
Assume that following bif file is used to generate authenticated image. SPK_ID used for for PMU_FW if 0x08.
boot_img:
{
   [auth_params] ppk_select = <0/1>
   [pskfile] <path_to_primary_secret_key_file>
   [sskfile] <path_to_secondary_secret_key_file>

   // FSBL – Loaded by BootROM signed by SSK provided by global [sskfile] tag
   // Default spk_select = spk-efuse
   [ bootloader,
     destination_cpu = a53-0,
     spk_select = spk-efuse,
     spk_id = <spk_id>,
     authentication = rsa,
   ] <path_to_fsbl_elf_file>

   // PMU FW - Loaded by FSBL, signed by SSK provided by below local sskfile tag
   [ destination_cpu = pmu,
     authentication = rsa,
     spk_select = user-efuse,
     spk_id = 0x08,
     sskfile = <path_to_second_secondary_secret_key_file>
   ] <path_to_pmufw_elf_file>

   // ATF - Loaded by FSBL, signed by SSK provided by below local sskfile tag
   [ destination_cpu = a53-0,
     exception_level = el-3,
     trustzone = secure,
     authentication = rsa,
     spk_select = user-efuse,
     spk_id = <spk_id_of_third_secondary_secret_key>,
     sskfile = <path_to_third_secondary_secret_key_file>
   ] <path_to_atf_elf_file>

   // U-boot - Loaded by FSBL, signed by SSK provided by global [sskfile] tag
   // Default spk_select = spk-efuse
   [ destination_cpu = a53-0,
     exception_level = el-2,
     authentication = rsa
   ] <path_to_uboot_elf_file>
}
Assume that following bif file is used to generate authenticated image. SPK_ID used for for PMU_FW if 0x08.
- To revoke SPK_ID 0x08, program eFUSE to set the corresponding bit of User eFUSEs to 1 (User eFUSE 0, bit 7). Refer Zynq UltraScale+ Device Technical Reference Manual (UG1085) & Programming BBRAM and eFUSEs Application Note (XAPP1319) for further details.
- Select new SPK_ID and make sure the corresponding bit in User eFUSE is not set to 1.
Use new SPK ID for generating image using bootgen. Update the above bif file with new SPK ID (assume new SPK ID selected is = 0x10) to generate image.
boot_img:
{
   [auth_params] ppk_select = <0/1>
   [pskfile] <path_to_primary_secret_key_file>
   [sskfile] <path_to_secondary_secret_key_file>

   // FSBL – Loaded by BootROM signed by SSK provided by global [sskfile] tag
   // Default spk_select = spk-efuse
   [ bootloader,
     destination_cpu = a53-0,
     spk_select = spk-efuse,
     spk_id = <spk_id>,
     authentication = rsa,
   ] <path_to_fsbl_elf_file>

   // PMU FW - Loaded by FSBL, signed by SSK provided by below local sskfile tag
   [ destination_cpu = pmu,
     authentication = rsa,
     spk_select = user-efuse,
     spk_id = 0x10,
     sskfile = <path_to_second_secondary_secret_key_file>
   ] <path_to_pmufw_elf_file>

   // ATF - Loaded by FSBL, signed by SSK provided by below local sskfile tag
   [ destination_cpu = a53-0,
     exception_level = el-3,
     trustzone = secure,
     authentication = rsa,
     spk_select = user-efuse,
     spk_id = <spk_id_of_third_secondary_secret_key>,
     sskfile = <path_to_third_secondary_secret_key_file>
   ] <path_to_atf_elf_file>

   // U-boot - Loaded by FSBL, signed by SSK provided by global [sskfile] tag
   // Default spk_select = spk-efuse
   [ destination_cpu = a53-0,
     exception_level = el-2,
     authentication = rsa
   ] <path_to_uboot_elf_file>
}
Advanced encryption standard - Galois/Counter Mode (AES-GCM)
ZynqMP SoC uses AES-GCM to implement confidentiality, authentication and integrity. ZynqMP SoC uses 256-bit AES key and 96-bit Initialization Vector (IV). When encryption only option is used, GCM is used for authentication and integrity check. When RSA is used for authentication and integrity check before decryption of image, GCM is disabled. In both options AES CTR is used for decryption.
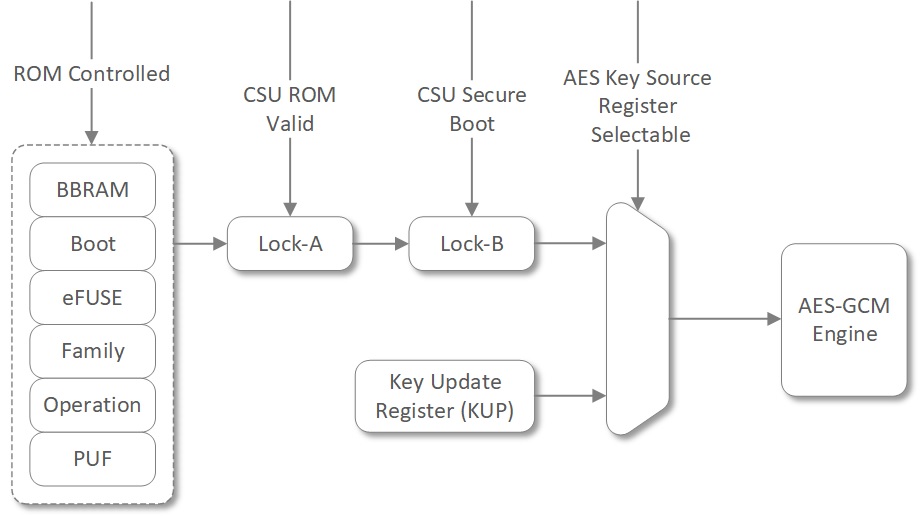
Figure 5: AES-Key Selection Process
As shown in above Figure 5, only CSU BootROM can unlock the device key. User can configure to use device key for decryption of boot images. The device key is also available after boot operations only if the initial configuration files are encrypted or authentication only option is selected. The device key selected by BootROM based on user configuration during boot must be the device key used post boot. The device key source cannot be changed until the next power-on-reset(POR).
User is free to use any user defined key after post boot using key update register (KUP).
ZynqMP allows to store the key in three forms - plain text key (Red key), obfuscated key (Gray key) and encrypted key (Black key).
Red Key
Red key is unencrypted key (plain-text key) and can be stored in eFUSE/BBRAM. The red key is used by bootgen to encrypt the image and ZynqMP uses red key to decrypt the image during boot process.
Following are the steps to create and boot encrypted FSBL image.
Generate the encrypted boot image using bootgen and following bif file template.
boot_img:
{
   [keysrc_encryption] <efuse_red_key / bbram_red_key>

   [ bootloader,
     destination_cpu = a53-0,
     encryption = aes,
     aeskeyfile = <path_to_nky_aes_key_file>
   ] <path_to_fsbl_elf_file>
}
Info:
If user want bootgen to generate AES key file, user should provide part # as argument for -p option (e.g. -p xczu9eg).
- bootgen accepts file associated with aeskeyfile tag in .nky format. If the key file is not present in the path specified in bif file, then a new encryption key is generated in the same path.
- bootgen expects two AES keys (Key 0, Key 1) and associated initialization vectors (IV 0, IV 1) in .nky file. Key 0 and IV 0 is used to encrypt boot header and Key 1 and IV 1 is used to encrypt the partition. It is highly recommended to use different AES keys and IV for each partition. Note that Key 0 and IV 0 should be same across all .nky files used in bif file for encrypting the partition .
- If keysrc_encryption is specified as efuse_red_key during generation of encrypted image in step 1, program AES eFUSEs to store the AES Key 0 used in image creation.
- If keysrc_encryption is specified as bbram_red_key during generation of encrypted image in step 1, program BBRAM to store the AES Key 0 used in image creation.
- Load the boot image to any of the configured/selected boot device(SD/QSPI/NAND) and boot.
Caution:
Its recommends best practice to use Operation key as a countermeasure to side channel attack. Refer Tamper resist designs (XAPP1098) for more information.
Refer following documents for programming BBRAM and eFUSEs
- Programming BBRAM and eFUSEs Application Note (XAPP1319)
- Xilinx Standalone Library Documentation XilsKey Library
Obfuscated Key
Obfuscated key is AES key encrypted (obfuscated) with the family key of the ZynqMP SoC. The family key is the dedicated embedded key in the device and the same key is used on all devices within a device family. Obfuscated key can be stored in eFUSE/boot header of the image.
For users who would like to have the encryption key store in obfuscated form, the red key can be encrypt with the family key as an encryption key. ZynqMP will decrypt the obfuscated key to get the actual red key. Note that the Family key is same across all the devices within the ZynqMP SoC family. This solution allows a user to distribute the obfuscated key to contract manufacturer's without disclosing the actual encryption key.
The family key is not distributed with Xilinx development tools, and user need to request family key by sending request to email address secure.solutions@xilinx.com . Install the family key received from Xilinx in the development tool installation directory, and then use development tools (bootgen) to create the obfuscated key.
Following are the steps to create and boot encrypted FSBL image.
Generate the obfuscated key from red key using bootgen and below bif template file.
generate_obfuscated_key:
{
   [aeskeyfile] <path_to_aes_red_key_file>
   [familykey] <path_to_family_key_file>
   [bh_key_iv] <path_to_obfuscated_key_init_vector_file>
}
Execute below command to generate obfuscated key from red key provided in .bif file. This command generates obfuscated key in obfuscatedkey.txt file.
bootgen -generate_keys obfuscatedkey -arch zynqmp -image <path_to_bif_file>
Generate the encrypted boot image using bootgen and one of the below bif template file. Note that Key 0 and IV 0 should be same across all .nky files used in bif file for encrypting the partition and should also match with the red key used for obfuscation in step 1 .
Bif file for generating boot image with obfuscated key stored in eFUSE.
boot_img:
{
   [keysrc_encryption] efuse_gry_key
   [bh_key_iv] <path_to_obfuscated_key_init_vector_file>

   [ bootloader,
     destination_cpu = a53-0,
     encryption = aes,
     aeskeyfile = <path_to_aes_red_key_file>
   ] <path_to_fsbl_elf_file>

   [ destination_cpu = a53-3,
     encryption = aes,
     aeskeyfile = <path_to_aes_red_key_file>
   ] <path_to_app_elf_file>
}
Bif file for generating boot image with obfuscated key stored in boot header.
boot_img:
{
   [keysrc_encryption] bh_gry_key
   [bh_keyfile] <path_to_obfuscated_key_file>
   [bh_key_iv] <path_to_obfuscated_key_init_vector_file>

   [ bootloader,
     destination_cpu = a53-0,
     encryption = aes,
     aeskeyfile = <path_to_aes_red_key_file>
   ] <path_to_fsbl_elf_file>


   [ destination_cpu = a53-3,
     encryption = aes,
     aeskeyfile = <path_to_aes_red_key_file>
   ] <path_to_app_elf_file>
}
Info:
If user want bootgen to generate AES key file, user should provide part # as argument for -p option (e.g. -p xczu9eg).
- bootgen accepts file associated with aeskeyfile tag in .nky format. If the key file is not present in the path specified in bif file, then a new encryption key is generated in the same path.
- bootgen expects two AES keys (Key 0, Key 1) and associated initialization vectors (IV 0, IV 1) in .nky file. Key 0 and IV 0 is used to encrypt boot header and Key 1 and IV 1 is used to encrypt the partition. It is highly recommended to use different AES keys and IV for each partition. Note that Key 0 and IV 0 should be same across all .nky files used in bif file for encrypting the partition .
- Attribute [bh_key_iv] should be same as used in step 1.
- If key source specified as efuse_gry_key during generation of encrypted image in step 2, program AES eFUSEs to store the obfuscated AES key (obfuscatedkey.txt) created in step 1.
- Load boot image to any of the configured/selected boot device(SD/QSPI/NAND) and boot.
Black Key
Black key is AES key encrypted with Key Encryption Key (KEK) generated by Physical Unclonable Function (PUF) module of the ZynqMP SoC. It can be stored in eFUSE/boot header of created image.
For users who would like to have the encryption key stored encrypted when not in use, the physical unclonable function (PUF) can be used. Here the actual red key is encrypted with the PUF key encryption key (KEK), which is an encryption key generated by the PUF. Zynqmp will decrypt the black key to get the actual red key, so you need to provide the required inputs to bootgen while creating the image. The black key can be stored in either eFUSE or the Boot Header.
The black key storage provides the following advantages.
- The encryption key is the same for all devices. Consequently, the encrypted boot images are the same for all devices that use the same user key.
- The PUF KEK is unique for each device. Consequently, the black key stored with the device is unique for each device.
- The PUF KEK value is only known by the device (cannot be read by the user).
User need to generate PUF helper data required for regeneration of encryption key by PUF module using PUF registration process. Refer application note External Secure Storage Using the PUF (XAPP1333) for PUF registration process and Zynq UltraScale+ MPSoC: Embedded Design Tutorial (UG1209) for programming and debugging.
Caution:
Make sure PUF Helper data and AES eFUSEs were not written before i.e. device is not exercised earlier for storing the PUF data to eFUSE, PUF Helper data and AES eFUSE bits are all 0.
Note
Helper data and black key are both signed by bootgen when they are stored in the boot image and both are unique per device, using black key in boot header means each device requires a unique run of bootgen. This is not the case when the black key & helper data are stored in eFUSE.
Following are the steps to create and boot encrypted image.
- Do PUF registration and copy following components form PUF registration log.
- Data between line "App:PUF Syndrome data Start!!!" and "App:PUF Syndrome data End!!!" to file puf_helper_data.txt.
- Copy the Black Key to file black_key.txt
- Copy the Black Key IV to file black_key_iv.txt
Info:
- In case user like to store PUF helper data and black key in eFUSE, make sure proper macros are enabled in PUF registration code which will write both of these items to eFUSE.
- AES Key 0 and IV 0 of .nky files used in bif file should be same as of red key and associated IV used to generate black key
- Generate RSA key pair using bootgen.
- Generate SHA-3 hash of Primary Public Key (PPK) created in step 1 using bootgen.
Generate the encrypted boot image using bootgen and one of the below bif template file.
Bif file for generating the boot image with black key stored in eFUSE.boot_img: { [fsbl_config] puf4kmode, shutter = 0x0100005E [auth_params] ppk_select = 0; spk_id = <spk_id> [pskfile] <path_to_primary_secret_key_file> [sskfile] <path_to_secondary_secret_key_file> [bh_key_iv] <path_to_black_key_init_vector_file> [keysrc_encryption] efuse_blk_key [ bootloader, destination_cpu = a53-0, encryption = aes, authentication = rsa, aeskeyfile = <path_to_bootloader_aes_red_key_file> ] <path_to_fsbl_elf_file> [ destination_cpu = a53-2, encryption = aes, authentication =rsa, aeskeyfile = <path_to_application_aes_red_key_file>, ] <path_to_app_elf_file> }Shutter value provided above indicates the time for which the oscillator values can be captured for PUF, this value must always be 0x100005E.
Bif file for generating the boot image with black key stored in boot header.
boot_img: { [fsbl_config] pufhd_bh, puf4kmode, shutter = 0x0100005E [auth_params] ppk_select = 0; spk_id = <spk_id> [pskfile] <path_to_primary_secret_key_file> [sskfile] <path_to_secondary_secret_key_file> [puf_file] <path_to_PUF_helper_data_file> [bh_keyfile] <path_to_bh_AES_encyption_key_file> [bh_key_iv] <path_to_black_key_init_vector_file> [keysrc_encryption] bh_blk_key [ bootloader, destination_cpu = a53-0, encryption = aes, authentication = rsa, aeskeyfile = <path_to_bootloader_aes_red_key_file> ] <path_to_fsbl_elf_file> [ destination_cpu = a53-2, encryption = aes, authentication = rsa, aeskeyfile = <path_to_application_aes_red_key_file>, ] <path_to_app_elf_file> }- Enable RSA authentication by setting “RSA_EN” eFUSEs.
- Write SHA-3 hash of PPK created in step 1 to PPK0 hash eFUSEs.
- If keysrc_encryption is specified as efuse_blk_key during generation of encrypted image in step 1, program AES eFUSEs to store the encrypted black AES key used in image creation.
- Load the boot image to any of the configured/selected boot device(SD/QSPI/NAND) and boot.
Info:
- To use Black key encryption authentication is mandatory
- Black key generated on one device will not work on another device.
Operational Key
A good key management practice includes minimizing the use of secret or private keys. This can be accomplished using the operational key option enabled in bootgen. Bootgen tool creates an encrypted, secure header that contains the operational key (opt_key), which is user-specified, and the initialization vector (IV) needed for the first block of the configuration file when this feature is enabled. The result is that the AES key stored on the device, in either the BBRAM or eFUSEs, is used for only 384 bits, which significantly limits its exposure to side channel attacks.
Following are the steps to create and boot encrypted image.
Generate the encrypted boot image using bootgen and the below bif template file.
boot_img:
{
   [fsbl_config] opt_key
   [keysrc_encryption]<efuse_red_key / bbram_red_key>

   [ bootloader,
     destination_cpu = a53-0,
     encryption = aes,
     aeskeyfile = <path_to_aes_red_key_file_2>
   ] <path_to_fsbl_elf_file>

   [ destination_cpu = a53-3,
     encryption = aes,
     aeskeyfile = <path_to_aes_red_key_file_1>
   ] <path_to_app_elf_file>
}
Info:
If user want bootgen to generate AES key file, user should provide part # as argument for -p option (e.g. -p xczu9eg).
- bootgen accepts file associated with aeskeyfile tag in .nky format. If the key file is not present in the path specified in bif file, then a new encryption key is generated in the same path.
- bootgen expects two AES keys (Key 0, Key 1) and associated initialization vectors (IV 0, IV 1) in .nky file. Key 0 and IV 0 is used to encrypt boot header and Key 1 and IV 1 is used to encrypt the partition. It is highly recommended to use different AES keys and IV for each partition. Note that Key 0, IV 0 and Key Opt should be same across all .nky files used in bif file for encrypting the partition .
- If keysrc_encryption is specified as efuse_red_key during generation of encrypted image in step 1, program AES eFUSEs to store the AES Key 0 used in image creation.
- If keysrc_encryption is specified as bbram_red_key during generation of encrypted image in step 1, program BBRAM to store the AES Key 0 used in image creation.
- Load the boot image to any of the configured/selected boot device(SD/QSPI/NAND) and boot.
Info:
User can use keysrc_encryption as efuse_blk_key/bh_blk_key/efuse_gry_key/bh_gry key. Use one of the required bif template given in earlier examples and add opt_key parameter to [fsbl_config] attribute. Follow the procedure to create and load image as per the template selected.
Key Rolling
Differential Power Attack (DPA) resistance is achieved by authentication before decryption and by key rolling. Authentication before decryption, using the RSA algorithm, prevents an adversary from acquiring additional data per key by substituting their own data for the data contained in the boot image. Key rolling limits the amount of data encrypted on any given key. The amount of data encrypted by a key is configurable by the user.
The AES_GCM rolling keys feature represent the entire encrypted image in terms of smaller AES encrypted blocks/modules. Each module is encrypted using its own unique key. The initial key is stored at the key source on the device, while keys for each successive module are encrypted (wrapped) in the previous module.
Following are the steps to create and boot encrypted image.
Generate the encrypted boot image using bootgen and the below bif template file.
boot_img:
{
   [keysrc_encryption]<efuse_red_key / bbram_red_key>

   [ bootloader,
     destination_cpu = a53-0,
     encryption = aes,
     aeskeyfile = <path_to_aes_keys_file>,
     blocks = 1024(2);2048;4096(2);8192(2);4096;2048;1024,
   ] <path_to_fsbl_elf_file>

   [ destination_cpu = a53-3,
     encryption = aes,
     aeskeyfile = <path_to_aes_keys_file>,
     blocks = 4096(1);1024,
   ] <path_to_app_elf_file>
}
Info:
- Number of keys in the key file should always be equal to the number of blocks to be encrypted.
- If the number of keys are less than the number of blocks to be encrypted, bootgen returns an error.
- If the number of keys are more than the number of blocks to be encrypted, bootgen ignores the extra keys.
- If you want to specify multiple Key/IV Pairs, you should specify no. of blocks + 1 pairs
- The extra Key/IV pair is to encrypt the secure header.
- Number of keys in the key file should always be equal to the number of blocks to be encrypted.
If keysrc_encryption is specified as efuse_red_key during generation of encrypted image in step 1, program AES eFUSEs to store the AES Key 0 used in image creation.
If keysrc_encryption is specified as bbram_red_key during generation of encrypted image in step 1, program BBRAM to store the AES Key 0 used in image creation.
Load the boot image to any of the configured/selected boot device(SD/QSPI/NAND) and boot.
Info:
User can use keysrc_encryption as efuse_blk_key/bh_blk_key/efuse_gry_key/bh_gry key and also combine key rolling with operational key. Use one of the required bif template given in earlier examples and add parameters to [blocks] attribute as required. Follow the procedure to create and load image as per the template selected.
NKY File Format
Single Key and IV pair
Device xc7z020clg484;
Key 0  AD00C023E238AC9039EA984D49AA8C819456A98C124AE890ACEF002100128932;
IV 0   F7F8FDE08674A28DC6ED8E37;
In case optional key is used, that should be appended at the end of .NKY file
Key Opt 11223344556677889900AABBCCDDEEFF11223344556677889900AABBCCDDEEFF;
Key and IV pair with seed
One key and one IV will be given along with a seed. Bootgen generates keys required for subsequent blocks randomly depending on the seed specified.
Device xc7z020clg484;
Key 0  AD00C023E238AC9039EA984D49AA8C819456A98C124AE890ACEF002100128932;
IV 0   F7F8FDE08674A28DC6ED8E37;
Seed   91DA312E42E9EDC79926DADBA574E422E6AD968A2E5C569D9D1794ED4098E83F;
Multiple Key and IV pair
User can provide multiple keys in following format in .nky file.
Device xc7z020clg484;
Key 0  AD00C023E238AC9039EA984D49AA8C819456A98C124AE890ACEF002100128932;
IV 0   F7F8FDE08674A28DC6ED8E37;
Key 1  0010C023E238AC9039EA984D49AA8C819456A98C124AE890ACEF002100128932;
IV 1   0018FDE08674A28DC6ED8E37;
Key 2  1199ACA89C34B9039EA22C8FE6D1A746129ACDDEF01001202218922344473551;
IV 2   2100FE7AEF22B4A1002561CD;
Key 3  B1DD3982167A44D78377116E0C51735A7B935EFF9F3471AB11983652101110AB;
IV 3   55BA374493D10102445123C0;
Key 4  5789ABDC9A77E7239073356C5D7123AAC26CD6667852969A6BB20040736599A1;
IV 4   F1E732760BD723C4650AE991;
Key Sources and corresponding BIF arguments
Key Source Option [keysrc_encryption] | Required arguments with example | Comments |
|---|---|---|
bbram_red_key | [aeskeyfile ] aes.nky | BBRAM should be programmed with RED key |
efuse_red_key | [aeskeyfile ] aes.nky | eFSUE should be programmed with RED key |
efuse_gry_key | [aeskeyfile] red.nky | eFSUE should be programmed with obfuscated key |
bh_gry_key | [aeskeyfile] red.nky | Here eFUSE need not be programmed, bootgen places the key and IV in boot header |
efuse_blk_key | [aeskeyfile] red.nky | Authentication is compulsory to use black key and eFUSE should be programmed with black key |
bh_blk_key | [aeskeyfile] red.nky | Authentication is compulsory to use black key and eFUSE need not be programmed with black key |
kup_key | [aeskeyfile ] aes.nky | This is not supported by primary boot image, this option is valid only for bitstream and non-bitstream encrypted images loaded from u-boot or Linux |
opt_key | [fsbl_config] opt_key | This feature can be used along with any of the key sources mentioned above, .nky should also contain operational key along with red key |
Table 1: Key Sources and corresponding BIF arguments
Authentication and Encryption
User can combine authentication and encryption for additional layer of security, thus increasing the security posture of the entire system. Bootgen helps to create the boot images that is authenticated by RSA 4096-bit key and AES 384-bit encryption.
Following are the steps to create and boot secure image with optional key feature is used for encryption and PPK whose hash is stored eFUSE is used for authentication.
- Generate RSA key pair using bootgen.
- Generate SHA-3 hash of Primary Public Key (PPK) created in step 1 using bootgen.
Generate the authenticated and encrypted boot image using bootgen and the below bif template file.
boot_img: { [fsbl_config] opt_key [auth_params] ppk_select = <1/2>; spk_id = <spk_id> [keysrc_encryption] efuse_red_key [pskfile] <path_to_primary_secret_key_file> [sskfile] <path_to_secondary_secret_key_file> [ bootloader, destination_cpu = a53-0, encryption = aes, authentication = rsa, aeskeyfile = <path_to_aes_red_key_file> ] <path_to_fsbl_elf_file> }- Program AES eFUSEs to store the AES red key used during building image in step 3.
Enable RSA authentication by setting “RSA_EN” eFUSEs.
Caution:
Once RSA authentication is enabled, ZynqMP SoC only allows RSA authenticated image (created using secret key of the key pair whose public key hash is stored in eFUSE) to boot.
- Write SHA-3 hash of PPK created in step 1 to PPK0 hash eFUSEs.
- Load the boot image to any of the configured/selected boot device(SD/QSPI/NAND) and boot.
Info:
User can combine RSA feature with any one of the encryption feature discussed in AES-GCM section. It is highly recommended to use secondary RSA keys along with key rolling for encryption to enhance the security posture of the system during boot time.
Single partition image created by bootgen
A secure non-bitstream image and encrypted and/or authenticated image can be loaded from u-boot and Linux, for more details refer to Loading authenticated and/or encrypted image partitions from u-boot and ZynqMP Secure Driver respectively .
Bitstream
Secure Bitstream can either be loaded by FSBL/U-boot/Linux.
- To load from FSBL primary boot image should contain the bitstream along with FSBL, then FSBL programs PCAP with provided bitstream
- To load from Linux please refer to Steps to load secure bitstream from Linux
- To load from U-boot please refer to Loading Authenticated and/or encrypted image partitions from u-boot.
New Features
Below features are supported from 2019.1 release.
- SHA 3 hash calculation on data blob from U-boot.
- RSA encryption and decryption of data blob from U-boot.
- AES Decryption and/or authentication of single partition image created by bootgen from Linux
References
| # | Reference Document | Details |
|---|---|---|
| 1. | Zynq UltraScale+ MPSoC: Embedded Design Tutorial (UG1209) | Gives step by step guide to writing application and debugging on ZynqMP Devices using Xilinx SDK. |
| 2. | Bootgen User Guide (UG1283) | Provides information on using bootgen and options available in BIF files. |
| 3. | Zynq UltraScale+ Device Technical Reference Manual (UG1085) | Provides in-depth technical details of ZynqMP. |
| 4. | Programming BBRAM and eFUSEs Application Note (XAPP1319) | Provides step by step guide to programming BBRAm and eFUSE. |
| 5. | Tamper resist designs (XAPP1098) | Guide to designing tamper resist design |
Related wiki pages
- XilSecure Library
- XilSKey Library
- Loading authenticated and/or encrypted image partitions from u-boot
- ZynqMP Secure Driver - Loading single partition image from Linux
- Zynq Ultrascale plus secure bitstream programming from Linux
Related content
© Copyright 2019 - 2022 Xilinx Inc. Privacy Policy