Zynq Ultrascale+ MPSoC Secure bitstream programming from Linux
Table of content
Introduction
The ZynqMp Programmable Logic (PL) can be programmed either using First Stage Boot-loader (FSBL), U-Boot or through Linux. This page provides the details about programming the secure bitstream from Linux using FPGA manager.
Supported features for loading the secure bitstream from Linux are:
- Encrypted full/partial bitstream loading with the user key.
- Authenticated full/partial bitstream loading.
- Authenticated and Encrypted full/partial bitstream loading.
- Encrypted only Bitstream full/partial loading with the device key.
Unsupported features for loading the secure bitstream from Linux are:
- Authentication of only headers.
Architecture
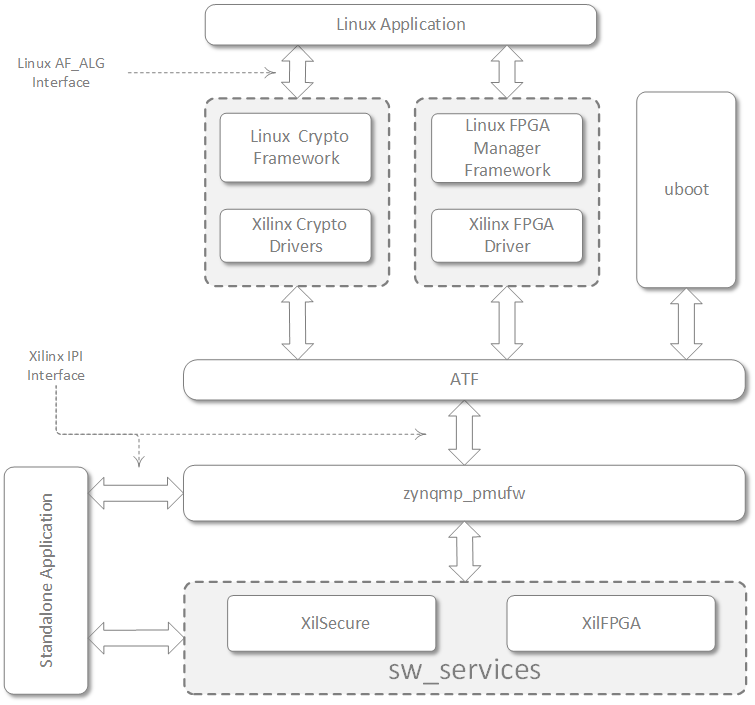
Linux application sends the secure bitstream to Linux FPGA Manager framework to program the PL. With help of Xilinx FPGA driver FPGA Manager sends the bitstream to PMU firmware running on PMU securely via ARM Trusted Firmware(ATF). ARM Trusted Firmware uses IPI messaging service to request PMU firmware to perform bitstream load. With help of XilFPGA library, PMU firmware perform bitstream programming to PL. For authentication and/or encryption of secure bitstream, XilFPGA uses XilSecure library services.
U-boot communicates directly with PMU firmware via ATF for bitstream downloading.
Standalone application has direct access to low level libraries – XilSecure & XilFPGA. It can use PMU firmware services using IPI calls to program PL or can write application using XilFPGA and XilSecure library to directly program PL.
As the data provided in user space will be located in virtual space, linux driver before handing off to ATF converts the data buffers to physical address.
The below image shows the high level architecture of image loading via PMU firmware.
Prerequisites for bitstream loading from Linux
Build PMUFW
As shown in below image, modify BSP settings of xilsecure and xilfpga library using Xilinx Vivado Design Suite.
Enable secure_environment variable of xilsecure library, if encryption only bitstream is to be downloaded.
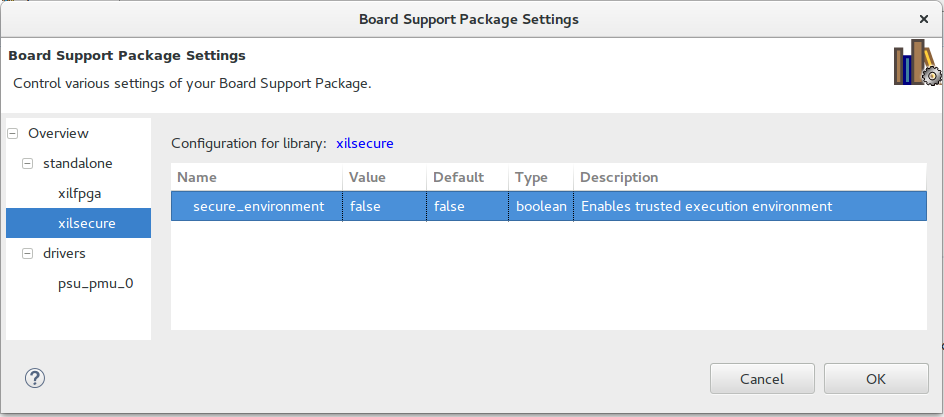
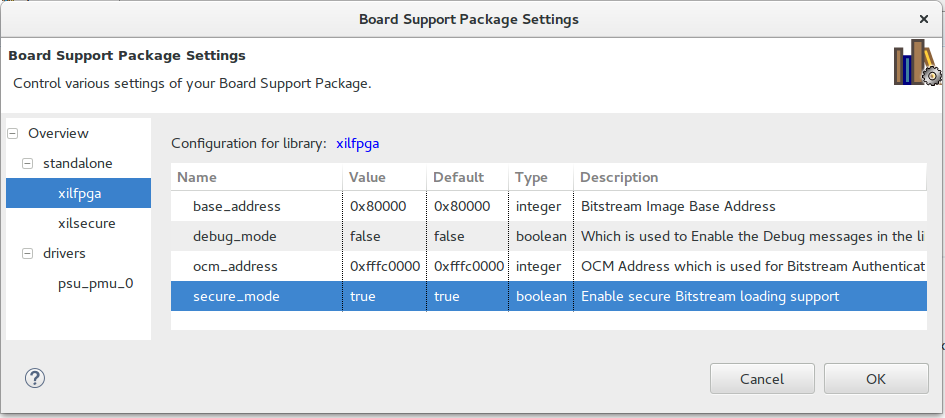
Enable secure_mode of xilfpga library, if secure bitstream is to be downloaded.
Build Linux bootable image with authentication
We will boot the ZynqMP system using the bootable image created below for all examples of loading different types of bitstream images from Linux.
- Generate RSA key pair using bootgen.
- Generate SHA-3 hash of Primary Public Key (PPK) created in step 1 using bootgen.
- We generated one secondary key (SSK) in step 1. If more SSK’s are required, repeat step 1 to create SSK keys.
Generate the authenticated boot image using bootgen and the below bif file template.
boot_img: { [auth_params] ppk_select = 0 [pskfile]<path_to_primary_secret_key_file> [sskfile]<path_to_secondary_secret_key_file> // FSBL – Loaded by BootROM signed by SSK provided in [sskfile] tag [ bootloader, destination_cpu = a53-0, authentication = rsa, spk_select = spk_efuse ] <path_to_fsbl_elf_file> // PMU FW - Loaded by FSBL, signed by SSK provided by ssk_file tag [ destination_cpu = pmu, authentication = rsa, spk_id = <spk_id_of_second_secondary_secret_key>, ssk_file = <path_to_second_secondary_secret_key_file> ] <path_to_pmufw_elf_file> // ATF - Loaded by FSBL, signed by SSK provided by ssk_file tag [ destination_cpu = a53-0, exception_level = el-3, trustzone = secure, authentication = rsa, spk_id = <spk_id_of_third_secondary_secret_key>, ssk_file = <path_to_third_secondary_secret_key_file> ] <path_to_atf_elf_file> // U-boot - Loaded by FSBL, signed by SSK provided by [sskfile] tag [ destination_cpu = a53-0, exception_level = el-2, authentication = rsa ] <path_to_uboot_elf_file> // Linux - Loaded by u-boot, signed by SSK provided by ssk_file tag [ destination_cpu = a53-0, exception_level = el-2, authentication = rsa, spk_id = <spk_id_of_forth_secondary_secret_key>, ssk_file = <path_to_forth_secondary_secret_key_file>, offset = 0x1E40000, load = 0X10000000 ] <path_to_linux_ub_file>- Enable RSA authentication by setting “RSA_EN” eFUSEs. Refer Programming BBRAM and eFUSEs Application Note (XAPP1319) for eFUSE programming.
Write SHA-3 hash of PPK created in step 2 to PPK0 hash eFUSEs.
Caution:
- Once RSA authentication is enabled on ZynqMP SoC, only RSA authenticated image created using secret key of the key pair whose public key hash is stored in eFUSE.
- When RSA is not enabled in efuse, for authentication of bitstream for development purpose one can use boot header authentication this is not recommended for field as it skips PPK and SPK eFUSE verification. To enable boot header authentication, add "[fsbl_config]bh_auth_enable" field to bif file.
- Load the boot image to any of the configured/selected boot device(SD/QSPI/NAND) and boot.
Info:
- when spk_select is selected as user-efuse, valid range of SPK ID is 1 to 256
- when spk_select is selected as spk-efuse, SPK ID can be any 32-bit value including 0 (which should match with programmed eFUSE SPK_ID)
Building Authenticated bitstream
Bitstream can be authenticated using OCM internal memory or by trusting external memory DDR, Xilinx recommends using OCM memory to authenticate the bitstream which is more secure. To authenticate bitstream using OCM, available OCM start address should be provided at BSP settings which is shown in highlighted second row of the above figure 2.
Caution:
For authentication of bitstream using OCM requires 63KB of buffer, by default XilFPGA uses 0xfffc0000 address. In this case warm restart may not work as XilFPGA corrupts the 64KB memory of OCM (where FSBL uses 0xfffc0000 as start address). To have warm restart feature as well, user should provide the free OCM memory to XilFPGA which is not been utilized by FSBL or ATF.
This issue is fixed in release 2019.1. So warm restart works along with authenticated bitstream loading from OCM.
To authenticate bitstream using DDR no need to provide any start address XilFPGA authenticates the bitstream directly from source address(.bin) provided by user.
Generate the authenticated bitstream using bootgen and the below bif file template.
bin_img:
{
   [auth_params] ppk_select = 0
   [pskfile]<path_to_primary_secure_key_file>
   [spk_select] <spk_efuse / usr_efuse>

   [ authentication = rsa,
     spk_id = <spk_id_of_spk/usr_efuse>
     ssk_file = <path_to_fifth_secure_key_file>
   ] <path_to_bitstream_bit_file>
}
Use following bootgen command to create the image.
bootgen –image <path_to_bif_file> –arch zynqmp -r –o <path_to_image_file> –p <part_#> -arch zynqmp -split bin
Building Encrypted bitstream
Bitstream can be encrypted either using device key or using user defined key in KUP register (KUP Key). Decryption of bitstream with Device key is possible only when one of the below condition meets:
- When PMU Firmware running on system is built with trusted execution environment (secure_environment) variable of XilSecure library enabled.
- Bitstream is authenticated.
There is no above restriction for using user defined key.
Generate the encrypted bitstream using bootgen and the below bif file template.
bin_img:
{
   [keysrc_encryption] kup_key

   [ encryption = aes,
     blocks = 1024(10),
     aeskeyfile = <path_to_aes_key_file>
   ] <path_to_bitstream_bit_file>
}
Use following bootgen command to create the image.
bootgen –image <path_to_bif_file> –arch zynqmp -r –o <path_to_image_file> –p <part_#> -arch zynqmp -split bin
Building Authenticated and Encrypted bitstream
Generate the authenticated and encrypted bitstream using bootgen and the below bif file template. Below example assumes that AES encryption key is stored to BBRAM. There are different options available for selecting key source. Refer Zynq Ultrascale plus Security Features # Advanced encryption standard - Galois/Counter Mode (AES-GCM) to find key source details. Note that Decryption of bitstream with Device key is possible only when authentication is enabled, but for KUP key authentication is not compulsory.
bin_img:
{
   [auth_params] ppk_select = 0
   [pskfile]<path_to_primary_secure_key_file>
   [spk_select] <spk_efuse / usr_efuse>
   [keysrc_encryption] bbram_red_key

   [ authentication = rsa,
     encryption = aes,
     spk_id = <spk_id_of_spk/usr_efuse>
     ssk_file = <path_to_secondary_secure_key_file>
   ] <path_to_bitstream_bit_file>
}
Use the following bootgen command to create the image.
bootgen –image <path_to_bif_file> –arch zynqmp -r –o <path_to_image_file> –p <part_#> -arch zynqmp -split bin
Steps to load secure bitstream from Linux
Follow below steps to load secure bitstream from Linux.
Create folder /lib/firmware if it does not exist using following command in Linux.
mkdir -p /lib/firmware
- Copy bitstream file (in .bin format) to be loaded to PL into folder /lib/firmware/.
Select the type of bitstream to be loaded to PL using below command in Linux.
echo <bitstream_type> > /sys/class/fpga_manager/fpga0/flags
where bitstream type can be selected from below table.
bitstream_type
Usage
0x01
Partial bitstream
0x40
Authentication with image in DDR. Once bitstream is authenticated, it is either copied to PL or sent to AES crypto engine based on the bitstream image type.
0x80
Authentication with image in OCM. During authentication of the bitstream block, the system stores the hash of the bitstream block chunk during authentication. Once authentication is passed, during the transfer of the bitstream block to PL or to AES engine, system revalidates hashes of chunks to make sure the image is not modified after authentication.
0x20
Decryption using user key (user key in KUP register)
0x4
Decryption using device key
0x60 Authentication(DDR memory) + Decryption using user key. Once bitstream is authenticated, it is sent to the AES crypto engine based on the bitstream image type. 0xA0 Authentication(OCM memory) + Decryption using user key. Once bitstream is authenticated, it is sent to the AES crypto engine based on the bitstream image type. 0x44 Authentication(DDR memory) + Decryption using Device key. Once bitstream is authenticated, it is sent to the AES crypto engine based on the bitstream image type. 0x84 Authentication(OCM memory) + Decryption using Device key. Once bitstream is authenticated, it is sent to the AES crypto engine based on the bitstream image type. If user key to be used for bitstream decryption, the key should be stored in file and pushed using following command in Linux.
cat <user_defined_key_file> > /sys/class/fpga_manager/fpga0/key
For example,
User key 2584B3F7844A0A0AECD36F0E511DA724E38492277D71192462AFC6975936EED0 is stored in usr_key.txt file and this file is pushed to system using following command.
echo usr_key.txt > /sys/class/fpga_manager/fpga0/key
Now download the bitstream using following command in Linux.
echo <bitstream_file_name> > /sys/class/fpga_manager/fpga0/firmware
where bitstream_file_name is the name of file copied into folder /lib/firmware in step 2.
Note:
Authenticated and Encrypted bitstreams can be loaded using external DDR (where the DDR is trusted) or using internal OCM (where the external DDR is not trusted)
Table of content
© Copyright 2019 - 2022 Xilinx Inc. Privacy Policy