Zynq-7000 AP SoC Spectrum Analyzer part 3 - Accelerating Software - Running ARM Library Tests Tech Tip 2014.3
Zynq-7000 AP SoC Spectrum Analyzer part 3 - Accelerating Software - Running ARM Library Tests Tech Tip 2014.3
Table of Contents
Document History
| Date |
Version |
Author |
Description of Revisions |
|
| 23 October 2014 |
1.0 |
Faster Technology |
Initial Posting - updated to 2014.3 |
|
| Date |
Author |
Comment |
||
|---|---|---|---|---|
| More Revisions |
||||
Description/Summary
In Tech Tip "Zynq-7000 AP SoC Spectrum Analyzer part 2 - Accelerating Software - Building ARM Neon Library Tech Tip 2014.3" a library of complex signal processing functions was obtained and built. This Tech Tip describes the process to build and execute on the ZC702 the tests that are supplied with the NE10 library and the subsequent results. This will demonstrate the ease with which externally sourced software can be built using Xilinx SDK and run on the ZC702. In addition, multiple methods for accessing and controlling the ZC702 will be shown, demonstrating the flexibility of the ZC702, the simple process of system debug and the speed of system development. A subset of the supplied tests will be used to indicate the level of performance improvement that might be possible using the NEON SIMD extension to the ARM processor in Zynq-7000 AP SoC Processing System (PS).
Implementation
| Implementation Details |
|
| Design Type |
PS Only |
| SW Type |
PetaLinux |
| CPUs |
1 CPU - standard ZC702 frequency |
| PS Features |
ARM Processor and NEON SIMD engine |
| PL Cores |
None |
| Boards/Tools |
ZC702 |
| Xilinx Tools Version |
Vivado / SDK 2014.3 |
| Other Details |
Standard ZC702 setup for console terminal and Ethernet required; HDMI display with Base TRD |
| Files Provided |
|
| Ne10LibraryBuild2014dt3.zip |
Saved workspace file set |
Step by Step Instructions
This Tech Tip uses the workspace that resulted from building the Ne10 library in the Tech Tip "Zynq-7000 AP SoC Spectrum Analyzer part 2 - Building ARM NEON Library Tech Tip 2014.3". If that workspace is available, skip the instructions below to start SDK with the workspace already in place at the Workspace in Place heading below.
If the workspace is not available or if there is a question if it was completed properly, the referenced file "PetaLinuxNe10LibraryBuild.zip" can be used to create a known good starting point for this Tech Tip.
Restoring the Workspace
Download the zip file from the Ne10LibraryBuild2014dt3.zip link.
Create an empty directory where you will be implementing this Tech Tip. To be consistent with the balance of these step by step instructions, the directory could be:
G:\Projects\ZC702_Ne10
However, these steps to import a known workspace will work with any new folder of the user's choosing.
Start -> All Programs -> Xilinx Design Tools -> Vivado 2014.3 -> Xilinx SDK 2014.3
In the Workspace Launcher, browse to and select \Projects\ZC702_Ne10 or the empty directory that you have created.

Click OK to continue.
When presented with the Welcome screen, click the x in the Welcome tab to close that screen

SDK will start with a blank Project Explorer pane

We can now import the saved workspace into SDK.
Select File -> Import or Right Click on the white space in the Project Explorer pane and select Import
The Import dialogue box will appear. Expand the General line and select Existing Projects into Workspace

Click Next
Click the Select archive file button. Then click Browse to navigate to the saved workspace that you want to import and click Open. In our case, this is Ne10LibraryBuild2014dt3.zip.

Be sure that both Ne10 and Ne10-master projects are selected.
Click Finish
SDK will build the workspace automatically. Because SDK is already started and the workspace is in place, you can skip the following instructions to start SDK and go directly to SDK running.
Workspace in Place
If you have not yet started SDK, do so by:
Start -> All Programs -> Xilinx Design Tools -> Vivado 2014.3 -> Xilinx SDK 2014.3
In the Workspace Launcher, browse to and select Projects\ZC702_Ne10.
Click OK to continue.
When presented with the Welcome screen, click the x in the Welcome tab to close that screen
SDK Running
With SDK now running with the existing or re-loaded workspace, continue from here.
Because this is an existing built project, you should see something similar to the following. The key is to have the Ne10 project with the directories shown. If these are not present, return to the Zynq-7000 AP SoC Spectrum Analyzer part 2 - Accelerating Software - Building ARM Neon Library Tech Tip 2014.3 and build the library again, or use the instructions above to load the known workspace file set.
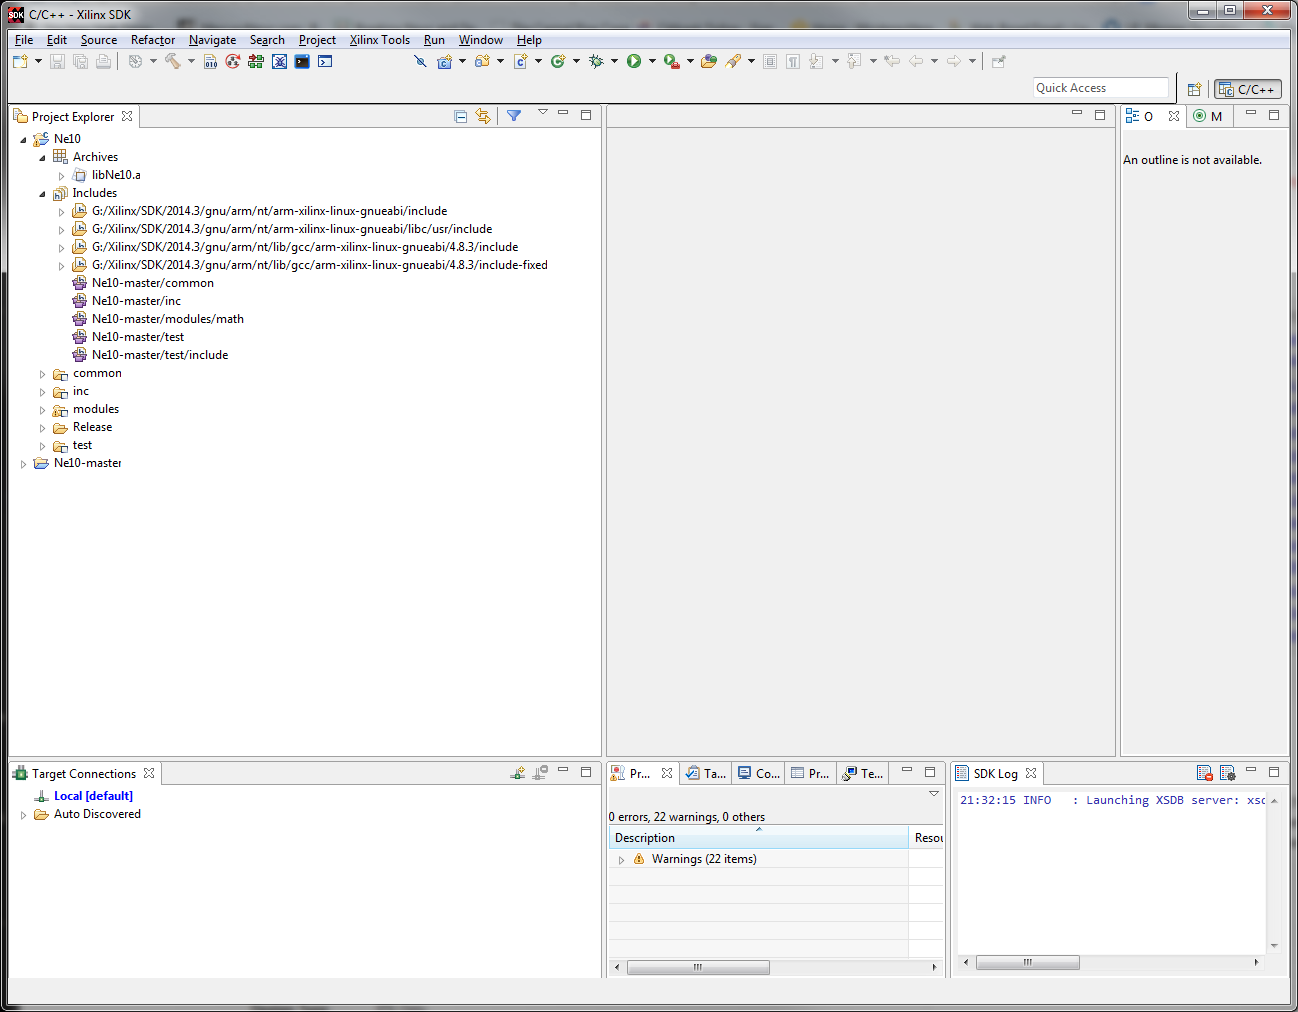
With the library in place, we build the standard test program that was supplied as part of the repository. A new project for the test program is created, the appropriate files from the repository are imported and then it is compiled into an executable program.
Select File -> New ->Project; expand the C/C++ group and select C Project.
Shortcut:
Right click on the white space in the Project Explorer pane. Then select New -> C Project.
In the Project name: box, give the project the name Ne10-test. Select the Project type: as Xilinx ARM Linux Executable by clicking on that option in the left column.
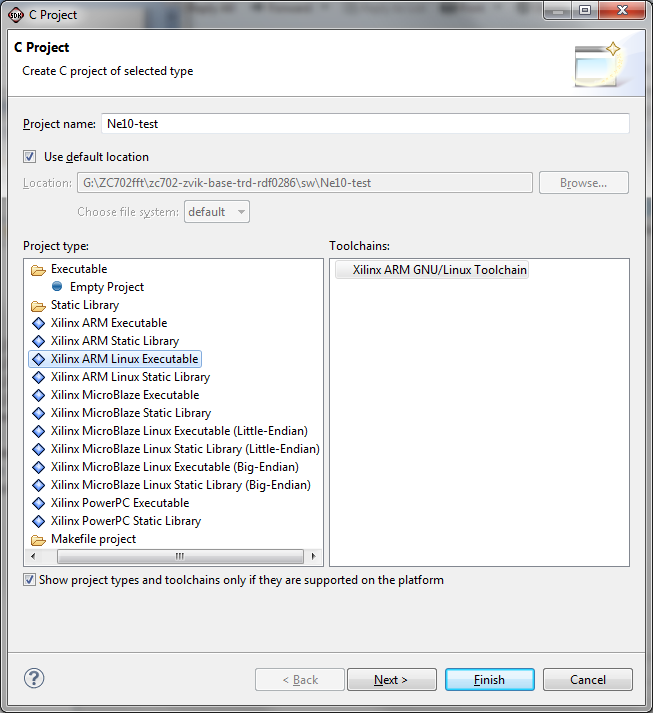
Click Next
Verify that both the Debug and Release Configurations: options are checked.

Click Advanced Settings.
We are now going to add the proper paths to library include files.
Expand the C/C++ General line in the left column and select the Paths and Symbols item. Be sure the Configuration: option is set to Release because we want to have the best performance. If desired, these settings can be applied to both debug and release configurations by selecting the All Configurations options as shown.
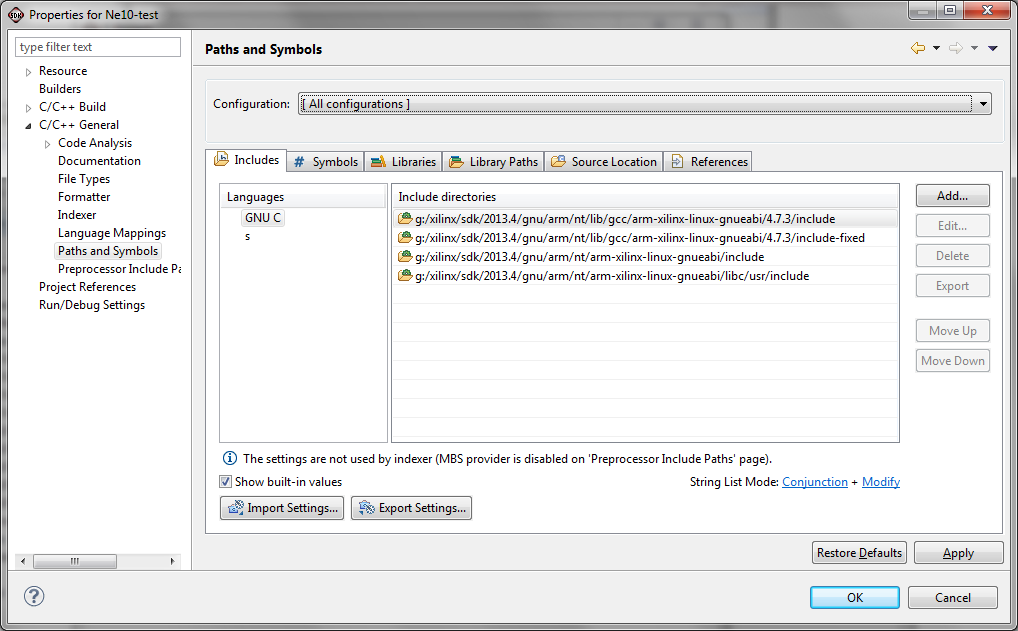
These steps are referred to as the Adding Paths steps and will be used several times
With the Includes tab selected, click Add in the right column to get the following dialogue box

Check both of the options and then Click Workspace to select the directory to be added
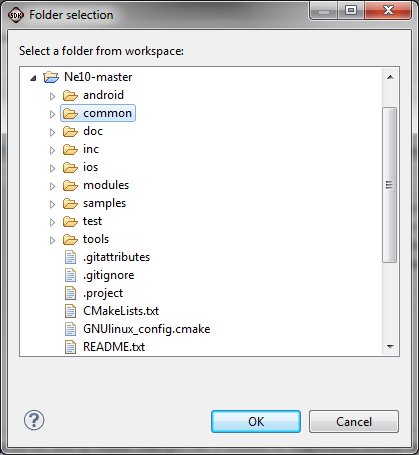
Select Ne10-master -> common and then click OK

Click OK again to add this path to the Includes with the result as shown below

Using these same Adding Paths steps, add the following paths:
- Ne10-master / inc
- Ne10-master / modules / math
- Ne10-master / test / include
When completed you should have the following include directories set.

We now need to add some library paths for tools to find all of the required components.
In the left column of the Properties for Ne10-test, expand C/C++ build options, and select Settings. In the left portion of the right side of the window, under ARM Linux gcc linker, select Libraries.
At the top of the Libraries (-l) area, click on the add icon (looks like a sheet of paper with a plus sign on it).
In the text entry box, type Ne10 and click OK. Then do the same steps for Linux libraries "m" and "rt" resulting in the following

In the Library search path pane, click the add icon (the paper with the plus sign as before) to get a pop up window:
Click Workspace and then select Ne10/Release.
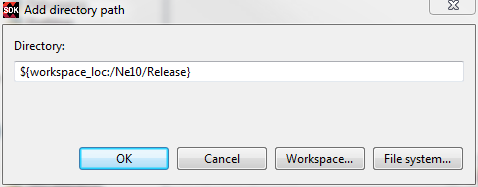
Click OK to return to the Settings window.
NOTE:
These same library paths should be added to the Release configuration also. If the Configuration: option box is not displayed at the top of the Settings window, expand the C/C++ General line and select the Paths and Symbols item. At the top of the window, the Configuration: option box should appear. From the drop down select Release. Then in the left column select the C/C++ Build / Settings item. In the list of Tool Settings, select the Libraries item under the ARM Linux gcc linker.
Using the Add steps used immediately prior for adding to the Debug configuration, add the following Libraries:
- Ne10
- m
- rt
Then add the Library search path (-L) Ne10/Release. You should then have the following:
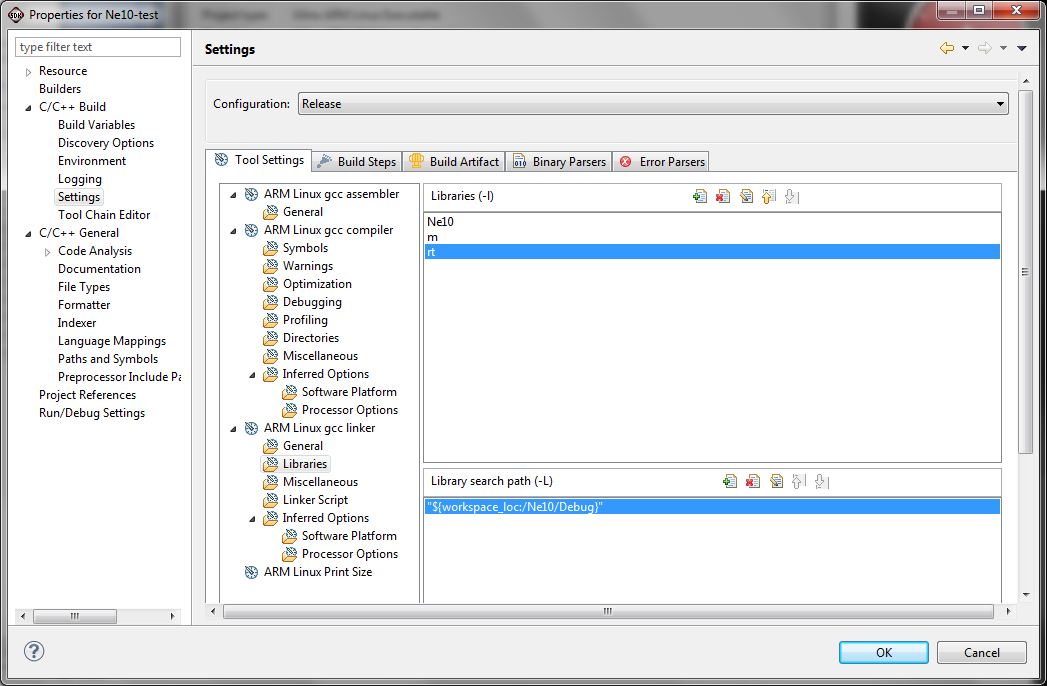
NOTE:
If the original Configuration: box is set to All Configurations, this will force the Debug and Release build options to be identical. This is a simpler approach that can be changed later if different options are desired for the release build versus the debug build. In general, a release build will invoke a higher degree of compiler optimization for more efficient code while a debug release includes additional hooks to simplify analysis and debug of the code. This causes Release build code to usually operate faster than Debug build code.
Click Apply
Click OK to return to the Select Configurations screen.
Click Finish to complete this portion of the setup.
We now need to import the actual code for the tests. This follows a set of steps similar to the import of the code into the Ne10 library in the Zynq-7000 AP SoC Spectrum Analyzer part 2 - Accelerating Software - Building ARM Neon Library Tech Tip 2014.3
Right click on Ne10-test in the Project Explorer window, and select Import.
In the Select window that pops up, expand General and select File System then click Next.
Browse to the Ne10-master directory that is under "Projects\ZC702_Ne10".
WARNING:
Do NOT use the original file that was unzipped or copied into a higher level directory.
Expand Ne10-master in the left pane and select the modules/dsp/test and test/src directories to import.
CAUTION:
If the original source Ne10-master is selected, subsequent build steps will fail. If that occurs, delete the Ne10-master in the workspace and perform the import again, being sure to point to the Ne10-master in workspace directory

Click Finish to perform the import.
The test software is now ready to be built.
NOTE:
To obtain the best execution performance, the compiler default options must be set to Release.
Right click on Ne10-test in the Project Explorer pane.
Select Build Configurations . Set Active > Release
Right click Ne10-test and select Build Project.
As before, there are a number of warnings. These can be ignored for now.
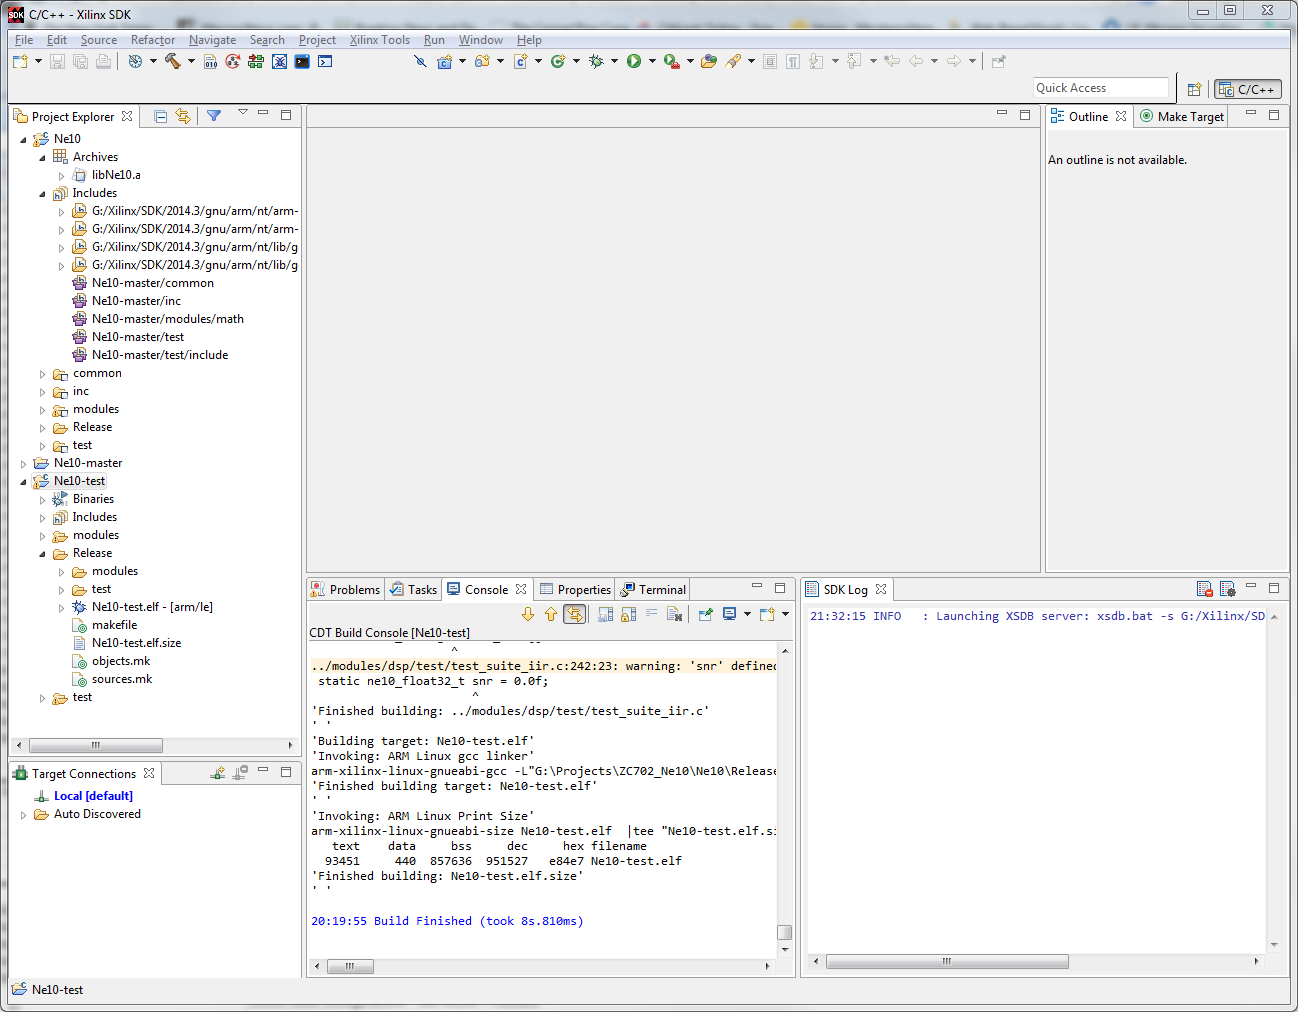
The test software can now be run on the ZC702.
There are several methods that can be used to run the test software on the ZC702. Among them are:
- Use the Remote System Explorer capability in SDK
- Copy the binary file to the SD card containing the TRD Linux system and execute from a remote terminal or from the local console
Since there are two tests that will be run, we will demonstrate each of the methods.
Running from Remote System Explorer
We will access the ZC702 over an Ethernet connection from the PC where SDK is running.
CAUTION!!
The default IP address of the ZC702 is different for PetaLinux than for the OSL Linux used in prior versions of this series of Tech Tips. The default IP address is now 192.168.0.10 so be sure your computer can reach that sub-net.
Connect your ZC702 to your computer or network with an Ethernet cable.
If you are unable to directly reach the .0 subnet from your computer, it is possible to change the IP address of the ZC702 after PetaLinux has booted. To make this change, do the following:
- Connect the console serial over USB port to your PC with the supplied mini-usb adapter and appropriate cable
- Start TeraTerm or similar terminal emulator
- Boot the ZC702 as described below
- Once PetaLinux has booted, log in using the username root and password root
- Use the ifconfig command to change the IP address using - "ifconfig eth0 192.168.1.65" where the IP address is one that you can reach from your PC
The ZC702 must be set to boot from the SD-MMC card that has been updated with the 2014.2 TRD as described in the TRD Technical Article Zynq Base TRD 2014.2. As a caution before proceeding, be sure that the ZC702 will properly run the 2014.2 TRD.
Set the boot select switches as shown below, then power on your ZC702.
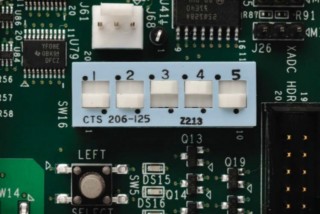
With the ZC702 running, we will set up a Remote System Explorer connection to the ZC702 board to allow us to download and run our program. Right click in the Project Explorer window, select New -> Other. In the pop up window, expand Remote System Explorer, highlight Connection.
NOTE:
The balance of these instructions assume that the IP address of the ZC702 has been changed to 192.168.1.65. If you have set the IP address differently, use that IP address.
With the ZC702 running, we will set up a Remote System Explorer connection to the ZC702 board to allow us to download and run our program. Right click in the Project Explorer window, select New -> Other. In the pop up window, expand Remote System Explorer, highlight Connection.
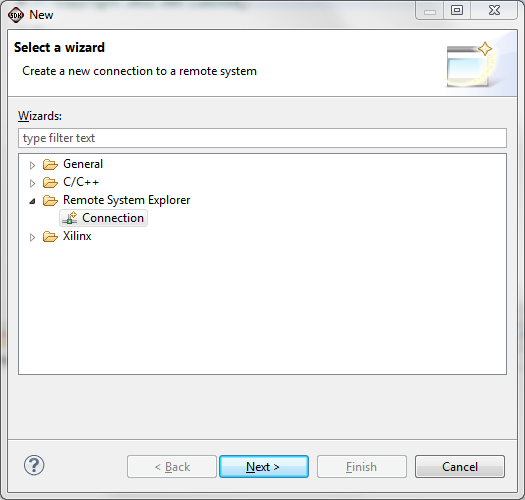
Click Next
In the next window, select SSH Only, and click Next

Use the IP address of the ZC702 (192.168.1.65) as the Host name and Connection name. Fill in the description field if you wish - it is not required.
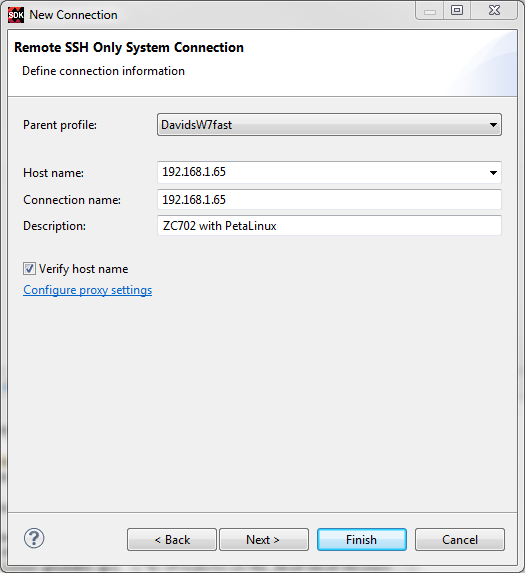
Click Finish.
NOTE:
Although the connection has been established, there is nothing showing. To view the connection, a new perspective must be started, replacing the current perspective. To do this,
Click Window -> Open Perspective -> Other
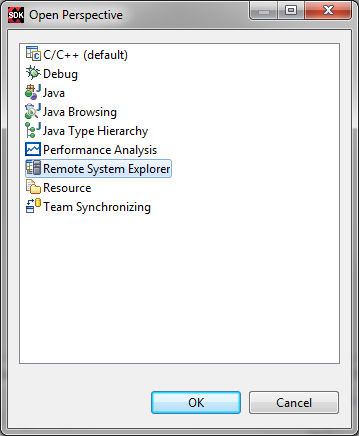
Then select Remote System Explorer and click OK.
The Remote System Explorer connection will be displayed.

Close this perspective by clicking
Window -> Close Perspective (As an alternative, click on the C/C++ tab in the upper right corner of the overall window. This returns to the build perspective with the RSE perspective still available.)
With the connection established and the standard Project Explorer perspective displayed, we can now download and run the test program directly to the ZC702.
In the Project Explorer, right click on Ne10-test, then select Run As -> Run Configurations.
A new window will open to create, manage and run configurations.

Create a new Remote ARM Linux Application by double clicking on "Remote ARM Linux Application" in the left column. (This can also be done by following the instructions in the main window for using the "New" button.)
Select the IP address of the ZC702 in the pull down Connection menu.
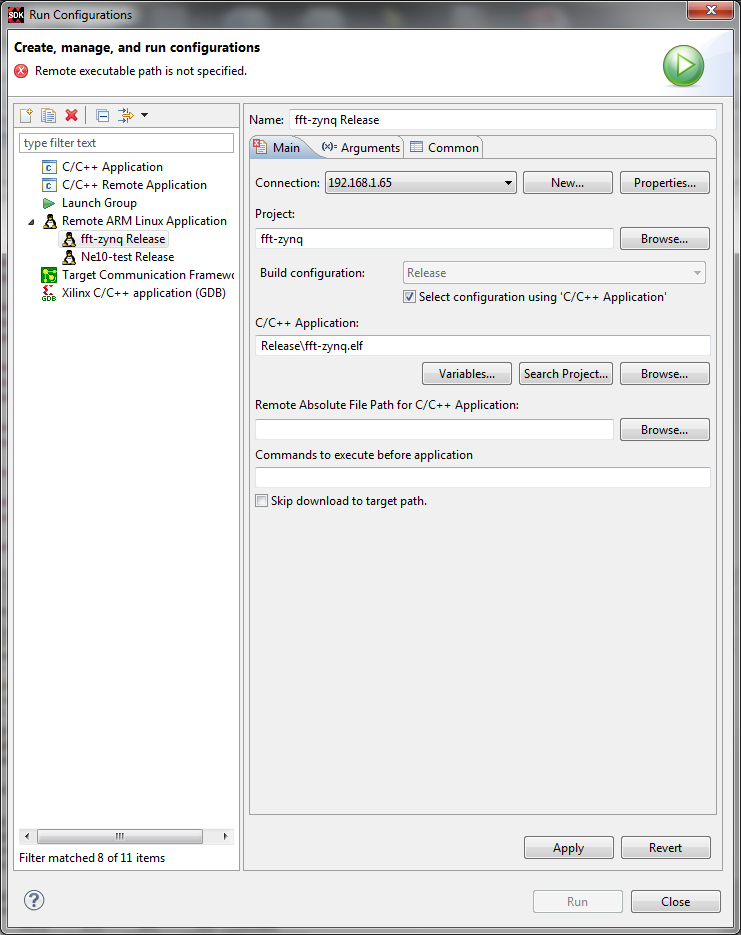
NOTE:
If SDK has been used for other Tech Tips or development work, there may be items listed under "Remote ARM Linux Application" in the left panel of the RSE screen above. These can be ignored. For example, in the screen above the item "fft-zynq Release" is from work on another Tech Tip.
Then click on the Browse button next to the Remote Absolute File Path for C/C++ Application field .
Expand the Root directory. Under the root directory select the tmp directory. If prompted for the User ID and Password, use root for both.


Click OK
Append /Ne10-test.elf to /tmp in the Remote Absolute File Path for C/C++ Applications field.
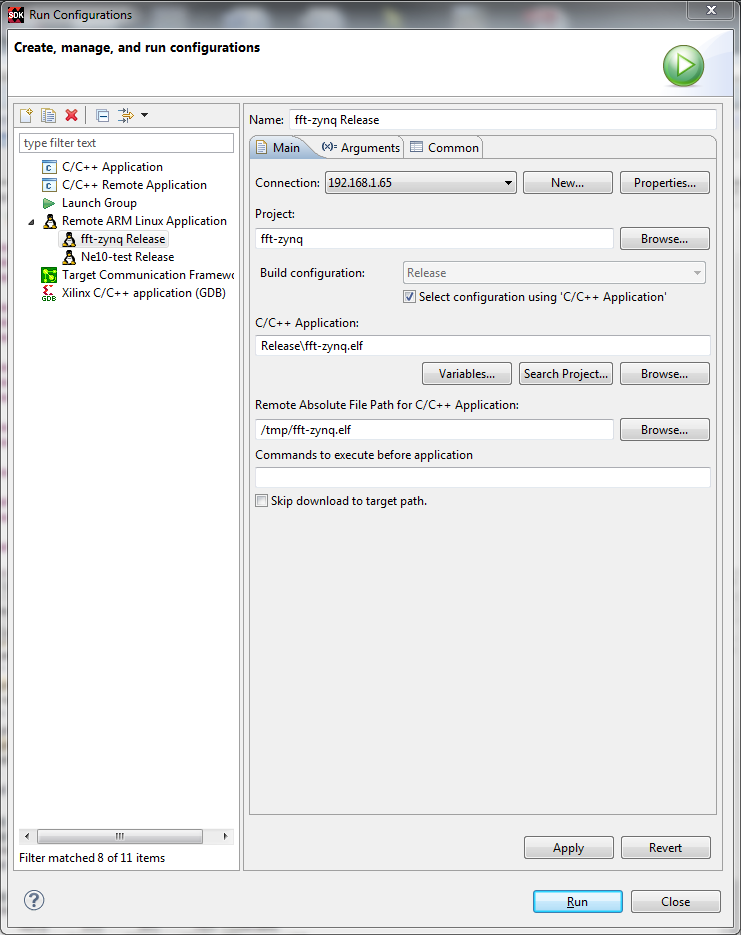
Click Apply, then click Run.
The test software will be downloaded to the ZC702 and then run. The results will show in the SDK Console window.
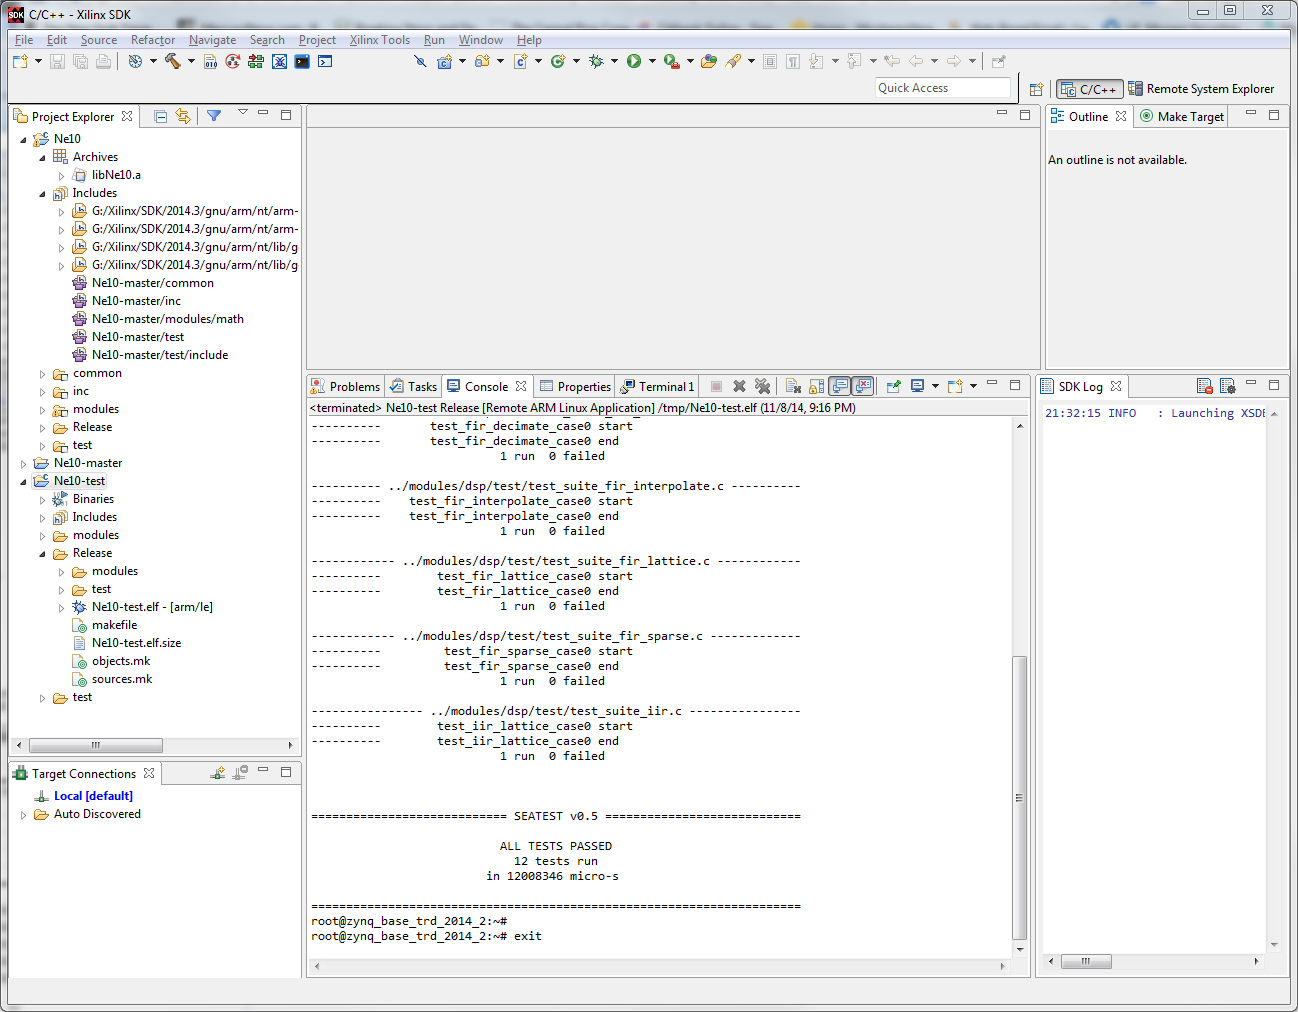
NOTE:
Once the Run Configuration has been set up, SDK will remember this configuration, simplifying subsequent tests in the same environment.
This first test is a regression test that checks the code in the library for correct results so any mistakes that are made in optimizations, etc. will be caught. It is using the open source SEATEST project that implements an xUnit style of Test Driven Development.
The SEATEST project is hosted at https://code.google.com/p/seatest/
Additional information about xUnit testing can be found at http://en.wikipedia.org/wiki/XUnit
At the conclusion of this test with all of the runs passing, we can conclude that the desired fft portion of the library has been properly built and is operating as designed.
Performance Test
The second test that we will run is a performance comparison between running these same complex functions on the ARM processor itself and then running with optimizations to use the NEON SIMD engine. This test is included in the Ne10 library and is selectively compiled based on the presence or absence of a special symbol. To run the performance test we need to define the PERFORMANCE_TEST symbol.
Right click on Ne10-test and select Properties.
Expand the C/C++ General line in the left column and then select the Paths and Symbols entry.
Select the #Symbols tab by clicking on it.
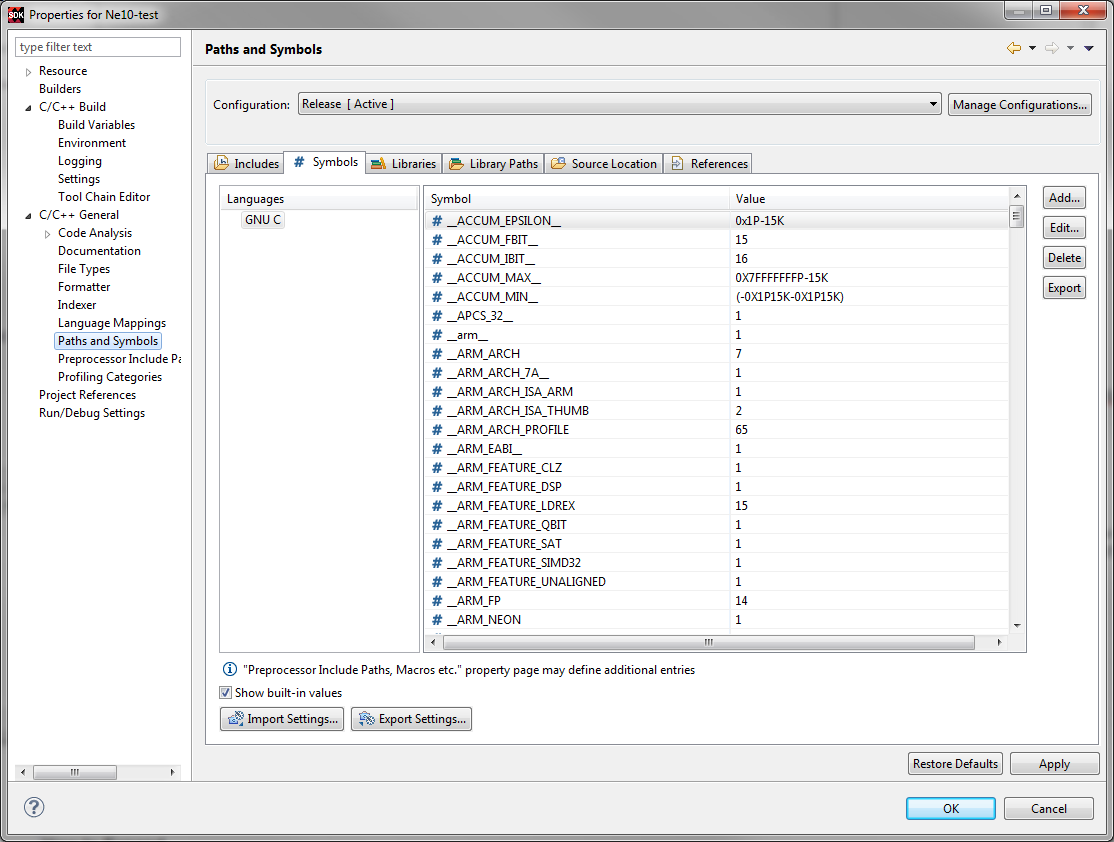
Click the Add button on the right side and enter PERFORMANCE_TEST as the symbol name. There is no value required so leave that entry blank.
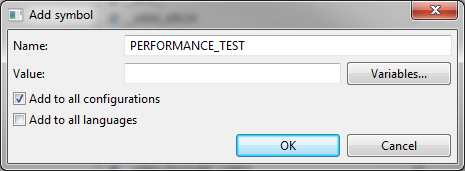
Click the Add to all configurations check box then Click OK.
The Add Symbol window closes revealing the Paths and Symbols window. If you scroll to the end of the list, you will see the PERFORMANCE_TEST symbol.
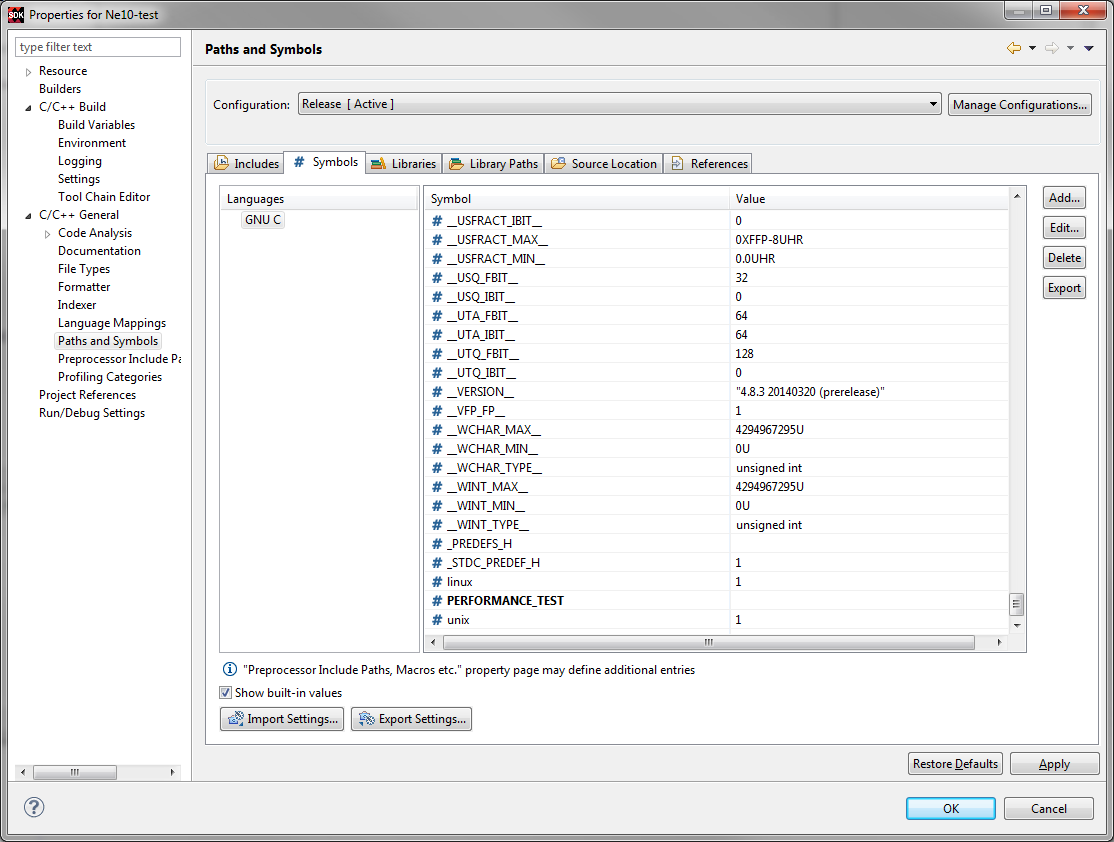
Click Apply
If an information box relating to changes in the paths or symbols appears, click Yes to accept it.
Click OK.
With the symbol in place, the test software must be rebuilt.
Right click on Ne10-test in the Project Explorer and select Build Project. As before, there will be several warnings that we can ignore for now.
The revised test program can now be run. We can use the same process just described to run it with the SDK Remote System Explorer. As noted earlier, the setup steps do not need to be performed again. Simply right click Ne10-test in the Project Explorer, select Run As -> Run Configurations. Then select the previously created Ne10-test configuration, and click Run.
The results will be displayed in the Console window of SDK as shown below.

We can see a generally consistent improvement in performance with NEON versus the general purpose ARM processor alone. Performance improvements vary for each execution run based on the other operations within Linux at the time the tests are run.
NOTE:
With the test performed in this manner, the base TRD is still operating.
An alternative method is to add the test program to the SD-MMC card that contains the base TRD, and then execute it from the console on the ZC702.
CAUTION!
In the OSL based version of these Tech Tips, files that are added to the root of the SD-MMC card are copied to the /mnt directory when the TRD boots up. For the PetaLinux based 2014.2 TRD, they are not automatically copied from the SD card. The copy process must be done manually as described in the following instructions.
In SDK, expand the line Ne10-test in Project Explorer, then expand the Binaries sub-directory. You should have a file Ne10-test.elf as the only item in the Binaries sub-directory.

Power off the ZC702 and remove the SD-MMC card from the ZC702 and insert it into an appropriate media reader on your computer.
Using standard Windows Explorer, navigate to the SD-MMC card to show its contents. The default should be the following showing the root of the SD-MMC card image.
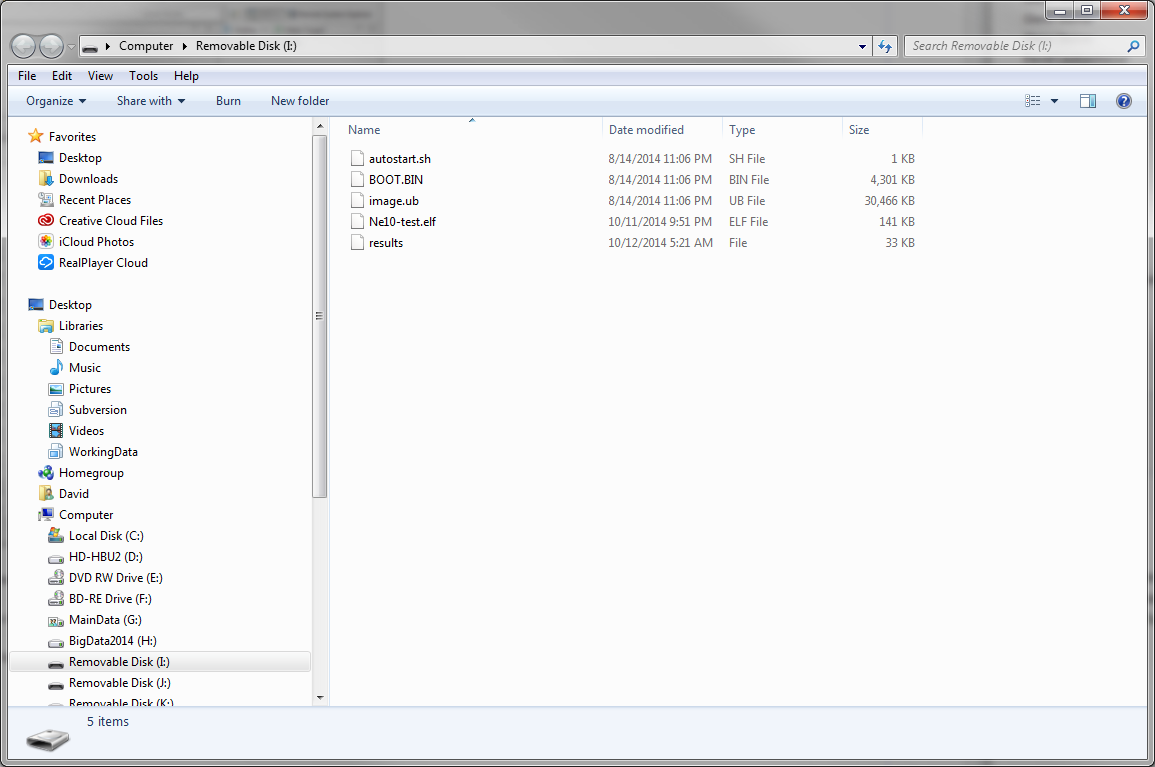
Use standard Windows copy / paste methods to copy the Ne10-test.elf file to the root of the SD-MMC card. In the SDK window, right click on the Ne10-test.elf file and select Copy. Then in the Windows Explorer window for the SD-MMC card, right click and select Paste.
Eject the SD-MMC card from your computer, re-insert it in the ZC702 and power on the ZC702.
After the ZC702 boots up, use the instructions in UG926_Z7_ZC702_Eval_Kit to establish a terminal connection to the ZC702. Log in using the username root and the password root.
Exit out of the QT window system if the terminal window does not respond to commands.
Change to the /media directory and verify that Ne10-test.elf is there (cd //media then use ls to see the files on the SD card).

Attempting to execute Ne10-test from here will fail because the standard execution path does not include the /mnt directory. There are at least three ways to resolve this:
- change the path variable to include the /mnt directory
- from the /mnt directory, type ./Ne10-test.elf and the program will execute in place
- copy the Ne10-test.elf to the /bin directory which is in the execution path by default.
We used the latter of these two; at the prompt type
cp Ne10-test.elf /bin
Then change to the /bin directory to verify that it is there using ls to list the files (if you are unfamiliar with Linux, the commands to enter can be seen on the next screen).

We can now execute the test from the terminal window.
Performance Results
Type Ne10-test.elf and then Return. The tests should run and provide the following results in the terminal window. There will be some variability in the reported numbers.
| --------------- ../modules/dsp/test_suite_fft_float32.c -------------- |
||||||||
| --------------- test_fft_c2c_1d_float32_performance start |
||||||||
| FFT Length |
C Time in ms |
NEON Time in ms |
Time Savings |
Performance Ratio |
||||
| FFT |
size |
4 |
||||||
| 4 |
374815 |
218158 |
41.80% |
1.72:1 |
||||
| 4 |
507480 |
316038 |
37.72% |
1.61:1 |
||||
| FFT |
size |
8 |
||||||
| 8 |
309311 |
218107 |
29.49% |
1.42:1 |
||||
| 8 |
451916 |
287729 |
36.33% |
1.57:1 |
||||
| FFT |
size |
16 |
||||||
| 16 |
424538 |
288772 |
31.98% |
1.47:1 |
||||
| 16 |
469142 |
332249 |
29.18% |
1.41:1 |
||||
| FFT |
size |
32 |
||||||
| 32 |
433718 |
290071 |
33.12% |
1.50:1 |
||||
| 32 |
465857 |
342670 |
26.44% |
1.36:1 |
||||
| FFT |
size |
64 |
||||||
| 64 |
593465 |
370792 |
37.52% |
1.60:1 |
||||
| 64 |
626945 |
407847 |
34.95% |
1.54:1 |
||||
| FFT |
size |
128 |
||||||
| 128 |
623664 |
382343 |
38.69% |
1.63:1 |
||||
| 128 |
651775 |
411053 |
36.93% |
1.59:1 |
||||
| FFT |
size |
256 |
||||||
| 256 |
793286 |
474970 |
40.13% |
1.67:1 |
||||
| 256 |
818263 |
499879 |
38.91% |
1.64:1 |
||||
| FFT |
size |
512 |
||||||
| 512 |
824819 |
496454 |
39.81% |
1.66:1 |
||||
| 512 |
851909 |
518939 |
39.09% |
1.64:1 |
||||
| FFT |
size |
102 |
4 |
|||||
| 1024 |
1006749 |
674242 |
33.03% |
1.49:1 |
||||
| 1024 |
1031796 |
695949 |
32.55% |
1.48:1 |
||||
| FFT |
size |
204 |
8 |
|||||
| 2048 |
1269389 |
814429 |
35.84% |
1.56:1 |
||||
| 2048 |
1295756 |
835657 |
35.51% |
1.55:1 |
||||
| FFT |
size |
409 |
6 |
|||||
| 4096 |
1624212 |
967713 |
40.42% |
1.68:1 |
||||
| 4096 |
1644871 |
990883 |
39.76% |
1.66:1 |
||||
| FFT |
size |
819 |
2 |
|||||
| 8192 |
1792991 |
1061726 |
40.78% |
1.69:1 |
||||
| 8192 |
1828000 |
1081759 |
40.82% |
1.69:1 |
||||
| FFT |
size |
163 |
84 |
|||||
| 16384 |
2034080 |
1264879 |
37.82% |
1.61:1 |
||||
| 16384 |
2053804 |
1295538 |
36.92% |
1.59:1 |
||||
| FFT |
size |
327 |
68 |
|||||
| 32768 |
2314123 |
1523282 |
34.17% |
1.52:1 |
||||
| 32768 |
2361641 |
1535453 |
34.98% |
1.54:1 |
||||
| 1 run 0 failed |
||||||||
| --------------- ../modules/dsp/test_suite_fft_float32.c -------------- |
||||||||
| --------------- test_fft_r2c_1d_float32_performance start |
||||||||
| FFT Length |
C Time in ms |
NEON Time in ms |
Time Savings |
Performance Ratio |
||||
| FFT |
size |
8 |
||||||
| 8 |
357331 |
347361 |
2.79% |
1.03:1 |
||||
| 8 |
448752 |
370542 |
17.43% |
1.21:1 |
||||
| FFT |
size |
16 |
||||||
| 16 |
308953 |
285220 |
7.68% |
1.08:1 |
||||
| 16 |
386598 |
299896 |
22.43% |
1.29:1 |
||||
| FFT |
size |
32 |
||||||
| 32 |
358051 |
268064 |
25.13% |
1.34:1 |
||||
| 32 |
379834 |
275302 |
27.52% |
1.38:1 |
||||
| FFT |
size |
64 |
||||||
| 64 |
359404 |
252432 |
29.76% |
1.42:1 |
||||
| 64 |
375510 |
271093 |
27.81% |
1.39:1 |
||||
| FFT |
size |
128 |
||||||
| 128 |
438858 |
284657 |
35.14% |
1.54:1 |
||||
| 128 |
450071 |
298862 |
33.60% |
1.51:1 |
||||
| FFT |
size |
256 |
||||||
| 256 |
452266 |
285775 |
36.81% |
1.58:1 |
||||
| 256 |
463162 |
298280 |
35.60% |
1.55:1 |
||||
| FFT |
size |
512 |
||||||
| 512 |
536469 |
329983 |
38.49% |
1.63:1 |
||||
| 512 |
543747 |
341439 |
37.21% |
1.59:1 |
||||
| FFT |
size |
102 |
4 |
|||||
| 1024 |
552250 |
340107 |
38.41% |
1.62:1 |
||||
| 1024 |
562154 |
351730 |
37.43% |
1.60:1 |
||||
| FFT |
size |
204 |
8 |
|||||
| 2048 |
681046 |
444149 |
34.78% |
1.53:1 |
||||
| 2048 |
703665 |
458512 |
34.84% |
1.53:1 |
||||
| FFT |
size |
409 |
6 |
|||||
| 4096 |
811137 |
531672 |
34.45% |
1.53:1 |
||||
| 4096 |
824888 |
548320 |
33.53% |
1.50:1 |
||||
| FFT |
size |
819 |
2 |
|||||
| 8192 |
1012151 |
687145 |
32.11% |
1.47:1 |
||||
| 8192 |
1015547 |
672147 |
33.81% |
1.51:1 |
||||
| FFT |
size |
163 |
84 |
|||||
| 16384 |
1090721 |
712975 |
34.63% |
1.53:1 |
||||
| 16384 |
1144431 |
721839 |
36.93% |
1.59:1 |
||||
| FFT |
size |
327 |
68 |
|||||
| 32768 |
1203119 |
918508 |
23.66% |
1.31:1 |
||||
| 32768 |
1293110 |
906816 |
29.87% |
1.43:1 |
||||
| 1 run 0 failed |
||||||||
| --------------- ../modules/dsp/test_suite_fft_int32.c -------------- |
||||||||
| --------------- test_fft_c2c_1d_int32_performance start |
||||||||
| FFT Length |
C Time in ms |
NEON Time in ms |
Time Savings |
Performance Ratio |
||||
| FFT |
size |
4 |
||||||
| 4 |
8810 |
6340 |
28.04% |
1.39:1 |
||||
| 4 |
8673 |
6446 |
25.68% |
1.35:1 |
||||
| 4 |
9941 |
6754 |
32.06% |
1.47:1 |
||||
| 4 |
10067 |
6640 |
34.04% |
1.52:1 |
||||
| FFT |
size |
8 |
||||||
| 8 |
10402 |
6596 |
36.59% |
1.58:1 |
||||
| 8 |
10256 |
6894 |
32.78% |
1.49:1 |
||||
| 8 |
13987 |
6894 |
50.71% |
2.03:1 |
||||
| 8 |
13988 |
7393 |
47.15% |
1.89:1 |
||||
| FFT |
size |
16 |
||||||
| 16 |
18187 |
6158 |
66.14% |
2.95:1 |
||||
| 16 |
18092 |
6052 |
66.55% |
2.99:1 |
||||
| 16 |
21839 |
6261 |
71.33% |
3.49:1 |
||||
| 16 |
21987 |
6641 |
69.80% |
3.31:1 |
||||
| FFT |
size |
32 |
||||||
| 32 |
21405 |
7428 |
65.30% |
2.88:1 |
||||
| 32 |
20880 |
7380 |
64.66% |
2.83:1 |
||||
| 32 |
26998 |
7585 |
71.91% |
3.56:1 |
||||
| 32 |
26918 |
7615 |
71.71% |
3.53:1 |
||||
| FFT |
size |
64 |
||||||
| 64 |
29977 |
9694 |
67.66% |
3.09:1 |
||||
| 64 |
29390 |
9695 |
67.01% |
3.03:1 |
||||
| 64 |
35435 |
9788 |
72.38% |
3.62:1 |
||||
| 64 |
35104 |
9788 |
72.12% |
3.59:1 |
||||
| FFT |
size |
128 |
||||||
| 128 |
33375 |
9732 |
70.84% |
3.43:1 |
||||
| 128 |
32389 |
9719 |
69.99% |
3.33:1 |
||||
| 128 |
41128 |
10004 |
75.68% |
4.11:1 |
||||
| 128 |
40395 |
10000 |
75.24% |
4.04:1 |
||||
| FFT |
size |
256 |
||||||
| 256 |
42147 |
12418 |
70.54% |
3.39:1 |
||||
| 256 |
41100 |
12419 |
69.78% |
3.31:1 |
||||
| 256 |
49761 |
12596 |
74.69% |
3.95:1 |
||||
| 256 |
49048 |
12605 |
74.30% |
3.89:1 |
||||
| FFT |
size |
512 |
||||||
| 512 |
45850 |
12968 |
71.72% |
3.54:1 |
||||
| 512 |
44530 |
12775 |
71.31% |
3.49:1 |
||||
| 512 |
55758 |
13254 |
76.23% |
4.21:1 |
||||
| 512 |
54445 |
13089 |
75.96% |
4.16:1 |
||||
| FFT |
size |
102 |
4 |
|||||
| 1024 |
56278 |
17334 |
69.20% |
3.25:1 |
||||
| 1024 |
55068 |
16803 |
69.49% |
3.28:1 |
||||
| 1024 |
66119 |
17555 |
73.45% |
3.77:1 |
||||
| 1024 |
64835 |
16961 |
73.84% |
3.82:1 |
||||
| FFT |
size |
204 |
8 |
|||||
| 2048 |
62570 |
20026 |
67.99% |
3.12:1 |
||||
| 2048 |
61224 |
20520 |
66.48% |
2.98:1 |
||||
| 2048 |
76321 |
20408 |
73.26% |
3.74:1 |
||||
| 2048 |
74265 |
20868 |
71.90% |
3.56:1 |
||||
| FFT |
size |
409 |
6 |
|||||
| 4096 |
74336 |
24348 |
67.25% |
3.05:1 |
||||
| 4096 |
71119 |
25278 |
64.46% |
2.81:1 |
||||
| 4096 |
84950 |
24601 |
71.04% |
3.45:1 |
||||
| 4096 |
82875 |
25401 |
69.35% |
3.26:1 |
||||
| FFT |
size |
819 |
2 |
|||||
| 8192 |
78762 |
26678 |
66.13% |
2.95:1 |
||||
| 8192 |
75575 |
27590 |
63.49% |
2.74:1 |
||||
| 8192 |
94085 |
27034 |
71.27% |
3.48:1 |
||||
| 8192 |
91373 |
27784 |
69.59% |
3.29:1 |
||||
| FFT |
size |
163 |
84 |
|||||
| 16384 |
89690 |
36522 |
59.28% |
2.46:1 |
||||
| 16384 |
87455 |
33728 |
61.43% |
2.59:1 |
||||
| 16384 |
102730 |
32248 |
68.61% |
3.19:1 |
||||
| 16384 |
99394 |
33614 |
66.18% |
2.96:1 |
||||
| FFT |
size |
327 |
68 |
|||||
| 32768 |
94097 |
38009 |
59.61% |
2.48:1 |
||||
| 32768 |
89076 |
38737 |
56.51% |
2.30:1 |
||||
| 32768 |
109723 |
38337 |
65.06% |
2.86:1 |
||||
| 32768 |
106292 |
38340 |
63.93% |
2.77:1 |
||||
| 1 run 0 failed |
||||||||
| --------------- ../modules/dsp/test_suite_fft_int32.c -------------- |
||||||||
| --------------- test_fft_r2c_1d_int32_performance start |
||||||||
| FFT Length |
C Time in ms |
NEON Time in ms |
Time Savings |
Performance Ratio |
||||
| FFT |
size |
8 |
||||||
| 8 |
9168 |
9796 |
-6.85% |
0.94:1 |
||||
| 8 |
8966 |
8989 |
-0.26% |
1.00:1 |
||||
| 8 |
10350 |
10769 |
-4.05% |
0.96:1 |
||||
| 8 |
9993 |
9831 |
1.62% |
1.02:1 |
||||
| FFT |
size |
16 |
||||||
| 16 |
9343 |
6808 |
27.13% |
1.37:1 |
||||
| 16 |
8708 |
6472 |
25.68% |
1.35:1 |
||||
| 16 |
11685 |
7087 |
39.35% |
1.65:1 |
||||
| 16 |
10981 |
6971 |
36.52% |
1.58:1 |
||||
| FFT |
size |
32 |
||||||
| 32 |
12875 |
5658 |
56.05% |
2.28:1 |
||||
| 32 |
12296 |
5376 |
56.28% |
2.29:1 |
||||
| 32 |
15213 |
6020 |
60.43% |
2.53:1 |
||||
| 32 |
14374 |
5881 |
59.09% |
2.44:1 |
||||
| FFT |
size |
64 |
||||||
| 64 |
14287 |
5895 |
58.74% |
2.42:1 |
||||
| 64 |
13372 |
5737 |
57.10% |
2.33:1 |
||||
| 64 |
17626 |
6104 |
65.37% |
2.89:1 |
||||
| 64 |
16717 |
6032 |
63.92% |
2.77:1 |
||||
| FFT |
size |
128 |
||||||
| 128 |
18511 |
6857 |
62.96% |
2.70:1 |
||||
| 128 |
17416 |
6691 |
61.58% |
2.60:1 |
||||
| 128 |
21804 |
6977 |
68.00% |
3.13:1 |
||||
| 128 |
20612 |
6968 |
66.19% |
2.96:1 |
||||
| FFT |
size |
256 |
||||||
| 256 |
20110 |
6763 |
66.37% |
2.97:1 |
||||
| 256 |
18815 |
6614 |
64.85% |
2.84:1 |
||||
| 256 |
24587 |
6941 |
71.77% |
3.54:1 |
||||
| 256 |
23248 |
6948 |
70.11% |
3.35:1 |
||||
| FFT |
size |
512 |
||||||
| 512 |
24475 |
8061 |
67.06% |
3.04:1 |
||||
| 512 |
23113 |
7954 |
65.59% |
2.91:1 |
||||
| 512 |
28890 |
8172 |
71.71% |
3.54:1 |
||||
| 512 |
27329 |
8222 |
69.91% |
3.32:1 |
||||
| FFT |
size |
102 |
4 |
|||||
| 1024 |
26285 |
8274 |
68.52% |
3.18:1 |
||||
| 1024 |
24682 |
8148 |
66.99% |
3.03:1 |
||||
| 1024 |
31795 |
8475 |
73.34% |
3.75:1 |
||||
| 1024 |
30041 |
8505 |
71.69% |
3.53:1 |
||||
| FFT |
size |
204 |
8 |
|||||
| 2048 |
32680 |
10707 |
67.24% |
3.05:1 |
||||
| 2048 |
30768 |
11154 |
63.75% |
2.76:1 |
||||
| 2048 |
38185 |
10790 |
71.74% |
3.54:1 |
||||
| 2048 |
36080 |
11746 |
67.44% |
3.07:1 |
||||
| FFT |
size |
409 |
6 |
|||||
| 4096 |
36049 |
13087 |
63.70% |
2.75:1 |
||||
| 4096 |
34017 |
12931 |
61.99% |
2.63:1 |
||||
| 4096 |
42809 |
13172 |
69.23% |
3.25:1 |
||||
| 4096 |
40918 |
13229 |
67.67% |
3.09:1 |
||||
| FFT |
size |
819 |
2 |
|||||
| 8192 |
40608 |
16293 |
59.88% |
2.49:1 |
||||
| 8192 |
38895 |
15635 |
59.80% |
2.49:1 |
||||
| 8192 |
46931 |
16145 |
65.60% |
2.91:1 |
||||
| 8192 |
45172 |
15774 |
65.08% |
2.86:1 |
||||
| FFT |
size |
163 |
84 |
|||||
| 16384 |
44386 |
18068 |
59.29% |
2.46:1 |
||||
| 16384 |
42292 |
16976 |
59.86% |
2.49:1 |
||||
| 16384 |
52148 |
17515 |
66.41% |
2.98:1 |
||||
| 16384 |
51038 |
17278 |
66.15% |
2.95:1 |
||||
| FFT |
size |
327 |
68 |
|||||
| 32768 |
46800 |
22048 |
52.89% |
2.12:1 |
||||
| 32768 |
44940 |
20038 |
55.41% |
2.24:1 |
||||
| 32768 |
52349 |
21121 |
59.65% |
2.48:1 |
||||
| 32768 |
54219 |
21326 |
60.67% |
2.54:1 |
||||
| 1 run 0 failed |
||||||||
| --------------- ../modules/dsp/test_suite_fft_int16.c -------------- |
||||||||
| --------------- test_fft_c2c_1d_int16_performance start |
||||||||
| FFT Length |
C Time in ms |
NEON Time in ms |
Time Savings |
Performance Ratio |
||||
| FFT |
size |
4 |
||||||
| 4 |
9924 |
4244 |
57.23% |
2.34:1 |
||||
| 4 |
9604 |
4214 |
56.12% |
2.28:1 |
||||
| 4 |
11849 |
4362 |
63.19% |
2.72:1 |
||||
| 4 |
11784 |
4221 |
64.18% |
2.79:1 |
||||
| FFT |
size |
8 |
||||||
| 8 |
11172 |
6736 |
39.71% |
1.66:1 |
||||
| 8 |
10866 |
7108 |
34.58% |
1.53:1 |
||||
| 8 |
15382 |
7253 |
52.85% |
2.12:1 |
||||
| 8 |
15153 |
7121 |
53.01% |
2.13:1 |
||||
| FFT |
size |
16 |
||||||
| 16 |
15068 |
5137 |
65.91% |
2.93:1 |
||||
| 16 |
14481 |
5136 |
64.53% |
2.82:1 |
||||
| 16 |
20011 |
5190 |
74.06% |
3.86:1 |
||||
| 16 |
19440 |
5160 |
73.46% |
3.77:1 |
||||
| FFT |
size |
32 |
||||||
| 32 |
17928 |
3929 |
78.08% |
4.56:1 |
||||
| 32 |
17346 |
4057 |
76.61% |
4.28:1 |
||||
| 32 |
24814 |
4175 |
83.17% |
5.94:1 |
||||
| 32 |
24570 |
4046 |
83.53% |
6.07:1 |
||||
| FFT |
size |
64 |
||||||
| 64 |
23008 |
4954 |
78.47% |
4.64:1 |
||||
| 64 |
23367 |
4984 |
78.67% |
4.69:1 |
||||
| 64 |
30405 |
5001 |
83.55% |
6.08:1 |
||||
| 64 |
30466 |
5030 |
83.49% |
6.06:1 |
||||
| FFT |
size |
128 |
||||||
| 128 |
26085 |
4699 |
81.99% |
5.55:1 |
||||
| 128 |
26661 |
4699 |
82.38% |
5.67:1 |
||||
| 128 |
35684 |
4840 |
86.44% |
7.37:1 |
||||
| 128 |
36113 |
4840 |
86.60% |
7.46:1 |
||||
| FFT |
size |
256 |
||||||
| 256 |
31287 |
5992 |
80.85% |
5.22:1 |
||||
| 256 |
32847 |
6006 |
81.72% |
5.47:1 |
||||
| 256 |
41402 |
6135 |
85.18% |
6.75:1 |
||||
| 256 |
42083 |
6077 |
85.56% |
6.92:1 |
||||
| FFT |
size |
512 |
||||||
| 512 |
34490 |
6001 |
82.60% |
5.75:1 |
||||
| 512 |
36257 |
6001 |
83.45% |
6.04:1 |
||||
| 512 |
46891 |
6129 |
86.93% |
7.65:1 |
||||
| 512 |
47936 |
6182 |
87.10% |
7.75:1 |
||||
| FFT |
size |
102 |
4 |
|||||
| 1024 |
39762 |
7310 |
81.62% |
5.44:1 |
||||
| 1024 |
42607 |
7300 |
82.87% |
5.84:1 |
||||
| 1024 |
52675 |
7394 |
85.96% |
7.12:1 |
||||
| 1024 |
54046 |
7428 |
86.26% |
7.28:1 |
||||
| FFT |
size |
204 |
8 |
|||||
| 2048 |
43917 |
8772 |
80.03% |
5.01:1 |
||||
| 2048 |
46858 |
8778 |
81.27% |
5.34:1 |
||||
| 2048 |
59075 |
8921 |
84.90% |
6.62:1 |
||||
| 2048 |
60890 |
8961 |
85.28% |
6.80:1 |
||||
| FFT |
size |
409 |
6 |
|||||
| 4096 |
51233 |
11634 |
77.29% |
4.40:1 |
||||
| 4096 |
54713 |
11616 |
78.77% |
4.71:1 |
||||
| 4096 |
67073 |
11772 |
82.45% |
5.70:1 |
||||
| 4096 |
69376 |
12027 |
82.66% |
5.77:1 |
||||
| 1 run 0 failed |
||||||||
| --------------- ../modules/dsp/test_suite_fft_int16.c -------------- |
||||||||
| --------------- test_fft_r2c_1d_int16_performance start |
||||||||
| FFT Length |
C Time in ms |
NEON Time in ms |
Time Savings |
Performance Ratio |
||||
| FFT |
size |
8 |
||||||
| 8 |
9423 |
8474 |
10.07% |
1.11:1 |
||||
| 8 |
9882 |
7925 |
19.80% |
1.25:1 |
||||
| 8 |
10916 |
9456 |
13.37% |
1.15:1 |
||||
| 8 |
11895 |
8704 |
26.83% |
1.37:1 |
||||
| FFT |
size |
16 |
||||||
| 16 |
9367 |
7984 |
14.76% |
1.17:1 |
||||
| 16 |
9458 |
7654 |
19.07% |
1.24:1 |
||||
| 16 |
12271 |
9037 |
26.35% |
1.36:1 |
||||
| 16 |
12323 |
8768 |
28.85% |
1.41:1 |
||||
| FFT |
size |
32 |
||||||
| 32 |
11007 |
4323 |
60.72% |
2.55:1 |
||||
| 32 |
10818 |
4105 |
62.05% |
2.64:1 |
||||
| 32 |
13963 |
4455 |
68.09% |
3.13:1 |
||||
| 32 |
13846 |
4199 |
69.67% |
3.30:1 |
||||
| FFT |
size |
64 |
||||||
| 64 |
12271 |
3308 |
73.04% |
3.71:1 |
||||
| 64 |
11939 |
3168 |
73.47% |
3.77:1 |
||||
| 64 |
16190 |
3414 |
78.91% |
4.74:1 |
||||
| 64 |
16137 |
3273 |
79.72% |
4.93:1 |
||||
| FFT |
size |
128 |
||||||
| 128 |
14604 |
3576 |
75.51% |
4.08:1 |
||||
| 128 |
14784 |
3552 |
75.97% |
4.16:1 |
||||
| 128 |
18908 |
3648 |
80.71% |
5.18:1 |
||||
| 128 |
18903 |
3574 |
81.09% |
5.29:1 |
||||
| FFT |
size |
256 |
||||||
| 256 |
16110 |
3304 |
79.49% |
4.88:1 |
||||
| 256 |
16344 |
3309 |
79.75% |
4.94:1 |
||||
| 256 |
21490 |
3473 |
83.84% |
6.19:1 |
||||
| 256 |
21598 |
3400 |
84.26% |
6.35:1 |
||||
| FFT |
size |
512 |
||||||
| 512 |
18666 |
3885 |
79.19% |
4.80:1 |
||||
| 512 |
19403 |
3942 |
79.68% |
4.92:1 |
||||
| 512 |
24337 |
4018 |
83.49% |
6.06:1 |
||||
| 512 |
24600 |
3976 |
83.84% |
6.19:1 |
||||
| FFT |
size |
102 |
4 |
|||||
| 1024 |
20306 |
3862 |
80.98% |
5.26:1 |
||||
| 1024 |
21109 |
3892 |
81.56% |
5.42:1 |
||||
| 1024 |
27050 |
4032 |
85.09% |
6.71:1 |
||||
| 1024 |
27416 |
4016 |
85.35% |
6.83:1 |
||||
| FFT |
size |
204 |
8 |
|||||
| 2048 |
22886 |
5100 |
77.72% |
4.49:1 |
||||
| 2048 |
24204 |
5029 |
79.22% |
4.81:1 |
||||
| 2048 |
29946 |
5166 |
82.75% |
5.80:1 |
||||
| 2048 |
30542 |
5094 |
83.32% |
6.00:1 |
||||
| FFT |
size |
409 |
6 |
|||||
| 4096 |
25432 |
6151 |
75.81% |
4.13:1 |
||||
| 4096 |
26850 |
5815 |
78.34% |
4.62:1 |
||||
| 4096 |
33654 |
6241 |
81.46% |
5.39:1 |
||||
| 4096 |
34532 |
5912 |
82.88% |
5.84:1 |
||||
| 1 run 0 failed |
||||||||
| --------------- ../modules/dsp/test_suite_fir.c -------------- |
||||||||
| --------------- test_fir_case0 start |
||||||||
| FIR Length & Taps |
C Time in ms |
NEON Time in ms |
Time Savings |
Performance Ratio |
||||
| 32 |
140854 |
158297 |
-12.38% |
0.89:1 |
||||
| 3 |
33112 |
38157 |
-15.24% |
0.87:1 |
||||
| 7 |
50449 |
53317 |
-5.68% |
0.95:1 |
||||
| --------------- test_fir_case0 end |
||||||||
| 1 run 0 failed |
||||||||
| --------------- ../modules/dsp/test_suite_fir_decimate.c -------------- |
||||||||
| --------------- test_fir_decimate_case0 start |
||||||||
| FIR Length & Taps |
C Time in ms |
NEON Time in ms |
Time Savings |
Performance Ratio |
||||
| 7 |
62156 |
32587 |
47.57% |
1.91:1 |
||||
| 32 |
113114 |
51201 |
54.74% |
2.21:1 |
||||
| 32 |
118319 |
56485 |
52.26% |
2.09:1 |
||||
| --------------- test_fir_decimate_case0 end |
||||||||
| 1 run 0 failed |
||||||||
| --------------- ../modules/dsp/test_suite_fir_interpolate.c -------------- |
||||||||
| --------------- test_fir_interpolate_case0 start |
||||||||
| FIR Length & Taps |
C Time in ms |
NEON Time in ms |
Time Savings |
Performance Ratio |
||||
| 27 |
146360 |
106583 |
27.18% |
1.37:1 |
||||
| 32 |
165548 |
102895 |
37.85% |
1.61:1 |
||||
| 27 |
139860 |
101679 |
27.30% |
1.38:1 |
||||
| 32 |
159137 |
98569 |
38.06% |
1.61:1 |
||||
| --------------- test_fir_interpolate_case0 end |
||||||||
| 1 run 0 failed |
||||||||
| --------------- ../modules/dsp/test_suite_fir_lattice.c -------------- |
||||||||
| --------------- test_fir_lattice_case0 start |
||||||||
| FIR Length & Taps |
C Time in ms |
NEON Time in ms |
Time Savings |
Performance Ratio |
||||
| 3 |
53917 |
83337 |
-54.57% |
0.65:1 |
||||
| 1 |
26551 |
17314 |
34.79% |
1.53:1 |
||||
| 3 |
52283 |
82193 |
-57.21% |
0.64:1 |
||||
| 1 |
24812 |
16242 |
34.54% |
1.53:1 |
||||
| --------------- test_fir_lattice_case0 end |
||||||||
| 1 run 0 failed |
||||||||
| --------------- ../modules/dsp/test_suite_fir_sparse.c -------------- |
||||||||
| --------------- test_fir_sparse_case0 start |
||||||||
| FIR Length & Taps |
C Time in ms |
NEON Time in ms |
Time Savings |
Performance Ratio |
||||
| 5 |
277042 |
269762 |
2.63% |
1.03:1 |
||||
| 5 |
194386 |
91738 |
52.81% |
2.12:1 |
||||
| 5 |
248446 |
197104 |
20.67% |
1.26:1 |
||||
| --------------- test_fir_sparse_case0 end |
||||||||
| 1 run 0 failed |
||||||||
| --------------- ../modules/dsp/test_suite_iir.c -------------- |
||||||||
| --------------- test_iir_lattice_case0 start |
||||||||
| IIR Length & Taps |
C Time in ms |
NEON Time in ms |
Time Savings |
Performance Ratio |
||||
| 9 |
545541 |
630834 |
-15.63% |
0.86:1 |
||||
| 9 |
461288 |
552453 |
-19.76% |
0.83:1 |
||||
| 33 |
1533778 |
1349427 |
12.02% |
1.14:1 |
||||
| --------------- test_iir_lattice_case0 end |
||||||||
| 1 run 0 failed |
||||||||
| - - - - - - - - - - |
SEATEST v0.5 |
- - - - - - - - - - - - |
||||||
| ALL TESTS PASSED |
||||||||
| 12 tests run |
||||||||
| in 105691051 micro-s |
||||||||
| - - - - - - - - - - - |
- - - - - - - - - - - - - - |
- - - - - - - - - - - - |
||||||
The default terminal window may not be wide enough to show each line without automatically wrapping to the next line. To solve this, the terminal window should be set to size automatically to the window size.
On the TeraTerm window, Click Setup -> Terminal and then click the box Term size = win size.

Click OK.
You can now drag the corner of the terminal window to make it any size desired. If the window size is changed, all of the current text is erased. Simply hit Return to get a command prompt and continue. Any Ne10-test run will need to be executed again so make sure the window size is larger enough to capture full lines.
Expected Results
The performance test runs each of the listed filters 1024 of times, first on the ARM processor alone and then the same number of times with the NEON SIMD engine enabled. For each of these runs, the time to execute the actual calculations (any system overhead is subtracted out before showing the results) is shown in the "C Time" and "NEON Time" column respectively. The Time Savings and Performance Ratio are calculated from these measured times.
With an average performance improvement of approximately 1.7, this clearly indicates that using the NEON in compute intensive applications is well worth the effort to optimize for it. Having the NEON SIMD engine included in the Zynq-7000 AP SOC enables the development of high performance SOC systems.
Saving the workspace
For ease of completing subsequent Tech Tips that use this completed build, it is wise to save the workspace so it can be restored later as a known starting point. Because only the /sw portion of the base TRD was modified, only that portion needs to be saved. If you choose to do this,
Select File -> Export or right click in the Project Explorer pane white space and select Export.
In the Export dialogue box, expand General and select Archive file.
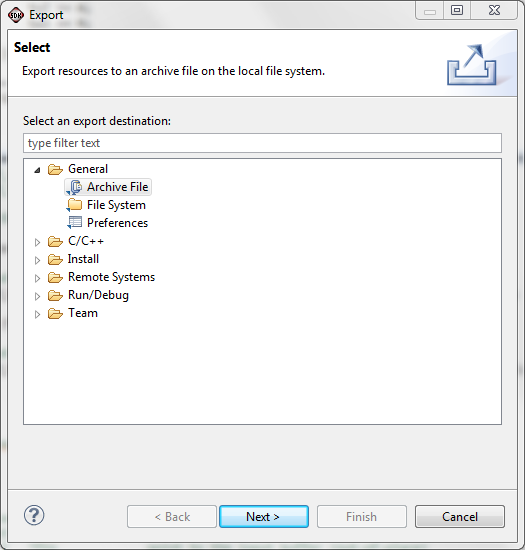
Click Next
The Export Archive dialogue will appear.
Click the Browse button and navigate to where you want to save the workspace and then create an appropriate file in which to save the workspace. In our case we are saving this as Ne10TestBuild2014dt3.zip.
Be sure the "Save in zip format" is selected unless you are on a Linux system in which case you might select the tar format.
Click Select All to export all of the items in the workspace
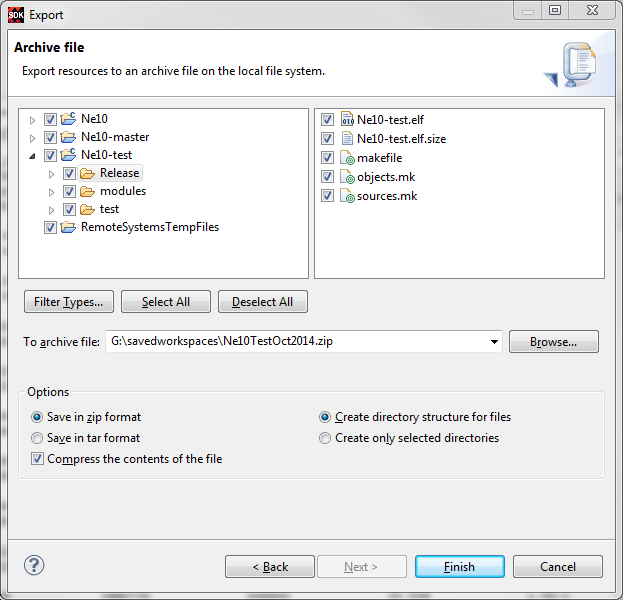
Then click Finish
The workspace will be saved in the specified archive file for later use.
Conclusions:
Inclusion of the SIMD engine in the PS of the Zynq-7000 AP SoC provides a simple means of achieving faster execution of compute intensive tasks. As this is a standard extension for the ARM family of processors, software from the vast ecosystem of the ARM community can be readily used, accelerating time to system development and time to market.
Multiple means of accessing and controlling the ZC702 enable users to choose the best method for their specific development environment. This flexibility accelerates debug and enables more rapid system development and deployment.
© Copyright 2019 - 2022 Xilinx Inc. Privacy Policy