Zynq UltraScale MPSoC 2016.2 - Tutorial for design module 1
Zynq UltraScale MPSoC 2016.2 - Tutorial for design module 1
Abstract
- Boot APU only
- o FSBL/ATF/u-boot: APU
- o APU OS: SMP Linux
- o Boot device: SD
- FB console via DP
- Ethernet via FTP/SCP
- Keyboard via USB
- Serial console via UART0
- File system via SD, USB, or SATA
- Standard Linux applications on rootfs
Block Diagram
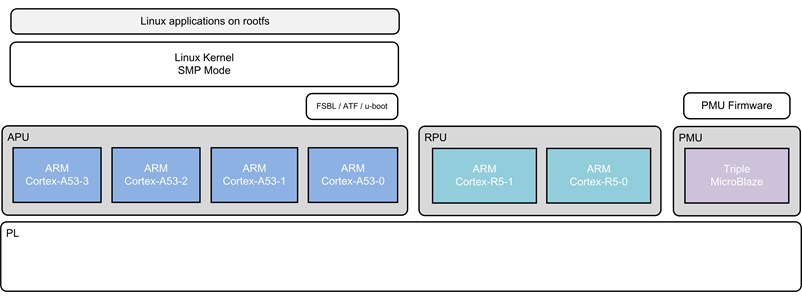
Component Diagram
<< TODO >>
Source Code
- Create workspace folder
- Checkout the source code for Linux
$ cd zynqmp_petaliunux_bsp
$ git checkout 2016.2/4.4
This creates a folder “zynqmp_petalinux_bsp” and gets all source files correspond to 2016.2 from git repository
- Apply the patch
- Checkout the source code for PMU FW
This creates a folder “pmu_fw” and gets all source files from git repository
How to build images
Apply Patches
Apply the design-1 patch
$ git apply 0001-Mini-Reference-Design-1-ZCU102-2016.2.patch
FSBL
FSBL build
follow common_procedure Build FSBL in the link: Common Functions
PMU Firmware
PMU FW build
follow common_procedure Build PMUFW in the link: Common Functions
Kernel
Build the kernel image
$ petalinux-build
This will create zynqmp_petalinux_bsp/images/linux/images.ub
BOOT.BIN image
Copy the PMUFW image into petalinux build area
$ cp default_pmufw/Debug/default_pmufw.elf zynqmp_petalinux_bsp/images/linux/pmufw.elf
Copy the FSBL image into petalinux build area, if it is build by xsdk
$ cp default_fsbl/Debug/default_fsbl.elf zynqmp_petalinux_bsp/images/linux/zynqmp_fsbl.elf
Create BOOT.BIN
$ cd images/linux
$ petalinux-package --force --boot --fsbl zynqmp_fsbl.elf --pmufw pmufw.elf --atf bl31.elf --uboot
This will create zynqmp_petalinux_bsp/images/linux/BOOT.BIN
How to Execute
- Copy the below files onto SD card (root folder)
boot.bin
- Insert the SD card into zcu102 board
- Connect power cable and UART cable
- Start TeraTerm or any other terminal application on Host PC (to view serial port messages)
- Power ON the board
- The board starts booting, observe for PMU FW messages followed by Linux boot messages
© Copyright 2019 - 2022 Xilinx Inc. Privacy Policy