Zynq UltraScale MPSoC 2016.2 - Tutorials Common Functionalities
Zynq UltraScale MPSoC 2016.2 - Tutorials Common Functionalities
Introduction
Table of Contents
For more details on Mini Reference Designs, refer to page: mini reference designs
This page
Build PMUFW
The pmu_fw (PMU Firmware) application is a bare-metal application that executes on the PMU MicroBlaze. It is loaded by the CSU early on in the boot process before the FSBL executes. The application's primary responsibility is to handle power management.
Launch the Xilinx software development kit (XSDK) from the console.
$ cd pmu_fw
$ mkdir workspace
$ xsdk &
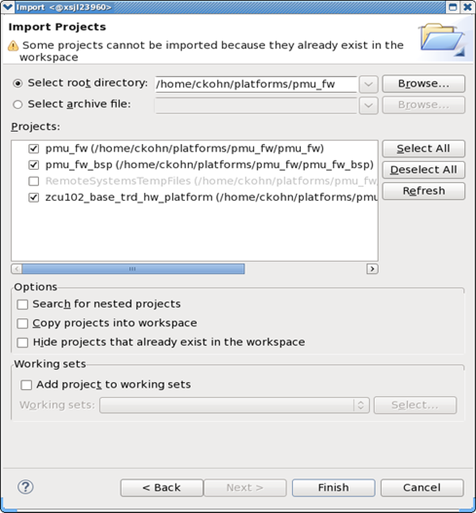
- Close the Welcome screen and import the PMU firmware projects.
- Click File -> Import... -> General -> Existing Projects into Workspace and click Next.
- Navigate to the $TRD_HOME/pmu_fw directory using the Browse button.
- Select the pmu_fw, pmu_fw_bsp, and zcu102_base_trd_hw_platform projects.
- Click Finish.
- Build the imported projects:
- o Right-click on the pmu_fw project and select Build Project.
- The generated elf file will be placed at pmu_fw/Debug/pmu_fw.elf.
- Use this image while generating SD card images
Build HEARTBEAT Application
use SDK to build
$ xsdk
create a new workspace
ex: rpu0_hbt
import the checked-out sources:
File -> Import -> General -> Existing Projects into Workspace
click <Next>
click <Browse>
select folder: 2_rpu0_freertos_app/heartbeat
click <OK>
select projects:
heartbeat
heartbeat_bsp
zcu102_base_trd_wrapper_hw_platform_0
click <Finish>
Change the ldscript (load addresses):
Build the rpu0_hbt image:
Right click on project: heartbeat
Clean Project
Right click on project: heartbeat
Build Project
This will create heartbeat/Debug/heartbeat.elf
PERFAPM-SERVER
This project is targeted to RPU and it is split into 3 parts as below:
- PerfAPM Library
- PerfAPM-CTL application
- This is a standalone application executed on RPU
- This application does not support RPmsg (remote procedure calls) library
- This application links the perfapm library statically.
- PerfAPM-Server application
- This is a standalone application executed on RPU
- This application supports RPmsg (remote procedure calls) library and provide APM numbers over IPC
- This application links the perfapm library statically.
Build PERFAPM Library
use SDK to build
$ xsdk
create a new workspace
ex: rpu1_perfapm
import the checked-out sources:
File -> Import -> General -> Existing Projects into Workspace
click <Next>
click <Browse>
select folder: 3_rpu1_baremetal_app/perfapm-server
click <OK>
select projects:
perfapm : library with common APIs
perfapm-server : baremetal application with IPC (static link with perfapm)
perfapm-server-ctl : baremetal application without IPC (static link with perfapm)
perfapm-server_bsp
zcu102_base_trd_wrapper_hw_platform_0
click <Finish>
Build the perfapm image:
Right click on project: perfapm
Clean Project
Right click on project: perfapm
Build Project
This will create perfapm/Debug/libperfapm.a
Build PERFAPM-SERVER-CTL Application
Build the perfapm-server-ctl image:
Change the ldscript (load addresses):
Right click on project: perfapm-server-ctl
Clean Project
Right click on project: perfapm-server-ctl
Build Project
This will create perfapm-server-ctl/Debug/perfapm-server-ctl.elf
(libperfapm.a is part of perfapm-server-ctl.elf)
Build PERFAPM-SERVER Application
Build the perfapm-server image:
Change the ldscript (load addresses):
Right click on project: perfapm-server
Clean Project
Right click on project: perfapm-server
Build Project
This will create perfapm-server/Debug/perfapm-server.elf
(libperfapm.a is part of perfapm-server.elf)
PERFAPM-CLIENT
This project is targeted to APU and it is split into 2 parts as below:
- PerfAPM-Client Library
- PerfAPM-client-unittest application
- This is a Linux application executed on APU
- This application supports RPmsg (remote procedure calls) library and fetches APM numbers over IPC
- This application links the perfapm-client library statically.
Build PERFAPM-CLIENT Library
use SDK to build
$ xsdk
create a new workspace
ex: perfapm-client
import the checked-out sources:
File -> Import -> General -> Existing Projects into Workspace
click <Next>
click <Browse>
select folder: 4_apu_rpu_ipc/perfapm-client
click <OK>
select projects:
perfapm-client
perfapm-client-unittest
click <Finish>
Build the perfapm-client-unittest image:
Right click on project: perfapm-client
Clean Project
Right click on project: perfapm-client
Build Project
This will create Debug/libperfapm-client.a
Build PERFAPM-CLIENT-UNITTEST Application
Build the perfapm-client-unittest image:Right click on project: perfapm-client-unittest
Clean Project
Right click on project: perfapm-client-unittest
Build Project
This will create Debug/perfapm-client-unittest.elf
Build FILTER2D
Checkout zcu102_base_trd_sdsoc_pfm
https://gitenterprise.xilinx.com/PAEG/zcu102_base_trd_sdsoc_pfm
Start SDSoC tool
Create new SDSoC project under 'File' -> 'New' -> 'SDSoC Project'
- Select target platform 'zcu102_base_trd'
- Select OS 'Linux'
- Check 'Shared Library' box
- Enter project name
- Click 'Next' and select desired template
- Click 'Finish'
Right-click the generated sample project and select 'C/C++ Settings'
Switch to the 'Build Artifact' tab and set 'Output prefix' to lib
For design-7, remove filter2d_sds() from the accelerator
For design-8, add filter2d_sds() to the accelerator
Right-click the sample project and select 'Build Project'
This will create 2 files:
SDDebug/filter2d.so
SDDebug/filter2d.so.bit
Build FSBL
FSBL can be created in 2 ways:- using XSDK tool
- using PetaLinux tool
Build FSBL using XSDK
Launch SDK tool
$ xsdk &
create a new workspace
ex: default_fsbl
start new application project:
File -> New -> Application Project
Project name: default_fsbl
OS platform: standalone
Hardware platform: ZynqMP_ZCU102_hw_platform (pre-defined)
Processor (select any of these): psu_cortexa53_0/ psu_cortexa53_1/
psu_cortexa53_2/ psu_cortexa53_4/
psu_cortexr5_0/ psu_cortexr5_1
click <Next>
select: Zynq MP FSBL
Click <Finish>
Build the default_fsbl image:
Right click on project: default_fsbl
Build Project
This will create default_fsbl/default_fsbl.elf
Build FSBL using PetaLinux
Update the hardware definition file into hw-description
$ rm zynqmp_petalinux_bsp/hw-description/*.hdf
$ cp design.hdf zynqmp_petalinux_bsp/hw-description/
Create FSBL project with new hardware settings
$ cd zynqmp_petalinux_bsp
$ petalinux-config --get-hw-description=./hw-description --oldconfig
Build FSBL
$ petalinux-build -c bootloader
This will create zynqmp_petalinux_bsp/images/linux/zynqmp_fsbl.elf
Build Linux Kernel
- Goto the Petalinux BSP folder
- Hardware configuration
- Modifications in Device tree
$ vi subsystems/linux/configs/device-tree/system-top.dts
- Comment fmc-hdmi-cam.dtsi, pl.dtsi, openamp-overlay.dtsi
/*#include "pl.dtsi"*/
/*#include "openamp-overlay.dtsi"*/
Save this file.
- Build the images
This completes the Linux kernel image build.
© Copyright 2019 - 2022 Xilinx Inc. Privacy Policy