Scope of Work
The purpose of this page is to describe how to boot ZCU102 using USB boot mode. Here two ZCU102 boards are connected back-to-back and configured as USB Host and Device. This can be done by setting ZCU102 device board in USB Boot mode and using DFU utility. Binaries like PMUFW, FSBL, U-Boot, ATF, Linux kernel, Device Tree and Rootfs are downloaded through DFU utility from Host.
Table of Contents
Introduction
Zynq UltraScale+ MPSoC, the next generation Zynq device, comes with a versatile Processing System (PS) integrated with a highly flexible and high-performance Programmable Logic (PL) section, all on a single system-on-a-chip (SoC).
Zynq Ultrascale+ MPSoC also supports USB Slave Boot Mode. This is using the USB DFU Device Firmware Upgrade (DFU) Device Class Specification of USB. Using a standard update utility such as DFU-Util, you will be able to load the newly created image on Zynq UltraScale+ via the USB Port of another Zynq Ultrascale+
Prerequisites
Vitis Tool
PetaLinux
Back-to-Back USB 3.0 Cable
Two ZCU102 boards
HW Test Environment
Connect two ZCU102 boards using USB 3.0 back-to-back setup. One in host mode and another in device mode.
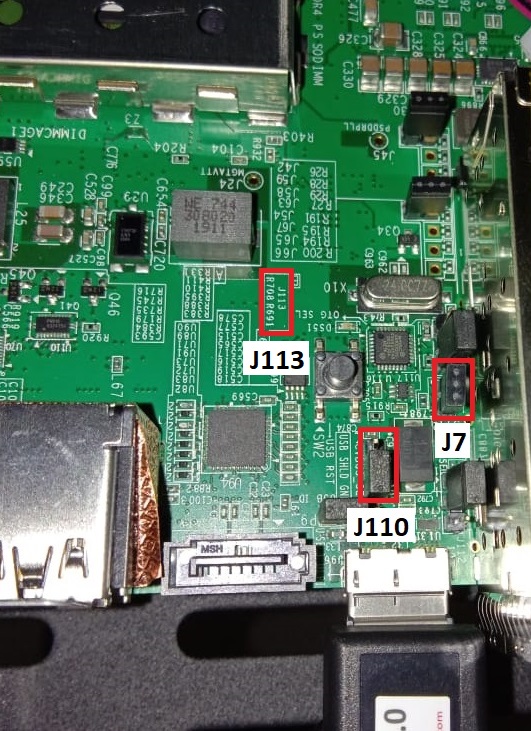
ZCU102 Host
Jumper settings for Host mode
J7 - 1-2 Close
J113 - 1-2 Close
J110 - 2-3 Close
Please refer the image below for Host Mode jumper settings
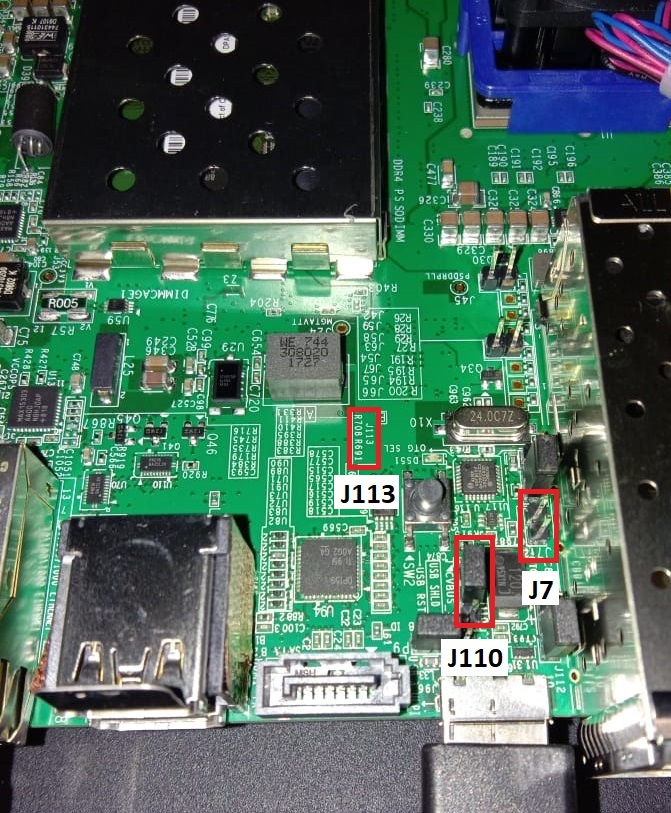
ZCU102 Device
Jumper settings for Peripheral mode
J7 – 1-2 Open
J113 - 1-2 Close
J110 - 1-2 Close
Set USB Boot mode by setting SW6 (1-OFF, 2-OFF, 3-OFF, and 4-ON) as shown below
Please refer the image below for Device Mode jumper settings
Please refer image below for Switch settings to set Device in USB Boot mode

Please refer the image below for ZCU102 USB Back-to-Back setup

Test Version
Example tested with Vitis 2021.1
PetaLinux Project is based on 2021.1
Software Build Procedure
The following procedure is for USB Non Secure Boot Mode. The process to create Secure Binaries and Boot via USB DFU will be added to this wiki in future.
PetaLinux Tool Steps
Create and Configure PetaLinux Project
Create PetaLinux Project
Create PetaLinux project with 2021.1 bsp using the command below
$ petalinux-create --type project --name <PROJECT_NAME> --source <petalinux-v2021.1-BSP path>
Configure PetaLinux
Configure PetaLinux with command below
$ petalinux-config
Save and Exit to create petalinux-config file.
Build PetaLinux with dfu-util utility for ZCU102 Host
Add dfu-util utility to user-rootfsconfig file
Enable dfu-util in PetaLinux
Add CONFIG_dfu-util to the last line of <PetaLinux Project>/project-spec/meta-user/conf/user-rootfsconfig
Please refer the below sample file
#Note: Mention Each package in individual line
#These packages will get added into rootfs menu entry

CONFIG_gpio-demo
CONFIG_peekpoke
CONFIG_dfu-util
Enable dfu-util utility in rootfs
$ petalinux-config -c rootfs
petalinux-config -c rootfs ->Configuration ->user packages ->dfu-util
Select “dfu-util” in “user-packages”. Please refer to the image below,

Build PetaLinux
Build PetaLinux with changes
$ petalinux-build
Create a copy of host binaries
$ cp images images_host -rf
Build PetaLinux with Device Mode changes for ZCU102 Device
Disable “dfu-util” in petalinux-config -c rootfs
Enable Device Mode
Modify PetaLinux U-Boot so that it can load the linux images. The Device tree needs to be modified to set USB in the peripheral mode. The default PetaLinux configuration is set for the USB in Host mode.
For this, follow the below steps to modify system-user.dtsi in the PetaLinux Project
Add the following code to <PetaLinux-project>/project-spec/meta-user/recipes-bsp/device-tree/files/system-user.dtsi, so that it looks like:
/include/ "system-conf.dtsi"
/ {
};

&dwc3_0 {
        status = "okay";
        dr_mode = "peripheral";
        maximum-speed = "super-speed";
};
Build PetaLinux
Build PetaLinux with changes.
$ petalinux-build
Vitis Tool Steps
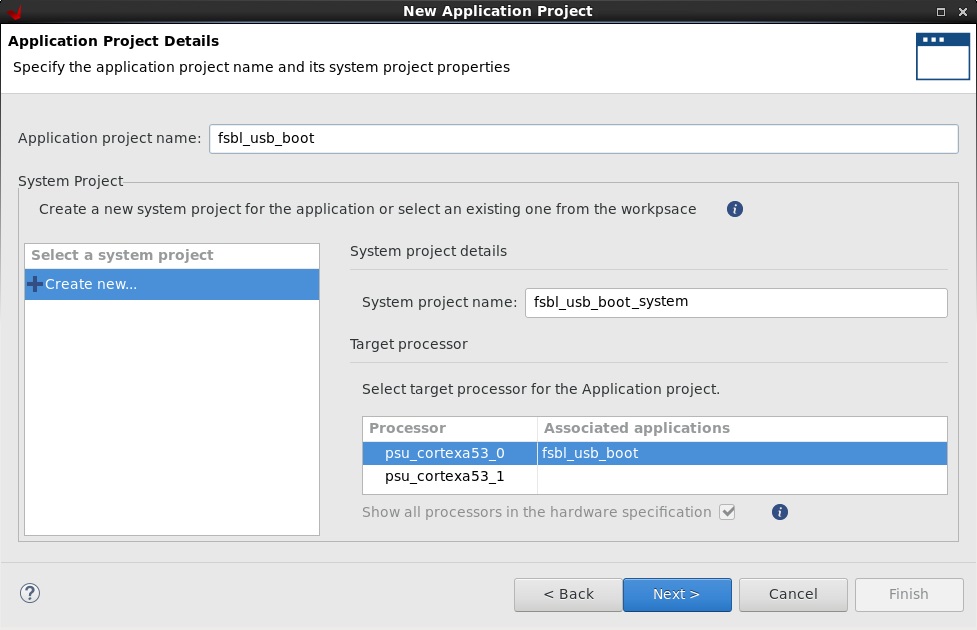
Create FSBL Application Project
Use the information provided below to make your selections in the wizard. Please refer to the image below,
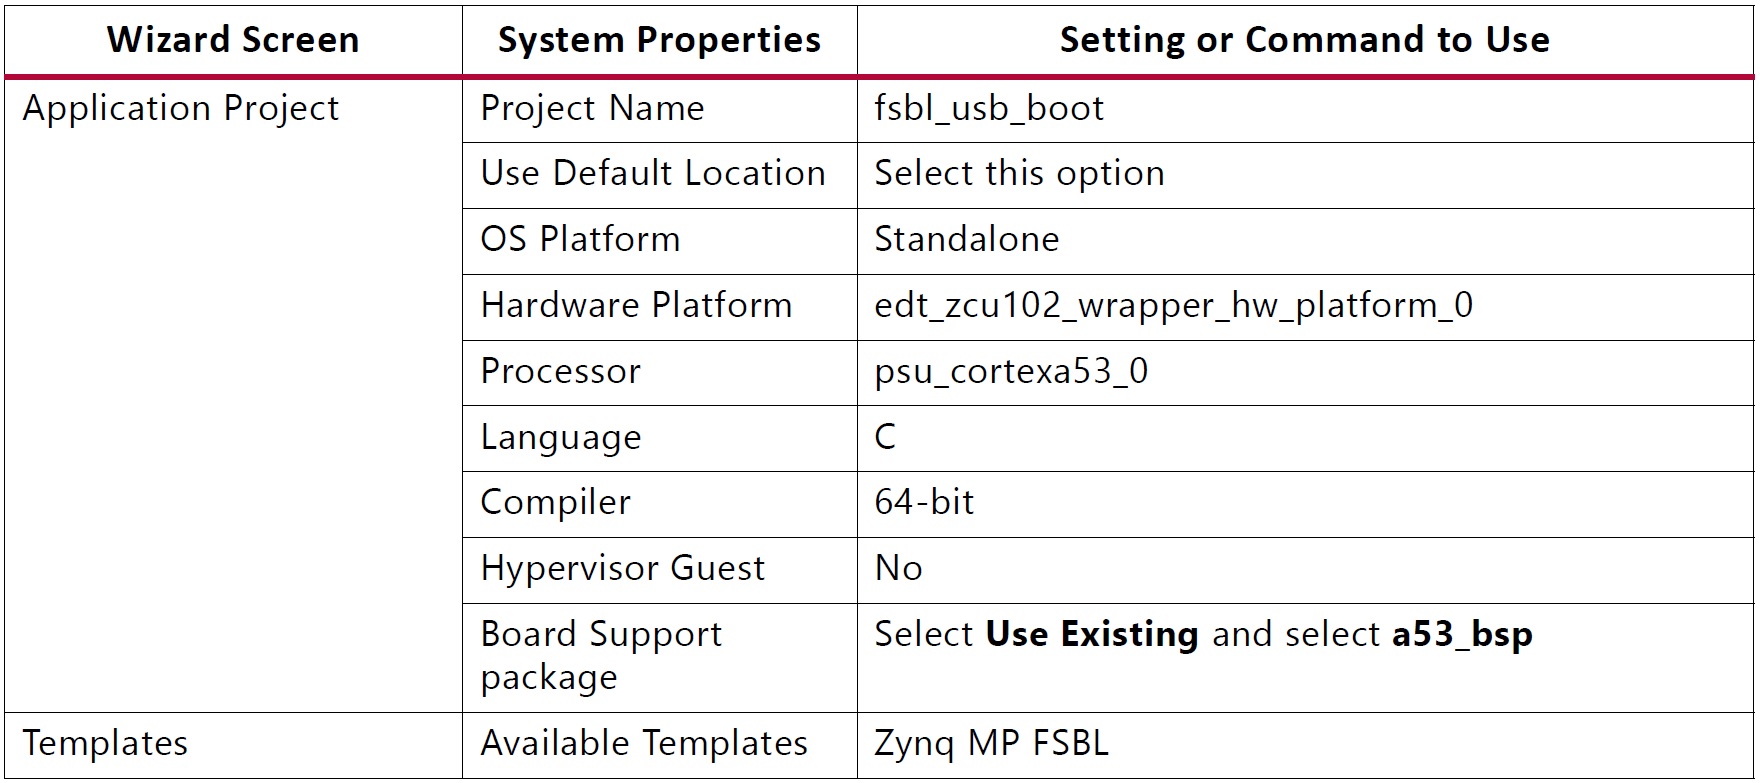
In Vitis, select File > New > Application Project to open the New Project wizard.
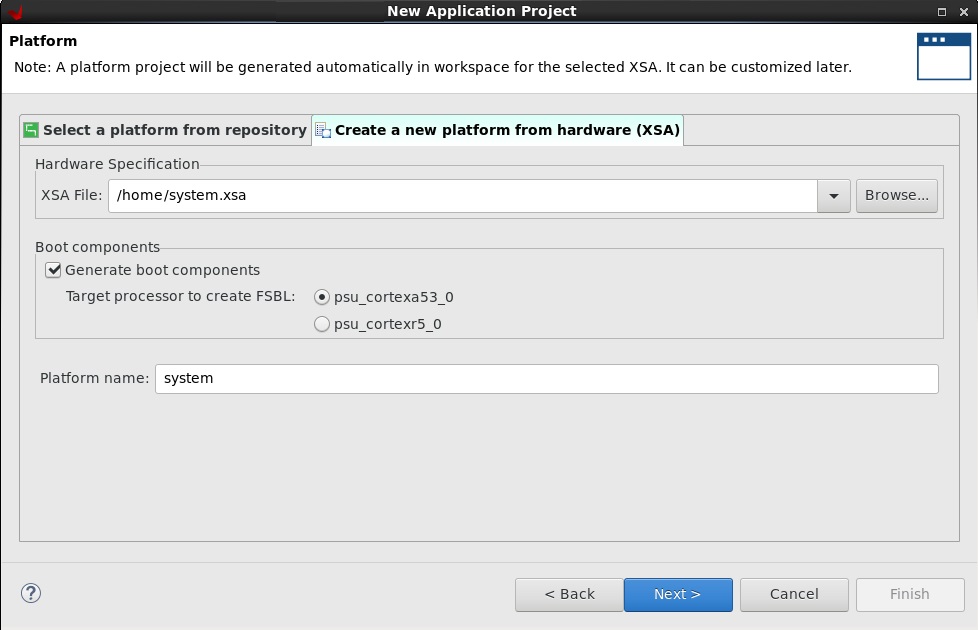
Create new platform from hardware(XSA) from <PetaLinux Project>/project-spec/hw-description/system.xsa file. Please refer to the image below,
Provide Application Project Name, please refer below image
Select Zynq MP FSBL template, please refer below image
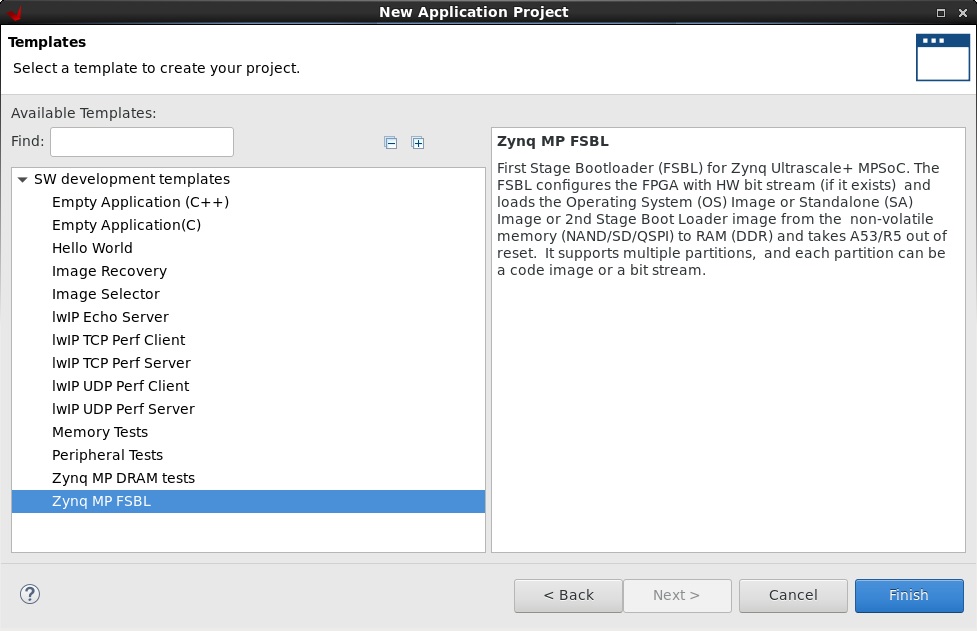
Click Finish
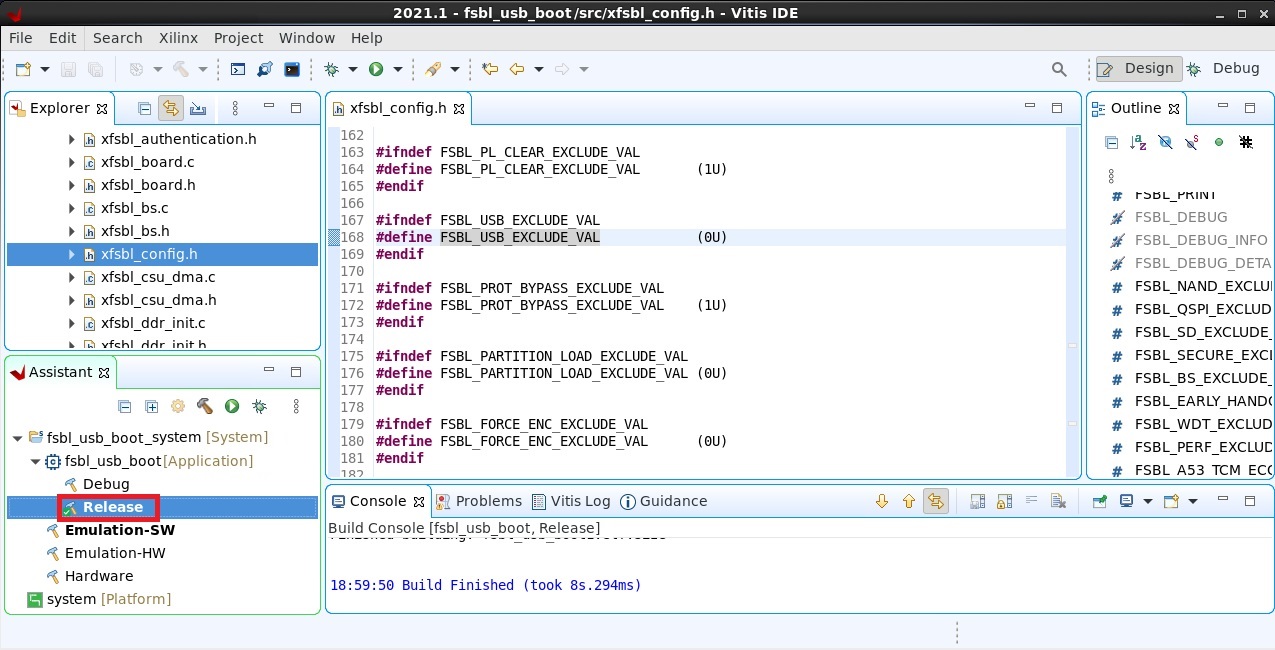
Configure FSBL to Enable USB Boot Mode
In the Project Explorer tab, expand the fsbl_usb_boot project and open xfsbl_config.h from: fsbl_usb_boot > src > xfsbl_config.h
In xfsbl_config.h change or set following settings:
#define FSBL_QSPI_EXCLUDE_VAL (1U)
#define FSBL_SD_EXCLUDE_VAL (1U)
#define FSBL_USB_EXCLUDE_VAL (0U)
Use CTRL + S to save these changes
Select Release and Build FSBL (fsbl_usb_boot)
Please refer image below for reference
Create Boot Image with FSBL
In this section, you will create the Boot Images to be loaded, via USB using DFU utility. Device Firmware Upgrade (DFU) is intended to download and upload firmware to/from devices connected over USB. In this boot mode, the Boot loader (FSBL) and the PMUFW which are loaded by Boot ROM are copied to ZCU102 Device’s On Chip Memory (OCM) from ZCU102 Host’s USB port using DFU Utility. The size of OCM (256 KB) limits the size of boot image downloaded by BootROM in USB boot mode. Considering this, and subject to size requirement being met, only FSBL and PMUFW are stitched into the first BOOT.bin, which is copied to OCM. Rest of the Boot partitions will be stitched in another Boot image and copied to DDR to be loaded by the FSBL which is already loaded and running at this stage.
Follow the below steps to Create Boot Images for this boot mode.
In Vitis, select Xilinx > Create Boot Image.
BOOT.bin can be created either by Import from existing BIF file or Create new BIF file
Import from existing BIF file can be used by providing the BOOT.bif as input and files path can be edited accordingly.
Please refer the BOOT.bif code provided below for reference.
//arch = zynqmp; split = false; format = BIN
the_ROM_image:
{
    [bootloader, destination_cpu = a53-0]/home/fsbl_usb_boot.elf
    [destination_cpu = pmu]/home/pmufw.elf
}
Ensure that Architecture is “Zynq MP” and PMU Partition’s Destination CPU is set to “PMU”
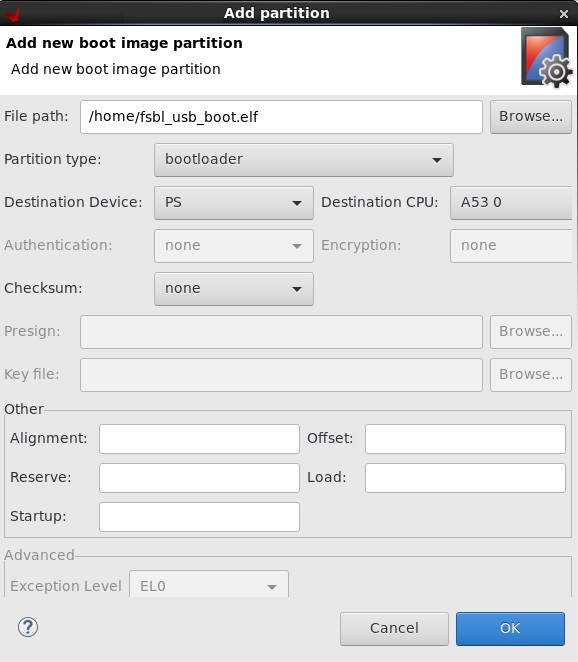
To create a new BIF file, select Create new BIF file and add the fsbl_usb_boot.elf and pmu_fw.elf partitions.
Select FSBL from <Vitis workspace path>/fsbl_usb_boot/Release/fsbl_usb_boot.elf
Select PMUFW from <PetaLinux Project>/images/linux/pmufw.elf
PetaLinux <PetaLinux Project>/pre-built/linux/images/pmufw.elf can also be used to create BOOT.bin
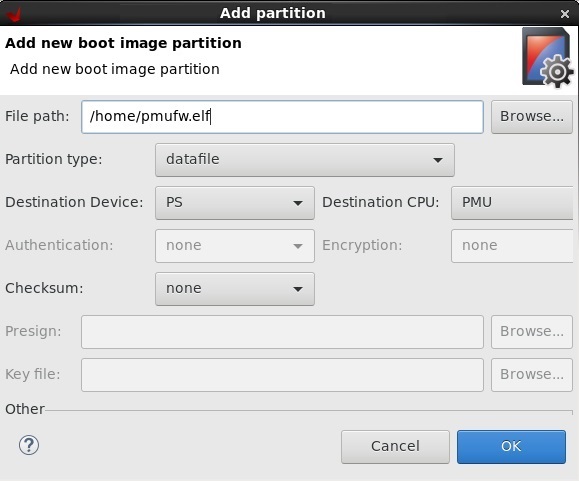
Select FSBL and PMUFW partitions and set them as shown in the following figure.
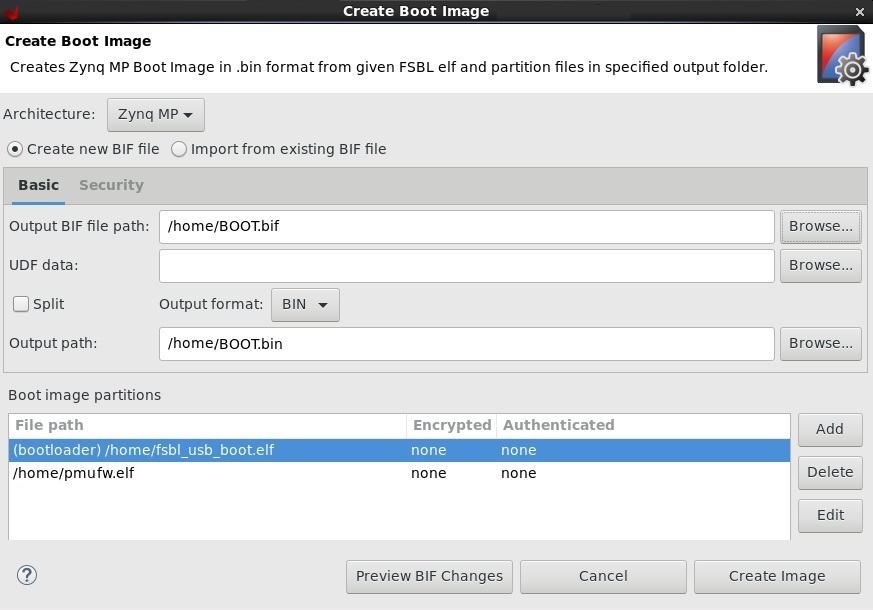
Click on Create Image to generate BOOT.bin
Create Boot Image with U-Boot
The following steps describe how to create usb_boot.bin.
In Vitis, select Xilinx > Create Boot Image.
usb_boot.bin can be created either from Import from existing BIF file or Create new BIF file
Import from existing BIF file can be used by providing the usb_boot.bif as input and files path can be edited accordingly.
Please refer the usb_boot.bif code provided below for reference.
//arch = zynqmp; split = false; format = BIN
the_ROM_image:
{
[bootloader, destination_cpu = a53-0]/home/fsbl_usb_boot.elf
[destination_cpu = pmu]/home/pmufw.elf
[destination_cpu = a53-0, exception_level = el-3, trustzone]/home/bl31.elf
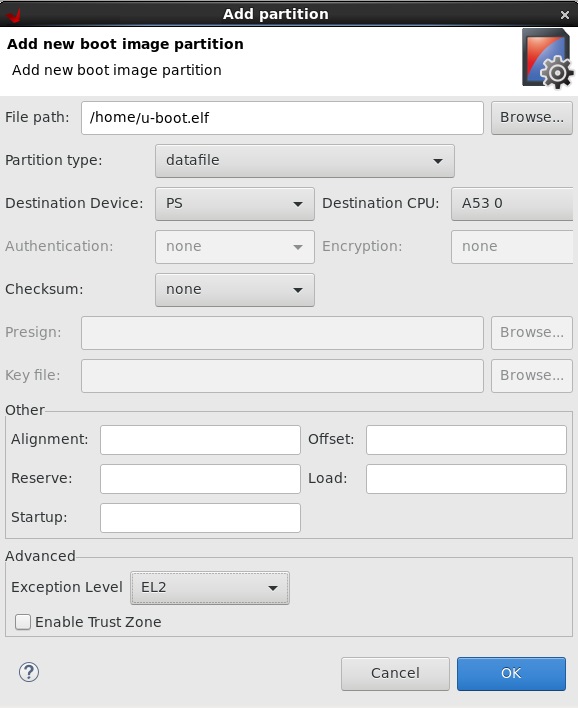
[destination_cpu = a53-0, exception_level = el-2]/home/u-boot.elf
[load = 0x100000, destination_cpu = a53-0]/home/system.dtb
}
To create a new BIF file, select Create new BIF file and add the fsbl_usb_boot.elf, pmu_fw.elf, bl31.elf, u-boot.elf and system.dtb partitions.
Select FSBL from <Vitis workspace path>/fsbl_usb_boot/Release/fsbl_usb_boot.elf
Select PMUFW from <PetaLinux Project>/images/linux/pmufw.elf
Ensure that you have set the correct exception levels for ATF (EL-3, Trustzone) and U-Boot (EL-2) partitions. These settings can be ignored for other partitions.
Select ATF from <PetaLinux Project>/images/linux/bl31.elf. Please refer below image,

Select U-BOOT from <PetaLinux Project>/images/linux/u-boot.elf. Please refer below image,
Select DTB from <PetaLinux Project>/images/linux/system.dtb. Please refer below image,

Select the partitions and set them as shown in the following figure.

Click on Create Image to generate usb_boot.bin
In addition to BOOT.bin and usb_boot.bin, binaries like Image, rootfs.cpio.gz.u-boot and system.dtb are required to boot the Device. These binaries can be loaded by DFU utility separately.
Test Procedure
Boot ZCU102 Host
Boot Host with dfu-util enabled PetaLinux images.
Copy Device’s binaries (BOOT.bin, usb_boot.bin, Image, rootfs.cpio.gz.u-boot and system.dtb) to SD Card and insert it into SD slot of Host.
Check DFU detection on Host
Check if the Host’s DFU can detect the USB target.
[  147.619619] usb 1-1: new high-speed USB device number 2 using xhci-hcd
[  147.772135] usb 1-1: New USB device found, idVendor=03fd, idProduct=0050, bcdDevice= 1.00
[  147.780313] usb 1-1: New USB device strings: Mfr=1, Product=2, SerialNumber=3
[  147.787444] usb 1-1: Product: Xilinx DFU Downloader
[  147.792321] usb 1-1: Manufacturer: XILINX
[  147.796328] usb 1-1: SerialNumber: 2A49876D9CC1AA4
root@xilinx-zcu102-2021_1:~# dfu-util -l
dfu-util 0.9

Copyright 2005-2009 Weston Schmidt, Harald Welte and OpenMoko Inc.
Copyright 2010-2016 Tormod Volden and Stefan Schmidt
This program is Free Software and has ABSOLUTELY NO WARRANTY
Please report bugs to http://sourceforge.net/p/dfu-util/tickets/
Found DFU: [03fd:0050] ver=0100, devnum=3, cfg=1, intf=0, path="1-1", alt=0, name="Xilinx DFU Downloader", serial="2A49876D9CC1AA4"
If you do not see the ‘Found DFU’ message, verify the connection and retry.
Download Binaries to Device
Download PMUFW and FSBL
On Host, use the command below to download BOOT.bin to Device
root@xilinx-zcu102-2021_1:~# dfu-util -d 03fd:0050 -D BOOT.bin
Verify from Device’s Serial Terminal whether the FSBL is loaded successfully.
ZCU102 Device’s log as follows
Xilinx Zynq MP First Stage Boot Loader
Release 2021.1 Apr 15 2021 - 13:29:46
As Device mode is enabled in FSBL, after FSBL gets loaded, USB DFU will be re-enumerated on Host.
Download U-Boot and ATF
On Host, use the command below to download usb_boot.bin to Device
root@xilinx-zcu102-2021_1:~# dfu-util -d 03fd:0050 -D usb_boot.bin
On Device, check UART 0 terminal and wait until U-Boot loads.
On U-Boot prompt, press Enter key to terminate autoboot.
Enable Rootfs Download on Device
On Device’s U-Boot console, modify dfu_ram_info to enable rootfs download via DFU.
ZynqMP> setenv dfu_ram_info "setenv dfu_alt_info Image ram 0x80000 $kernel_size_r\\;system.dtb ram $fdt_addr_r $fdt_size_r\\;rootfs.cpio.gz.u-boot ram 0x7000000 0x10000000"
Verify the dfu_ram_info using printenv.
ZynqMP> printenv dfu_ram_info
dfu_ram_info=setenv dfu_alt_info Image ram 0x80000 0x10000000\;system.dtb ram 0x40000000 0x400000\;rootfs.cpio.gz.u-boot ram 0x7000000 0x10000000
Download Linux Image
On Device’s U-Boot console start DFU_RAM to download Linux Image
After executing the command below, Device gets detected on Host
ZynqMP> run dfu_ram
On Host, check if the DFU can detect the USB target.
root@xilinx-zcu102-2021_1:~# dfu-util -l
dfu-util 0.9

Copyright 2005-2009 Weston Schmidt, Harald Welte and OpenMoko Inc.
Copyright 2010-2016 Tormod Volden and Stefan Schmidt
This program is Free Software and has ABSOLUTELY NO WARRANTY
Please report bugs to http://sourceforge.net/p/dfu-util/tickets/

Found DFU: [03fd:0300] ver=0223, devnum=2, cfg=1, intf=0, path="2-1", alt=2, name="rootfs.cpio.gz.u-boot", serial="UNKNOWN"
Found DFU: [03fd:0300] ver=0223, devnum=2, cfg=1, intf=0, path="2-1", alt=1, name="system.dtb", serial="UNKNOWN"
Found DFU: [03fd:0300] ver=0223, devnum=2, cfg=1, intf=0, path="2-1", alt=0, name="Image", serial="UNKNOWN"
Download Linux Image using following command from Host
root@xilinx-zcu102-2021_1:~# dfu-util -d 03fd:0300 -D Image --alt 0
dfu-util 0.9

Copyright 2005-2009 Weston Schmidt, Harald Welte and OpenMoko Inc.
Copyright 2010-2016 Tormod Volden and Stefan Schmidt
This program is Free Software and has ABSOLUTELY NO WARRANTY
Please report bugs to http://sourceforge.net/p/dfu-util/tickets/

dfu-util: Invalid DFU suffix signature
dfu-util: A valid DFU suffix will be required in a future dfu-util release!!!
Opening DFU capable USB device...
ID 03fd:0300
Run-time device DFU version 0110
Claiming USB DFU Interface...
Setting Alternate Setting #0 ...
Determining device status: state = dfuIDLE, status = 0
dfuIDLE, continuing
DFU mode device DFU version 0110
Device returned transfer size 4096
Copying data from PC to DFU device

Download [=========================] 100%     32000512 bytes
Download done.
state(7) = dfuMANIFEST, status(0) = No error condition is present
state(2) = dfuIDLE, status(0) = No error condition is present
Done!
On Device, after successful download of Linux Image, execute CTRL+C on U-Boot console to stop dfu_ram.
ZCU102 Device’s sample log
ZynqMP> run dfu_ram
##DOWNLOAD ... OK
Ctrl+C to exit ...
Download DTB
On Device’s U-Boot console start DFU_RAM to download system.dtb
After executing the command below, Device gets detected on Host
ZynqMP> run dfu_ram
Download system.dtb using following command from Host
root@xilinx-zcu102-2021_1:~# dfu-util -d 03fd:0050 -D system.dtb --alt 1
After successful download of DTB to Device execute CTRL+C on U-Boot console to stop dfu_ram.
Download ROOTFS
On Device’s U-Boot console start DFU_RAM to download rootfs.cpio.gz.u-boot
After executing the command below, Device gets detected on Host
ZynqMP> run dfu_ram
Download rootfs.cpio.gz.u-boot using following command from Host
root@xilinx-zcu102-2021_1:~# dfu-util -d 03fd:0050 -D rootfs.cpio.gz.u-boot --alt 2
After successful download of rootfs to Device execute CTRL+C on U-Boot console to stop dfu_ram.
Boot ZCU102 Device
On Device, Boot Linux with booti command on U-Boot Console.
ZynqMP> booti 0x80000 0x7000000 0x40000000