This article describes how to install CentOS or Fedora on a disk image from an ISO installer image using Qemu. This disk image can be copied to an SD card to boot the ZCU102.
Table of Contents
Introduction
Linux distros generally distribute ISO files for installation. This works well for PC and server platforms, but generally not for embedded platforms. In this article we will use QEMU with a generic ARM64 model to install CentOS and Fedora from an ISO onto a raw disk image. We will install CentOS 8 and Fedora 29 as both of these ship with 4.18 kernel which has enough upstreamed driver support for Zynq Ultrascale+.
Installing a CentOS or Fedora system for Zynq UltraScale+ is currently a proof-of-concept (POC). You should not assume this builds a Xilinx supported, production-ready system. Please do your due diligence before deploying CentOS or Fedora and regression test against your system requirements.
While this flow targets CentOS and Fedora because they are close relatives, this flow can be extended to support Ubuntu, Debian and openSUSE.
Requirements
Linux VM or bare-metal machine
Sudo privileges
Terminal emulator
Internet access
ZCU102 evaluation board
8 GB (minimum)/16 GB (recommended) SD card
Linux Host Machine
Install Host Package Dependencies
CentOS/Fedora/RHEL
$ sudo dnf group install "Virtualization Host"
$ sudo dnf install wget kpartx epel-release
Ubuntu/Debian
$ sudo apt-get install qemu wget kpartx
Install QEMU for Aarch64
CentOS/Fedora/RHEL
$ sudo dnf install qemu-system-aarch64
Ubuntu/Debian
$ sudo apt-get install qemu-system-arm
If the install fails you may need to build QEMU from source. If the install succeeds, you may skip to “Prepare Workspace.”
Build QEMU for Aarch64
CentOS/Fedora/RHEL
$ sudo dnf group install "Development Tools"
$ sudo dnf install glib2-devel pixman-devel
Ubuntu/Debian
$ sudo apt-get install pkg-config libglib2.0-dev libpixman-1-dev git-core build-essential
Build QEMU
$ git clone https://git.qemu.org/git/qemu.git
$ cd qemu
$ git checkout -b v4.1.1.xlnx v4.1.1 # or later stable tag
$ git submodule update --init --recursive
$ ./configure --target-list=aarch64-softmmu,microblazeel-softmmu --disable-kvm --disable-xen
$ make
Recommend adding the path for the newly built aarch64 Qemu to your PATH variable in “.bashrc”, which should be $HOME/qemu/aarch64-softmmu.
Prepare Workspace
Create a directory structure for your workspace.
$ export COS_BUILD=$HOME/centos8-dev
$ mkdir -p $COS_BUILD/rpmbuild $COS_BUILD/images/{efi,boot} $COS_BUILD/deploy/{efi/dtb/xilinx,boot}
$ export IMG_ROOT= $COS_BUILD/images
$ cd $IMG_ROOT
Download the UEFI boot image for the QEMU generic ARM model.
$ wget https://releases.linaro.org/components/kernel/uefi-linaro/latest/release/qemu64/QEMU_EFI.img.gz
$ gunzip QEMU_EFI.img.gz
Create the QEMU script to run the ISO installer.
These scripts use the QEMU generic ARM model vs. the ZCU102 model. This allows us to use a full-blown UEFI bootloader from Linaro and does not rely on a properly configured kernel for Zynq UltraScale+.
#!/bin/bash
# Install distro from an ISO onto a virtual disk image
# . runqemu-iso <distro>.iso

iso=$1
os=${iso%.iso}
size=7G

disk_img=$os.qcow2
efi_img=$os.efi

qemu-img create -f qcow2 $disk_img ${size}
qemu-img create -f qcow2 $efi_img 64M

qemu-system-aarch64 \
    -cpu cortex-a53 -M virt -m 4096 -nographic -smp $(nproc) -boot d \
    -drive if=pflash,format=raw,file=QEMU_EFI.img \
    -drive if=pflash,format=qcow2,file=${efi_img} \
    -device virtio-scsi-device \
    -device scsi-cd,drive=cdrom \
    -device virtio-blk-device,drive=hd0 \
    -drive file=${iso},id=cdrom,media=cdrom,if=none \
    -drive file=${disk_img},id=hd0,if=none
The actual storage space on your SD card is less than the size on the label. This script creates a 7 GB image targeting an 8 GB SD card.
Create the QEMU script to boot from a QCOW2 or raw image.
#!/bin/bash
# Boot distro from a QCOW2 or raw image
# . runqemu-img <distro>.qcow2

disk_img=$1
efi_img=${1%.*}.efi

qemu-system-aarch64 \
    -cpu cortex-a53 -M virt -m 4096 -nographic -smp $(nproc) \
    -drive if=pflash,format=raw,file=QEMU_EFI.img \
    -drive if=pflash,format=qcow2,file=${efi_img} \
    -device virtio-blk-device,drive=hd0 \
    -drive file=${disk_img},id=hd0,if=none
CentOS
Install CentOS on Virtual Disk from ISO
Download an ISO from one of mirrors for aarch64 CentOS 8.
$ cd $IMG_ROOT
$ wget http://mirrors.usc.edu/pub/linux/distributions/centos/8.0.1905/isos/aarch64/CentOS-8-aarch64-1905-dvd1.iso
$ wget http://mirrors.usc.edu/pub/linux/distributions/centos/8.0.1905/isos/aarch64/CHECKSUM
$ sha256sum -c CHECKSUM
CentOS-8-aarch64-1905-boot.iso: OK
Depending on the number of ISOs included in the CHECKSUM file, you may get failures for files you have not downloaded. This is OK.
$ . runqemu-iso CentOS-8-aarch64-1905-dvd1.iso
At the Grub menu, select install Linux and follow the installation menus. Configure as you see fit and let the VM reboot.
Prepare the Virtual Disk Image for ZCU102
Login as root or switch to superuser (su). Since the initramfs is built with “hostonly” support, we will force dracut to add the MMC and SDHCI drivers.
# echo "add_drivers+=\"mmc_block sdhci-of-arasan\"" > /etc/dracut.conf.d/zcu102.conf
# dracut --force
If your ZCU102 fails to boot, you can try adding all the kernel modules to the initramfs with dracut “no-hostonly” option.
# dracut --force --no-hostonly
Power down the VM.
# systemctl poweroff
Convert the QCOW2 image to a raw disk image.
$ qemu-img convert CentOS-8-aarch64-1905-dvd1.qcow2 CentOS-8-aarch64-1905-dvd1.raw
I recommend archiving the QCOW2 image if you ever need to refer back to a clean installation.
Create loop devices for the raw disk image. Mount the 2nd partition onto the “boot” directory.
$ sudo kpartx -va CentOS-8-aarch64-1905-dvd1.raw
add map loop0p1 (253:3): 0 1228800 linear 7:1 2048
add map loop0p2 (253:4): 0 2097152 linear 7:1 1230848
add map loop0p3 (253:5): 0 11350016 linear 7:1 3328000
$ sudo mount /dev/mapper/loop0p2 boot
Next grep the kernel configuration looking for a couple key options to see if we at least have a console and SDHCI support.
$ grep 'ARCH_ZYNQMP\|SERIAL_XILINX\|SDHCI_OF_ARASAN' boot/config-4.18.0-80.el8.aarch64
# CONFIG_ARCH_ZYNQMP is not set
# CONFIG_SERIAL_XILINX_PS_UART is not set
# CONFIG_MMC_SDHCI_OF_ARASAN is not set
The default CentOS 8 kernel may not boot on the ZCU102, so you may need to build and install a new kernel. Please see Build a CentOS 8 System for Zynq UltraScale+ to generate the kernel RPMS if the CONFIG_* requirements above are not met.
$ sudo cp ../rpmbuild/kernel/RPMS/aarch64/kernel-4.18.0-80.el8.xlnx.aarch64.rpm \
../rpmbuild/kernel/RPMS/aarch64/kernel-core-4.18.0-80.el8.xlnx.aarch64.rpm \
../rpmbuild/kernel/RPMS/aarch64/kernel-modules-4.18.0-80.el8.xlnx.aarch64.rpm \
../rpmbuild/kernel/RPMS/aarch64/kernel-headers-4.18.0-80.el8.xlnx.aarch64.rpm \
boot/
Unmount the boot directory and cleanup the mappings.
$ sudo umount boot
$ sudo kpartx -d CentOS-8-aarch64-1905-dvd1.raw
loop deleted : /dev/loop0
Boot the system with the raw disk image and we will install the kernel RPM packages in the QEMU VM.
$ . runqemu-img CentOS-8-aarch64-1905-dvd1.raw
Login as root and install the kernel.
zcu102 login: root
Password:
[root@localhost ~]# rpm -ivh kernel-*.rpm
Once the kernel installation is complete, power-off the VM.
[root@localhost ~]# systemctl poweroff
Next lets check the partition scheme on the raw disk image. The installer should have used a GPT scheme.
fdisk -l CentOS-8-aarch64-1905-dvd1.raw
Disk CentOS-8-aarch64-1905-dvd1.raw: 7 GiB, 7516192768 bytes, 14680064 sectors
Units: sectors of 1 * 512 = 512 bytes
Sector size (logical/physical): 512 bytes / 512 bytes
I/O size (minimum/optimal): 512 bytes / 512 bytes
Disklabel type: gpt
Disk identifier: A01B0908-71D5-4058-A016-AE386F645BD9

Device                              Start       End  Sectors  Size Type
CentOS-8-aarch64-1905-dvd1.raw1   2048      1230847  1228800  600M EFI System
CentOS-8-aarch64-1905-dvd1.raw2   1230848   3327999  2097152    1G Linux filesystem
CentOS-8-aarch64-1905-dvd1.raw3   3328000   14678015 11350016  5.4G Linux LVM
However, the Zynq UltraScale+ ROM requires an MBR scheme. So let’s convert the GPT to MBR.
$ sgdisk -m 1:2:3 CentOS-8-aarch64-1905-dvd1.raw
Warning: The kernel is still using the old partition table.
The new table will be used at the next reboot or after you
run partprobe(8) or kpartx(8)
GPT data structures destroyed! You may now partition the disk using fdisk or
other utilities.
Mark the 1st partition with the boot flag.
$ sfdisk -A CentOS-8-aarch64-1905-dvd1.raw 1
The bootable flag on partition 1 is enabled now.

The partition table has been altered.
Syncing disks.
Lets check to make sure the partition scheme converted correctly. You should see “Disklabel type: dos” and the Boot flag marked.
$ fdisk -l CentOS-8-aarch64-1905-dvd1.raw
Disk CentOS-8-aarch64-1905-dvd1.raw: 7 GiB, 7516192768 bytes, 14680064 sectors
Units: sectors of 1 * 512 = 512 bytes
Sector size (logical/physical): 512 bytes / 512 bytes
I/O size (minimum/optimal): 512 bytes / 512 bytes
Disklabel type: dos
Disk identifier: 0x00000000

Device                          Boot   Start      End  Sectors  Size Id Type
CentOS-8-aarch64-1905-dvd1.raw1 *       2048  1230847  1228800  600M ef EFI (FAT
CentOS-8-aarch64-1905-dvd1.raw2      1230848  3327999  2097152    1G 83 Linux
CentOS-8-aarch64-1905-dvd1.raw3      3328000 14678015 11350016  5.4G 8e Linux LV
Now lets create mappings for the raw image and mount the 1st partition on “efi.”
$ sudo kpartx -va CentOS-8-aarch64-1905-dvd1.raw
add map loop0p1 (253:5): 0 1228800 linear 7:2 2048
add map loop0p2 (253:6): 0 2097152 linear 7:2 1230848
add map loop0p3 (253:7): 0 11350016 linear 7:2 3328000
$ sudo mount /dev/mapper/loop0p1 efi
Install UEFI (boot.bin), DTB and replace shim with GRUB since we are not using PC secure boot.
$ sudo cp boot.bin efi/
$ mkdir -p efi/dtb/xilinx/
$ sudo cp zynqmp-zcu102-rev1.0.dtb efi/dtb/xilinx/
$ sudo cp efi/EFI/centos/grubaa64.efi efi/EFI/BOOT/BOOTAA64.EFI
Unmount the “efi” partition and delete the mappings.
$ sudo umount efi
$ sudo kpartx -d CentOS-8-aarch64-1905-dvd1.raw
loop deleted : /dev/loop0
Finally copy the raw disk image to the SD card and boot the ZCU102.
$ sudo dd if=CentOS-8-aarch64-1905-dvd1.raw of=/dev/sdX bs=4M iflag=fullblock oflag=direct status=progress; sync
Boot CentOS on ZCU102

Fedora
Install Fedora on Virtual Disk from ISO
$ cd $IMG_ROOT
$ wget https://archives.fedoraproject.org/pub/archive/fedora/linux/releases/29/Server/aarch64/iso/Fedora-Server-dvd-aarch64-29-1.2.iso
$ wget https://archives.fedoraproject.org/pub/archive/fedora/linux/releases/29/Server/aarch64/iso/Fedora-Server-29-1.2-aarch64-CHECKSUM
$ sha256sum -c Fedora-Server-29-1.2-aarch64-CHECKSUM
Fedora-Server-dvd-aarch64-29-1.2.iso: OK
$ . install-iso Fedora-Server-dvd-aarch64-29-1.2.iso
At the Grub menu, select Install Linux and follow the installation menus. Configure as you see fit and let the VM reboot.
Prepare the Virtual Disk Image for ZCU102
Login as root or switch to superuser (su). Since the initramfs is built with “hostonly” support, we will force dracut to add the MMC and SDHCI drivers. You can verify the presence of these modules in the initramfs using “lsinitrd” before and after running dracut.
# echo "add_drivers+=\"mmc_block sdhci-of-arasan\"" > /etc/dracut.conf.d/zcu102.conf
# dracut --force
If your ZCU102 fails to boot, you can try adding all the kernel modules to the initramfs with dracut “no-hostonly” option.
# dracut --force --no-hostonly
Power down the VM.
# systemctl poweroff
First you will need to first convert the QCOW2 image to a raw disk image.
$ qemu-img convert Fedora-Server-dvd-aarch64-29-1.2.qcow2 Fedora-Server-dvd-aarch64-29-1.2.raw
I recommend archiving the QCOW2 image if you ever need to refer back to a virgin installation.
Create loop devices for the raw disk image. Mount the 2nd partition onto the “boot” directory.
$ sudo kpartx -va Fedora-Server-dvd-aarch64-29-1.2.raw
add map loop0p1 (253:3): 0 409600 linear 7:0 2048
add map loop0p2 (253:4): 0 2097152 linear 7:0 411648
add map loop0p3 (253:5): 0 12169216 linear 7:0 2508800
$ sudo mount /dev/mapper/loop0p2 boot
Next check the kernel to see if we believe it will boot the ZCU102. Let’s grep the configuration looking for a couple key options.
$ grep 'ARCH_ZYNQMP\|SERIAL_XILINX\|SDHCI_OF_ARASAN' boot/config-4.18.16-300.fc29.aarch64
CONFIG_ARCH_ZYNQMP=y
CONFIG_SERIAL_XILINX_PS_UART=y
CONFIG_SERIAL_XILINX_PS_UART_CONSOLE=y
CONFIG_MMC_SDHCI_OF_ARASAN=m
It appears there are enough configuration options to at least get a console and mount the SD card.
Unmount the boot directory and cleanup the mappings.
$ sudo umount boot
$ sudo kpartx -d Fedora-Server-dvd-aarch64-29-1.2.raw
loop deleted : /dev/loop0
Next lets check the partition scheme on the raw disk image. The installer should have used a GPT scheme.
$ fdisk -l Fedora-Server-dvd-aarch64-29-1.2.raw
Disk Fedora-Server-dvd-aarch64-29-1.2.raw: 7 GiB, 7516192768 bytes, 14680064 sectors
Units: sectors of 1 * 512 = 512 bytes
Sector size (logical/physical): 512 bytes / 512 bytes
I/O size (minimum/optimal): 512 bytes / 512 bytes
Disklabel type: gpt
Disk identifier: BA9EE671-D41D-4199-B3FF-4F4A54B09E79

Device                                  Start      End  Sectors  Size Type
Fedora-Server-dvd-aarch64-29-1.2.raw1    2048   411647   409600  200M EFI System
Fedora-Server-dvd-aarch64-29-1.2.raw2  411648  2508799  2097152    1G Linux file
Fedora-Server-dvd-aarch64-29-1.2.raw3 2508800 14678015 12169216  5.8G Linux LVM
However, the Zynq UltraScale+ ROM requires an MBR scheme. So let’s convert the GPT to MBR.
$ sgdisk -m 1:2:3 Fedora-Server-dvd-aarch64-29-1.2.raw
Warning: The kernel is still using the old partition table.
The new table will be used at the next reboot or after you
run partprobe(8) or kpartx(8)
GPT data structures destroyed! You may now partition the disk using fdisk or
other utilities.
Also, mark the 1st partition with the boot flag.
$ sfdisk -A Fedora-Server-dvd-aarch64-29-1.2.raw 1
The bootable flag on partition 1 is enabled now.

The partition table has been altered.
Syncing disks.
Now lets check to make sure the partition scheme converted correctly. You should see “Disklabel type: dos” and the Boot flag marked.
$ fdisk -l Fedora-Server-dvd-aarch64-29-1.2.raw
Disk Fedora-Server-dvd-aarch64-29-1.2.raw: 7 GiB, 7516192768 bytes, 14680064 sectors
Units: sectors of 1 * 512 = 512 bytes
Sector size (logical/physical): 512 bytes / 512 bytes
I/O size (minimum/optimal): 512 bytes / 512 bytes
Disklabel type: dos
Disk identifier: 0x00000000

Device                                Boot   Start      End  Sectors  Size Id Type
Fedora-Server-dvd-aarch64-29-1.2.raw1 *       2048   411647   409600  200M ef EFI
Fedora-Server-dvd-aarch64-29-1.2.raw2       411648  2508799  2097152    1G 83 Linu
Fedora-Server-dvd-aarch64-29-1.2.raw3      2508800 14678015 12169216  5.8G 8e Linu
Now lets create mappings for the raw image and mount the 1st partition on “efi” and the 2nd partition on “boot”.
$ sudo kpartx -va Fedora-Server-dvd-aarch64-29-1.2.raw
add map loop0p1 (253:3): 0 409600 linear 7:0 2048
add map loop0p2 (253:4): 0 2097152 linear 7:0 411648
add map loop0p3 (253:5): 0 12169216 linear 7:0 2508800
$ sudo mount /dev/mapper/loop0p1 efi
$ sudo mount /dev/mapper/loop0p2 boot
Install UEFI (boot.bin), DTB and replace shim with GRUB since we are not using PC secure boot.
$ sudo cp boot.bin efi/
$ mkdir -p efi/dtb/xilinx/
$ sudo cp boot/dtb-4.18.16-300.fc29.aarch64/xilinx/zynqmp-zcu102-rev1.0.dtb efi/dtb/xilinx/
$ sudo cp efi/EFI/fedora/grubaa64.efi efi/EFI/BOOT/BOOTAA64.EFI
Unmount the “efi” and “boot” partitions. Then delete the mappings.
$ sudo umount efi
$ sudo umount boot
$ sudo kpartx -d Fedora-Server-dvd-aarch64-29-1.2.raw
loop deleted : /dev/loop0
Finally copy the raw disk image to the SD card and boot the ZCU102.
$ sudo dd if=Fedora-Server-dvd-aarch64-29-1.2.raw of=/dev/sdX bs=4M iflag=fullblock oflag=direct status=progress; sync
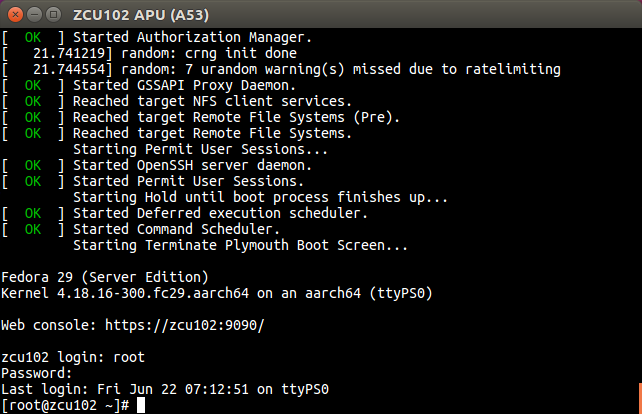
Boot Fedora on ZCU102
Fedora (Quick Install)
This quick install leverages a preinstalled RPI ARMv8 disk image.
Install Fedora from a Raw Disk Image
Fedora also provides raw disk images. You may download the raw disk image for a quicker install.
$ wget https://archives.fedoraproject.org/pub/archive/fedora/linux/releases/29/Server/aarch64/images/Fedora-Server-29-1.2.aarch64.raw.xz
$ wget https://archives.fedoraproject.org/pub/archive/fedora/linux/releases/29/Server/aarch64/images/Fedora-Server-29-1.2-aarch64-CHECKSUM
$ sha256sum -c Fedora-Server-29-1.2-aarch64-CHECKSUM
Fedora-Server-29-1.2.aarch64.raw.xz: OK
$ xz -d Fedora-Server-29-1.2.aarch64.raw.xz
Prepare the Virtual Disk Image for ZCU102
The raw image is already formatted as MBR, so we don’t need to modify the partitioning scheme.
$ fdisk -l Fedora-Server-29-1.2.aarch64.raw
Disk Fedora-Server-29-1.2.aarch64.raw: 7 GiB, 7516192768 bytes, 14680064 sectors
Units: sectors of 1 * 512 = 512 bytes
Sector size (logical/physical): 512 bytes / 512 bytes
I/O size (minimum/optimal): 512 bytes / 512 bytes
Disklabel type: dos
Disk identifier: 0x180b287d

Device                            Boot   Start      End  Sectors  Size Id Type
Fedora-Server-29-1.2.aarch64.raw1 *       2048   411647   409600  200M  6 FAT16
Fedora-Server-29-1.2.aarch64.raw2       411648  2508799  2097152    1G 83 Linux
Fedora-Server-29-1.2.aarch64.raw3      2508800 14680063 12171264  5.8G 8e Linux
Now lets create mappings for the raw image and mount the 1st partition on “efi” and the 2nd partition on “boot”.
$ sudo kpartx -va Fedora-Server-29-1.2.aarch64.raw
[sudo] password for emil:
add map loop0p1 (253:3): 0 409600 linear 7:0 2048
add map loop0p2 (253:4): 0 2097152 linear 7:0 411648
add map loop0p3 (253:5): 0 12171264 linear 7:0 2508800
$ sudo mount /dev/mapper/loop0p1 efi
$ sudo mount /dev/mapper/loop0p2 boot
Install UEFI (boot.bin), DTB and replace shim with GRUB since we are not using PC secure boot.
$ sudo cp boot.bin efi/
$ mkdir -p efi/dtb/xilinx/
$ sudo cp boot/dtb/xilinx/zynqmp-zcu102-rev1.0.dtb efi/dtb/xilinx/
$ sudo cp efi/EFI/fedora/grubaa64.efi efi/EFI/BOOT/BOOTAA64.EFI
The “efi” directory also contains RPI support images and files. You may delete them or leave them as they are benign.
Next check the kernel to see if we believe it will boot the ZCU102. Let’s grep the configuration looking for a couple key options.
$ grep 'ARCH_ZYNQMP\|SERIAL_XILINX\|SDHCI_OF_ARASAN' boot/config-4.18.16-300.fc29.aarch64
CONFIG_ARCH_ZYNQMP=y
CONFIG_SERIAL_XILINX_PS_UART=y
CONFIG_SERIAL_XILINX_PS_UART_CONSOLE=y
CONFIG_MMC_SDHCI_OF_ARASAN=m
It appears there are enough configuration options to at least get a console and mount the SD card.
Check the initramfs for mmc_block and sdhci-of-arasan kernel modules.
$ sudo lsinitrd boot/initramfs-4.18.16-300.fc29.aarch64.img | grep 'mmc_block\|sdhci-of-arasan'
-rw-r--r--   1 root     root        18740 Jul 26  2018 usr/lib/modules/4.18.16-300.fc29.aarch64/kernel/drivers/mmc/core/mmc_block.ko.xz
-rw-r--r--   1 root     root         5800 Jul 26  2018 usr/lib/modules/4.18.16-300.fc29.aarch64/kernel/drivers/mmc/host/sdhci-of-arasan.ko.xz
These modules are installed in the initramfs, so we should be able to mount a block device on the SD card.
Unmount the “efi” and “boot” partitions and delete the mappings.
$ sudo umount efi
$ sudo umount boot
$ sudo kpartx -d Fedora-Server-29-1.2.aarch64.raw
loop deleted : /dev/loop0
Finally copy the raw disk image to the SD card and boot the ZCU102.
$ sudo dd if=Fedora-Server-29-1.2.aarch64.raw of=/dev/sdX bs=4M iflag=fullblock oflag=direct status=progress; sync