Zynq Ultrascale Fixed Link PS Ethernet Demo
Build Hardware:
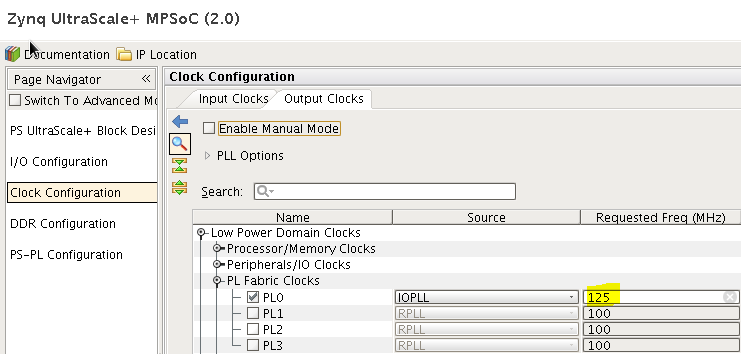
Launch Vivado 2017.2, create a new project targeting the ZCU102 board.
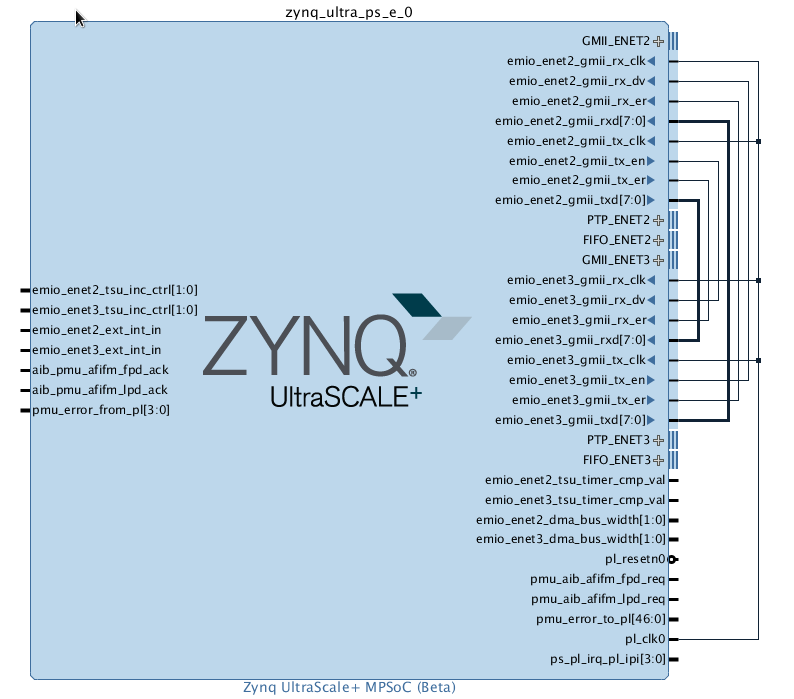
Use the Block Automation in IPI, make slight PS changes:

Connect as shown below:
Generate Output Products, Create HDL wrapper, write_bitstream and export to SDK (include bitstream).
Build Linux Image:
Here, Petalinux 2017.2 is used. See the link here for more info on the Petalinux commands:
- cd project_1/project_1.sdk
- petalinux-create --type project --template zynqMP --name fixed_link_test
- cd fixed_link_test
- petalinux-config --get-hw-description=..
- o Save and Exit
- Open the system-user.dts in project-spec/meta-user/recipes-bsp/device-tree/files
and make the changes below:
&gem2 {
        phy-mode = "moca";
        fixed-link {
                speed = <1000>;
                full-duplex;
         };
};
&gem3 {
        phy-mode = "moca";
        fixed-link {
                speed = <1000>;
                full-duplex;
         };
};
- petalinux-config -c kernel
- (Opt) Networking Support -> Networking Options -> Network Packet filtering framework (Netfilter) -> Core Netfilter Configuration -> <*> Netfilter connection tracking support
- (Opt) Networking Support -> Networking Options -> Network Packet filtering framework (Netfilter) -> IP: Netfilter Configuration -> <*> IPv4 connection tracking support
- (Opt) Networking Support -> Networking Options -> Network Packet filtering framework (Netfilter) -> IP: Netfilter Configuration -> <*> IPv4 NAT
- (Opt) Networking Support -> Networking Options -> Network Packet filtering framework (Netfilter) -> IP: Netfilter Configuration -> <*> IP tables support
- (Opt) Networking Support -> Networking Options -> Network Packet filtering framework (Netfilter) -> IP: Netfilter Configuration -> <*> iptables NAT support
- (Opt) Networking Support -> Networking Options -> Network Packet filtering framework (Netfilter) -> IP: Netfilter Configuration -> <*> MASQUERADE target support
- (Opt) Networking Support -> Networking Options -> Network Packet filtering framework (Netfilter) -> Core Netfilter Configuration -> {*} ipv4/IPV6 redirect support
- Device Drivers -> Network device support -> PHY Device Support and infrastructure -> <*> Driver for MDIO Bus/PHY emulation with fixed/link PHYs
- (Opt) petalinux-config -c rootfs
- Filesystem Packages -> misc -> iptables -> [*] iptables
- Filesystem Packages -> misc -> net-tools -> [*] net-tools
- petalinux-build
- cd images/linux
- petalinux-package --boot --fsbl zynqmp_fsbl.elf --fpga design_1_wrapper.bit --u-boot
Testing on Hardware:
Place the following files onto the SD card and boot:
- BOOT.BIN
- Image.ub
- command.sh (opt)
Place the commands below into a commands.sh file:
- iptables -t nat -A POSTROUTING -s 10.50.0.1 -d 10.60.1.1 -j SNAT --to-source 10.60.0.1
- iptables -t nat -A PREROUTING -d 10.60.0.1 -j DNAT --to-destination 10.50.0.1
- iptables -t nat -A POSTROUTING -s 10.50.1.1 -d 10.60.0.1 -j SNAT --to-source 10.60.1.1
- iptables -t nat -A PREROUTING -d 10.60.1.1 -j DNAT --to-destination 10.50.1.1
- ip route add 10.60.1.1 dev eth0
- arp -i eth0 -s 10.60.1.1 00:0a:35:00:22:02
- ip route add 10.60.0.1 dev eth1
- arp -i eth1 -s 10.60.0.1 00:0a:35:00:22:01
Note: If the file was created on a windows OS, make sure that this is converted to Unix. For example dos2unix
Make sure each MAC address is unique. To verify, do a ipconfig -a

User can set the MAC address with the command below:
- ifconfig eth0 hw ether 00:0a:35:00:22:01
- ifconfig eth1 hw ether 00:0a:35:00:22:02
Since we have the system added in a loop, we can use the NAT to set up the LAN and test. This is optional.
To test follow the tests below:
- ifconfig eth0 10.50.0.1/24 netmask 255.0.0.0
- ifconfig eth1 10.50.1.1/24 netmask 255.0.0.0
- mount /dev/mmcblk0p1 /mnt
- source /mnt/commands.sh
- Note: User can manually enter the commands from commands.sh above here too
- ping 10.60.1.1
- ping 10.60.0.1
