Zynq UltraScale+ MPSoC VCU TRD 2018.3 - HDMI Video Capture and HDMI Display With SDSoC
...
This design-module demonstrates how to add a data-copy (also known as By-Pass) accelerator between HDMI Video Capture (HDMI-Rx) and HDMI Display (HDMI-Tx) pipelines in PL using SDSoC tool. The accelerator function (which simply copy the input data to output) is translated to RTL using the Vivado HLS compiler (which is part of SDSoC tool).
Sources:
- HDMI-Rx capture pipeline implemented in the PL.
- File source (SD card, USB storage, SATA hard disk).
- Stream-In from network or internet.
Sinks:
- HDMI-Tx display pipeline implemented in the PL.
VCU Codec:
- Video Encode/Decode capability using VCU hard block in PL
- AVC/HEVC encoding.
- Encoder/decoder parameter configuration.
Streaming Interfaces:
- 10G PL Ethernet.
- 1G Ethernet on PS
Supported Resolution:
The table below provides the supported resolution from a command line app in this design.
| Resolution | Command Line | |
| Single Stream | Multi-stream | |
| 4kp60 | √ | NA |
| 4kp30 | √ | NA |
| 1080p60 | √ | NA |
| 1080p30 | √ | NA |
√ - Supported
NA – Not applicable
x – Not supported
The below table gives information about the features supported in this design.
| Pipeline | Input source | Output Type | Resolution | VCU codec |
|---|---|---|---|---|
Capture --> bypass --> Display (Passthrough pipeline) With and without bypass plugin | HDMI-Rx | HDMI-Tx | 4KP/1080p | None |
Stream-Out pipeline with and without bypass plugin | HDMI-Rx | Stream-Out | 4K/1080p | HEVC/AVC |
File/Streaming Playback pipeline with and without bypass plugin | File Source/ Stream-In | HDMI-Tx | 4K/1080p | HEVC/AVC |
Capture--> Encode--> Decode--> Display without bypass plugin | HDMI-Rx | HDMI-Tx | 4K/1080p | HEVC/AVC |
Record pipeline without bypass plugin | HDMI-Rx | File Sink | 4K/1080p | HEVC/AVC |
For the overview, software tools, system requirements and design files, follow the link below:
The below figure shows the VCU TRD design hardware block diagram.

The below figure shows the HDMI Video Capture and HDMI Display with SDSoC support design software block diagram.

1.1 Board Setup
Refer below link for Board Setup
...
TRD package contents specific to this design are placed in the following directory structure. The user needs to copy all the files from the $TRD_HOME/images/vcu_sdx/ to FAT32 formatted SD card directory.
| Code Block | ||
|---|---|---|
| ||
└── rdf0428-zcu106-vcu-trd-2018-3
    ├── apu
    │   ├── apps
    │   └── vcu_petalinux_bsp
    ├── documentation
    ├── images
    │   ├── vcu_sdx
    │   │   ├── autostart.sh
    │   │   ├── bin
    │   │   ├── BOOT.BIN
    │   │   ├── config
    │   │   ├── image.ub
    │   │   ├── system.dtb
    │   │   └── vcu
    ├── pl
    │   ├── constrs
    │   ├── pre-built
    │   │   ├── vcu_sdx
    │   ├── Readme.txt
    │   ├── scripts
    │   │   └── vcu_sdx.tcl
    │   └── srcs
└── README.txt |
...
By Pass Sample and GStreamer Plugin
This tutorial shows how to build the By-Pass accelerator sample with/without HW acceleration based on the VCU TRD SDSoC platform.
- Set the build environment variables. This requires that you have previously completed the PetaLinux SDK installation step from Zynq UltraScale+ MPSoC VCU TRD 2018.3 - Run and Build Flow.
Note 1: Make sure you set the env variables in the same shell that is used to launch SDx. Also make sure the env variables are set before starting SDx, otherwise close and re-start SDx.
Note 2: The below command might ask you to execute unset LD_LIBRARY_PATH and then re-execute the command. Go ahead and follow those steps.
...
| Code Block | ||
|---|---|---|
| ||
% source $TRD_HOME/apu/vcu_petalinux_bsp/sdk/environment-setup-aarch64-xilinx-linux |
Create a new workspace for the bypass sdsoc and GStreamer plugin projects.
Code Block language bash % cd $TRD_HOME/apu/ws_bypass % sdx -workspace .
- Click 'Import Project' from the welcome screen, select Import Type as "Eclipse workspace or zip file", click Next. Browse to the current working directory and make sure all projects are selected as shown in the figure. De-select "Copy projects into workspace". Click Finish.

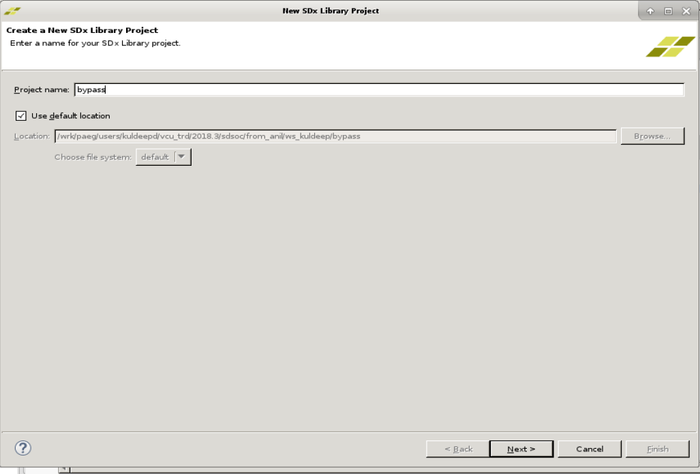
- Click 'File -> New → SDx Library Project'. Enter bypass as project name and click 'Next'.
- Select Accelerated Library Type as "Shared Library" and click Next.
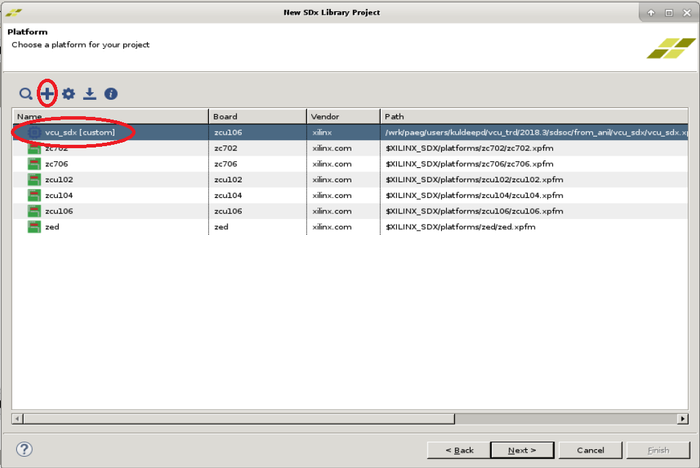
- Click + symbol to add Custom Platform', browse to the $TRD_HOME/apu/vcu_sdx folder and click OK. Select the "vcu_sdx [custom]" platform from the list and click 'Next'.
- Click Next in System Configuration window.
- Select "By-Pass" from the template list and click 'Finish'.

- For Acceleration in HW following steps to be executed:
- With HW Acceleration, in the "SDx Application Project Settings" panel, keep the active build configuration to "Release" which will have the pre-selected Hardware Function marked for acceleration. Make sure the 'Generate SD card image' box is checked.
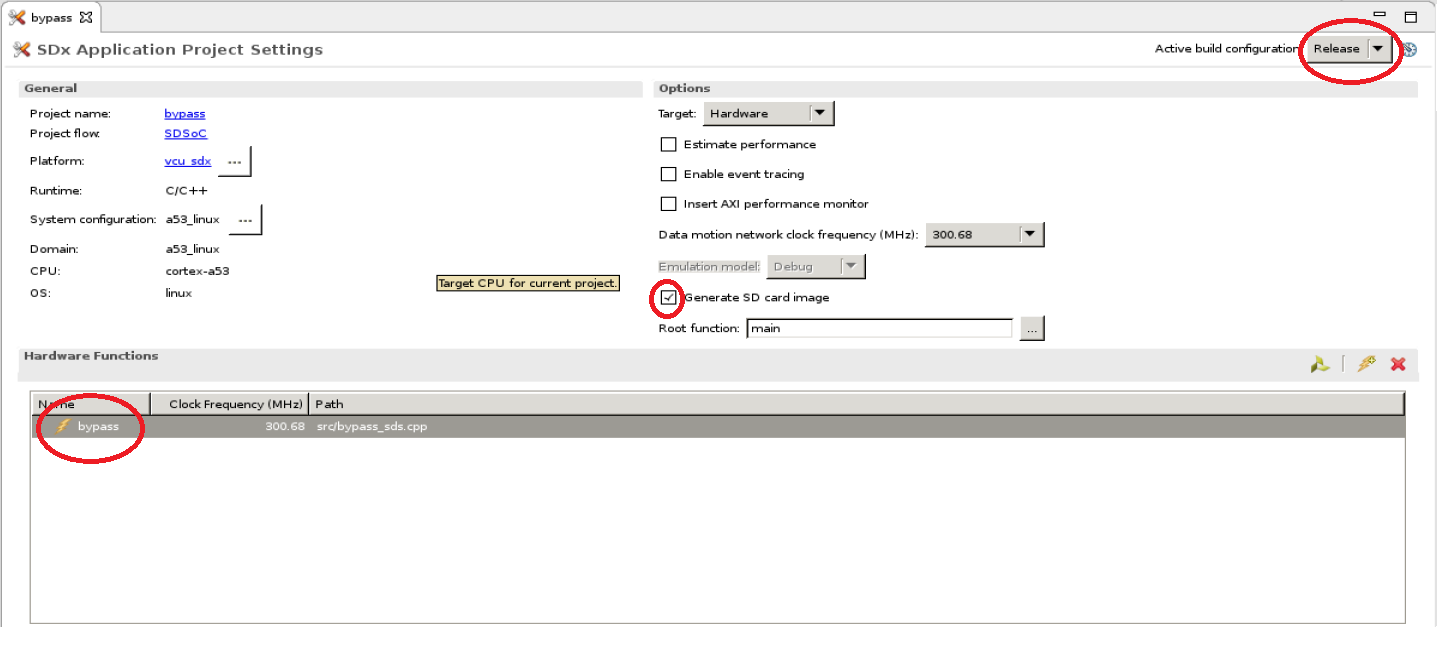
- With HW Acceleration, in the "SDx Application Project Settings" panel, keep the active build configuration to "Release" which will have the pre-selected Hardware Function marked for acceleration. Make sure the 'Generate SD card image' box is checked.
- Right-click the "bypass" project in the explorer panel and select 'Build Project'. Copy the generated SD card image.
- When the build is finished, right-click the "gstsdxbypass" project and select "Build Project". Copy the generated libraries and the plugin.
Note: This project has a dependency on "bypass" and the build will fail if "bypass" was not built previously.
| Code Block | ||
|---|---|---|
| ||
% cp bypass/Release/sd_card/BOOT.BIN $TRD_HOME/images/vcu_sdx/ % cp bypass/Release/sd_card/image.ub $TRD_HOME/images/vcu_sdx/ % cp bypass/Release/sd_card/libbypass.so $TRD_HOME/images/vcu_sdx/lib/ % cp gst/allocators/Debug/libgstsdxallocator.so gst/base/Debug/libgstsdxbase.so $TRD_HOME/images/vcu_sdx/lib % cp gst/plugins/gstsdxbypass/Debug/libgstsdxbypass.so $TRD_HOME/images/vcu_sdx/lib/ |
...