Zynq UltraScale+ MPSoC VCU TRD 2019.1 - HDMI Video Capture and HDMI Display With SDSoC
...
TRD package contents specific to this design are placed in the following directory structure. The user needs to copy all the files from the $TRD_HOME/images/vcu_sdx/ to FAT32 formatted SD card directory.
| Code Block |
|---|
|
└── rdf0428-zcu106-vcu-trd-2019-1
    ├── apu
    │   ├── apps
    │   └── vcu_petalinux_bsp
    │   └── vcu_sdx
    │   └── ws_bypass
    ├── documentation
    ├── images
    │   ├── vcu_sdx
    │   │   ├── autostart.sh
    │   │   ├── bin
    │   │   ├── BOOT.BIN
    │   │   ├── config
    │   │   ├── image.ub
    │   │   ├── lib
    │   │   ├── system.dtb
    │   │   └── vcu
    ├── pl
    │   ├── constrs
    │   ├── pre-built
    │   │   ├── vcu_sdx
    │   ├── Readme.txt
    │   ├── scripts
    │   │   └── vcu_sdx.tcl
    │   └── srcs
└── README.txt |
...
By Pass Sample and GStreamer Plugin
This tutorial shows how to build the By-Pass accelerator sample with/without HW acceleration based on the VCU TRD SDSoC platform.
- Set the build environment variables. This requires that you have previously completed the PetaLinux SDK installation step from Zynq UltraScale+ MPSoC VCU TRD 2019.1 - Run and Build Flow.
Note 1: Make sure you set the env variables in the same shell that is used to launch SDx. Also make sure the env variables are set before starting SDx, otherwise close and re-start SDx.
Note 2: The below command might ask you to execute unset LD_LIBRARY_PATH and then re-execute the command. Go ahead and follow those steps.
| Code Block |
|---|
|
% source <path/to/SDx>/installs/lin64/SDx/2019.1/settings64.sh
% export LD_LIBRARY_PATH=""
% source $TRD_HOME/apu/vcu_petalinux_bsp/xilinx-vcu-trd-zcu106-v2019.1-final/images/linux/sdk/environment-setup-aarch64-xilinx-linux |
Create a new workspace for the bypass sdsoc and GStreamer plugin projects.
| Code Block |
|---|
|
% cd $TRD_HOME/apu/ws_bypass
% sdx -workspace . |
- Click 'Import Project' from the welcome screen, select Import Type as "Eclipse workspace or zip file", click Next. Browse to the current working directory and make sure all projects are selected as shown in the figure. De-select "Copy projects into workspace". Click Finish.
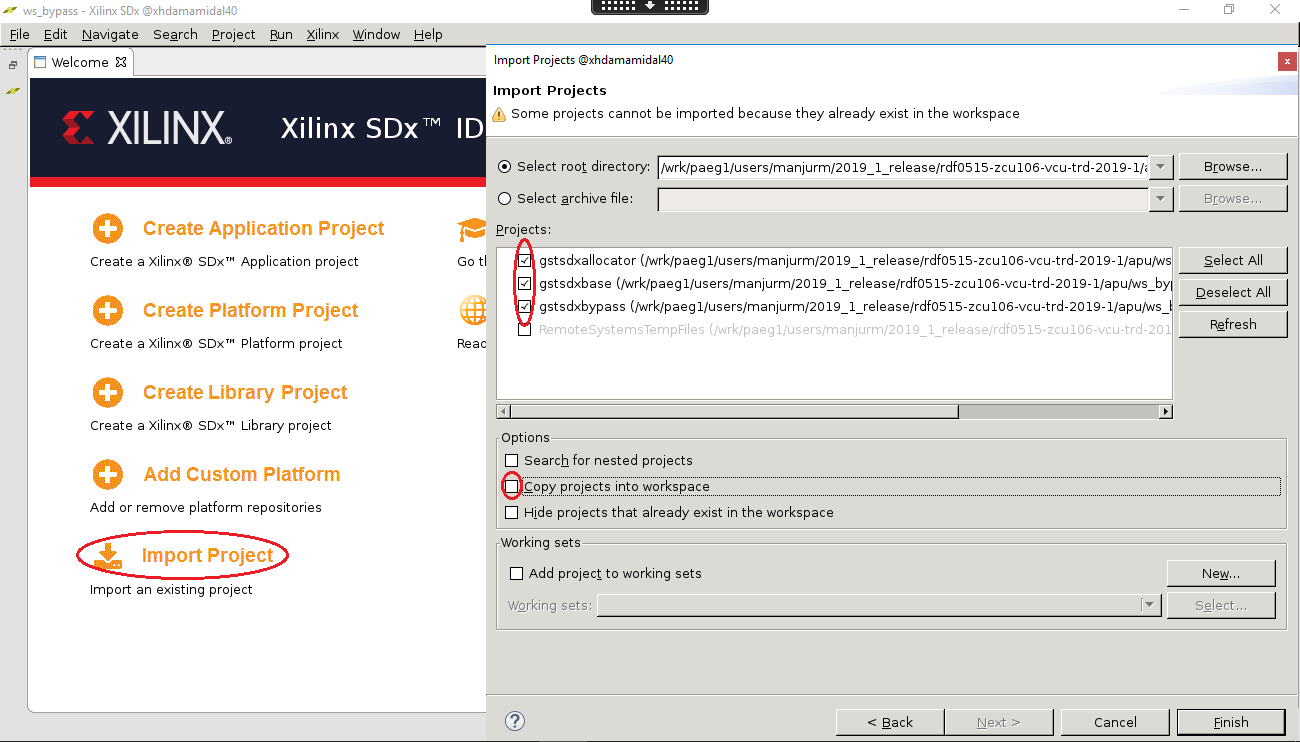 Image Modified
- Click 'File -> New → SDx Library Project'. Enter bypass as project name and click 'Next'.
 Image Modified
- Select Accelerated Library Type as "Shared Library" and click Next.
- Click + symbol to add Custom Platform', browse to the $TRD_HOME/apu/vcu_sdx folder and click OK. Select the "vcu_sdx [custom]" platform from the list and click 'Next'.
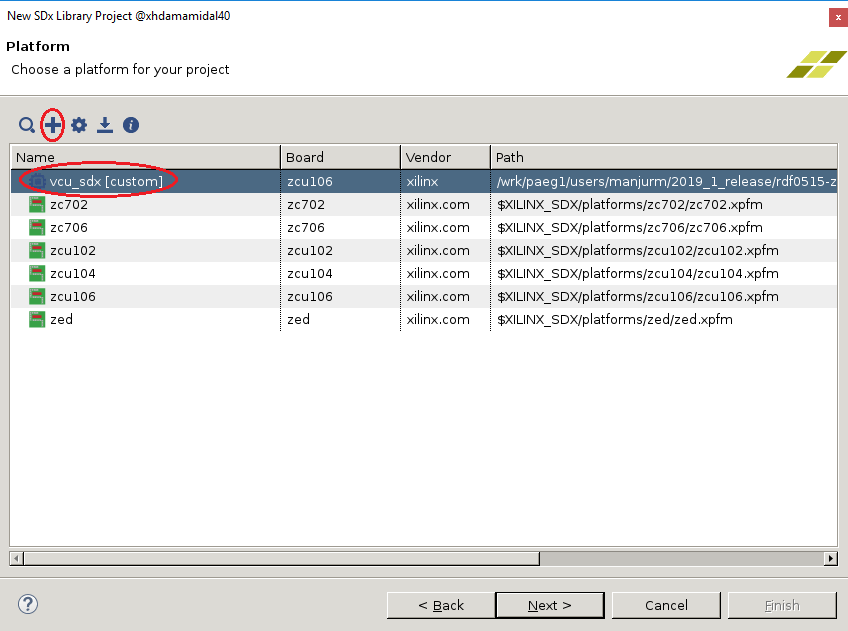 Image Modified
- Click Next in System Configuration window.
- Select "By-Pass" from the template list and click 'Finish'.
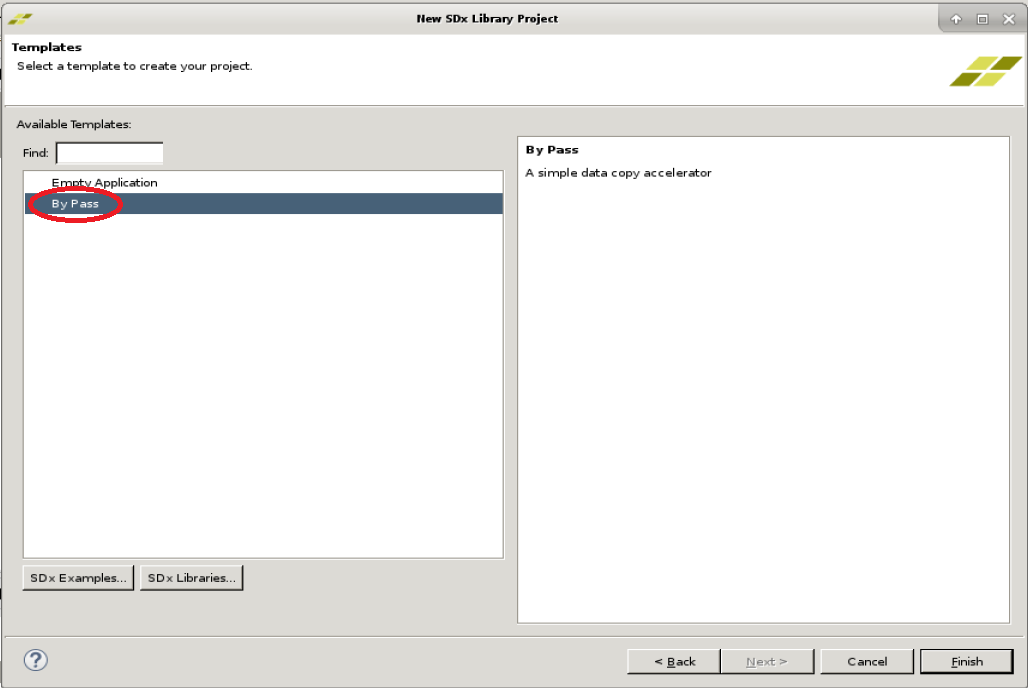 Image Modified
- For Acceleration in HW following steps to be executed:
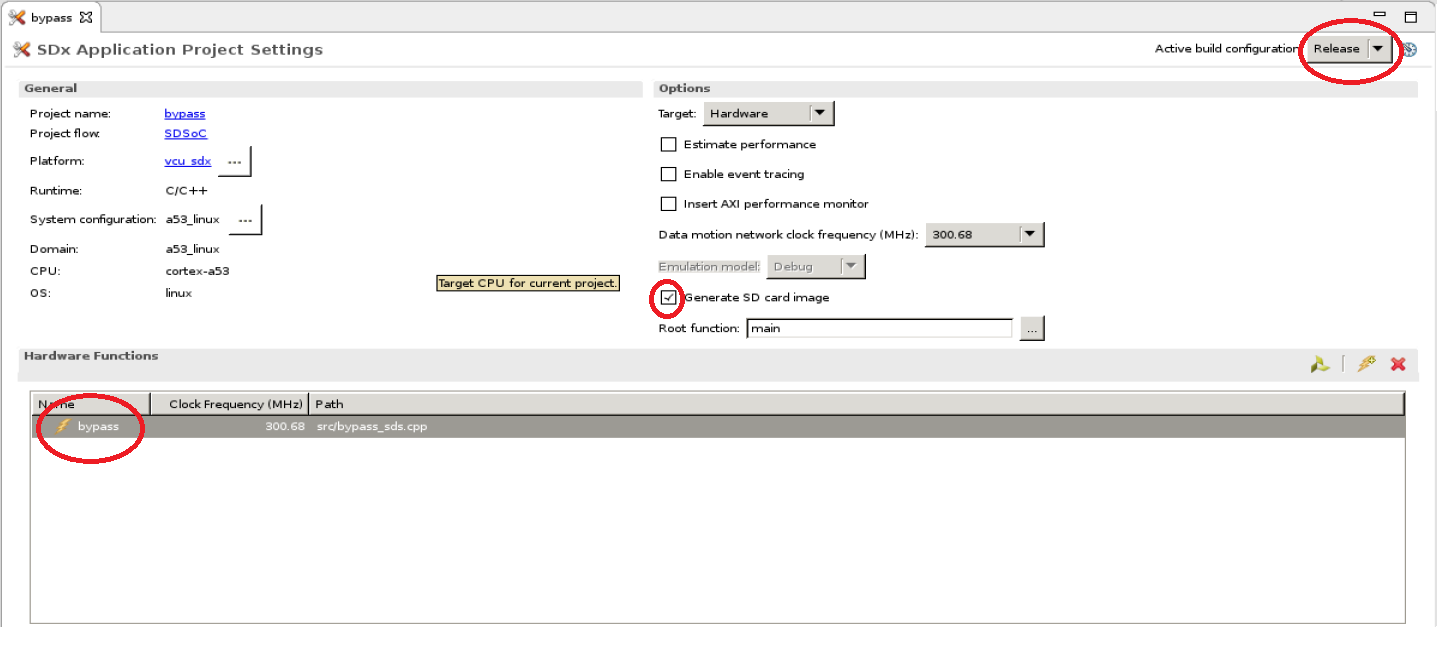
- With HW Acceleration, in the "SDx Application Project Settings" panel, keep the active build configuration to "Release" which will have the pre-selected Hardware Function marked for acceleration. Make sure the 'Generate SD card image' box is checked
- Right-click the "bypass" project in the explorer panel and select 'Build Project'. Copy the generated SD card image.
- When the build is finished, right-click the "gstsdxbypass" project and select "Build Project". Copy the generated libraries and the plugin.
Note: This project has a dependency on "bypass" and the build will fail if "bypass" was not built previously.
| Code Block |
|---|
|
% cp bypass/Release/sd_card/BOOT.BIN  $TRD_HOME/images/vcu_sdx/
% cp bypass/Release/sd_card/image.ub  $TRD_HOME/images/vcu_sdx/
% cp bypass/Release/sd_card/libbypass.so $TRD_HOME/images/vcu_sdx/lib/
% cp gst/allocators/Debug/libgstsdxallocator.so gst/base/Debug/libgstsdxbase.so $TRD_HOME/images/vcu_sdx/lib
% cp gst/plugins/gstsdxbypass/Debug/libgstsdxbypass.so $TRD_HOME/images/vcu_sdx/lib/ |
...
- To check the link status, resolution and video node of HDMI input source, run below xmedia-ctl command.
| Code Block |
|---|
|
$ xmedia-ctl -p -d /dev/media0 |
When HDMI source is connected to 4KP60 resolution, it shows:
| Code Block |
|---|
|
root@zcu106_vcu_trd:/media/card# xmedia-ctl -p -d /dev/media0
Media controller API version 4.19.0

Media device information
------------------------
driver          xilinx-video
model           Xilinx Video Composite Device
serial
bus info
hw revision     0x0
driver version  4.19.0

Device topology
- entity 1: vcap_hdmi output 0 (1 pad, 1 link)
            type Node subtype V4L flags 0
            device node name /dev/video0 -----> Video node for HDMI Rx source
        pad0: Sink
                <- "a0080000.v_proc_ss":1 [ENABLED]

- entity 5: a0080000.v_proc_ss (2 pads, 2 links)
            type V4L2 subdev subtype Unknown flags 0
            device node name /dev/v4l-subdev0
        pad0: Sink
                [fmt:Y8_1X8/1280x720 field:none colorspace:srgb]
                <- "a0000000.v_hdmi_rx_ss":0 [ENABLED]
        pad1: Source
                [fmt:Y8_1X8/1920x1080 field:none colorspace:srgb]
                -> "vcap_hdmi output 0":0 [ENABLED]

- entity 8: a0000000.v_hdmi_rx_ss (1 pad, 1 link)
            type V4L2 subdev subtype Unknown flags 0
            device node name /dev/v4l-subdev1
        pad0: Source
                [fmt:RBG888_1X24/3840x2160 field:none colorspace:srgb]
                [dv.caps:BT.656/1120 min:0x0@25000000 max:4096x2160@297000000 stds:CEA-861,DMT,CVT,GTF caps:progressive,reduced-
blanking,custom]
                [dv.detect:BT.656/1120 3840x2160p30 (4400x2250) stds:CEA-861 flags:CE-video] -----> Resolution and Frame-rate of HDMI Rx source
                -> "a0080000.v_proc_ss":0 [ENABLED]
|
NOTE: Check resolution and frame-rate of "dv.detect" under "v_hdmi_rx_ss" node.
When the HDMI source is not connected, it shows:
| Code Block |
|---|
|
root@zcu106_vcu_trd:/media/card# xmedia-ctl -p -d /dev/media0
Media controller API version 4.19.0

Media device information
------------------------
driver          xilinx-video
model           Xilinx Video Composite Device
serial
bus info
hw revision     0x0
driver version  4.19.0

Device topology
- entity 1: vcap_hdmi output 0 (1 pad, 1 link)
            type Node subtype V4L flags 0
            device node name /dev/video0 -----> Video node for HDMI Rx source
        pad0: Sink
                <- "a0080000.v_proc_ss":1 [ENABLED]

- entity 5: a0080000.v_proc_ss (2 pads, 2 links)
            type V4L2 subdev subtype Unknown flags 0
            device node name /dev/v4l-subdev0
        pad0: Sink
                [fmt:Y8_1X8/1280x720 field:none colorspace:srgb]
                <- "a0000000.v_hdmi_rx_ss":0 [ENABLED]
        pad1: Source
                [fmt:Y8_1X8/1920x1080 field:none colorspace:srgb]
                -> "vcap_hdmi output 0":0 [ENABLED]

- entity 8: a0000000.v_hdmi_rx_ss (1 pad, 1 link)
            type V4L2 subdev subtype Unknown flags 0
            device node name /dev/v4l-subdev1
        pad0: Source
                [fmt:RBG888_1X24/3840x2160 field:none colorspace:srgb]
                [dv.caps:BT.656/1120 min:0x0@25000000 max:4096x2160@297000000 stds:CEA-861,DMT,CVT,GTF caps:progressive,reduced-
blanking,custom]
                [dv.query:no-link] -----> HDMI Rx Link Status
                -> "a0080000.v_proc_ss":0 [ENABLED]
|
NOTE: Here "dv.query:no-link" under "v_hdmi_rx_ss" node shows HDMI-Rx source is not connected or HDMI-Rx source is not active(Try waking up the device by pressing a key on remote).
- Follow the below steps to switch the HDMI-Rx resolution from 1080p60 to 4kp60.
- Check current HDMI Input Source Resolution (1080p60) by following the above-mentioned steps.
- Run vcu_gst_app for current HDMI resolution (1080p60) by executing the following command.
| Code Block |
|---|
|
$ vcu_gst_app /media/card/config/input.cfg |
Below configurations needs to be set in input.cfg for HDMI-1080p60.
| Code Block |
|---|
|
Common Configuration    : START
Num Of Input            : 1
Output                  : HDMI
Out Type                : Display
Frame Rate              : 60
Exit

Input Configuration     : START
Input Num               : 1
Input Type              : hdmi
Raw                     : TRUE
Width                   : 1920
Height                  : 1080
Exit |
- Change Resolution of HDMI Input Source from 1080p60 to 4kp60 by following below steps.
- Set the HDMI source resolution to 4kp60 (Homepage → settings → display & Sound → Resolution → change to 4kp60).
- Save the configuration to take place the change.
- Verify the desired HDMI Input Source Resolution (4kp60) by following the above-mentioned steps.
- If HDMI Tx link-up issue is observed after Linux booting, use the following command:
| Code Block |
|---|
|
$ modetest -D a0070000.v_mix -s 40:3840x2160-60@AR24 -w 36:"alpha":0 |
- Run the following gst-launch-1.0 command to display raw HDMI video using GStreamer pipeline.
| Code Block |
|---|
|
$ gst-launch-1.0 v4l2src device=/dev/video0 io-mode=4 ! video/x-raw, width=3840, height=2160, format=NV12, framerate=60/1 ! queue ! kmssink bus-id="a0070000.v_mix" |
- Run the following gst-launch-1.0 command for file playback using GStreamer pipeline.
| Code Block |
|---|
|
$ gst-launch-1.0 uridecodebin uri="file:///run/media/sda/test.ts" ! queue max-size-bytes=0 ! kmssink bus-id="a0070000.v_mix" |
NOTE: File location should be SATA SSD(ext4 format) to avoid the read-write bandwidth issue.
- Run the following gst-launch-1.0 command for cbr stream-out HDMI video using GStreamer pipeline.
| Code Block |
|---|
|
$ gst-launch-1.0 v4l2src device=/dev/video0 io-mode=4 ! video/x-raw, format=NV12, width=3840, height=2160, framerate=60/1 ! omxh265enc qp-mode=auto gop-mode=basic gop-length=60 b-frames=0 target-bitrate=60000 num-slices=8 control-rate=constant prefetch-buffer=true low-bandwidth=false filler-data=true cpb-size=1000 initial-delay=500 periodicity-idr=60 ! video/x-h265, profile=main, alignment=au ! queue ! mpegtsmux alignment=7 name=mux ! rtpmp2tpay ! udpsink host=192.168.25.89 port=5004 |
NOTE: Here 192.168.25.89 is host/client IP address and 5004 is port no.
- Run the following gst-launch-1.0 command to display cbr stream-in on HDMI-Tx video using Gstreamer pipeline where 5004 is port no.
| Code Block |
|---|
|
$ gst-launch-1.0 udpsrc port=5004 buffer-size=60000000 caps="application/x-rtp, clock-rate=90000" ! rtpjitterbuffer latency=1000 ! rtpmp2tdepay ! tsparse ! video/mpegts ! tsdemux name=demux ! queue ! h265parse ! video/x-h265, profile=main, alignment=au ! omxh265dec internal-entropy-buffers=5 low-latency=0 ! queue max-size-bytes=0 ! kmssink bus-id="a0070000.v_mix" |
- Run the following gst-launch-1.0 command for low-latency stream-out HDMI video using GStreamer pipeline.
| Code Block |
|---|
|
$ gst-launch-1.0 v4l2src device=/dev/video0 io-mode=4 ! video/x-raw, format=NV12, width=3840, height=2160, framerate=60/1 ! omxh265enc qp-mode=auto gop-mode=basic gop-length=60 b-frames=0 target-bitrate=60000 num-slices=8 control-rate=low-latency prefetch-buffer=true low-bandwidth=false filler-data=true cpb-size=1000 initial-delay=500 periodicity-idr=60 ! video/x-h265, profile=main, alignment=nal ! queue ! mpegtsmux alignment=7 name=mux ! rtpmp2tpay ! udpsink host=192.168.25.89 port=5004 |
NOTE: Here 192.168.25.89 is host/client IP address and 5004 is port no.
- Run the following gst-launch-1.0 command to display low-latency stream-in on HDMI-Tx video using Gstreamer pipeline where 5004 is port no.
| Code Block |
|---|
|
$ gst-launch-1.0 udpsrc port=5004 buffer-size=60000000 caps="application/x-rtp, clock-rate=90000" ! rtpjitterbuffer latency=1000 ! rtpmp2tdepay ! tsparse ! video/mpegts ! tsdemux name=demux ! queue ! h265parse ! video/x-h265, profile=main, alignment=nal ! omxh265dec internal-entropy-buffers=5 low-latency=1 ! queue max-size-bytes=0 ! kmssink bus-id="a0070000.v_mix" |
NOTE: Low latency stream-in pipeline is not supported in vcu_gst_app.
Notes for gst-launch-1.0 commands:
- Make sure HDMI-Rx media pipeline is configured for 4kp60 resolution and source/sink have the same color format. Run below xmedia-ctl commands to set resolution and format of HDMI scaler node.
When HDMI Input Source is NVIDIA SHIELD
| Code Block |
|---|
|
$ xmedia-ctl -d /dev/media0 -V "\"a0080000.v_proc_ss\":0  [fmt:RBG888_1X24/3840x2160 field:none]"
$ xmedia-ctl -d /dev/media0 -V "\"a0080000.v_proc_ss\":1 [fmt:VYYUYY8_1X24/3840x2160 field:none]" |
NOTE: Make sure NVIDIA SHIELD is configured for 4kp resolution and RGB888 color format.
When HDMI Input Source is ABOX
| Code Block |
|---|
|
$ xmedia-ctl -d /dev/media0 -V "\"a0080000.v_proc_ss\":0  [fmt:VYYUYY8_1X24/3840x2160 field:none]"
$ xmedia-ctl -d /dev/media0 -V "\"a0080000.v_proc_ss\":1 [fmt:VYYUYY8_1X24/3840x2160 field:none]" |
NOTE: Make sure ABOX is configured for 4kp resolution and VYYUYY8 color format.