HDMI FrameBuffer Example Design 2020.1
This page describes the HDMI FrameBuffer Example design for 2020.1, source of the packages and how to build and run it.
Table of Contents
1 Overview
The Zynq UltraScale+ MPSOC HDMI (High-bandwidth Digital Multimedia Interface) Example design is an embedded video application targetting the ZCU102 using both the APU (PS) and PL to showcase the connectivity solution under Linux with the optional HDCP (High-bandwidth Digital Content Protection) feature.
The design demonstrates the capture and display capability of the HDMI interface implemented in PL and configured with the APU application. This design enables the user to get video data in and out of the FPGA with relative ease. This includes encrypted data with the use of HDCP Revision 1.4/2.2 to securely send audio-visual data from/to an HDCP protected source/sink. Typically HDCP 2.2 is used to encrypt content at Ultra High Definition (UHD) while HDCP 1.4 is used as a legacy encryption scheme for lower resolutions.
2 Software Tools and System Requirements
2.1 Hardware
Required:
- ZCU102 Evaluation Board with Production Silicon (Rev 1.0)
- Monitor with HDMI input with up to UHD resolution (3840x2160@60Hz)
- HDMI Premium Certified cables
- Micro-USB cable, connected to laptop or desktop for the terminal emulator
- SD card
2.2 Software
Required:
- Linux host machine with Ubuntu 16.04 LTS, for all tool flow tutorials (see UG1144 for detailed OS requirements)
- Vivado Design Suite version 2020.1
- PetaLinux Tools version 2020.1 (see UG1144 for installation instructions)
- Git distributed version control system
- Silicon Labs quad CP210x USB-to-UART bridge driver
- Serial terminal emulator e.g. Teraterm, Putty
- Example Design Zip File
- ZCU102 rev 1.0 including all source code and project files (See Licensing for additional Third-Party Library Sources)
2.3 Licensing
- Important: Certain material in this reference design is separately licensed by third parties and may be subject to the GNU General Public License version 2, the GNU Lesser General License version 2.1, or other licenses. The Third-Party Library Sources zip file provides a copy of separately licensed material that is not included in the reference design.
- You will need only the Vivado Design Suite license to build the design. You can evaluate for 30-days or purchase it here.
- You will also require the HDMI IP Core evaluation license to build this design. You can request the IP evaluation license here.
- The design comes in two flavors – one with HDCP feature and one without. For using the HDCP feature, users need to have their own HDCP keys. Additionally, users will need to implement HDCP IP. Xilinx provides the IP to implement HDCP encryption block but legally can only offer the IP to users who are HDCP2.2 adopters – list of HDCP adopters is verified here https://www.digital-cp.com/licensee-list. If you or your company is not an HDCP adopter, we recommend using the non-HDCP version of the design.
Steps to generate the license:
- Log in here with your work E-mail address (If you do not yet have an account, follow the steps under Create Account)
- Generate a license from “Create New Licenses” by checking "Vivado Design Suite, 30 Day Evaluation License"
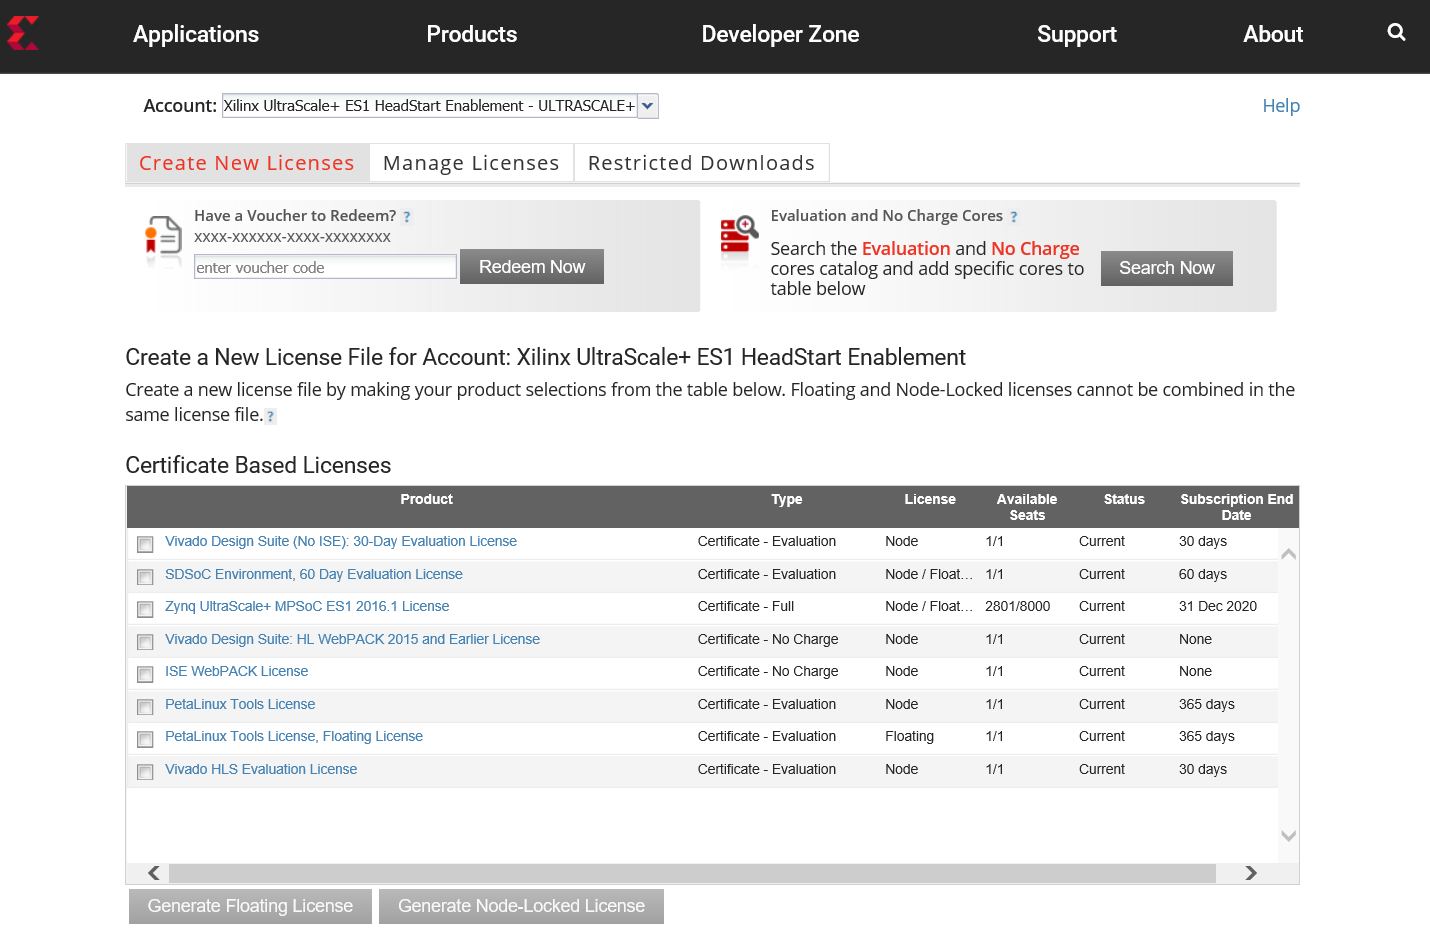
- Under system information, give the host details.
- Proceed until you get the license agreement and accept it.
- The License (.lic file) will be sent to the email-id mentioned in the login details.
- Copy the license file locally and give the same path in the SDSoC license manager.
3 Design
3.1 Hardware
2 reference designs are available with different IP configuration to demonstrate the targeted features
- 2 Pixels/Clock, 8-bit Color Depth with NO HDCP
- 2 Pixels/Clock, 10-bit Color Depth with HDCP 1.4 & 2.2 (Demonstrates deep color and HDCP functionality) *See Licensing for HDCP Requirements.
The example design is built around the HDMI 1.4/2.0 Transmitter Subsystem (HDMI_TX_SS), HDMI 1.4/2.0 Receiver Subsystem (HDMI_RX_SS), Video PHY (VPHY) Controller core and leverages existing Xilinx IP cores to form the complete system. The VPHY Controller core has been configured for the HDMI application that allows the transmission and reception of HDMI video/audio to and from the on-board HDMI 2.0 circuitry.
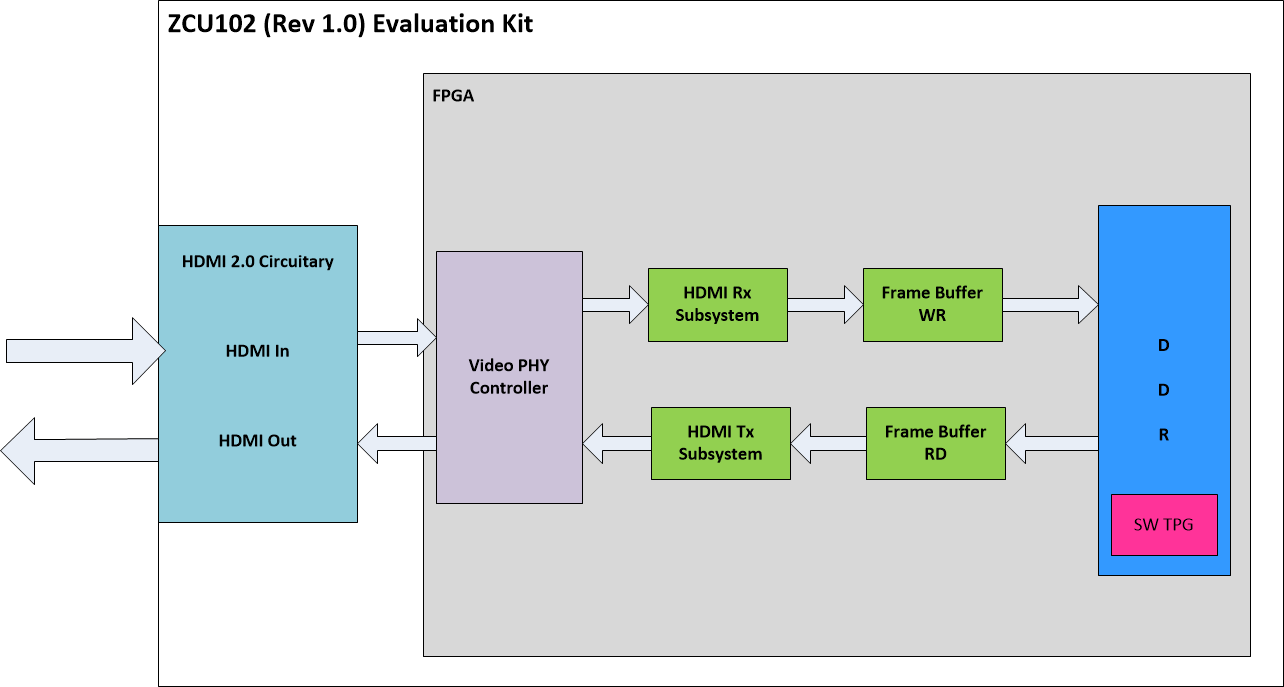
Shown above is pass-through mode where HDMI is received by the design and then sent back out of the design
This functionality is created when the VPHY Controller core(PG230) recovers the high-speed serial video stream, converts it to a parallel data stream, forwards it to the HDMI_RX_SS core(PG236), which extracts the video from the HDMI stream and converts it into AXI stream(UG934). The AXI video is connected to the Frame Buffer Write IP(PG278) that writes this data into the DDR in the user-specified memory format. On the display side, Frame Buffer Read IP(PG278) reads the data from DDR and sends it to the HDMI_TX_SS core(PG235), which converts the AXI video back to an HDMI stream before being transmitted by the VPHY Controller core as a high-speed serial data stream.
3.2 Software Application
HDMI Pass-through application aka video_cmd is a user space application provided to demonstrate the end-to-end capture to display pipeline. No video processing is performed on the frames stored in memory. During initialization, video_cmd can detect a video source that is plugged into the RX port and then comes up in pass-through mode. If video_cmd does not find any source, it comes up in TPG mode and starts streaming SMPTE colorbars (generated by the open source modetest utility integrated into the software application) . video_cmd can also detect any change in the input like video source hot-plug, video source disconnect, resolution change, color format change, user input etc. and adapts accordingly.
If the user is running this app on a design that supports HDCP, the application expects the production HDCP keys to be available on the EEPROM (refer HDMI IP product guide pg235/236 for details) and prompts the user to enter the password during initialization. If the user enters correct password, the application retrieves HDCP keys from the EEPROM and loads them into the IP and enables the HDCP feature. 3 attempts are provided to enter correct password, failing which causes the application to start with HDCP feature disabled.
video_cmd is an interactive tool where the user can choose the action from following menu:
---------------------
--- MAIN MENU ---
---------------------
i - Info
=> Displays HDMI info.
h - HDCP Info
=> Displays HDCP info.
d - Display Logs
=> Display HDMI and HDCP logs.
c - Colorbar
=> Displays the colorbar on the source output.
r - Resolution
=> Change the video resolution of the testpattern.
f - Pixel-Format
=> Change the pixel-format of the testpattern.
p - Pass-through
=> Passes the HDMI sink input to source output.
t - Tiles-pattern
=> Displays a tile-pattern on the source output.
e - EDID
=> Display and set edid.
99 - Exit
3.3 Design Components
The top-level directory structure shows the major design components. A pre-built SD card image is provided along with a basic README and legal notice file
zcu102_hdmi_10b_hdcp_exdes_2020_1
|---- apu
|     |---- hdmi_passthrough_app
|     |           |---- modetest
|     |           |---- video_lib
|     |---- petalinux_bsp
|
|---- images
|
|---- pl
      |---- design
      |---- imports
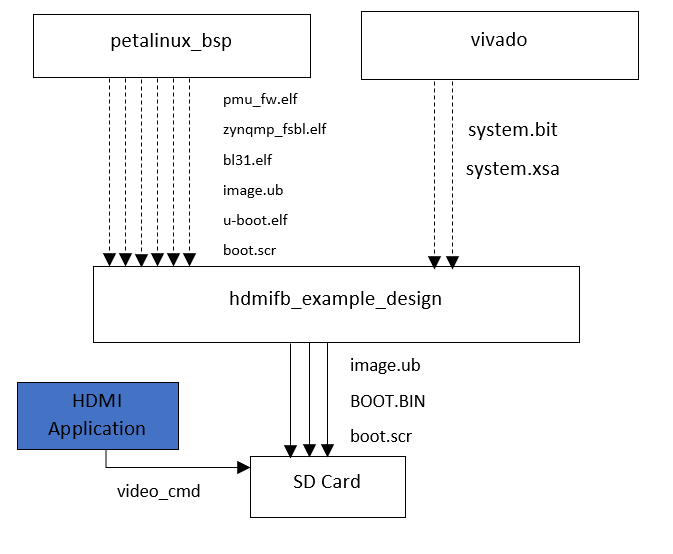
The below figure shows the relevant design components as well as inter-dependencies and generated output products
4 Tutorials
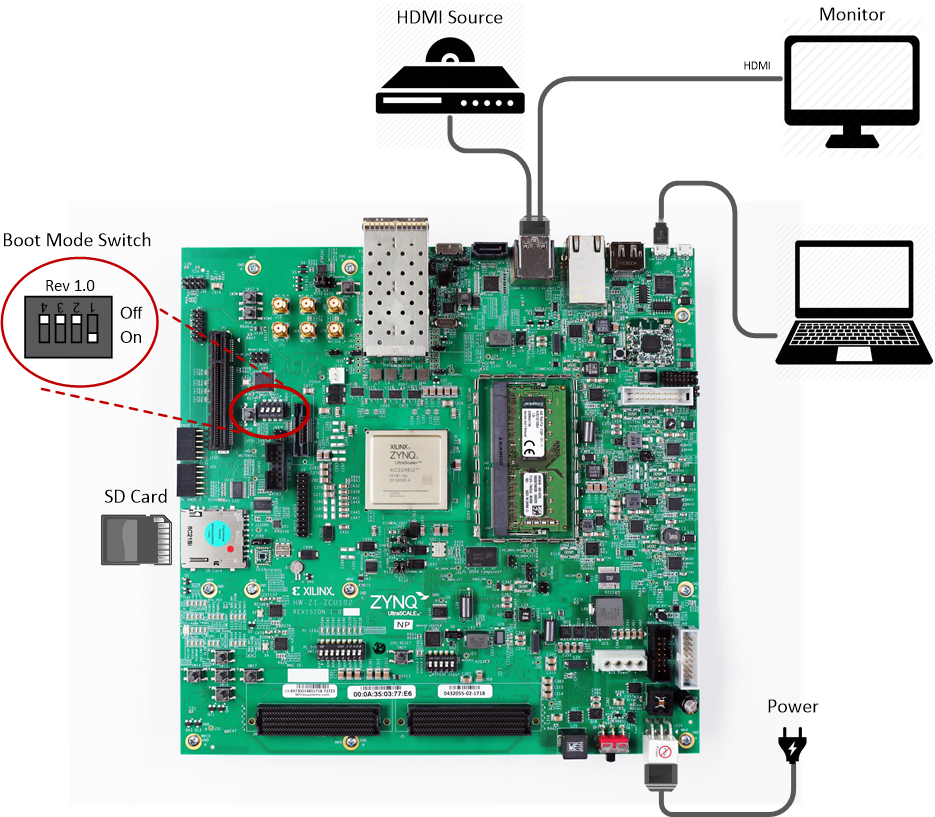
4.1 Board Setup
Required:
- Connect power supply to 12V power connector.
- Connect an HDMI cable to HDMI Rx connector (bottom) on the board; connect the other end to an HDMI source
- Display - Connect an HDMI cable to HDMI Tx connector (top) on the board; connect the other end to a monitor
- Connect micro-USB cable to the USB-UART connector; use the following settings for your terminal emulator:
- Baud Rate: 115200
- Data: 8 bit
- Parity: None
- Stop: 1 bit
- Flow Control: None
- Insert SD card (FAT formatted) with binaries copied from $HDMI_HOME/images directory.
Jumpers & Switches:
- Set boot mode to SD card:
- Rev 1.0: SW6[4:1] - off,off,off, on
To run the pre-built SD card image for the design follow the instructions in 4.3 Run Flow Tutorial section.
4.2 Build and Run Flow
The following tutorials assume that the $HDMI_HOME environment variable has been set as below
% export HDMI_HOME=<path/to/downloaded/zip-file>/zcu102_hdmi_<n>b_[hdcp]_exdes_2020_1/
4.2.1 Hardware
Vivado TCL scripts are included in the archive file that enables the user to create the HDMI hardware design from scratch. To execute the script make sure the vivado 2020.1 tools is available and has been sourced in the shell
% cd $HDMI_HOME/pl
% vivado -s ./design/setup.tcl
This will open the Vivado GUI and generate the hardware design.
- Click "Generate Bitstream" under "PROGRAM AND DEBUG" tab and wait for the bit-stream to be generated.
- Click "File->Export->Export Hardware". Select "Fixed" as Platform Type. Click "Next". Select "Include bitstream" as Output and click "Next". Set the XSA name and location. Click "Next". Finally click "Finish". This will generate an archive file (.xsa) in the location with the bitstream included.
- Copy the generated .xsa file to the PetaLinux hw-description folder and rename to system.xsa
E.g. If you name the xsa as "hdmi_wrapper.xsa" then

% cp hdmi_project/hdmi_wrapper.xsa $HDMI_HOME/apu/petalinux_bsp/project-spec/hw-description/system.xsa
4.2.2 PetaLinux BSP
This tutorial shows how to build the Linux image and boot image using the PetaLinux build tool
- To build the petalinux_bsp, make sure the petalinux 2020.1 tool is available and has been sourced in the shell
- NOTE: HDMI drivers are available as out-of-tree kernel module. A recipe is included in the petalinux_bsp/project-spec/meta-user/recipes-hdmi/hdmi that will automatically fetch the hdmi drivers from the github during the build process
- Design hardware file (xsa) should be available in the hw-description folder
- Build the project image file along with the rootfs
% cd $HDMI_HOME/apu/petalinux_bsp
% petalinux-build
- Wait for build to complete successfully.
- Create a boot image
% cd images/linux
% petalinux-package --boot --fpga images/linux/system.bit --fsbl images/linux/zynqmp_fsbl.elf --pmufw images/linux/pmufw.elf --u-boot
- Copy the generated BOOT.BIN, image.ub and boot.scr files to the SD card directory
% cp BOOT.BIN image.ub boot.scr $HDMI_HOME/images
4.2.3 Software Application
HDMI Pass-through application is an user space application that implements and manages the video pipeline (capture to display) and dynamically responds to changes in the input to adapt the output accordingly.
To compile this application, refer the instructions provided in the README.md file available in apu/hdmi_passthrough_app folder
- Copy the generated application binary to the SD card directory
% cp video_cmd $HDMI_HOME/images
4.3 Run Flow Tutorial
- See Section 4.1 Board Setup for board setup instructions.
- Copy all the files from the $HDMI_HOME/images SD card directory to a FAT formatted SD card.
- Power on the board to boot the images; make sure INIT_B, done and all power rail LEDs are lit green.
- After ~20 seconds, the display will turn on and the application will start automatically, targeting the max supported resolution of the monitor. The application will detect if an input source is connected to HDMI Rx. If a valid input is detected application will automatically switch to Rx and update the output resolution to follow the input. If no source is detected then SMPTE Colorbars will be displayed at the display's native resolution.
5 Other Information
5.1 Known Issues
- HDCP compliance test for HDCP 2.2 TX is failing
- Some HDMI monitors may not sync up reliably at 4K60 when working with reduced blanking timing parameters in EDID.
- Philips BDM 4350UC/61
5.2 Limitations
- The application does not support audio
5.3 Source code and License terms
Note: This design excludes any Xilinx LogiCORE IP cores that are distributed under separate license agreement(s) which you must sign, execute or otherwise accept prior to obtaining LogiCORE IP cores.
- The source code and license terms for the zcu102 designs is available here
- The source code and license terms for the BOOT.bin is available here
- The source code and license terms for the image.ub is available here
- The source code and license terms for the HDMI Application is available here
- The source code and license terms for the HDMI Driver is available here
- The source code and license terms for the linux-xlnx 2020.1 package is available here
6 Support
To obtain technical support for this reference design, go to the:
- Xilinx Answers Database to locate answers to known issues
- Xilinx Community Forums to ask questions or discuss technical details and issues. Please make sure to browse the existing topics first before filing a new topic. If you do file a new topic, make sure it is filed in the sub-forum that best describes your issue or question e.g. Embedded Linux for any Linux related questions. Please include "ZCU102 HDMI ExDes" and the release version in the topic name along with a brief summary of the issue.
Related Links
© Copyright 2019 - 2022 Xilinx Inc. Privacy Policy