Using Cryptography in Zynq UltraScale MPSoC
...
Table of Contents
...
| Table of Contents |
|---|
Introduction
The Zynq UltraScale+ MPSoC provides hardware and software SHA, RSA, and AES cryptographic functions. This note provides examples which show how to use these functions at the basic level. Crytography is generally useful when used in high level applications: protecting data in memory, network security, and authentication of endpoints. High level cryptography is supported in SSL and IPSeC.
This note shows how to use the WolfSSL library for protecting memory, network security, and authentication. In the case of Zynq UltraScale+, the WolfSSL library optionally uses soft, hard, or ARMv8 Crypto Extension implementations for underlying SHA/RSA/AES functionality in the application.
Although the focus of this note is the high level applications, the WolfSSL library can be used for a wide range of cryptographic algorithms besides SHA, RSA, and AES.
After discussing high level objectives, this note provides steps to build and run two tests: cryptographic operations and network security. The following three methods are used, so six systems are tested.
The user_settings.h file is used to specify the method. The wolfssl library is used in each case. Depending on the method, the wolfssl library compilation options may differ.
NOTE: As of this writing, there is a known issue with using xilsecure with the Zynq UltraScale+ SHA3 and AESGCM-256 hardened crypto components with data patterns with lengths (in bytes) which are not a integer multiple of 4.
High Level Objectives of Cryptographic Functions
Three objectives of cryptography in embedded systems are:
Network security and authentication require higher level cryptographic functions than is provided in the SHA/RSA/AES examples. Protecting data at rest is feasible using the SHA/RSA/AES functions, but it can be made stronger using a SSL library.
The figure below shows a system which requires network security
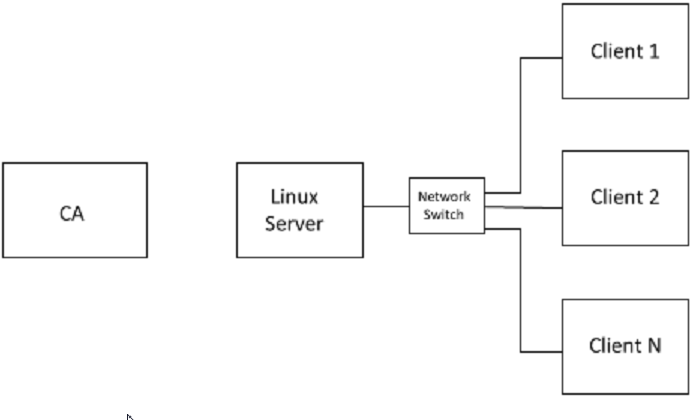
The server is connected to clients over an Ethernet connection. Xilinx provides MACB drivers for Ethernet devices in Zynq UltraScale+. A lightweight Internet Protocol (lWIP) connection using TCP/IP or datagrams is discussed in XAPP1026, XAPP1305, and XAPP1306.
The Transport Layer Security (TLS) handshake is universally used in SSL and IPSeC applications. The TLS handshake occurs between the server and client(s) endpoints. The TLS handshake example uses hello exchanges between the server and client(s). In the TLS handshake, the endpoints negotiate the cryptographic algorithms used for encryption, authentication, and key exchange.
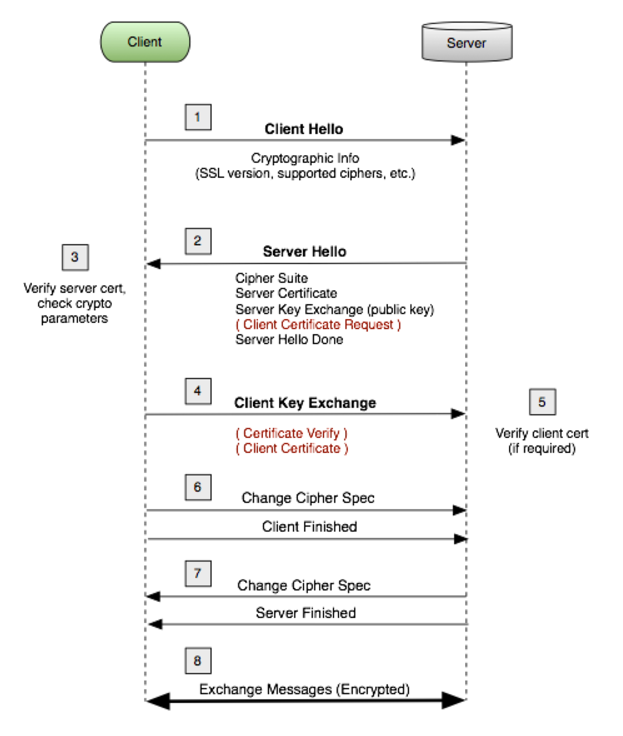
The figure shows a basic form of the TLS handshake. The TLS handshake uses both asymmetric and symmetric keys. The asymmetric key is used for authentication, and symmetric key exchange. The shared symmetric key is used for encryption/decryption of the message. The TLS handshake uses asymmetric encryption such as RSA which consists of a private and public key pair. The private/public key pair allows endpoints to share a private symmetric key for encryption.
A basic description of the client - server exchange in TLS is given below.
1. The client requests an encrypted session and provides a list of cipher suites. A cipher suite defines the encryption and authentication cryptography used. There are many cipher suites. The cipher suites used in this note are AES128-SHA, ECDHE-RSA-AES128GCM-SHA256, and ECDHE-RSA-AES256GCM-SHA384.
2. The server agrees to/provides a cipher suite, TLS version, and sends a certificate with a public key.
3. The client verifies the server's certificate. The client uses the public key to encrypt the shared symmetric key, and sends the shared symmetric key to the server.
4. The server uses the private key to decrypt the shared symmetric key.
5. AES encryption/decryption is used for messages sent between the endpoints using the shared symmetric key.
While authentication is done as part of the TLS handshake, a second application of authentication uses Public Key Infrastructure (PKI). Endpoint authentication involves at least one Certificate Authority (CA), a server, and clients. The two forms of endpoint authentication are one way and two way (mutual authentication). In one way authentication, the server transmits a certificate to the client. The client does not pass a certificate to the server. Only the server is authenticated. In mutual authentication, certificates are passed from the server to the client and from the client to the server.
In PKI, the server and client each have X509v3 certificates which reference name, organization, address, RSA public key, certificate validatity dates, and the name and signiture of the issurer. The CA publishes a self signed certificate. with its own public key. The server or clients, using a SSL library, generate the X509 certificates, and then generate a certificate sign request (CSR). The CA signs the certificates. The private key never leaves the endpoint.
In this note, protecting sensitive data at rest is restricted to protecting data in DDR or NVM, not data in the cloud, which requires network security. The protection is to store the DDR/NVM data in encrypted format, and at the time of use, decrypt and move it to on chip memory. Data can be encrypted/decrypted to/from DDR/NVM using the AES GCM. The aes_encrypt_decrypt example given in a later section provides this functionality. If a SSL library is available, the AES key can be generated and stored on chip. The GCM authentication in AES GCM is generally adequate, but RSA authentication is an option.
The amount of data which can be protected is limited to the size of on chip memory (OCM), tightly coupled memory (TCM) and Block RAM (BRAM) on the Zynq UltraScale+. The system architect needs to identify what data is really sensitive, and swap NVM/DDR to OCM/TCM decryption operations as needed.
An interesting variation on this functionality, as yet untested, is decrypting sensitive code, and running the code from internal memory. The hard AES crypto block is fast.
The hard cryptographic primitives provided in Zynq UltraScale+ are not enough to support network security or endpoint authentication applications. Using a secure sockets layer (SSL) library is needed. The SSL used in this note is from WolfSSL.
The WolfSSL library consists of wolfcrypt and wolfssl components. The wolfcrypt component provides exhaustive support for a wide variety of cryptographic algorithms, including use cases, tests, and benchmarks. The wolfssl component provides higher level support for network security, mutual authentication, public key infrastructure (PKI), and key generation/management functions.
For this note, the WolfSSL is used with the Zynq UltraScale+ MPSoC and the Zynq-7000 AP SoC. WolfSSL should run on MicroBlaze IP in FPGAs, but it has not been tested. The systems used most in this note use FreeRTOS, running on either the Cortex-A53 or Cortex-R5 on the Zynq UltraScale+ device, or on the Cortex-A9 on Zynq-7000. X509 Certificates have expiration dates, normally supported by a real time clock (RTC). The Zynq UltraScale+ device has a RTC, and the device driver is used by the WolfSSL library. The Zynq-7000 does not have a RTC on chip, so the PMOD Real Time Clock / Calendar which uses the Microchip MCP79410 is used. The rtcci2c.zip provides a driver.
Additional info is available from:
http://store.digilentinc.com/pmod-rtcc-real-time-clock-calendar/
The cryptographic operations in the WolfSSL library can be run by compiling the library with the WOLFCRYPT_ONLY macro.
In Zynq UltraScale+, security functions can be isolated from non-security functions using protection units and TrustZone as described in XAPP1320. An architecural decision is whether to run the high level security functions discussed in this note in the APU or the RPU. If the R5s are not used in a dual lockstep functional safety application or in an application requiring the low latency associated with RTOS, the security system should run on the R5.
The systems in this note have been tested using standalone and RTOS operating systems. The WolfSSL port to Linux is in development. StrongSWAN provides high level security using IPSeC, and it is built into Yocto based projects for Zynq-7000 and Zynq UltraScale+. StrongSWAN use is discussed in XAPP1309.
There are three methods of implementing SHA, RSA, and AES functions in Zynq UltraScale+:
The Zynq UltraScale+ hardened crypto accelerators are very fast, use advanced algorithms, and add encryptio support. The ARMv8 Crypto Extensions use the Neon SIMD processor. The potential advantages with using the ARMv8 Crypto Extensions are speed and security. For short data patterns such as a web click, the lower context switch time may result in a speed advantage. The SIMD used for the ARMv8 Crypto Extensions requires fewer key accesses than the hard core, so Differential Power Analysis (DPA) resistance is generally higher.
Note on Zynq-7000 and Zynq UltraScale+ silicon differences. The Zynq UltraScale+ uses AES GCM which can be used for either encryption or decryption. The Zynq-7000 AES is only used for decryption. The Zynq UltraScale+ RSA Engine uses a hard Montgomery Multiplier, and is available for use during boot or runtime (ie, anytime) for RSA-2048 or RSA-4096. Zynq uses the XILRSA software library for RSA-2048 authentication of boot partitions and runtime applications. Zynq UltraScale+ supports SHA2 and SHA3. Zynq-7000 supports SHA2.
This section provides the steps to run example SHA, RSA, and AES code.
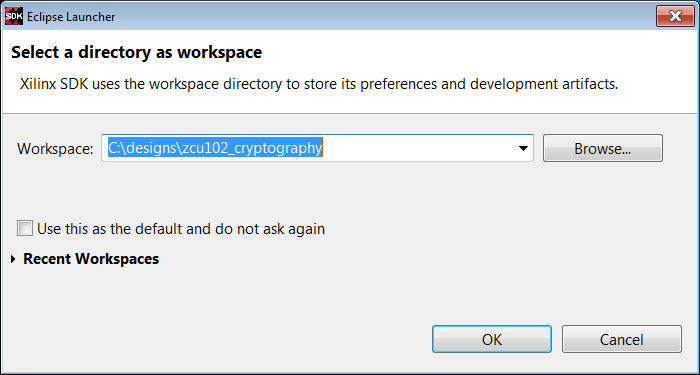
1. Invoke SDK. Close the Welcome window.
2. Select File -> New -> Application. Enter fsbl in the Project Name text box. Select ZCU_hw_platform(predefined). Click Next. In the Templates pane, select Zynq MP FSBL. Click Finish.
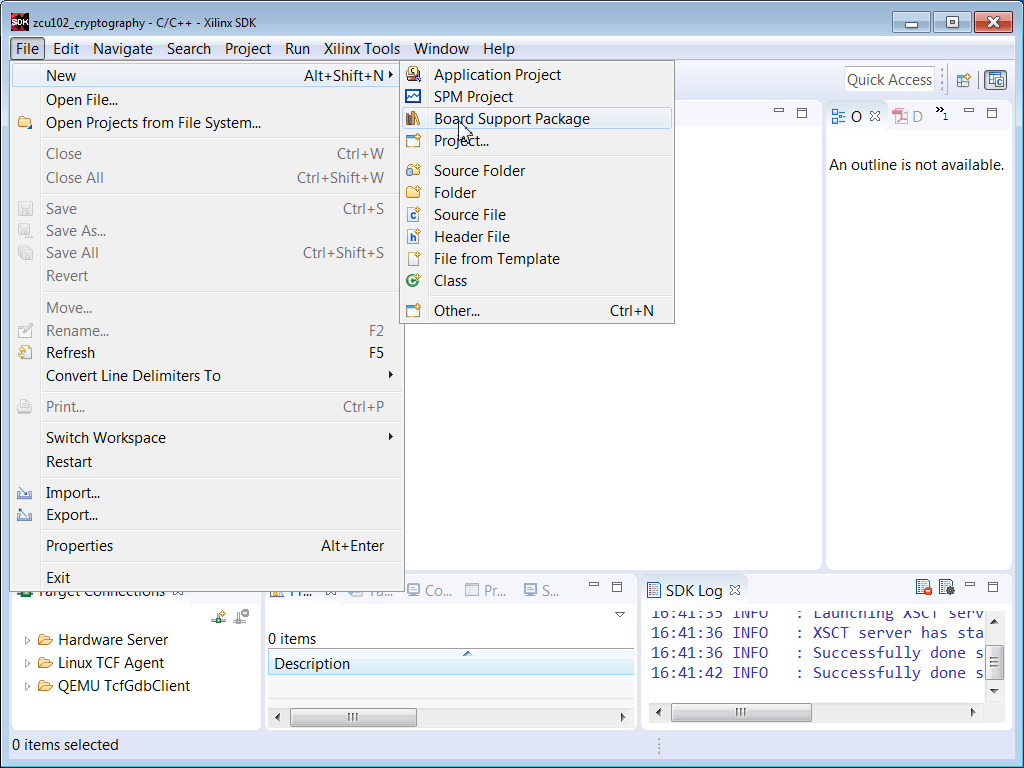
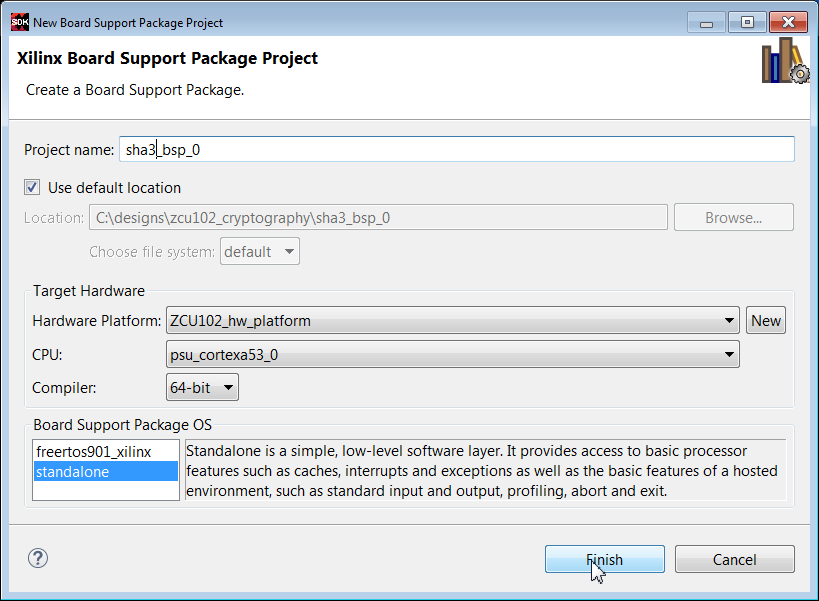
3. Select File -> New -> Board Support Package.
4. In the Project Name text box, enter sha3_bsp_0
5. Right click sha3_bsp_0, and select Board Support Package Settings. Check the xilsecure box.
6. Scroll to the bottom of the MSS window. Check Import Examples next to the xilsecure library.
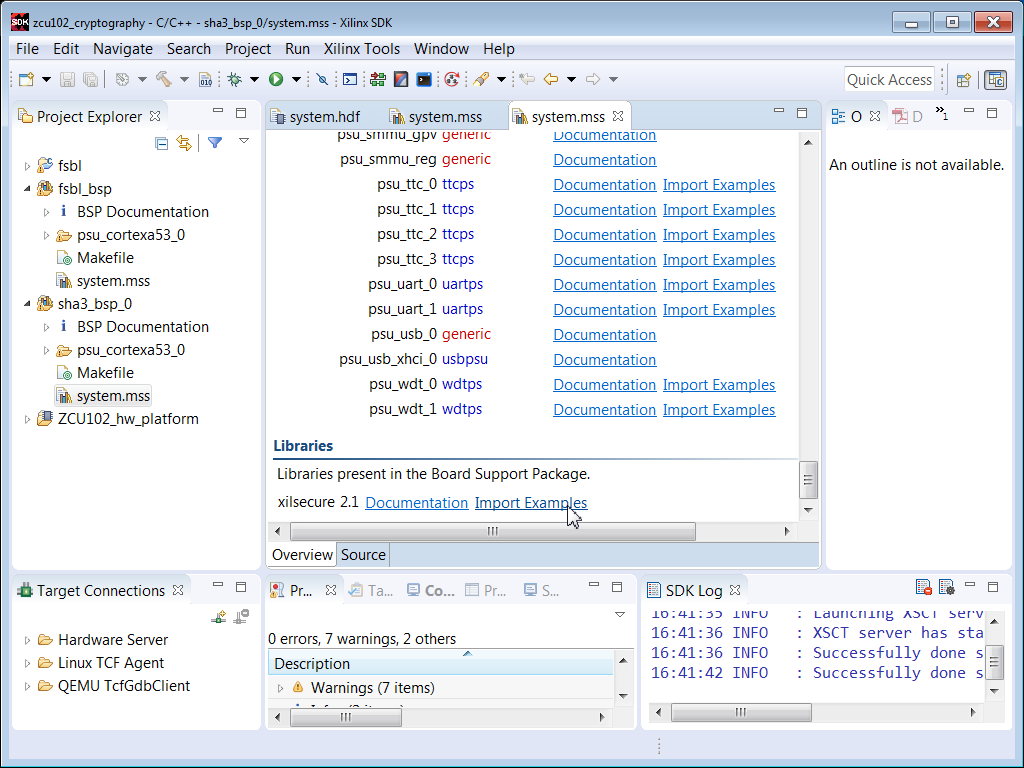
7. Check the sha box. Click OK.
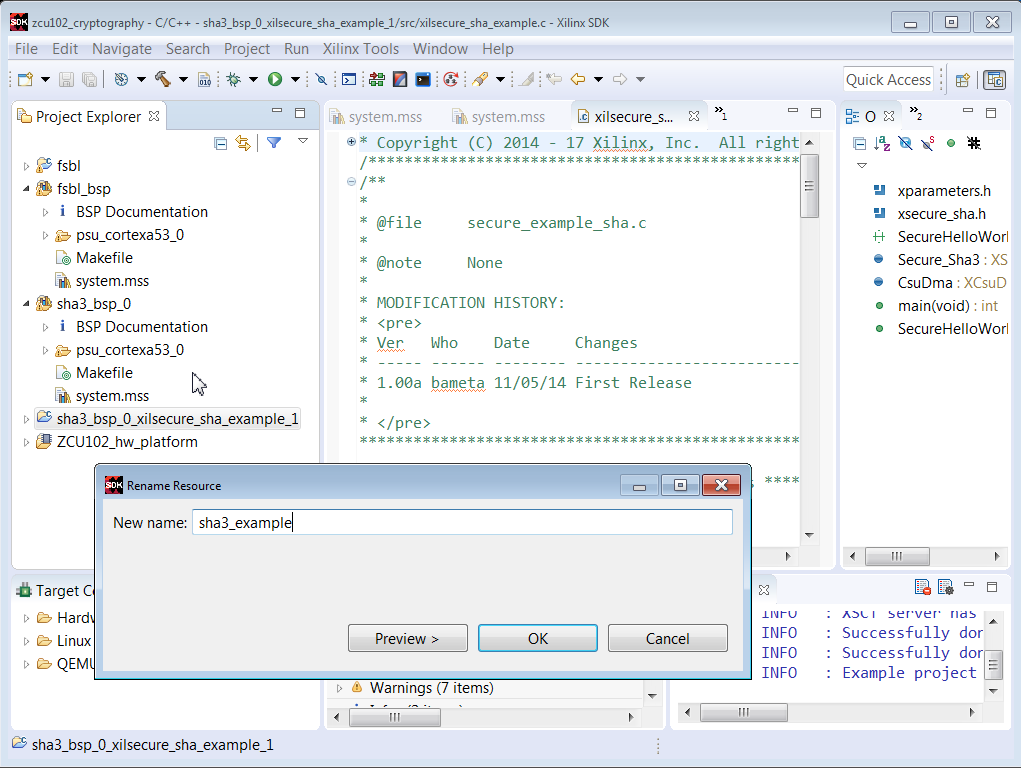
8. Rename the project to sha3_example. Select the sha3_example project and run Build Project.
9. Setup ZCU102 or UltraZed-EG Board with power supply, UART connection, and Platform Cable USB II or equivalent. Set the configuration mode to JTAG.
10. Invoke Teraterm or similar communication terminal (usually COM3).
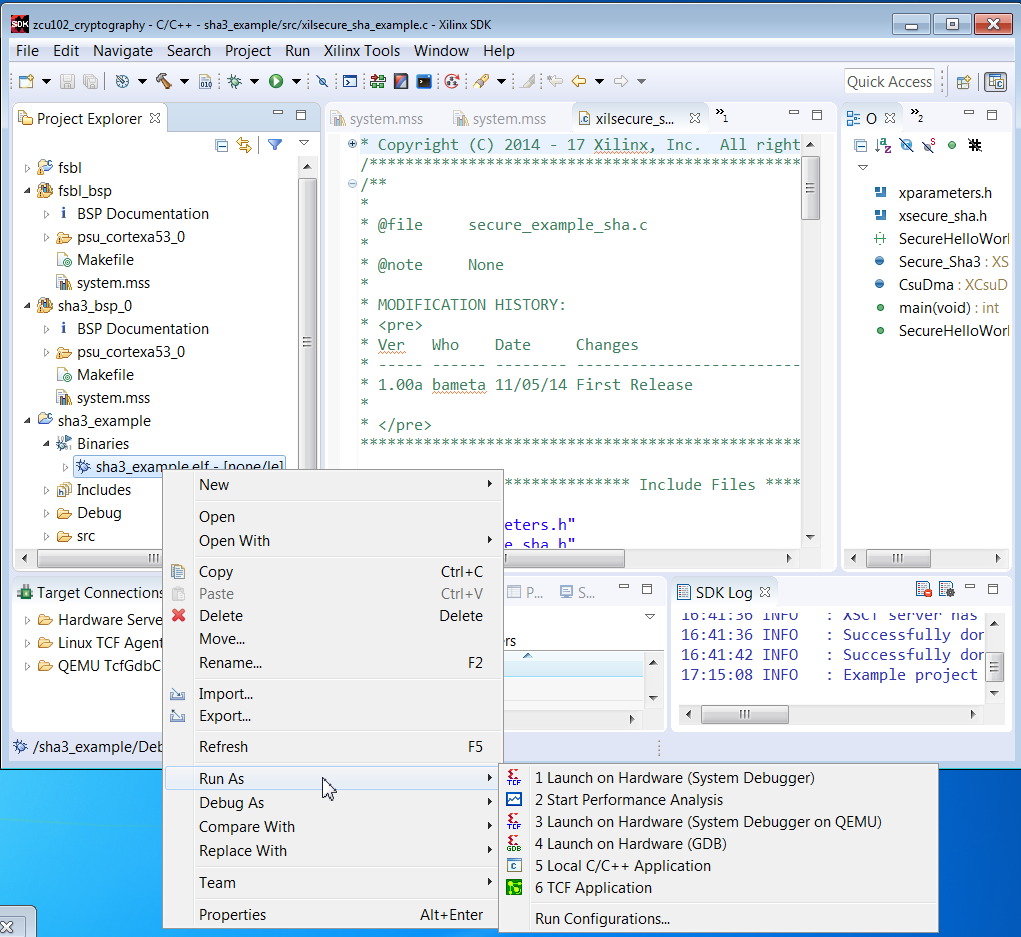
11. Right click sha3_example.elf, and select Run As -> Launch on Hardware (System Debugger)
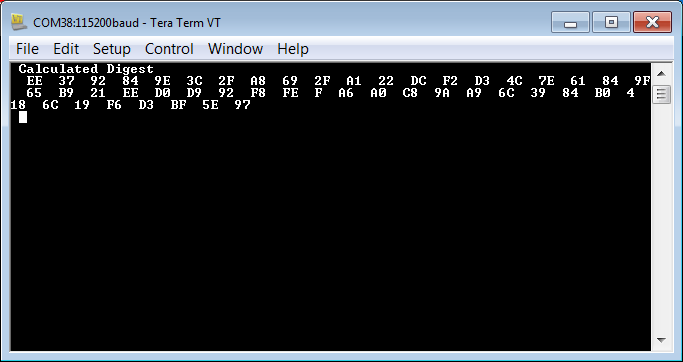
12. Verify that the results are similar to that shown below.
The initial steps for running the RSA example are similar to that of the SHA3 example.
1. Select File -> New -> Board Support Package
2. In the Project name text box, enter rsa_bsp_0.
3. Right click rsa_bp_0, and select Board Support Package Settings. Check the xilsecure box.
4. Scroll to the bottom of the MSS window. Check Import Examples next to xilsecure.
5. Check the rsa box. Click OK.
6. Rename the project to rsa_example. Run Project Build.
7. Setup ZCU102 or UltraZed-EG board and communication terminal. Set configuration mode to JTAG.
8. In SDK, click Xilinx Tools -> XSCT Console.
9. Enter the following commands in the XSCT Console.
connect
targets
target 10
source zcu102_hw_platform/psu_init.tcl
rst -processor
psu_init
dow -data BOOT.BIN 0x04000000
dow rsa_example/debug/rsa_example.elf
con
10. Verify that the results in the communication terminal are identical for the values calculated from the boot image hash and the hash from the signature.
To support RSA-2048, run the patch on the rsa.c and rsa.h files in the xilsecure library in $SDK/2017.2/data/embeddedsw/lib/sw_services/silsecurev2_1.
patch < xsecure_rsa_2048.patch
In user_settings.h, add the macro:
#define WOLFSSL_XILINX_PATCH
The initial steps for running the AES GCM example are similar to that of the SHA3 example.
1. Select File -> New -> Board Support Package
2. In the Project name text box, enter aes_bsp_0.
3. Right click aes_bsp_0, and select Board Support Package Settings. Check the xilsecure box.
4. Scroll to the bottom of the MSS window. Check Import Examples next to xilsecure.
5. Check the aes box. Click OK.
6. Rename the project to aes_example. Run Project Build.
7. Setup ZCU102 or UltraZed-EG board and communication terminal. Set configuration mode to JTAG.
8. Right click aes.elf, and select Run As -> Launch on Hardware (System Debugger)
9. Verify the results in the communication terminal.
In the previous example, the data encrypted is included in the file. In an actual application, data resides in memory, with the data identified using a start address and length.
1. Select File -> New -> Application
2. In the Project name text box, enter aes_encrypt_decrypt. Click Next.
3. In the Template dialog box, select Empty Applicaton. Click Finish.
4. In the Project Explorer pane, right click on aes_encrypt_decrypt -> src, and select File Import -> General -> File System, and browse to the aes_encrypt_decrypt.c file.
5. Run Project Build.
7. Setup ZCU102 or UltraZed-EG board and communication terminal. Set configuration mode to JTAG.
8. Right click aes_encrypt_decrypt.elf, and select Run As -> Launch on Hardware (System Debugger)
10. Verify the results in the communication terminal.
This section provides two methods for building and using the WolfSSL library. The first method uses local library built in a SDK project. This method can use a Windows or Linux based SDK. This library is used in the wolfcrypt_test and network security examples provided in later sections. The second method uses the cross_compile.sh script, generally run on Linux, which is used for the configure and make commands. An objective of a SSL library for embedded security is to minimize the footprint. In the configuration step, the footprint is minimized by selecting only those algorithms used in the application.
There are two methods for library use. The library can be placed as a local project or repository. Using the C/C++ Build SEttings option in SDK, the library can then be referenced by name, and the location idenitified using Directories. The steps for this use case are provided later in this note.
The second method is to add the library in the SDK install area such as \Xilinx\SDK\2017.2\data\embeddedsw\lib\sw_services. Adding the wolfssl library to this area should follow the structure of existing libraries. The data directory should contain the wolfssl.mld and wolfssl.tcl files similar to mld and tcl files for existing libraries. The wolfssl .c, .h, and Makefile should be placed in the src directory. The wolfcrypt_test and network_security examples should be placed in the examples directory.
The steps for creating a local wolfssl library for use in the wolfcrypt_test and network_security examples are listed below.
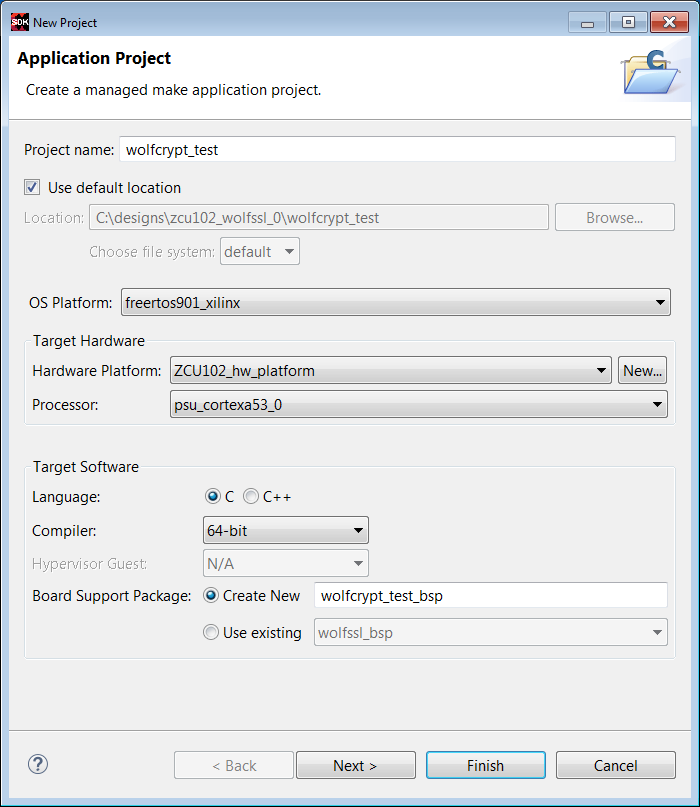
1. Create c:\wolfssl. Add user_settings.h to the c:\wolfssl directory. Unzip wolfssl-3.11.1.zip in the c:\wolfssl directory.
2. md c:\designs\zcu102_wolfssl_0
3. Invoke SDK.
4. Enter File -> New -> Application Project
5. Enter fsbl in the Project Name text box. Select zcu102_hw_platform(pre-defined) in the Hardware Platform box. Click Next.
6. Select Zynq MP FSBL in the Templates window. Click Finish.
7. Select File -> New -> Application Project.
8. Enter wolfssl in the Project Name text box.
9. Select freertos901_xilinx in the OS box. Click Next.
10. In the Templates window, select Empty Application. Click Finish.
11. In the Project Explorer pane, right click wolfssl -> src, and select File -> Import -> General -> File System.
12. Browse to select files in c:\wolfssl-3.11.1\wolfssl directory.

13. Repeat steps 11 and 12 to select files in the c:\wolfssl-3.11.1\wolfssl\wolfcrypt directory.

14. Under wolfssl -> src, remove the bio.c, evp.c, and misc.c files.
15. Select wolfssl -> Project Build.
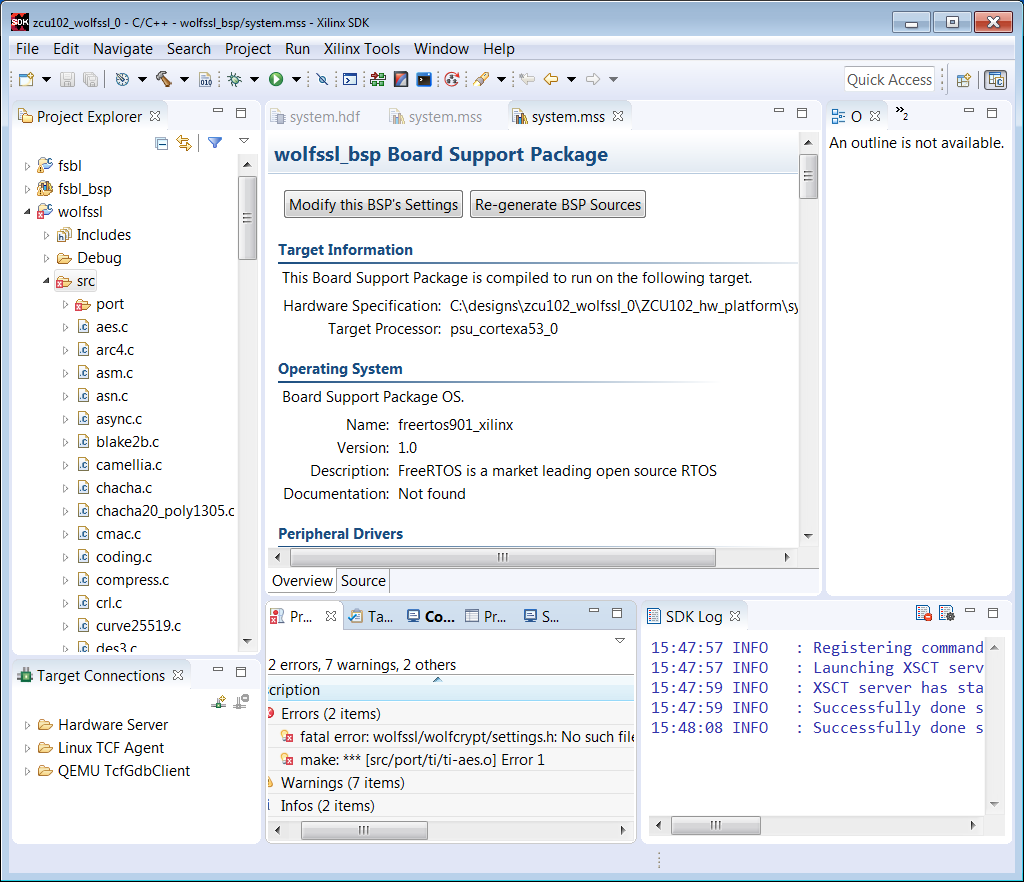
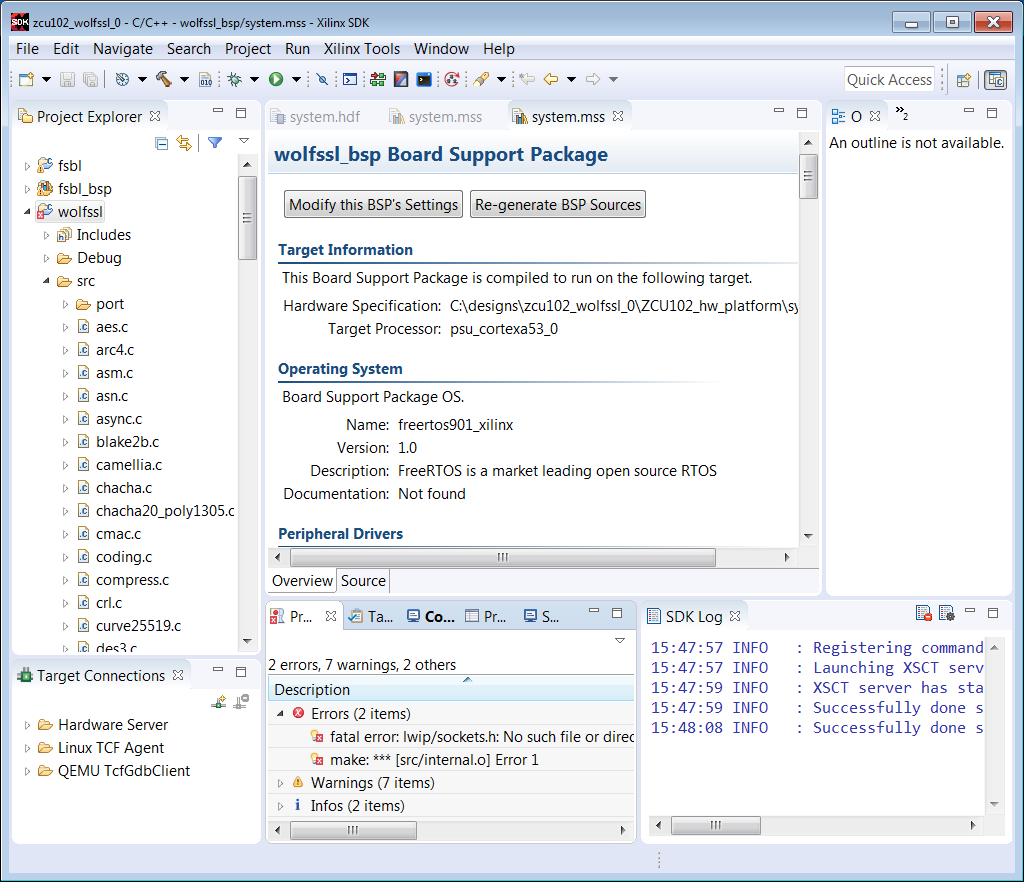
16. Settings are required to build. The first error is shown below.
17. Right click on the wolfssl project, and select C/C++ Build Settings.
18. Click Symbols, +, and enter WOLFSSL_USER_SETTINGS in the text box.

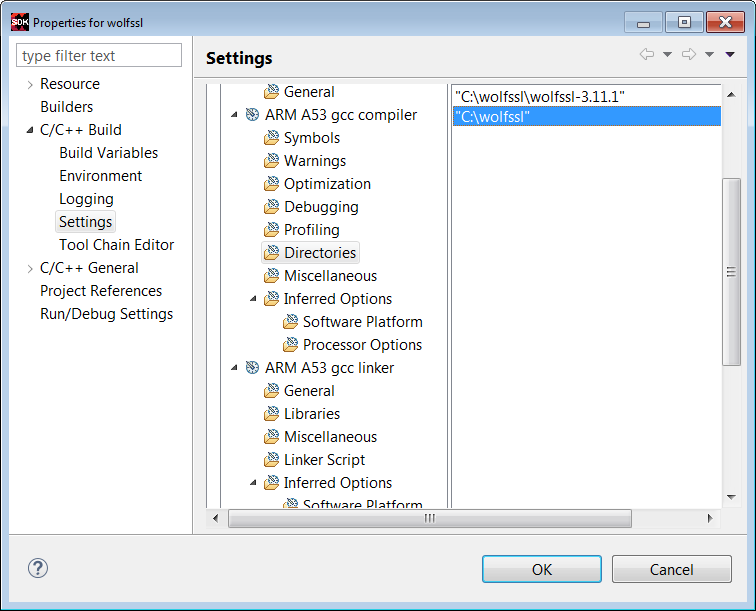
19. Click Directories -> File, and browse to add the c:\wolfssl directory.

20. Click Directories -> File and browse to the c:\wolfssl\wolfssl-3.11.1 directory.

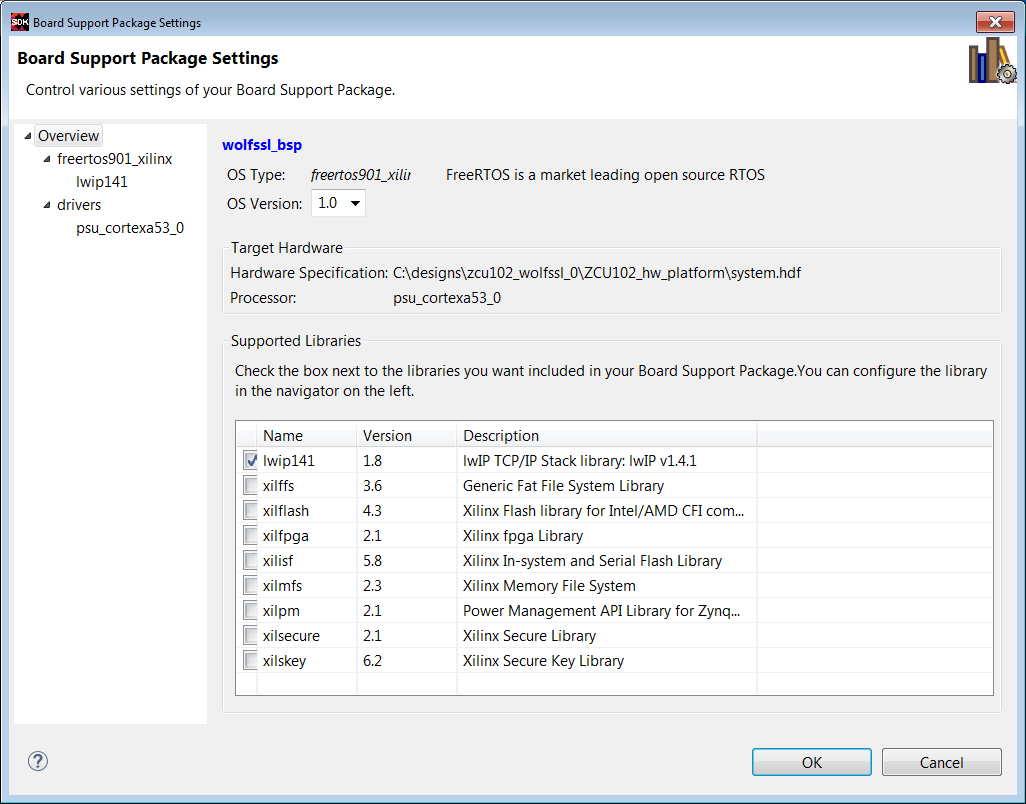
21. For the socket error, right click wolfssl_bsp_0 -> Board Support Package Settings, and check lwip141. In the BSP Settings window, select lwip141. Use the pull down to change RAW to Socket. Regenerate the BSP.
22. Verify include directories are set correctly.
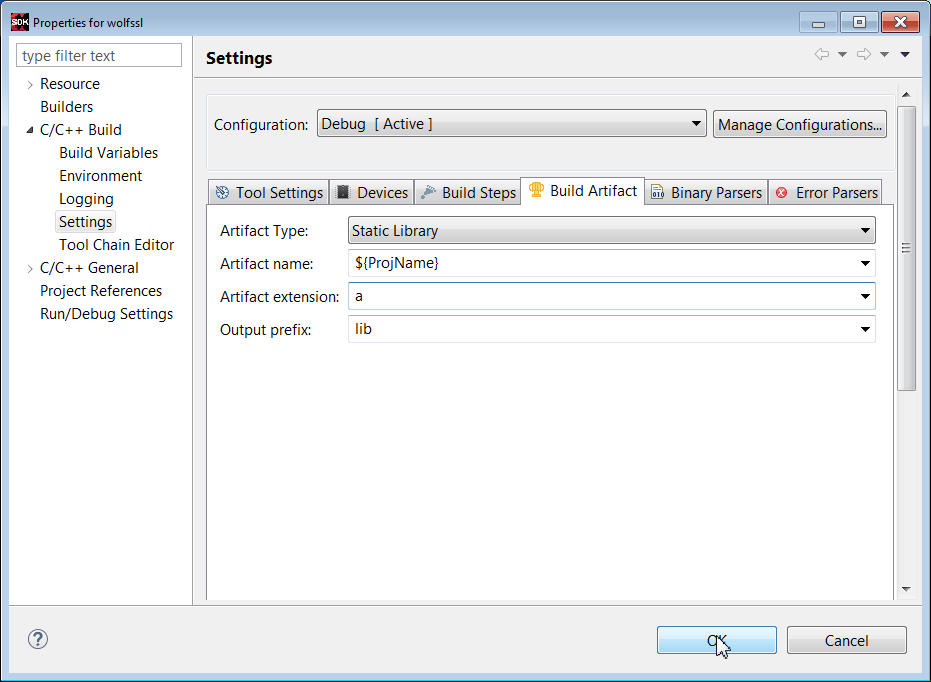
23. Select the Build Artifact tab. Select Artifact Type -> Static Library. In Artifact Extension text box, enter a.
Click Apply. Click OK.
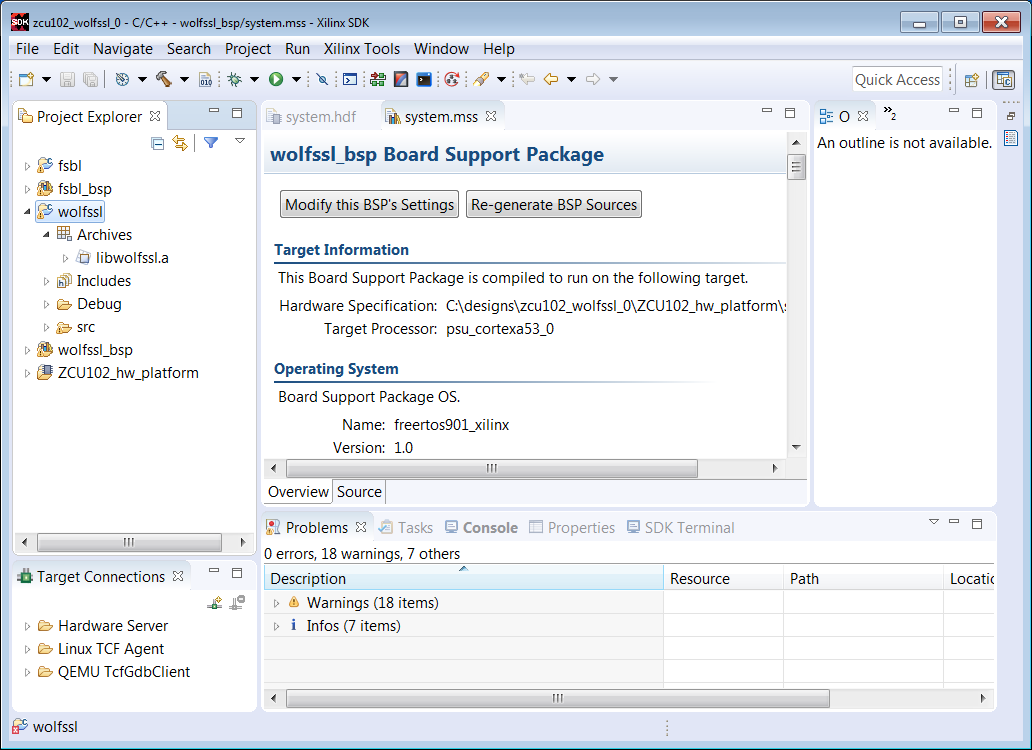
24. Verify that the wolfssl library is built as shown below.
25. To use the wolfssl library in an application, right click the application, and select C/C++ Build Settings -> Settings -> Libraries.
Fill in the library name as wolfssl and the location. This is done in the wolfcrypt_test and network_security examples.
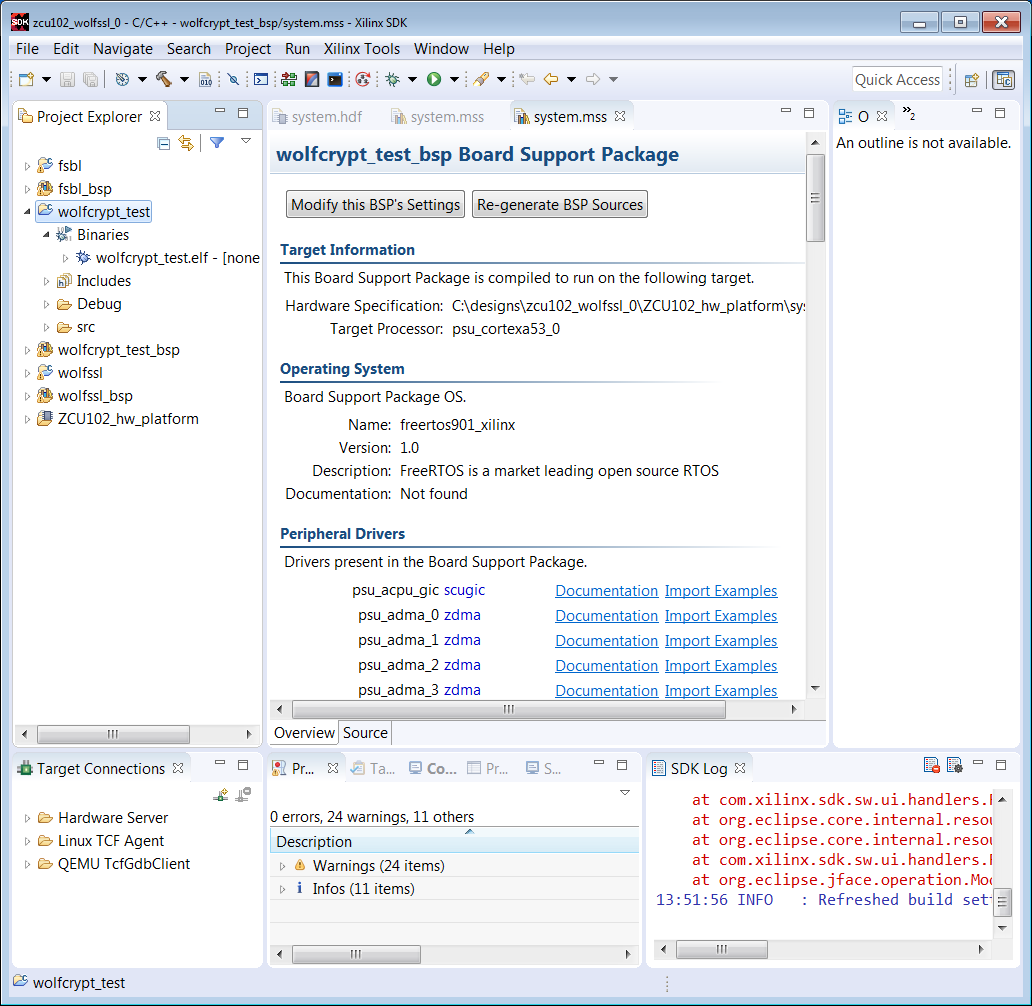
The wolfssl library supports many cryptographic algorithms. Source files are in wolfssl-3.11.1/wolfssl/wolfcrypt. The wolfcrypt_test tests the functionality of many of the algorithms. The wolfssl library built in a previous section is used for the algorithms and the tests. This section provides the steps to run the wolfcrypt_test application.
1. Invoke SDK in c:\designs\zcu102_wolfssl_0.
2. Select File -> New -> Application. Enter wolfcrypt_test in the Project Name text box. Select freertos901_xilinx as the OS. Click Next.
3. In the Templates window, select Empty Application. Select Finish.
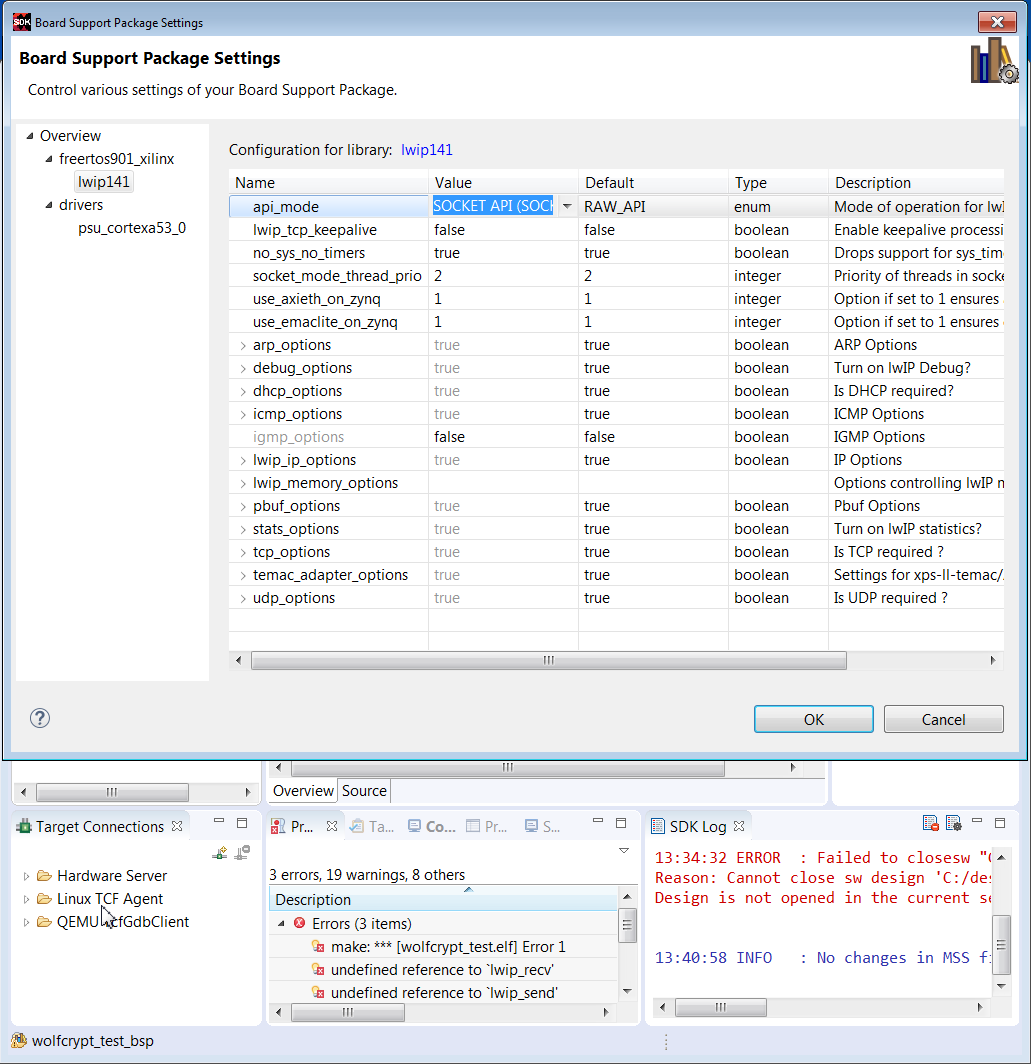
4. Right click wolfcrypt_test_bsp and select Board Support Package Settings. Select lwip141.
5. Highlight lwip141, and change api_mode value from RAW API to SOCKET API. Regenerate the BSP.
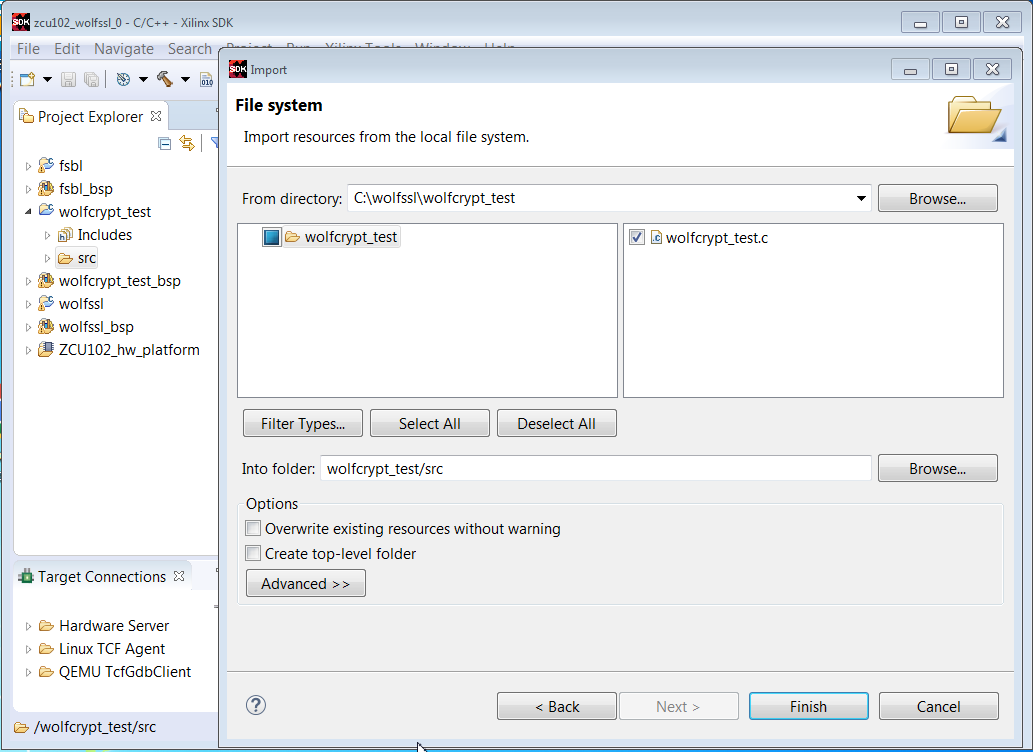
6. In the Project Explorer pane, select wolfcrypt_test/src -> Import -> File System. In the File Directory text box, browse to c:\wolfssl\wolfcrypt_test\wolfcrypt_test.c.
7. Right click the wolfcrypt_test project and select C/C++ Build Settings.
8. Click Symbols -> +, and enter WOLFSSL_USER_SETTINGS in the text box.
9. Click Directories -> +, and use the browse box to select c:\wolfssl.
10. Click Directories -> +, and use the browse box to select c:\wolfssl\wolfssl-3.11.1.
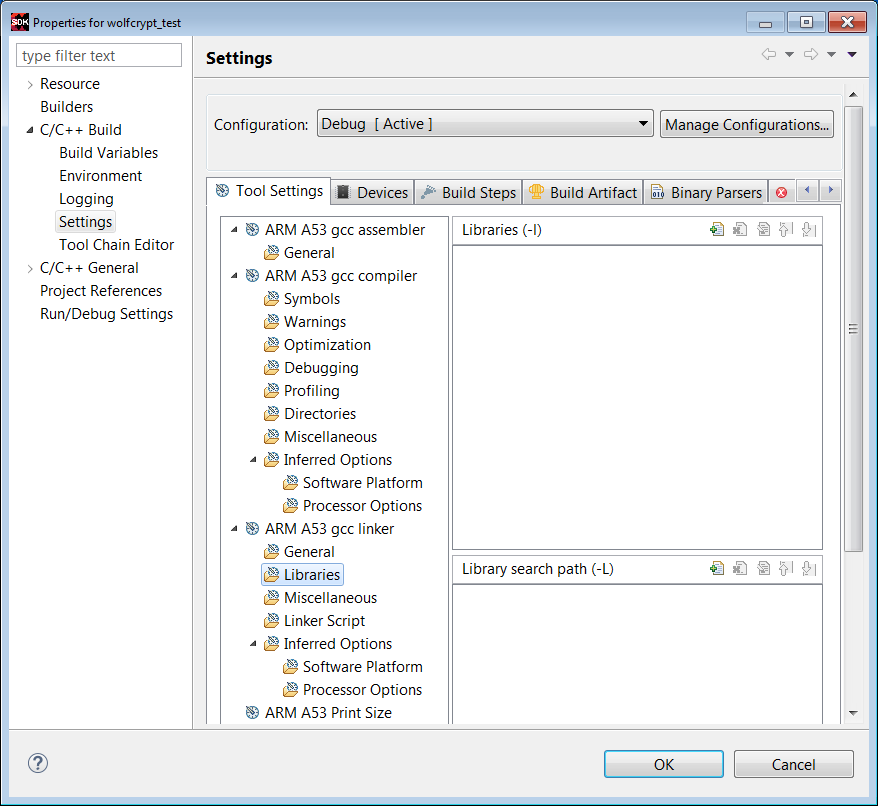
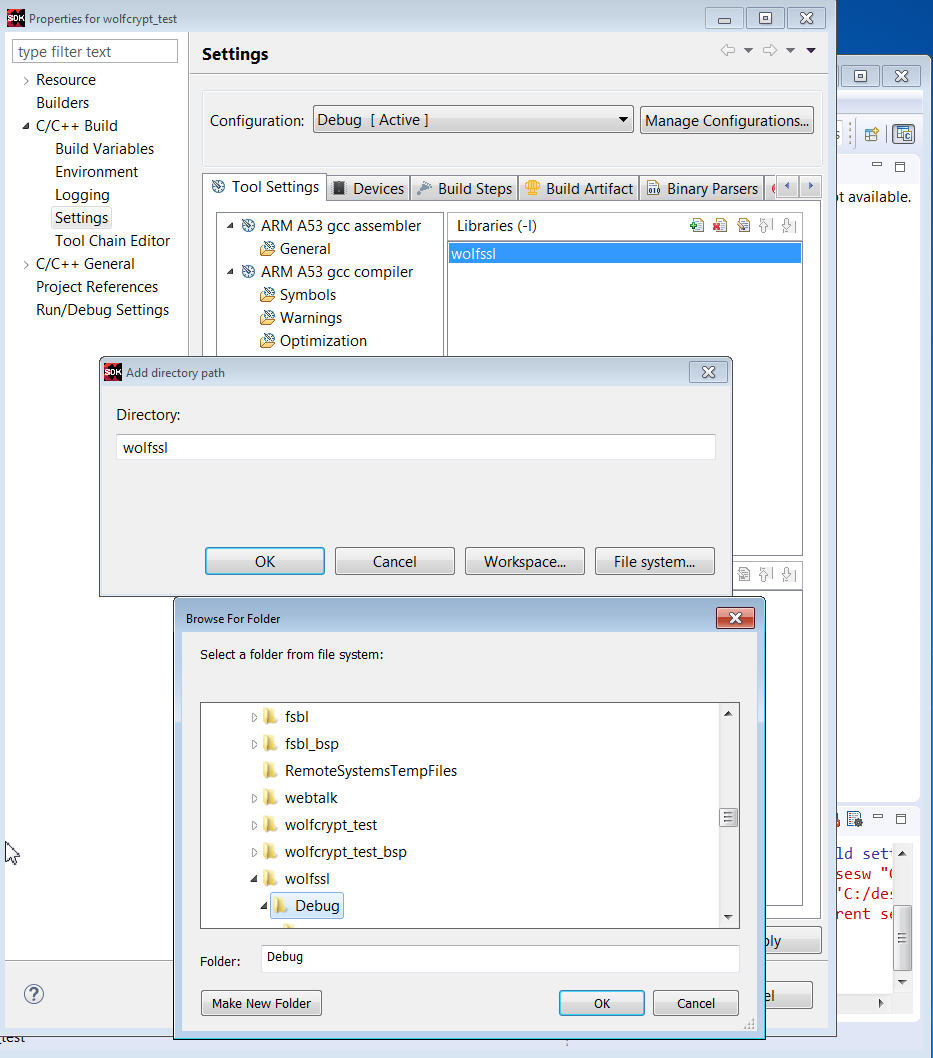
11. Click Librariies -> +, and enter wolfssl as a library name. As shown below, use Browse to define the path to the wolfssl library: c:\designs\zcu102_wolfssl_0\wolfssl\Debug.
12. Select the wolftest_crypt project and verify that the ELF is built.
13. Setup the ZCU102 or UltraZed-EG board. Set the configuration mode to JTAG.
14. Invoke Teraterm communication terminal. Select 115200 as the baud rate.
15. Right click on wolfcrypt_test.elf and select Run As -> System Debugger.
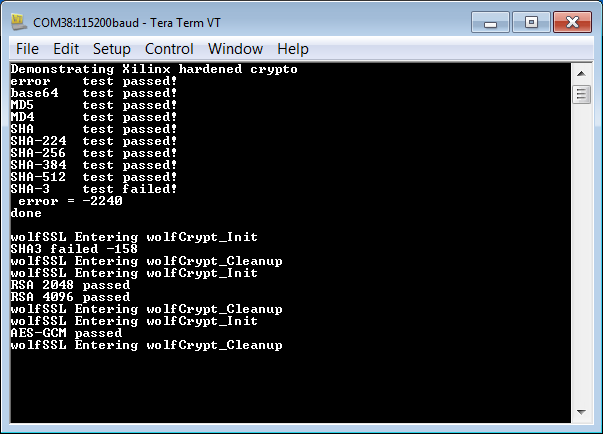
16. Verify the results in the communication terminal as below.
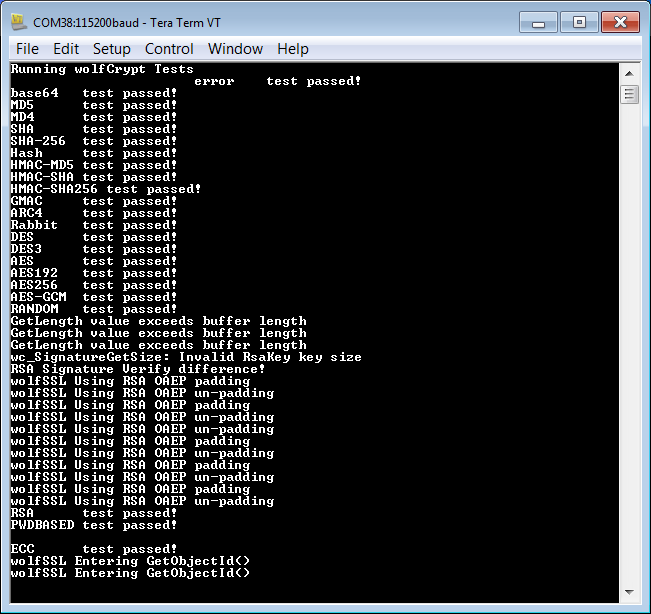
In this section, only the SHA3/RSA/AES functions in wolfcrypt are run. These functions use the hard crypto functions in Zynq UltraScale+. This functionality is enabled in user_settings.h using the macro:
#define WOLFSSL_XILINX_CRYPT.
The steps to run this test are listed below.
1. Invoke SDK in c:\designs\zcu102_wolfssl_0.
2. Enter File -> New -> Application Project. Enter wolfcrypt_zynqmp_crypto_tests in the Project Name text box. Enter freertos901_xilinx as the OS. Click Next.
3. Select Empty Application in the Templates window. Click Finish.
4. Click on wolfcrypt_zynqmp_crypto_tests/src -> Import -> File. Browse to c:\wolfssl\wolfcrypt_zynqmp_crypto_tests. Select All. Click Finish.
4. Select wolfcrypt_zynqmp_crypto_tests_bsp -> Board Support Settings. Check lwip141. Click lwip141 and change the api_mode to SOCKET_API. Click Regenerate BSP.
5. Run Project Build.
6. Right click the zynqmp_crypto_tests.elf -> Run As -> Launch on Hardware (System Debugger).
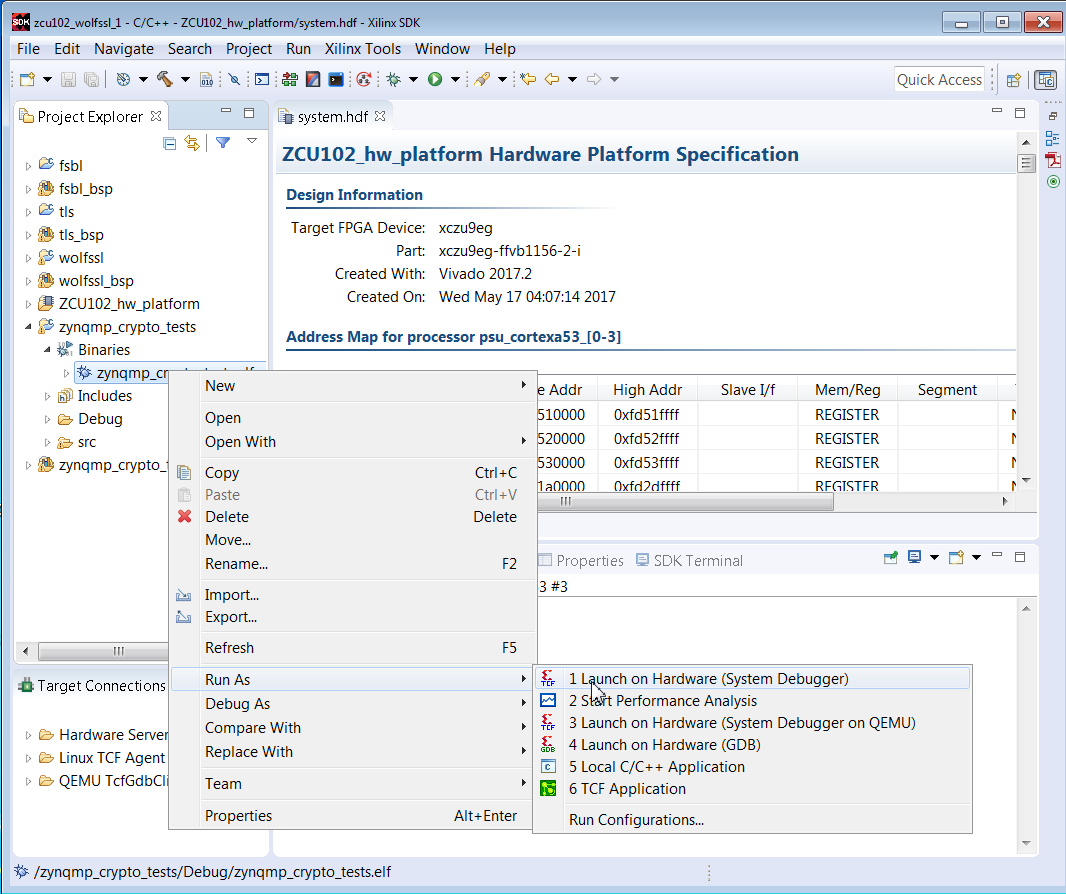
7. View the results in the communication terminal.
This section shows how to build a network security example. In this example, the server runs on the ZCU102 or UltraZed-EG board, and the client runs on a Linux workstation. The following lists the steps to build and run the example
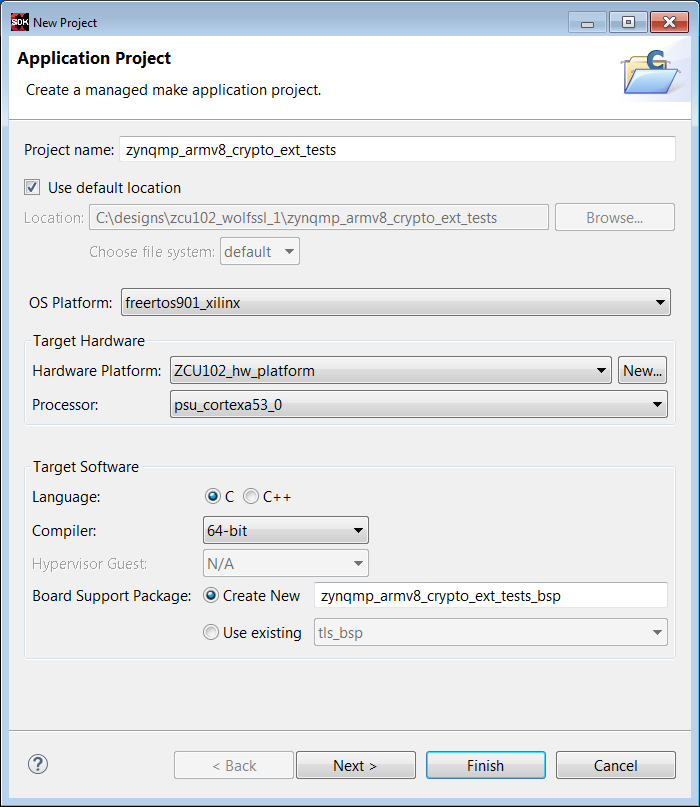
1. Invoke SDK on c:\designs\zcu102_wolfssl_1.
2. Click File -> New -> Application. Enter network_security_server in the Project Name text box. Select freertos901_xilinx as the OS.. Click Next.
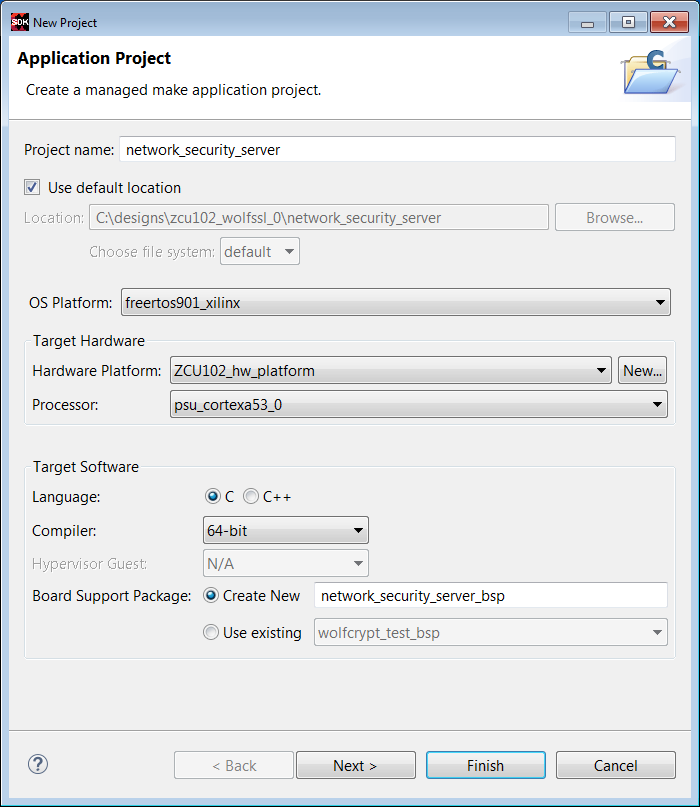
3. In the Templates window, select Empty Application.
4. Click Finish.
5. Right click the network_security_client_bsp and select Board Support Package Settings. Check lwip141. Check lwip141, and change the api_mode from RAW IPI to SOCKET API. Click Regenerate Board Support Package.
6. In Project Explorer, select the network_security_client/src -> Import -> File ->, and browse to c:\wolfssl\network_security. Select tls_server.c.
7. In Project Explorer, select the network_security_client project -> C/C++ Build Settings. Repeat the steps done for the wolfcrypt_test project. Click Symbols -> +, and add WOLFSSL_USER_SETTINGS to the text box. Select Directories -> +. and browse to add c:\wolfssl and c:\wolfssl\wolfssl directories. Select Libraries and enter wolfssl as the library name, and browse to c:\designs\zcu102_wolfssl_0\wolfssl\Debug. Click Apply. Click OK.
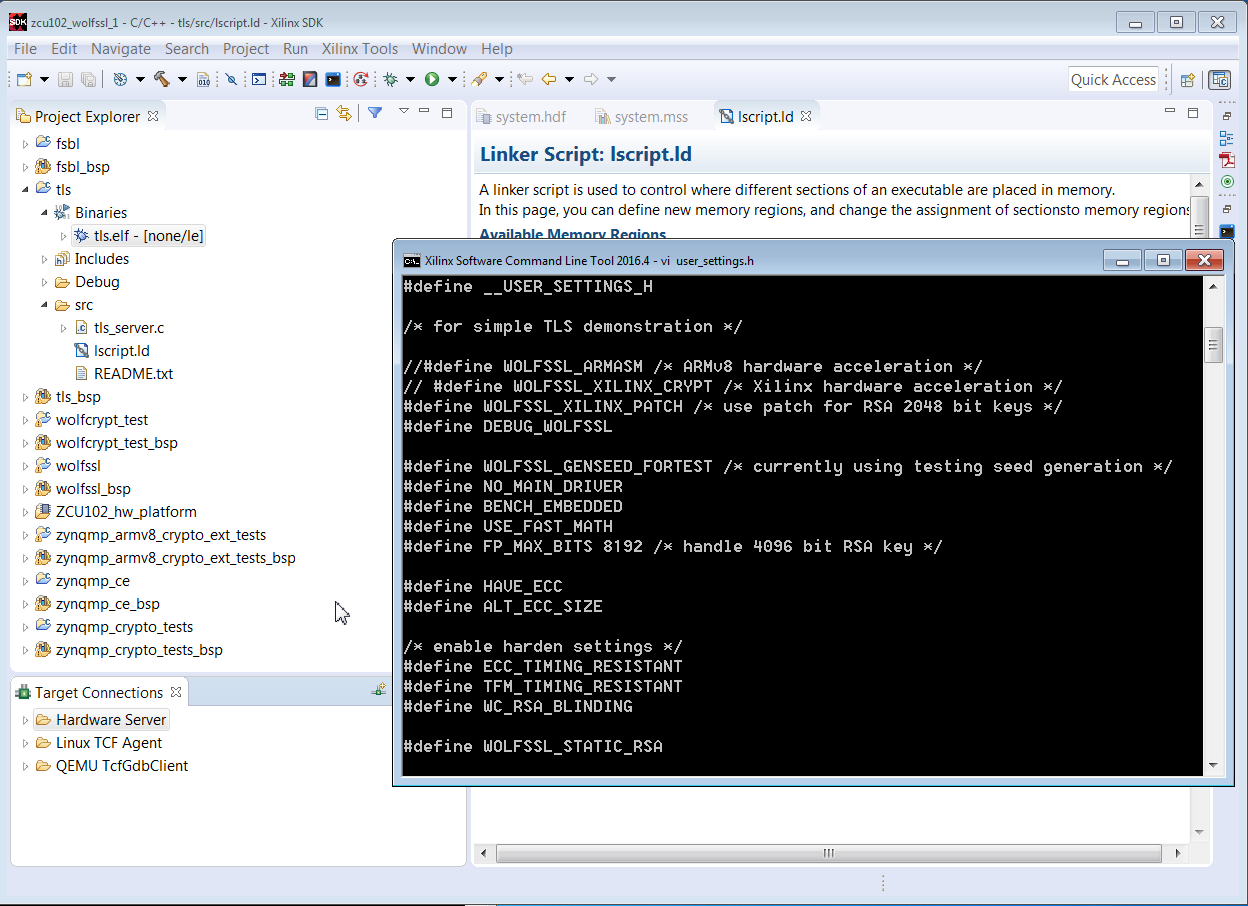
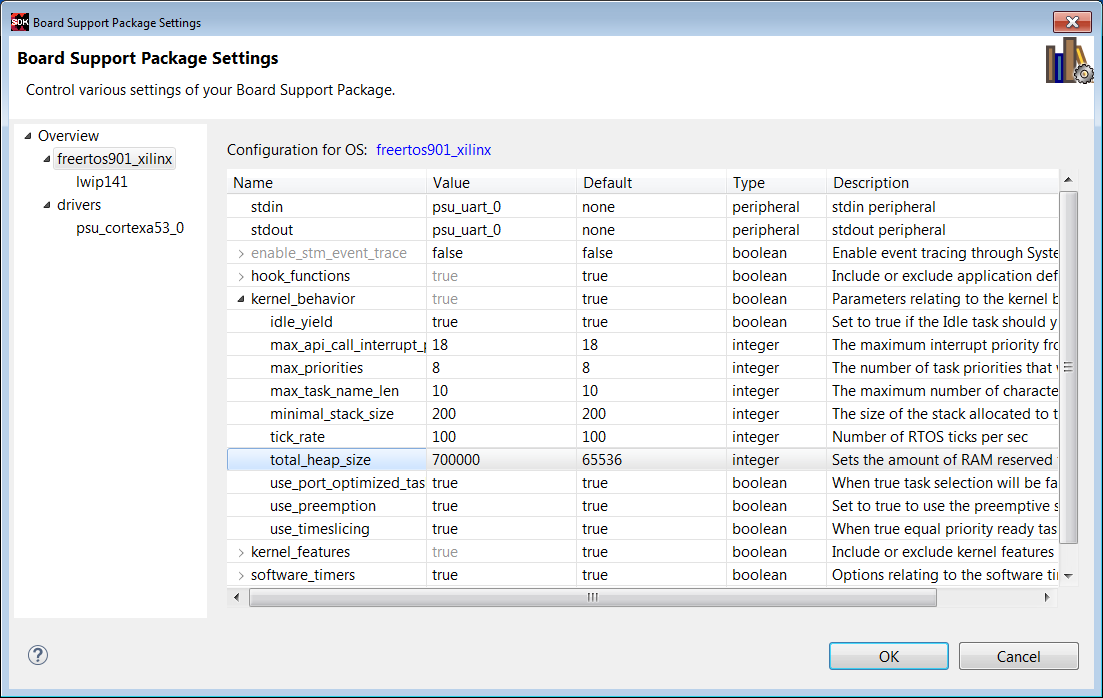
8. In the linker script lscript.ld, change the stack size to 0x927C0 and the heap size to 0x6ACFC0. Select network_security_server_bsp -> freertos901_xilinx -> kernel_behavior -> total_heap_size, and set total_heap_size to 700000.
8. Verify that the network_security_server ELF is built as expected in Project Explorer.
9. Setup the client on the Linux desktop. Run
git clone https://github.com/wolfssl/wolfssl
cd wolfssl
./autogen.sh
configure C_EXTRA_FLAGS=-DWOLFSSL_STATIC_RSA
make
10. Connect a CAT5e Ethernet cable from ZCU102 or UltraZed-EG to an Ethernet wall socket. Alternatively, a crossover cable can be used with a static IP address.
Hardware Setup
The hardware setup for connected sytems generally consists of an isolated Certificate Authority and/or Hardware Security Module (HSM), a server, and clients as shown in a previous section. Most initial development configurations use a direct connected server and client. The server can be Windows or Linux based, and can be setup using static IP address or DHCP.
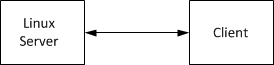
In the examples in this note, the server runs on the ZCU102 or UltraZed-EG. The client runs on the Linux workstation.
11. Invoke a communication terminal as Teraterm at 115200 baud rate.
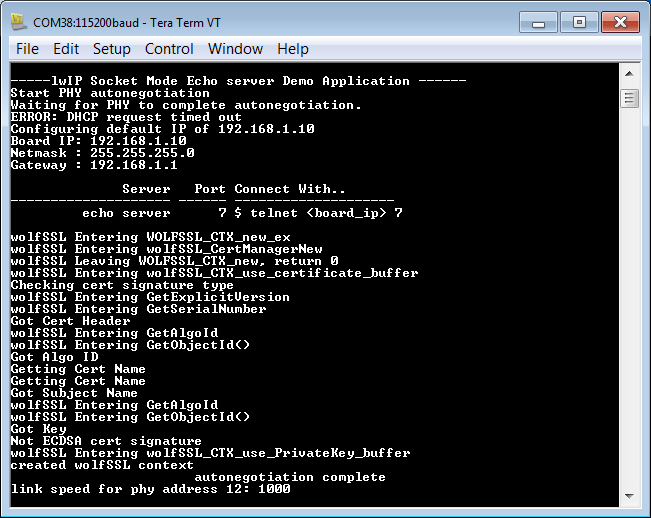
11. Power on the ZCU102 or UltraZed-EG board. Select network_security_server.elf -> Run As -> Launch on Hardware (System Debugger). Verify that the output is similar to that shown below.
12. On Linux desktop, enter
./examples/client/client -l AES128-SHA -h 172.16.25.10 -p 7 -d
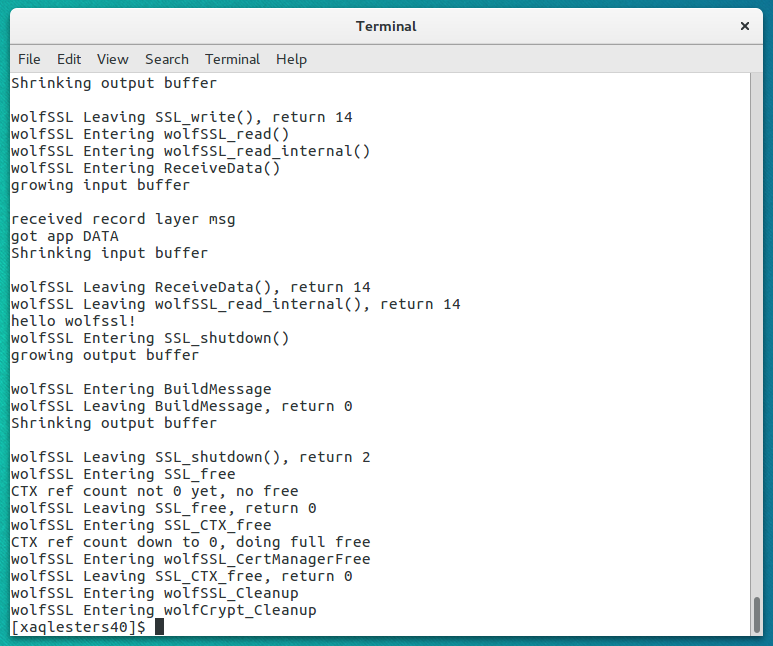
13. View the terminal output. The "hello wolfssl" indicates that the TLS handshake in the client - server connection functions as expected. Scroll up to view the detailed output.
14. Invoke sudo wireshark to view the details of the TLS handshake. As show in the figure below, enter ip.addr == 172.16.25.10 as a display filter.
Note: The IP Address is shown in the server terminal output. A 172.16.25.* is generally a DHCP generated address. A 192.168.1.10 is a typical static IP address.
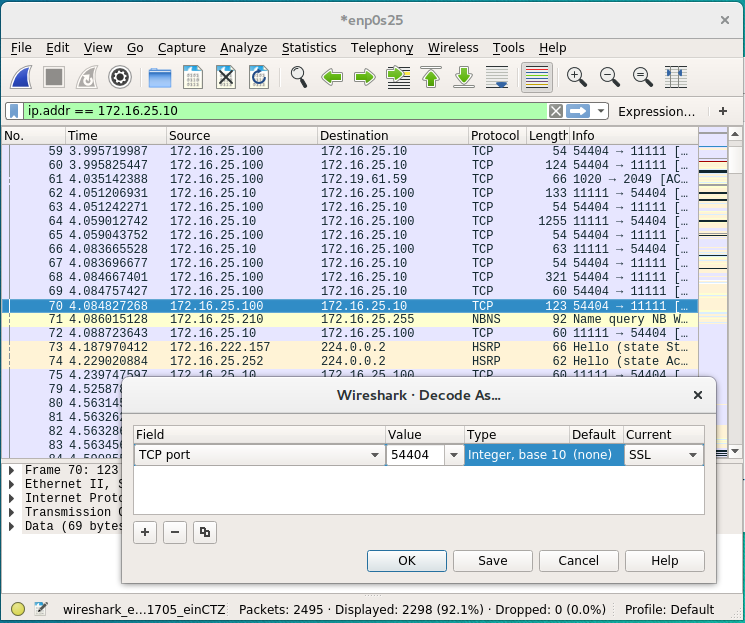
Click the blue fin in the top left to start capturing packets. Re-run the client command in step 12 to start the TLS handshake. Right click a packet with a destinatioin address 172.16.25.10. Enter Decode As. Select the rightmost column Current, and enter SSL.
15. View TLS Handshake in wireshark. Change Cipher Spec is used to in the negotiation of the cipher suite.
The ARMv8 Crypto Extensions execute SHA and AES cryptography on the NEON FPU using assembly language. The implementation uses a wide data path which may have speed advantages. Since the key is accessed fewer times, it may provide resistance to differential power analysis (DPA). The steps to run SHA and AES algorithms using the ARMv8 Crypto Extensions are to run the steps just given for the wolfcrypt_test and network_security_server run above, and uncomment the following #define in user_settings.h.
#define WOLFSSL_ARMASM
//#define WOLFSSL_XILINX_CRYPT
1. Create a project.
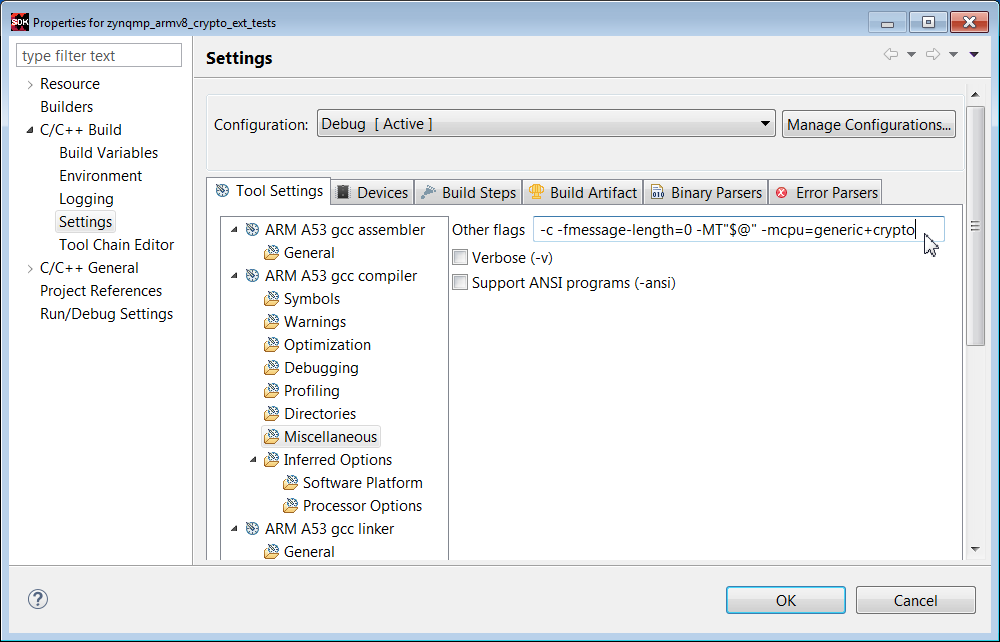
2. Import Files and run C/C++ Build Settings as done with the zynqmp_crypto_tests example, In addition, in the Misc option in C/C++ Build settings, add -mcpu=generic+crypto.
3. Set up the board in JTAG mode.
4. Invoke a communication as Teraterm at 115200.
5. Select the ELF -> Run As -> Run on Hardware (System Debugger)
6. View the results.

Build the network security example as done using functions in the WolfSSL library, using the macro below in user_settings.h.
#define WOLFSSL_XILINX_CRYPT
The steps for board and comm terminal setup, and running the design are identical for the software version.
Build the network security example as done using functions in the WolfSSL library, using the macro below in user_settings.
#define WOLFSSL_ARMASM
The steps for board and comm terminal setup, and running the design are identical for the software version.
This note shows how to use the WolfSSL library for protecting memory, network security, and authentication. In the case of Zynq UltraScale+, the WolfSSL library optionally uses soft, hard, or ARMv8 Crypto Extension implementations for underlying SHA/RSA/AES functionality in the application.
Although the focus of this note is the high level applications, the WolfSSL library can be used for a wide range of cryptographic algorithms besides SHA, RSA, and AES.
After discussing high level objectives, this note provides steps to build and run two tests: cryptographic operations and network security. The following three methods are used, so six systems are tested.
- WolfSSL Software
- Zynq UltraScale+ Hard Cryptographic SHA/RSA/AESGCM
- ARMv8 Crypto Extensions
The user_settings.h file is used to specify the method. The wolfssl library is used in each case. Depending on the method, the wolfssl library compilation options may differ.
NOTE: As of this writing, there is a known issue with using xilsecure with the Zynq UltraScale+ SHA3 and AESGCM-256 hardened crypto components with data patterns with lengths (in bytes) which are not a integer multiple of 4.
High Level Objectives of Cryptographic Functions
Three objectives of cryptography in embedded systems are:
- Protecting Data at Rest
- Network Security
- Authentication of Endpoints
Network security and authentication require higher level cryptographic functions than is provided in the SHA/RSA/AES examples. Protecting data at rest is feasible using the SHA/RSA/AES functions, but it can be made stronger using a SSL library.
Network Security
The figure below shows a system which requires network security
The server is connected to clients over an Ethernet connection. Xilinx provides MACB drivers for Ethernet devices in Zynq UltraScale+. A lightweight Internet Protocol (lWIP) connection using TCP/IP or datagrams is discussed in XAPP1026, XAPP1305, and XAPP1306.
TLS Handshake
The Transport Layer Security (TLS) handshake is universally used in SSL and IPSeC applications. The TLS handshake occurs between the server and client(s) endpoints. The TLS handshake example uses hello exchanges between the server and client(s). In the TLS handshake, the endpoints negotiate the cryptographic algorithms used for encryption, authentication, and key exchange.
The figure shows a basic form of the TLS handshake. The TLS handshake uses both asymmetric and symmetric keys. The asymmetric key is used for authentication, and symmetric key exchange. The shared symmetric key is used for encryption/decryption of the message. The TLS handshake uses asymmetric encryption such as RSA which consists of a private and public key pair. The private/public key pair allows endpoints to share a private symmetric key for encryption.
A basic description of the client - server exchange in TLS is given below.
1. The client requests an encrypted session and provides a list of cipher suites. A cipher suite defines the encryption and authentication cryptography used. There are many cipher suites. The cipher suites used in this note are AES128-SHA, ECDHE-RSA-AES128GCM-SHA256, and ECDHE-RSA-AES256GCM-SHA384.
2. The server agrees to/provides a cipher suite, TLS version, and sends a certificate with a public key.
3. The client verifies the server's certificate. The client uses the public key to encrypt the shared symmetric key, and sends the shared symmetric key to the server.
4. The server uses the private key to decrypt the shared symmetric key.
5. AES encryption/decryption is used for messages sent between the endpoints using the shared symmetric key.
Endpoint Authentication
While authentication is done as part of the TLS handshake, a second application of authentication uses Public Key Infrastructure (PKI). Endpoint authentication involves at least one Certificate Authority (CA), a server, and clients. The two forms of endpoint authentication are one way and two way (mutual authentication). In one way authentication, the server transmits a certificate to the client. The client does not pass a certificate to the server. Only the server is authenticated. In mutual authentication, certificates are passed from the server to the client and from the client to the server.
In PKI, the server and client each have X509v3 certificates which reference name, organization, address, RSA public key, certificate validatity dates, and the name and signiture of the issurer. The CA publishes a self signed certificate. with its own public key. The server or clients, using a SSL library, generate the X509 certificates, and then generate a certificate sign request (CSR). The CA signs the certificates. The private key never leaves the endpoint.
Protecting Sensitive Data at Rest
In this note, protecting sensitive data at rest is restricted to protecting data in DDR or NVM, not data in the cloud, which requires network security. The protection is to store the DDR/NVM data in encrypted format, and at the time of use, decrypt and move it to on chip memory. Data can be encrypted/decrypted to/from DDR/NVM using the AES GCM. The aes_encrypt_decrypt example given in a later section provides this functionality. If a SSL library is available, the AES key can be generated and stored on chip. The GCM authentication in AES GCM is generally adequate, but RSA authentication is an option.
The amount of data which can be protected is limited to the size of on chip memory (OCM), tightly coupled memory (TCM) and Block RAM (BRAM) on the Zynq UltraScale+. The system architect needs to identify what data is really sensitive, and swap NVM/DDR to OCM/TCM decryption operations as needed.
An interesting variation on this functionality, as yet untested, is decrypting sensitive code, and running the code from internal memory. The hard AES crypto block is fast.
SSL Functionality
The hard cryptographic primitives provided in Zynq UltraScale+ are not enough to support network security or endpoint authentication applications. Using a secure sockets layer (SSL) library is needed. The SSL used in this note is from WolfSSL.
The WolfSSL library consists of wolfcrypt and wolfssl components. The wolfcrypt component provides exhaustive support for a wide variety of cryptographic algorithms, including use cases, tests, and benchmarks. The wolfssl component provides higher level support for network security, mutual authentication, public key infrastructure (PKI), and key generation/management functions.
Architectural Considerations
- Zynq vs Zynq UltraScale+
- Zynq UltraScale+ - A53 or R5
- Standalone, RTOS, or Linux/Android
For this note, the WolfSSL is used with the Zynq UltraScale+ MPSoC and the Zynq-7000 AP SoC. WolfSSL should run on MicroBlaze IP in FPGAs, but it has not been tested. The systems used most in this note use FreeRTOS, running on either the Cortex-A53 or Cortex-R5 on the Zynq UltraScale+ device, or on the Cortex-A9 on Zynq-7000. X509 Certificates have expiration dates, normally supported by a real time clock (RTC). The Zynq UltraScale+ device has a RTC, and the device driver is used by the WolfSSL library. The Zynq-7000 does not have a RTC on chip, so the PMOD Real Time Clock / Calendar which uses the Microchip MCP79410 is used. The rtcci2c.zip provides a driver.
Additional info is available from:
http://store.digilentinc.com/pmod-rtcc-real-time-clock-calendar/
The cryptographic operations in the WolfSSL library can be run by compiling the library with the WOLFCRYPT_ONLY macro.
In Zynq UltraScale+, security functions can be isolated from non-security functions using protection units and TrustZone as described in XAPP1320. An architecural decision is whether to run the high level security functions discussed in this note in the APU or the RPU. If the R5s are not used in a dual lockstep functional safety application or in an application requiring the low latency associated with RTOS, the security system should run on the R5.
The systems in this note have been tested using standalone and RTOS operating systems. The WolfSSL port to Linux is in development. StrongSWAN provides high level security using IPSeC, and it is built into Yocto based projects for Zynq-7000 and Zynq UltraScale+. StrongSWAN use is discussed in XAPP1309.
Using SHA, RSA, and AES Functions
There are three methods of implementing SHA, RSA, and AES functions in Zynq UltraScale+:
- Zynq UltraScale Hard SHA, RSA, and AES Cryptographic Accelerators
- ARMv8 Crypto Extensions
- WolfSSL Library (software)
The Zynq UltraScale+ hardened crypto accelerators are very fast, use advanced algorithms, and add encryptio support. The ARMv8 Crypto Extensions use the Neon SIMD processor. The potential advantages with using the ARMv8 Crypto Extensions are speed and security. For short data patterns such as a web click, the lower context switch time may result in a speed advantage. The SIMD used for the ARMv8 Crypto Extensions requires fewer key accesses than the hard core, so Differential Power Analysis (DPA) resistance is generally higher.
Note on Zynq-7000 and Zynq UltraScale+ silicon differences. The Zynq UltraScale+ uses AES GCM which can be used for either encryption or decryption. The Zynq-7000 AES is only used for decryption. The Zynq UltraScale+ RSA Engine uses a hard Montgomery Multiplier, and is available for use during boot or runtime (ie, anytime) for RSA-2048 or RSA-4096. Zynq uses the XILRSA software library for RSA-2048 authentication of boot partitions and runtime applications. Zynq UltraScale+ supports SHA2 and SHA3. Zynq-7000 supports SHA2.
This section provides the steps to run example SHA, RSA, and AES code.
1. Invoke SDK. Close the Welcome window.
2. Select File -> New -> Application. Enter fsbl in the Project Name text box. Select ZCU_hw_platform(predefined). Click Next. In the Templates pane, select Zynq MP FSBL. Click Finish.
Running SHA3 Example
3. Select File -> New -> Board Support Package.
4. In the Project Name text box, enter sha3_bsp_0
5. Right click sha3_bsp_0, and select Board Support Package Settings. Check the xilsecure box.
6. Scroll to the bottom of the MSS window. Check Import Examples next to the xilsecure library.
7. Check the sha box. Click OK.
8. Rename the project to sha3_example. Select the sha3_example project and run Build Project.
9. Setup ZCU102 or UltraZed-EG Board with power supply, UART connection, and Platform Cable USB II or equivalent. Set the configuration mode to JTAG.
10. Invoke Teraterm or similar communication terminal (usually COM3).
11. Right click sha3_example.elf, and select Run As -> Launch on Hardware (System Debugger)
12. Verify that the results are similar to that shown below.
Running RSA Example
The initial steps for running the RSA example are similar to that of the SHA3 example.
1. Select File -> New -> Board Support Package
2. In the Project name text box, enter rsa_bsp_0.
3. Right click rsa_bp_0, and select Board Support Package Settings. Check the xilsecure box.
4. Scroll to the bottom of the MSS window. Check Import Examples next to xilsecure.
5. Check the rsa box. Click OK.
6. Rename the project to rsa_example. Run Project Build.
7. Setup ZCU102 or UltraZed-EG board and communication terminal. Set configuration mode to JTAG.
8. In SDK, click Xilinx Tools -> XSCT Console.
9. Enter the following commands in the XSCT Console.
connect
targets
target 10
source zcu102_hw_platform/psu_init.tcl
rst -processor
psu_init
dow -data BOOT.BIN 0x04000000
dow rsa_example/debug/rsa_example.elf
con
10. Verify that the results in the communication terminal are identical for the values calculated from the boot image hash and the hash from the signature.
To support RSA-2048, run the patch on the rsa.c and rsa.h files in the xilsecure library in $SDK/2017.2/data/embeddedsw/lib/sw_services/silsecurev2_1.
patch < xsecure_rsa_2048.patch
In user_settings.h, add the macro:
#define WOLFSSL_XILINX_PATCH
Running AES GCM Example
The initial steps for running the AES GCM example are similar to that of the SHA3 example.
1. Select File -> New -> Board Support Package
2. In the Project name text box, enter aes_bsp_0.
3. Right click aes_bsp_0, and select Board Support Package Settings. Check the xilsecure box.
4. Scroll to the bottom of the MSS window. Check Import Examples next to xilsecure.
5. Check the aes box. Click OK.
6. Rename the project to aes_example. Run Project Build.
7. Setup ZCU102 or UltraZed-EG board and communication terminal. Set configuration mode to JTAG.
8. Right click aes.elf, and select Run As -> Launch on Hardware (System Debugger)
9. Verify the results in the communication terminal.
Running AES GCM Example - Version 2
In the previous example, the data encrypted is included in the file. In an actual application, data resides in memory, with the data identified using a start address and length.
1. Select File -> New -> Application
2. In the Project name text box, enter aes_encrypt_decrypt. Click Next.
3. In the Template dialog box, select Empty Applicaton. Click Finish.
4. In the Project Explorer pane, right click on aes_encrypt_decrypt -> src, and select File Import -> General -> File System, and browse to the aes_encrypt_decrypt.c file.
| View file | ||
|---|---|---|
|
5. Run Project Build.
7. Setup ZCU102 or UltraZed-EG board and communication terminal. Set configuration mode to JTAG.
8. Right click aes_encrypt_decrypt.elf, and select Run As -> Launch on Hardware (System Debugger)
10. Verify the results in the communication terminal.
Building and Using WolfSSL library
This section provides two methods for building and using the WolfSSL library. The first method uses local library built in a SDK project. This method can use a Windows or Linux based SDK. This library is used in the wolfcrypt_test and network security examples provided in later sections. The second method uses the cross_compile.sh script, generally run on Linux, which is used for the configure and make commands. An objective of a SSL library for embedded security is to minimize the footprint. In the configuration step, the footprint is minimized by selecting only those algorithms used in the application.
There are two methods for library use. The library can be placed as a local project or repository. Using the C/C++ Build SEttings option in SDK, the library can then be referenced by name, and the location idenitified using Directories. The steps for this use case are provided later in this note.
The second method is to add the library in the SDK install area such as \Xilinx\SDK\2017.2\data\embeddedsw\lib\sw_services. Adding the wolfssl library to this area should follow the structure of existing libraries. The data directory should contain the wolfssl.mld and wolfssl.tcl files similar to mld and tcl files for existing libraries. The wolfssl .c, .h, and Makefile should be placed in the src directory. The wolfcrypt_test and network_security examples should be placed in the examples directory.
The steps for creating a local wolfssl library for use in the wolfcrypt_test and network_security examples are listed below.
1. Create c:\wolfssl. Add user_settings.h to the c:\wolfssl directory. Unzip wolfssl-3.11.1.zip in the c:\wolfssl directory.
2. md c:\designs\zcu102_wolfssl_0
3. Invoke SDK.
4. Enter File -> New -> Application Project
5. Enter fsbl in the Project Name text box. Select zcu102_hw_platform(pre-defined) in the Hardware Platform box. Click Next.
6. Select Zynq MP FSBL in the Templates window. Click Finish.
7. Select File -> New -> Application Project.
8. Enter wolfssl in the Project Name text box.
9. Select freertos901_xilinx in the OS box. Click Next.
10. In the Templates window, select Empty Application. Click Finish.
11. In the Project Explorer pane, right click wolfssl -> src, and select File -> Import -> General -> File System.
12. Browse to select files in c:\wolfssl-3.11.1\wolfssl directory.
13. Repeat steps 11 and 12 to select files in the c:\wolfssl-3.11.1\wolfssl\wolfcrypt directory.
14. Under wolfssl -> src, remove the bio.c, evp.c, and misc.c files.
15. Select wolfssl -> Project Build.
16. Settings are required to build. The first error is shown below.
17. Right click on the wolfssl project, and select C/C++ Build Settings.
18. Click Symbols, +, and enter WOLFSSL_USER_SETTINGS in the text box.
19. Click Directories -> File, and browse to add the c:\wolfssl directory.
20. Click Directories -> File and browse to the c:\wolfssl\wolfssl-3.11.1 directory.
21. For the socket error, right click wolfssl_bsp_0 -> Board Support Package Settings, and check lwip141. In the BSP Settings window, select lwip141. Use the pull down to change RAW to Socket. Regenerate the BSP.
22. Verify include directories are set correctly.
23. Select the Build Artifact tab. Select Artifact Type -> Static Library. In Artifact Extension text box, enter a.
Click Apply. Click OK.
24. Verify that the wolfssl library is built as shown below.
25. To use the wolfssl library in an application, right click the application, and select C/C++ Build Settings -> Settings -> Libraries.
Fill in the library name as wolfssl and the location. This is done in the wolfcrypt_test and network_security examples.
Building and running the wolfcrypt_test example
The wolfssl library supports many cryptographic algorithms. Source files are in wolfssl-3.11.1/wolfssl/wolfcrypt. The wolfcrypt_test tests the functionality of many of the algorithms. The wolfssl library built in a previous section is used for the algorithms and the tests. This section provides the steps to run the wolfcrypt_test application.
1. Invoke SDK in c:\designs\zcu102_wolfssl_0.
2. Select File -> New -> Application. Enter wolfcrypt_test in the Project Name text box. Select freertos901_xilinx as the OS. Click Next.
3. In the Templates window, select Empty Application. Select Finish.
4. Right click wolfcrypt_test_bsp and select Board Support Package Settings. Select lwip141.
5. Highlight lwip141, and change api_mode value from RAW API to SOCKET API. Regenerate the BSP.
6. In the Project Explorer pane, select wolfcrypt_test/src -> Import -> File System. In the File Directory text box, browse to c:\wolfssl\wolfcrypt_test\wolfcrypt_test.c.
7. Right click the wolfcrypt_test project and select C/C++ Build Settings.
8. Click Symbols -> +, and enter WOLFSSL_USER_SETTINGS in the text box.
9. Click Directories -> +, and use the browse box to select c:\wolfssl.
10. Click Directories -> +, and use the browse box to select c:\wolfssl\wolfssl-3.11.1.
11. Click Librariies -> +, and enter wolfssl as a library name. As shown below, use Browse to define the path to the wolfssl library: c:\designs\zcu102_wolfssl_0\wolfssl\Debug.
12. Select the wolftest_crypt project and verify that the ELF is built.
13. Setup the ZCU102 or UltraZed-EG board. Set the configuration mode to JTAG.
14. Invoke Teraterm communication terminal. Select 115200 as the baud rate.
15. Right click on wolfcrypt_test.elf and select Run As -> System Debugger.
16. Verify the results in the communication terminal as below.
Using Zynq UltraScale+ Hard SHA / RSA / AES in wolfcrypt
In this section, only the SHA3/RSA/AES functions in wolfcrypt are run. These functions use the hard crypto functions in Zynq UltraScale+. This functionality is enabled in user_settings.h using the macro:
#define WOLFSSL_XILINX_CRYPT.
The steps to run this test are listed below.
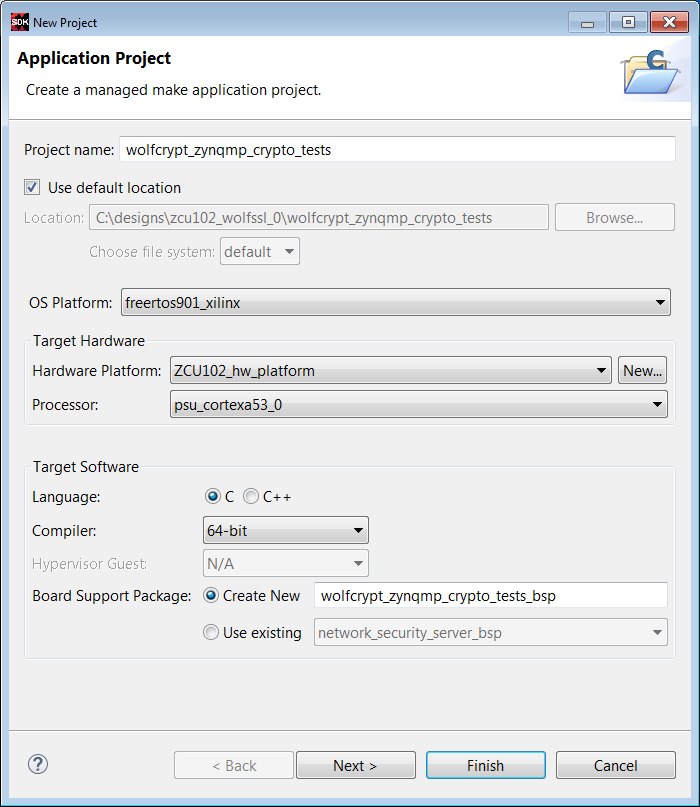
1. Invoke SDK in c:\designs\zcu102_wolfssl_0.
2. Enter File -> New -> Application Project. Enter wolfcrypt_zynqmp_crypto_tests in the Project Name text box. Enter freertos901_xilinx as the OS. Click Next.
3. Select Empty Application in the Templates window. Click Finish.
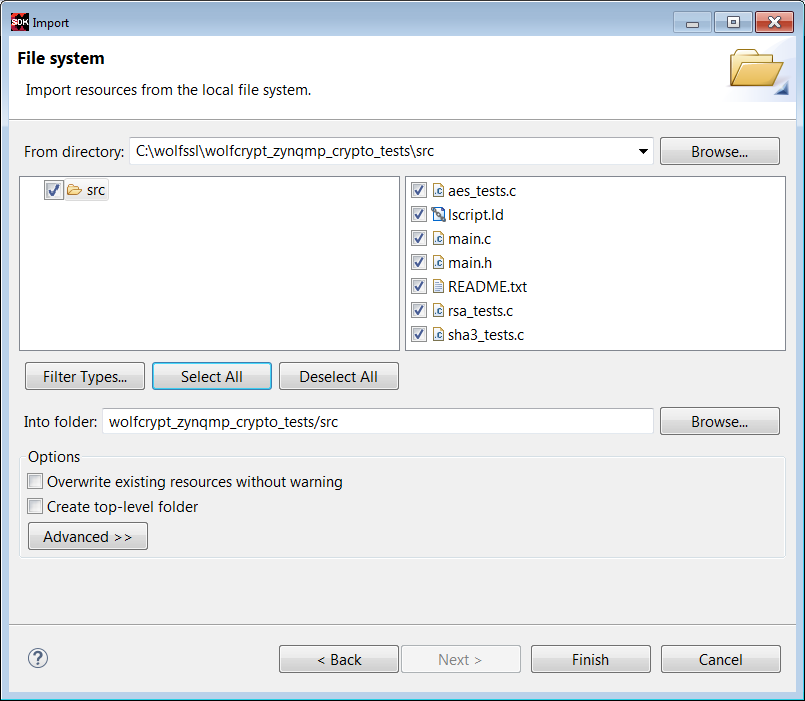
4. Click on wolfcrypt_zynqmp_crypto_tests/src -> Import -> File. Browse to c:\wolfssl\wolfcrypt_zynqmp_crypto_tests. Select All. Click Finish.
4. Select wolfcrypt_zynqmp_crypto_tests_bsp -> Board Support Settings. Check lwip141. Click lwip141 and change the api_mode to SOCKET_API. Click Regenerate BSP.
5. Run Project Build.
6. Right click the zynqmp_crypto_tests.elf -> Run As -> Launch on Hardware (System Debugger).
7. View the results in the communication terminal.
Building and running the network_security example
This section shows how to build a network security example. In this example, the server runs on the ZCU102 or UltraZed-EG board, and the client runs on a Linux workstation. The following lists the steps to build and run the example
1. Invoke SDK on c:\designs\zcu102_wolfssl_1.
2. Click File -> New -> Application. Enter network_security_server in the Project Name text box. Select freertos901_xilinx as the OS.. Click Next.
3. In the Templates window, select Empty Application.
4. Click Finish.
5. Right click the network_security_client_bsp and select Board Support Package Settings. Check lwip141. Check lwip141, and change the api_mode from RAW IPI to SOCKET API. Click Regenerate Board Support Package.
6. In Project Explorer, select the network_security_client/src -> Import -> File ->, and browse to c:\wolfssl\network_security. Select tls_server.c.
7. In Project Explorer, select the network_security_client project -> C/C++ Build Settings. Repeat the steps done for the wolfcrypt_test project. Click Symbols -> +, and add WOLFSSL_USER_SETTINGS to the text box. Select Directories -> +. and browse to add c:\wolfssl and c:\wolfssl\wolfssl directories. Select Libraries and enter wolfssl as the library name, and browse to c:\designs\zcu102_wolfssl_0\wolfssl\Debug. Click Apply. Click OK.
8. In the linker script lscript.ld, change the stack size to 0x927C0 and the heap size to 0x6ACFC0. Select network_security_server_bsp -> freertos901_xilinx -> kernel_behavior -> total_heap_size, and set total_heap_size to 700000.
8. Verify that the network_security_server ELF is built as expected in Project Explorer.
9. Setup the client on the Linux desktop. Run
git clone https://github.com/wolfssl/wolfssl
cd wolfssl
./autogen.sh
configure C_EXTRA_FLAGS=-DWOLFSSL_STATIC_RSA
make
10. Connect a CAT5e Ethernet cable from ZCU102 or UltraZed-EG to an Ethernet wall socket. Alternatively, a crossover cable can be used with a static IP address.
Hardware Setup
The hardware setup for connected sytems generally consists of an isolated Certificate Authority and/or Hardware Security Module (HSM), a server, and clients as shown in a previous section. Most initial development configurations use a direct connected server and client. The server can be Windows or Linux based, and can be setup using static IP address or DHCP.
In the examples in this note, the server runs on the ZCU102 or UltraZed-EG. The client runs on the Linux workstation.
11. Invoke a communication terminal as Teraterm at 115200 baud rate.
11. Power on the ZCU102 or UltraZed-EG board. Select network_security_server.elf -> Run As -> Launch on Hardware (System Debugger). Verify that the output is similar to that shown below.
12. On Linux desktop, enter
./examples/client/client -l AES128-SHA -h 172.16.25.10 -p 7 -d
13. View the terminal output. The "hello wolfssl" indicates that the TLS handshake in the client - server connection functions as expected. Scroll up to view the detailed output.
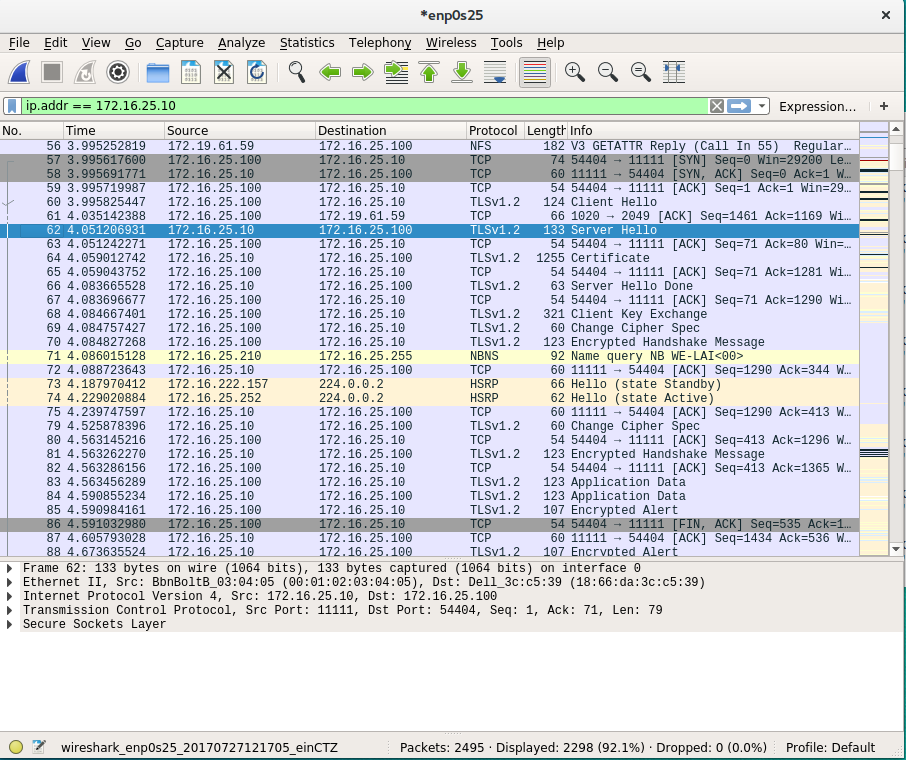
14. Invoke sudo wireshark to view the details of the TLS handshake. As show in the figure below, enter ip.addr == 172.16.25.10 as a display filter.
Note: The IP Address is shown in the server terminal output. A 172.16.25.* is generally a DHCP generated address. A 192.168.1.10 is a typical static IP address.
Click the blue fin in the top left to start capturing packets. Re-run the client command in step 12 to start the TLS handshake. Right click a packet with a destinatioin address 172.16.25.10. Enter Decode As. Select the rightmost column Current, and enter SSL.
15. View TLS Handshake in wireshark. Change Cipher Spec is used to in the negotiation of the cipher suite.
Cryptographic Tests Using ARMv8 Crypto Extensions
The ARMv8 Crypto Extensions execute SHA and AES cryptography on the NEON FPU using assembly language. The implementation uses a wide data path which may have speed advantages. Since the key is accessed fewer times, it may provide resistance to differential power analysis (DPA). The steps to run SHA and AES algorithms using the ARMv8 Crypto Extensions are to run the steps just given for the wolfcrypt_test and network_security_server run above, and uncomment the following #define in user_settings.h.
#define WOLFSSL_ARMASM
//#define WOLFSSL_XILINX_CRYPT
1. Create a project.
2. Import Files and run C/C++ Build Settings as done with the zynqmp_crypto_tests example, In addition, in the Misc option in C/C++ Build settings, add -mcpu=generic+crypto.
3. Set up the board in JTAG mode.
4. Invoke a communication as Teraterm at 115200.
5. Select the ELF -> Run As -> Run on Hardware (System Debugger)
6. View the results.
Network Security Using Zynq UltraScale+ Hard Crypto Circuitry
Build the network security example as done using functions in the WolfSSL library, using the macro below in user_settings.h.
#define WOLFSSL_XILINX_CRYPT
The steps for board and comm terminal setup, and running the design are identical for the software version.
Network Security Using ARMv8 Crypto Extensions
Build the network security example as done using functions in the WolfSSL library, using the macro below in user_settings.
#define WOLFSSL_ARMASM
The steps for board and comm terminal setup, and running the design are identical for the software version.