...
The Clock Mux (BUFGMUXs) which is present in 2018.2 design for muxing MTS and Non-MTS clocks are not present in subsequent designs. The MTS design is clocked with PL clock as shown in the figure below. To further simplify the MTS design there is a common trigger signal for all channels rather than having individual trigger for all 8-channels on DAC and ADC sides. These triggers are enabled by using channel control GPIO pins. Also the GPIO required to differentiate between Non MTS and MTS design is no longer required. The corresponding constraints for GPIOs and clock structure have also been modified. The updated constraint files are provided as the part of the TRD ZIP Package.
For DAC

For ADC

RFSoC RFdc Build and Run Flow Tutorial
...
This will enable MTS, Advanced Clocking settings in UI.
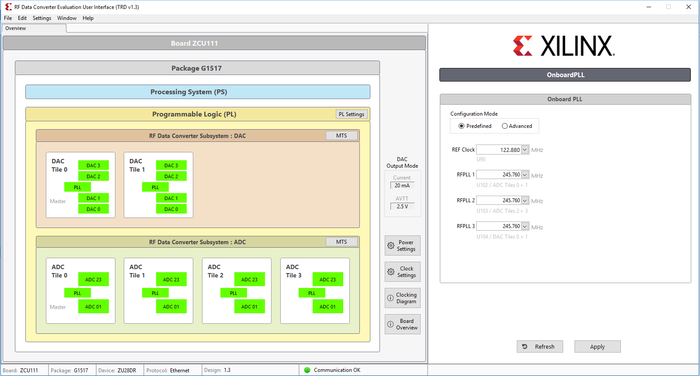
2. The UI Overview window is as shown in the following figure. By default, MTS is not enabled.
3. Click on the Clock Settings.
4. Set the RFPLL 1, RFPLL 2 and RFPLL 3 frequencies to 3932.16 MHz. Press Apply.

5. Once these frequencies are chosen,the user needs to bypass the Internal PLL for all the DAC’s and ADC’s. Refer to Appendix A.1 Internal PLL to External PLL of the (RFSoC Build and Run Flow Tutorial) for steps to bypass Internal PLL and go to External PLL.
6. Once the PLL’s are bypassed, the user needs to enable MTS. Click on MTS button of DAC in the Overview tab of the UI.

7. Enable MTS by clicking on the checkbox and press Apply.

8. Then, click on the Synchronize button.

9. The MTS window looks as shown in the figure below after synchronization.

10 10. Click on the MTS button of ADC in the Overview tab of the UI.
11 11. Enable the MTS by clicking on the checkbox and press Apply.

12 12. Then, click on Synchronize button.

13 13. The MTS window looks as shown in the figure below after synchronization.

14. Go to Window -> Multiview -> DAC FFT.
15. Select all DAC channels sequentially as shown in the following figure.

16) 16. Once all the DAC channels are chosen, clock on the Generate All button. This will generate data on all DAC channels.
17) . Go to Window -> Multiview -> ADC Time Domain.
18) . Select all the ADC channels as shown in the figure below.

19) . Once all the channels are selected, click on the Acquire button. The output looks as shown in the figure below. All the ADC channels will be in a synchronization.
...