Zynq UltraScale+ MPSoC Power Advantage Tool part 2 - Installing the Pre-Built Power Advantage Tool
Table of Contents
The fastest way to get something working is to install the Pre-Built Power Advantage Tool. Installing the Pre-Built Power Advantage Tool is an important first step in building the system from sources, as it gives us a functioning baseline to work from. Once we have a functioning baseline, we can then replace individual modules with ones we have built. This development method is much easier to debug than starting from scratch.
1 Setup
1.1 Software SetupIn this section, you will install software drivers and apps that are common to many demonstrations.
In the previous web page, you had extracted a .zip file to C:\zynqus.
From C:\zynqus\pwr copy the ZynqUS_Demos folder to your PC C:\
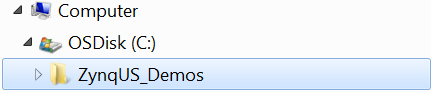
Figure 1. Copying the ZynqUS_Demos Directory
Warning: The folder must be copied to C:\.
Open C:\ZynqUS_Demos\tools, and install the software as follows:
(Note: They only need to be installed once.)
- Open the CP210x_VCP_Windows folder, and install CP210xVCPInstaller_x64.exe USB to UART driver from Silicon Labs.
Note: It is a bit fussy to remove another version of Silicon Labs driver, but it can be done per
http://community.silabs.com/t5/Interface-Knowledge-Base/Uninstalling-the-CP210x-Virtual-COM-Port-driver-including-6-6/ta-p/134074
C:\Program Files\Silabs\MCU\CP210x\DriverUninstaller.exe "VCP CP210x Cardinal\SLABCOMM&10C4&EA60"
C:\Program Files (x86)\Silabs\MCU\DriverUninstall\DriverUninstaller.exe "VCP CP210x Cardinal\SLABCOMM&10C4&EA60"
Other versions can be removed from Control Panel > Programs and Features
Control Panel > Device Manager > Ports (COM & LPT) > Right Click Silicon Labs... > Uninstall > Delete Device Driver > OK
- Install CDM v2.12.10 WHQL Certified.exe USB to UART driver from FTDI if included in the tools directory.
- Install AutoHotkey112203_Install.exe
- Install teraterm-4.87.exe (Tera Term)
Set a static IP Address 192.168.1.110 on your PC: (Only needed if your demo requires networking.)
In Windows 7 this is done from Control Panel > Network and Internet (on some systems you may be able to proceed without this step) > Network and Sharing Center > Change adapter settings (found on left side of page) > Right Click Local Area Connection > Properties > Yes…
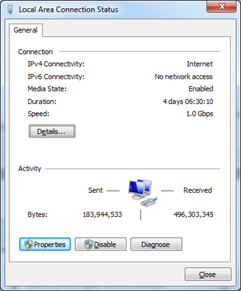
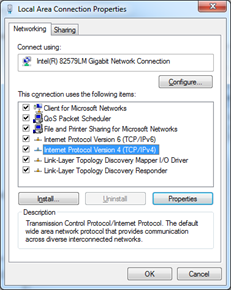

Figure 1. Static IP Address.
Internet Protocol Version 4 (TCP/IPv4) > Properties > Use the following IP address > IP address: 192.168.1.110 (Enter and use the default Subnet mask) > OK > Close
1.2 Hardware Setup
In this section, you will start to become familiar with the evaluation board (e.g. ZCU102), and will set it up for Demonstration.Note: This board orientation is standard for most of our documents. It is usually best to orient the board to have the Xilinx logo right-side-up for the customer.

Figure 2. ZCU102 Board Components.
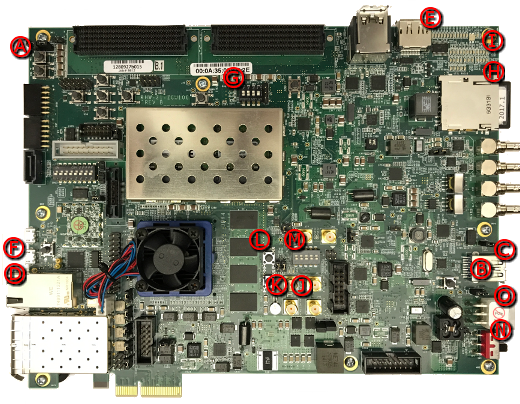
Figure 3. ZCU106 Board Components.
Set up your Power Advantage Tool hardware as follows:
- Connect 12V Power (JS2) to (O)
- Connect Ethernet (D) to PC
- Connect DisplayPort (E) to Monitor (needed only for Ubuntu based demos)
- Connect Micro USB (UART) (J83) (F) to PC
- For ZCU102, connect Micro USB (UART) (J96) (C) to Micro USB Keyboard and Mouse
- For ZCU106, connect USB (UART) (J96) (C) to USB Keyboard and Mouse

- For ZCU102, set the USB Mode Jumpers (J109, J110, J112, J113) (B)
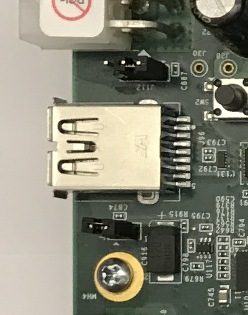
- For ZCU106, set the USB Mode Jumpers (J110, J112) (B)
- Set the Boot Mode Switch (SW6) (G) 1-4 On-Off-Off-Off (Note: For ES1 Silicon, this is 1-4 Off-On-Off-On)
- Insert the SD card (H)
- Power On/Cycle the Evaluation Board (SW1) (N) and confirm that the INIT_B LED is green.
The Rail LED’s (I) should be green except the PS_ERR_OUT LED can remain red.
The SYSCTLR_1 LED (DS46) (J) should be on, and SYSCTLR_0 LED (DS47) (K) should blink
1.3 Creating a Pre-Built SD
A Pre-Built SD image is included in the package. A bootable SD can be created as follows:
Note: An .img file is needed in the case of Ubuntu demos since Ubuntu uses an additional Linux formatted partition that is large and difficult to deploy under Windows other than this method.
Note: Some non-Ubuntu demos do not contain a Pre-Built SD image. If this is the case, please copy the pre-built C:/zynqus/pwr/sd/<folder>/boot.bin to a blank SD card (image.ub, system.dtb, *.sh, and *.bit.bin may also be provided).
Note: Some measurement-only Power Advantage Tools do not contain a Pre-Built SD image. If this is the case, the tool is intended to be used to measure a design of your own choice.
- Unzip the image C:\zynqus\pwr\sd\<Timestamp>_<Board>_<Descripton>.zip (e.g. C:\zynqus\pwr\sd\20160922_zcu102_ubuntu.zip).
- Run C:\ZynqUS_Demos\tools\Win32DiskImager-0.9.5-install.exe to install Win32DiskImager.
- Insert a 16GB SD card to be programmed. Note: Avoid Class 10 SD cards for 2017.1 and 2017.2 images (i.e. Class 4 is okay for these versions).
- Launch Win32DiskImager.
- Select the Image File:
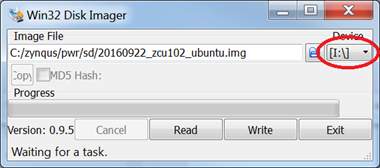
Figure 3. Win32 Disk Imager.
C:/zynqus/pwr/sd/<Timestamp>_<Board>_<Description>.img (e.g. C:/zynqus/pwr/sd/20160922_zcu102_ubuntu.img).
Be extremely careful to select the Device Letter of your SD card (whatever drive selected will be overwritten), then select “Write”.
- When programming has completed, insert this SD card into the Xilinx Evaluation Board (e.g. ZCU102) and power cycle the evaluation board. In a minute, you should see the Ubuntu desktop on the DisplayPort monitor for Ubuntu SD images, or you should see a Linux prompt for all other Linux SD images. If you do not, please see Common Setup Issues below.
1.4 Flashing the MSP430
1.4.1 Flashing the MSP430 with an MSP-FET cable
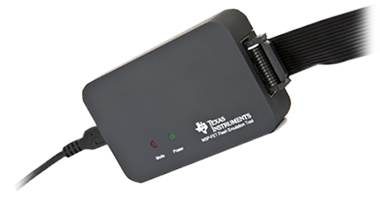
Figure 4. MSP-FET.
Most Xilinx Evaluation Boards now come with a pre-flashed MSP430 image. Note: The exception is MSP430 version May 17th 2017, which is incompatible. If LED DS47 is flashing, the MSP430 has been flash programmed. If you have an older Evaluation Board or have another reason to flash your own, you may do it as follows:
- Attach the MSP-FET Flash Emulation Tool to PC USB and Evaluation Board J92 (on the side of the board with the power switch).
- Install C:\ZynqUS_Demos\tools\MSP430Drivers-1_00_00_01-windows-installer.exe (needed once).
- Run C:\ZynqUS_Demos\tools\FlashMSP430.bat with the board powered on.
1.4.2 Flashing the MSP430 without an MSP-FET cable
[Instructions TBD.]1.5 Common Setup Issues
1.5.1 Most Common Setup Issues
- Incorrect MSP430 software version.
This can be checked in Power Advantage Tool > Select > About
The correct MSP430 software version can be installed per section 1.4
- Incorrect CP210x driver version.
This can be checked at C:\ZynqUS_Demos\ZyqnusPowerToolDeployment\log
Two strings should match
"Silicon Labs Quad CP210x USB to UART Bridge: Interface 3"
"Found MSP430"
If the strings are different, then remove the driver and reinstall per section 1.1 "Silicon Labs" driver
1.5.2 Debug Flowchart
There are many steps to get the typical Power Advantage Tool demonstration set up. It is handy to have a debug guide so the most common setup issues can be resolved quickly. Skip this section and come back to it if you have problems.
Common Setup Issues.
The debug flow asks five questions, and depending on which question fails, there is a series of possible causes to check. Completing this flowchart debugs a full Power Advantage Tool installation.

Figure 5. Debug Flowchart
Test 1: Launch TeraTerm and attach it to the COM Port for Interface 3 at 115200. Press Return and the cursor should advance. Then type @ver and Return. This should return the MSP430 firmware version… If this is okay, the MSP430 is alive. Note: The exception is MSP430 version May 17th 2017, which is incompatible. … Close the TeraTerm to free up the Port for the Power Advantage Tool, and skip to the next test. If this fails…
- Check for the Power Indicator LED’s. If none are lit, check for the Board Power.
- Check for the MSP430 light to be flashing… If it is not, press the MSP430 reset button… If it is still not flashing, perhaps the MSP430 was not flashed, or is bad. Directions how to flash are in section 1.4 "Flashing the MSP430".
Test 2: Launch the Power Advantage Tool from C:\ZynqUS_Demos\ZynqusPowerTool.exe Shortcut. The Power Advantage Tool should produce a Power Report that updates every few seconds… If this is okay, the Power Advantage Tool is alive… Skip to the next test. If this fails…
- If the Power Advantage Tool crashes, there may be an unhandled exception. This will probably be a corner case of a new feature. This may be cleared by rebooting. Please report this one if you get this far in the debug flow, and the problem persists.
- If the Power Advantage Tool runs, but the readings are all 0, this is usually an indication that the Power Monitoring circuits (INA226) are not initialized. The Power Advantage Tool needs to be closed and opened, to initialize the INA226, after any time the Evaluation Board (e.g. ZCU102) is power cycled. Also, make sure the TeraTerm is not open to Interface 3, thus taking the Port. Also, make sure there is not another instance of the Power Advantage Tool running, thus taking the Port.
- If the Power Advantage Tool runs, but the readings are incorrect, this is usually an indication that Linux has corrupted the Power Monitoring circuit initialization. Close and re-launch the Power Advantage Tool after Linux has booted.
- If the Power Advantage Tool runs, but the readings do not update, and everything else has passed this far, it is possible that contention for I2C0 has locked up the Bus. This can be reset by Power Cycling the Evaluation Board. Make sure you close and reopen the Power Advantage Tool to initialize the Power Monitoring INA226’s.
Test 3: Launch TeraTerm windows by running the script C:\ZynqUS_Demos\01_open_terminals_zcu102.ahk. Then power cycle the Evaluation Board (e.g. ZCU102) by the Power Switch. Messages should appear in all three TeraTerm windows… If this is okay, the Zynq device is alive… Skip to the next test. If this fails…
- Check for the SD card inserted.
- Check the Boot Switch Settings
- Try a known good SD card (tested good in a different setup)
- It is possible for the USB UART driver to lock up. Reboot the PC as a last resort.
Test 4: Launch the Terminals demonstration by C:\ZynqUS_Demos\02_demonstration_start_ZCU102.ahk. This should open five PuTTY terminal windows containing Linux apps … If this is okay, it should mostly be working. If this fails…
- If five terminal windows do not open… Check if PuTTY has been installed correctly and PuTTY has been correctly configured for the five applications. Also, the "Terminals" feature may not be available on this demo version or SD. To check, please refer to the release-specific instructions "Running the Pre-Built Power Advantage Tool" on the next wiki page.
- If five terminal windows open but do not connect… Make sure we are using the correct SD card for the scripts. Check the Ethernet cable. Check that the PC has been configured for a Static IP Address 192.168.1.110 (on the correct network interface). There are some Ethernet adapters that are not compatible, and may require an external USB to Ethernet adapter.
Test 5: Launch the Ubuntu demonstration by rebooting from the SD card. This should open the Ubuntu desktop on the DisplayPort terminal. Launching Soft glmark2 from the desktop and run_cube.sh from the Home window should work… If this is okay, it should mostly be working. If this fails…
- If Ubuntu desktop does not open… The "Ubuntu" feature may not be available on this demo version or SD. To check, please refer to the release-specific instructions "Running the Pre-Built Power Advantage Tool" on the next wiki page. If Ubuntu should be supported, try rebooting from the SD card again. It has been noted that occasionally Ubuntu will not boot. If that doesn’t work, check your DisplayPort cable. And perhaps try another demo that uses the DisplayPort monitor to verify the hardware.
- If the Ubuntu desktop opens, but you have no control of the cursor or keyboard, check the USB cables, mouse, and keyboard. Check the USB jumpers.
Related Links
Home Previous Next© Copyright 2019 - 2022 Xilinx Inc. Privacy Policy