Table of Contents
Introduction
This wiki shows how to create a custom layer in an open source Xilinx Yocto flow. After creating the layer, it provides an example of creating your own machine based on a ZCU102 configuration.
Releases Supported
Xilinx Yocto rel-v2018.1 and later (Rocko 2.4)
Prerequisites
Yocto Supported Linux Distro
- Dedicated or virtual Linux machine
- Yocto Project Reference Manual: Supported Linux Distributions
Xilinx Tools Dependencies (rel-v2018.2
rel-v2018.2- Install
xvfb(X virtual framebuffer) see UG1144 Table 2-1 - XSDK or XSCT Installation (required for
meta-xilinx-toolslayer)
Xilinx Open Source Yocto Installation
Xilinx Tools Path
Don't forget to edit the path and version variables in local.conf to point to the current SDK root directory.
Creating Your Custom Layer
You may create your custom layer manually by copying an existing layer.conf, however, Yocto provides some helper scripts to automate it. The bitbake-layers create-layer script will generate a base layer with a default priority of 6. Once the layer is created, you can either add the layer to bblayers.conf manually or use the bitbake-layers add-layer to automate it. Note that adding it manually will be faster, but may increase the likelihood of typos or syntax errors. The sequence below is an example of how to apply these scripts. You may cut-and-paste the commands below into a local script to further automate this flow. The resulting layer.conf and bblayers.conf are shown below.
export LAYER=example # your layer name goes here
# From Yocto root directory
source setupsdk
# Optional: Make a backup copy of bblayers.conf
cp conf/bblayers.conf conf/bblayers.conf.bk
# Optional: Make a backup copy of local.conf
cp conf/local.conf conf/local.conf.bk
# Add a default MACHINE in local.conf or specify on the command line for bitbake-layers
echo 'MACHINE ?= "zcu102-zynqmp"' >> conf/local.conf
# Create your layer in the sources directory
cd ../sources
bitbake-layers create-layer meta-$LAYER
# Add new layer with bitbake-layers or edit bblayers.conf manually
cd ../build
bitbake-layers add-layer ../sources/meta-$LAYER
# Create your custom layer directory structure
cd ../sources/meta-$LAYER
mkdir -p conf/machine recipes-kernel/linux recipes-bsp/u-boot/u-boot-xlnx
mkdir -p recipes-bsp/device-tree/files recipes-bsp/hdf/files recipes-bsp/fsbl/files recipes-bsp/pmu-firmware/files
layer.conf
In releases rel-v2018.1 and rel-v2018.2, edit conf/layer.conf. If there is a double backward slash “\\” in the BBFILES variable, delete one backward slash, so there is only a single backward slash “\”. This is required for proper line continuation, otherwise your bbappend files will not be found.
# We have a conf and classes directory, add to BBPATH
BBPATH .= ":${LAYERDIR}"

# We have recipes-* directories, add to BBFILES
BBFILES += "${LAYERDIR}/recipes-*/*/*.bb \
            ${LAYERDIR}/recipes-*/*/*.bbappend"

BBFILE_COLLECTIONS += "meta-example"
BBFILE_PATTERN_meta-example = "^${LAYERDIR}/"
BBFILE_PRIORITY_meta-example = "6"
LCONF_VERSION = "7"

BBPATH = "${TOPDIR}"
BBFILES ?= ""

BBLAYERS ?= " \
  /home/emil/yocto/sources/core/meta \
  /home/emil/yocto/sources/core/meta-poky \
<...>
  /home/emil/yocto/sources/core/../meta-xilinx/meta-xilinx-bsp \
  /home/emil/yocto/sources/core/../meta-xilinx/meta-xilinx-contrib \
  /home/emil/yocto/sources/core/../meta-xilinx-tools \
  /home/emil/yocto/sources/core/../meta-petalinux \
  /home/emil/yocto/sources/core/../meta-virtualization \
  /home/emil/yocto/sources/core/../meta-openamp \
  /home/emil/yocto/sources/meta-example \
  "

BBLAYERS_NON_REMOVABLE ?= " \
    /home/emil/yocto/sources/core/meta \
"
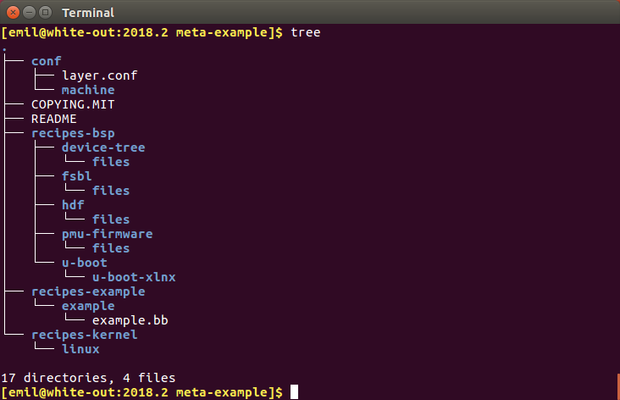
Custom Layer Directory Structure
After the directory structure is created, you can begin populating the layer with recipes, bbappends, patches, cfg fragments, machine configs, etc. The example.bb recipe is an artifact of the create-layer and can be safely deleted. You can continue expanding your layer to include recipes for custom BSPs, applications and other open source components or stacks. At this point, it's pretty straight forward to put your layer under Git control.
Verify Your Layer
You can verify that your custom layer has been properly added to the Yocto build system by running bitbake-layers show-layers as shown below.
$ bitbake-layers show-layers | grep meta-example
meta-example          /home/emil/yocto/sources/meta-example  6
Removing Your Layer
To remove a layer, you can either manually edit the bblayers.conf or use the bitbake-layers remove-layer script as shown below from the build directory.
$ bitbake-layers remove-layer meta-example
Creating a New Machine Configuration
Now lets create a machine configuration that inherits all of the defaults from the zcu102-zynqmp machine. The name of this new machine will be the tuple example-zcu102-zynqmp. In the conf/machine directory of your custom layer, create a machine configuration file named example-zcu102-zynqmp.conf with the require statement below . This will include all of the defaults from the zcu102-zynqmp. At this point you can customize the machine by adding new properties or overriding any of the zcu102-zynqmp defaults.
require conf/machine/zcu102-zynqmp.conf
Now you can build your new machine by specifying the MACHINE variable on the bitbake command line.
$ MACHINE=example-zcu102-zynqmp bitbake petalinux-image-minimal
bitbake
Make sure you have sourced setupsdk and you are in the build directory when bitbaking.