This instruction page has been tested only on the Ultra96 v2 and Bus Pirate (official Seeed Studio) v3.6
Table of Contents
Document History
| Date | Version | Author | Description of Revisions |
| Sep 21, 2020 | jerrywo | Created |
Power Advantage Tool Hardware
Power Advantage Tool Parts
Power Advantage Tool Fabrication

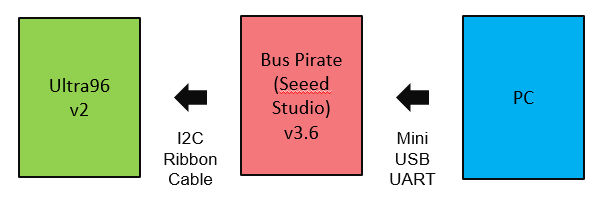
- Ribbon Cable: Strip 5” length to female pin sockets, solder darkest wire to Ultra96 GND, brightest wire to SCL (CLK), and mid wire to SDA (MOSI)
- Bus Pirate (Seeed Studio) v3.6: Attach female ribbon cable sockets to Bus Pirate connector GND pin 10, CLK (SCL) pin 4, and MOSI (SDA) pin 3
- Velcro dots: Mount Bus Pirate to back side of Ultra96
- Mini USB: Attach to Bus Pirate to PC. This powers the Bus Pirate via USB power.
Power Advantage Tool
Launching the Power Advantage Tool Control Console
If you have connected Bus Pirate Mini USB (UART) to PC for the first time, or switched boards, you may need to wait a few minutes for the PC to recognize the new hardware. Then you can open the Power Advantage Tool.
In a few seconds, you should see a Power Advantage Tool Control Console window with a Power Report. The Power numbers should update every few seconds.
If it is not displayed properly, refer to “Common Setup Issues”, and debug until the “Power Advantage Tool is alive” before returning here to continue.
The Power Advantage Tool now takes control of the APU serial port if available. To give user control of the APU terminal, close the Power Advantage Tool, then launch the following script to open terminals, then open the Power Advantage Tool again. The Power Advantage Tool will complain that "No APU UART available", but just close that message.

Launching the Power Advantage Tool Control Console
If you have connected Micro USB (UART) (J83) to PC for the first time, or switched boards, you may need to wait a few minutes for the PC to recognize the new hardware. Then you can open the Power Advantage Tool.
In a few seconds, you should see a Power Advantage Tool Control Console window with a Power Report. The Power numbers should update every few seconds.
If it is not displayed properly, refer to “Common Setup Issues”, and debug until the “Power Advantage Tool is alive” before returning here to continue.
Getting to Know the Power Advantage Tool Control Console
After successfully launching the Power Advantage Tool, you should see the following Power Advantage Tool Control Console window (may take a few seconds):
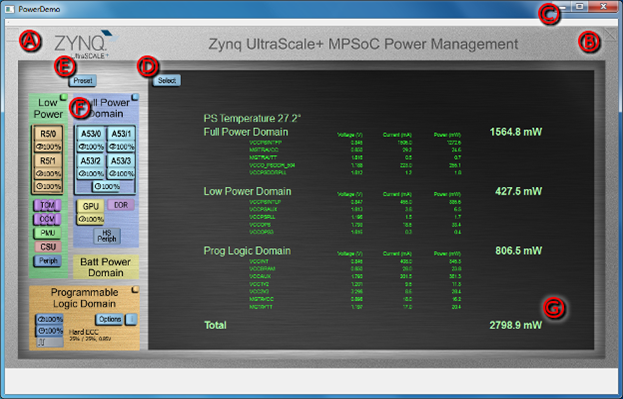
Figure 1. Power Advantage Tool Control Console
This interface is important to most of the demonstrations, so it would be good to familiarize yourself with it. Take a moment to identify the following:
- Zoom Display (transparent button [ ]) (A) resizes to fill a 1920x1080 display.
- Close (transparent button [X]) (B)
- Minimize (C)
- Select (D) Selects the display mode (Rails, Plot, About contains the version number)
- Preset (E) Not supported in this version.
- Block Diagram of Zynq (F) shows the current device state.
- Power Totals for various domains (G) (Note: There can be a few seconds delay for measurement and update.)
Here is a Table of the Rails for Ultra96:
- VCCINT – PL Core Rail
- VCCAUX – Auxiliary Circuits
- VCC3V3 – Main PMBUS Utility Rails
- VCCINTFP – Core Full Power Domain
- VCCO_HP – PS DDR Controller IO
- VCCPSINTLP – Core Low Power Domain
- VCCPSAUX – Aux and GPIO
It is a power advantage to be able to turn off unused circuitry. The more power islands and domains you have, the more flexibility you have to save power.
Islands are power switched internally to the Zynq UltraScale+ MPSoC, whereas Domains are powered externally to the Zynq device. When Domain or island switching can be done, this has the advantage of drawing no power by being able to completely turn off a portion of the silicon device.
Switching off domains can clear the program memory until reboot.
Direct GUI power domain control is not supported in this version.
Selecting Displays
Pressing the Select button gives a menu to select from various displays:
- Plot: Graphically displays the power for each of the three domains and total power.

Figure 4. Plot.
- Rails: This is the default display. Rails displays the voltage and power for each of the rails, as well as the chip temperature, and the total power. The power measurements are made external to the Zynq by TI INA226 chips.
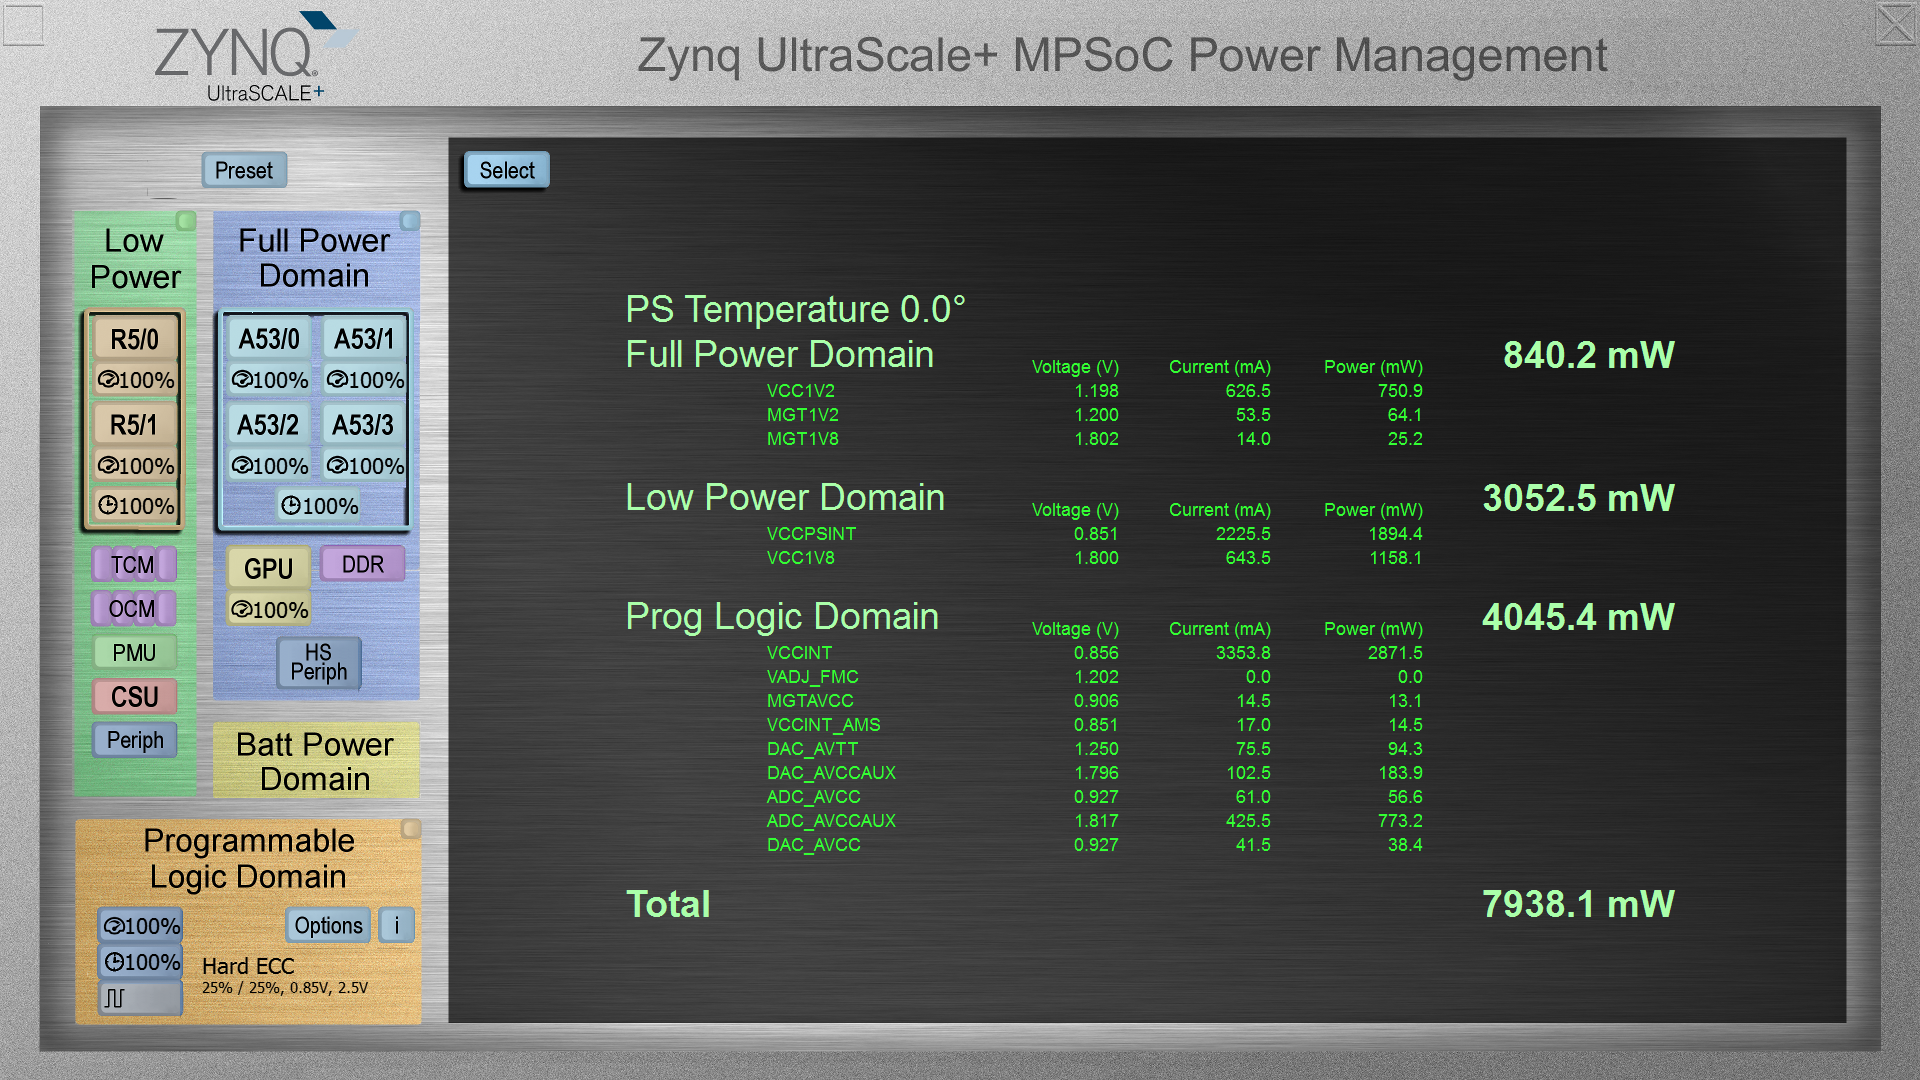
Figure 5. Rails.
- Sysmon: Display temperature and voltages read from Sysmon.
- Legend: This page defines each of the Zynq rails.
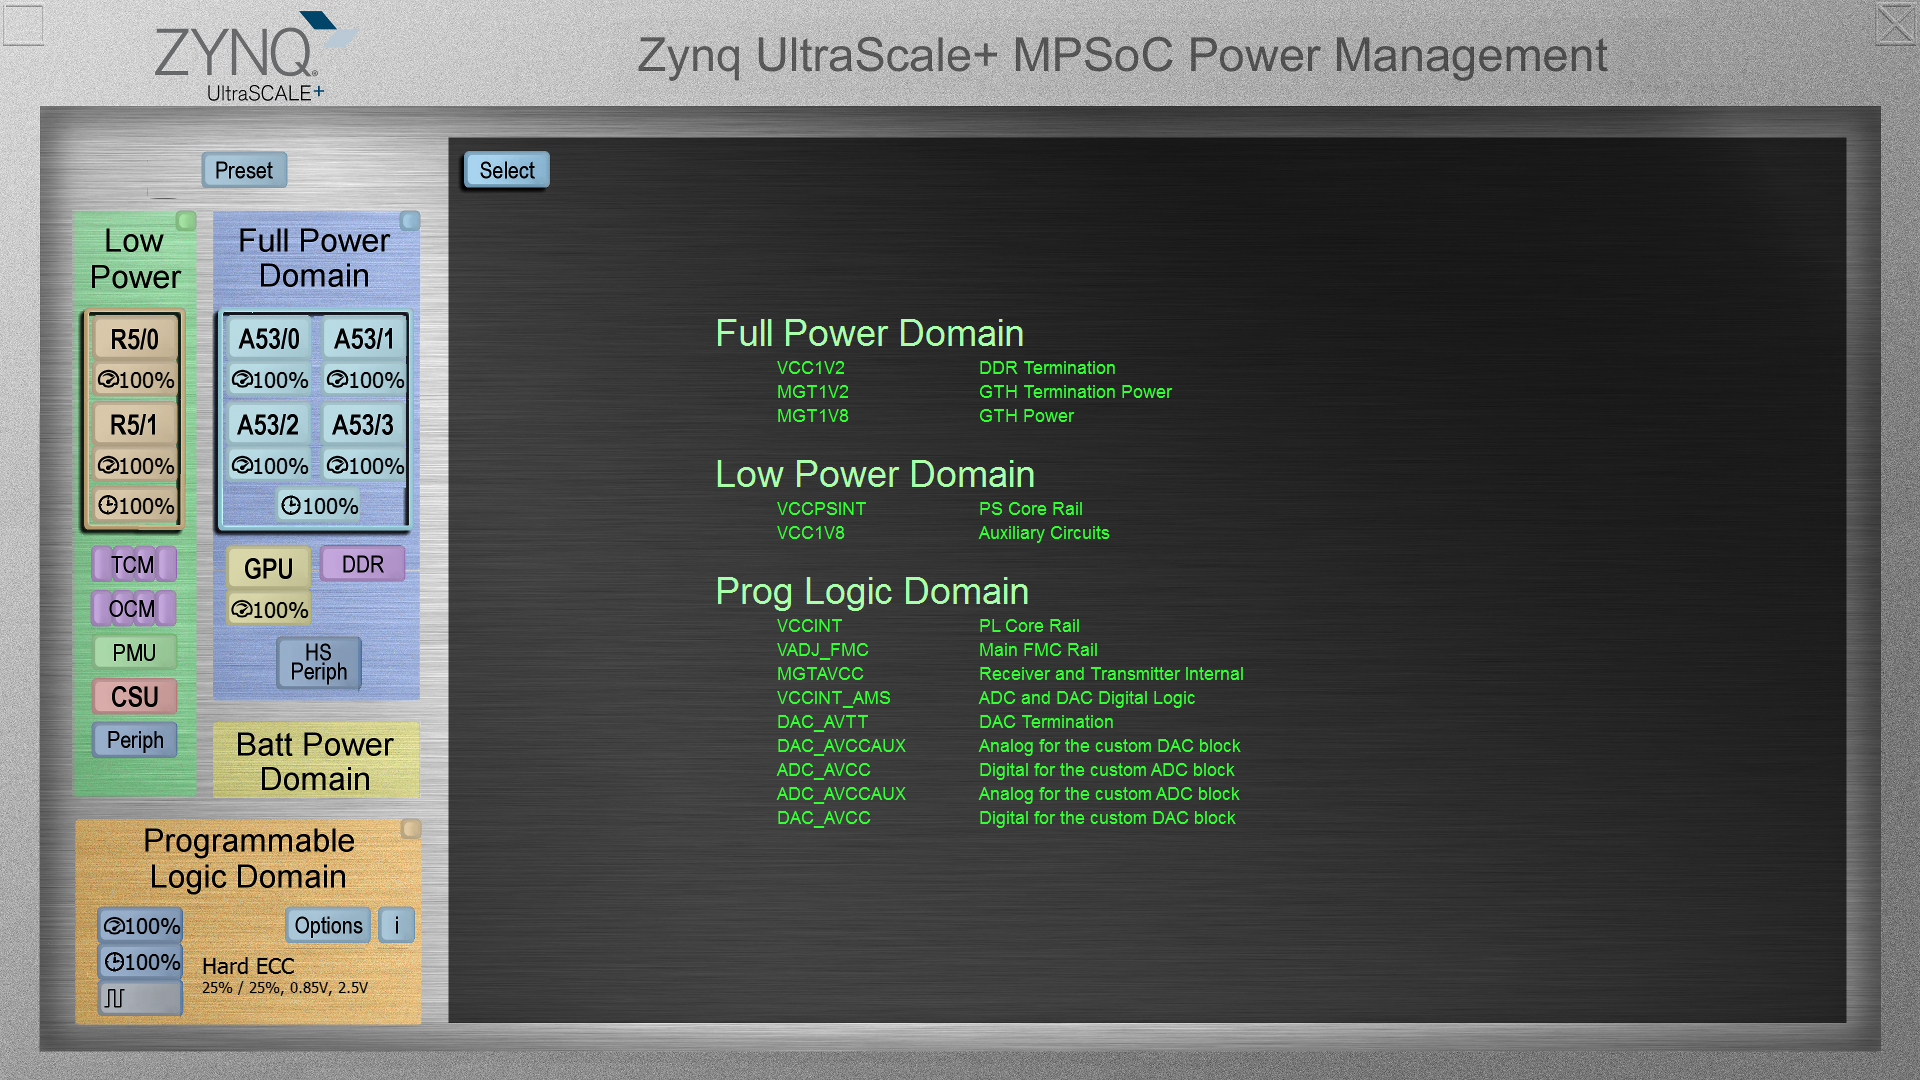
Figure 6. Legend.
- About: This page contains the legal notice, as well as the software revisions for Qt and MSP430 code.
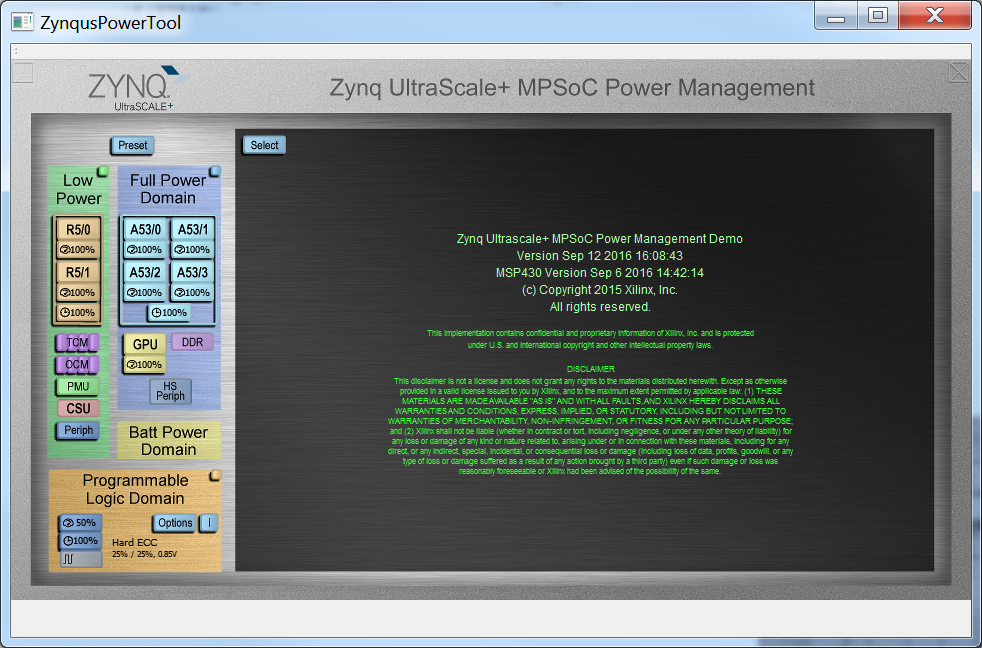
Figure 7. About.