In this simple demo, we will learn how we can use the JTAG to AXI to peek and poke registers of IP in the PS and the PL. I will be using the ZCU102 board. However, this would apply for any Zynq ultrascale device.
We will also discuss how we can use this feature in a TCL script in order to automate testing.
Hardware Design:

Here, I have added the JTAG to AXI IP from the IP catalog and have connected this master to the AXI GPIO, and to the slave port on the PS. The Address map for the JTAG to AXI master is seen below:
Note: I am using the Clock and Reset from the Zynq PSU block for the IP in the PL. I used the board settings for the ZCU102 and made slight changes to enable the slave ports, and disabled the master ports.
I will use the FSBL to config the PSU. The FSBL will also toggle the PS to PL reset.
Software Design:
Since I need to configure the PSU. I will export to SDK, and create an FSBL. I then used the create boot image GUI to create the BOOT.BIN file that contains the bitstream and the fsbl.elf.
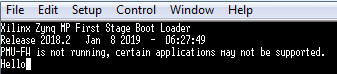
Place the BOOT.BIN onto an SD Card, and boot:

Connecting to Vivado Hardware Manager:
In Vivado, select Open Hardware Manager → Open New Target → Open New Target → Next
Note: If you are doing a remote connection, then make sure you have a hw_manager running on the local machine, and add relevant info into the Hardware Sever Settings GUI
Note: this can also be done via the TCL console:
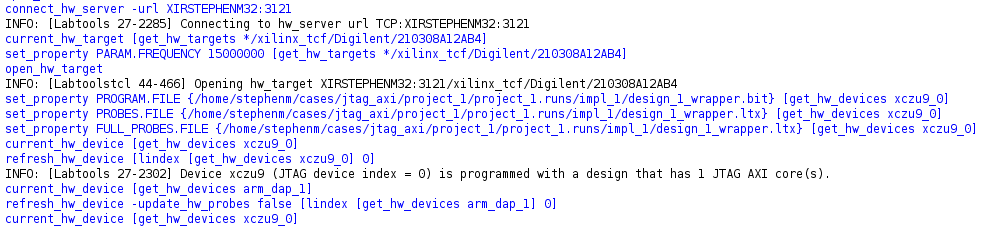
If connection is successful you should see the following (where the highlighted is the jtag to axi instance):

Testing the IP over JTAG to AXI:
To do a simple poke of a register, the user can follow the examples on page 19 in the link here. For example, lets turn on the LED:
create_hw_axi_txn -force wr_txn0 [get_hw_axis hw_axi_1] -address 80000000 -data {00000001} -len 8 -size 32 -type write
run_hw_axi wr_txn0
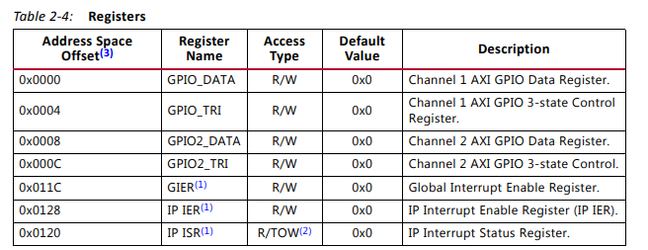
Note: Here, I am writing 0x1 to the data register of the AXI GPIO at address 0x80000000:
Note: The default state of the pins are output pins, so I dont need to set the pins to output.
Users can also access IP in the PS, as the JTAG to AXI master is connected to the Slave port on the Zynq PSU. For example, lets write to the TX FIFO of the UART 0:

create_hw_axi_txn -force wr_txn1 [get_hw_axis hw_axi_1] -address $address -data $char -len 1 -size 32 -type write
run_hw_axi wr_txn1
Creating proc's fro read and write:
Users can wrap these commands above in a TCL procedure that can be used within a script. For example, below is a read and write proc:
proc write {address value} {
	set address [string range $address 2 [expr {[string length $address]-1}]]
	create_hw_axi_txn -quiet -force wr_tx [get_hw_axis hw_axi_1] -address $address -data $value -len 1 -size 32 -type write
	run_hw_axi -quiet wr_tx
}

proc read {address} {
	set address [string range $address 2 [expr {[string length $address]-1}]]
	create_hw_axi_txn -quiet -force rd_tx [get_hw_axis hw_axi_1] -address $address -len 1 -size 32 -type read
	run_hw_axi -quiet rd_tx
	return 0x[get_property DATA [get_hw_axi_txn rd_tx]]
}
For example, lets do a read and write on the AXI GPIO:
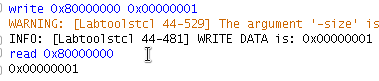
User can also create procs to test individual IP. For example to toggle the LED, we can use the read/write procs created above in our proc:
proc test_gpio {gpio} {
	while {1} {
		write $gpio 0x00000001
		after 1000
		write $gpio 0x00000000
	}
}
The same can be applied to test the UART:
proc string2hex s {
    binary scan [encoding convertto utf-8 $s] H* hex
    regsub -all (..) $hex {\1 }
}

proc print {uart string} {
	set address [string range $uart 2 [expr {[string length $uart]-1}]]
	set hex_string [split [string trim [string2hex $string]] " "]
	foreach char $hex_string {
		write $uart 000000$char
		after 100
	}
}
For example to test, use the command below:
print 0xff000030 "Hello"
File used in this demo can be downloaded from below: