Table of Contents
Overview of the PetaLinux design flow with Vivado on Zynq
Linux made easy:The PetaLinux Solution
PetaLinux Tools offer everything necessary to customize, build and deploy Embedded Linux solutions on Xilinx processing systems. Tailored to accelerate design productivity, the solution works with the Xilinx hardware design tools to ease the development of Linux systems for Zynq®-7000 SoCs, MicroBlaze and PowerPC.
PetaLinux consists of three key elements: pre-configured binary bootable images, fully customizable Linux for the Xilinx device, and PetaLinux SDK which includes tools and utilities to automate complex tasks across configuration, build, and deployment.
Visit the PetaLinux wiki page for more details.
Tools Installation & Setup
The Xilinx Vivado (with SDK) and PetaLinux tools and BSPs must be installed prior to any design development. Download and Install Vivado and PetaLinux SDK.Refer to the PetaLinux SDK Installation Guide for more information on installing the tools and BSPs.
Quickstart Using PreBuilt library with QEMU / Hardware
The PetaLinux installation comes with pre-built images that you can test in simulation (QEMU) or on hardware. Refer to the PetaLinux Getting Started user guide for more detailed information.Once the PetaLinux tools and BSPs are installed:
- Setup the environment:
$ source <path-to-installed-PetaLinux>/settings.sh
- Create a project (This command will create a new PetaLinux project folder from a default template)
$petalinux-create --type project --template zynq --name <project root>
- With QEMU: Change to the project directory and boot the prebult linux kernel image
$ petalinux-boot --qemu --prebuilt 3
OR
- With Hardware: Connect the JTAG port, serial port, ethernet port on your board and workstation; set the mode switches on the board to JTAG mode
- Start a serial communication program (kermit, minicom etc) with baud rate set to 115200
- Run petalinux-boot
$ petalinux-boot --jtag --prebuilt 3
Replace the PetaLinux Kernel/U-boot with Your Own Source
- Create the following directory in your local project as follows:
- Put your Linux source into that directory. E.g.:
- Run “petalinux-config” to select the Linux kernel you want.
Alternatively, you can put the Linux source outside the project:
- Create following directory:
- Put your Linux source into that directory. E.g.:
- Add “<SOME_PLACE_ON_YOUR_HOST>/components/” to your components search path as follows:
- Run “petalinux-config” to select the Linux kernel you want
The XilinxTools Design Flow
The figure shows a high level block diagram of the design flow using Vivado (v2014.x) and PetaLinux (v2013.10).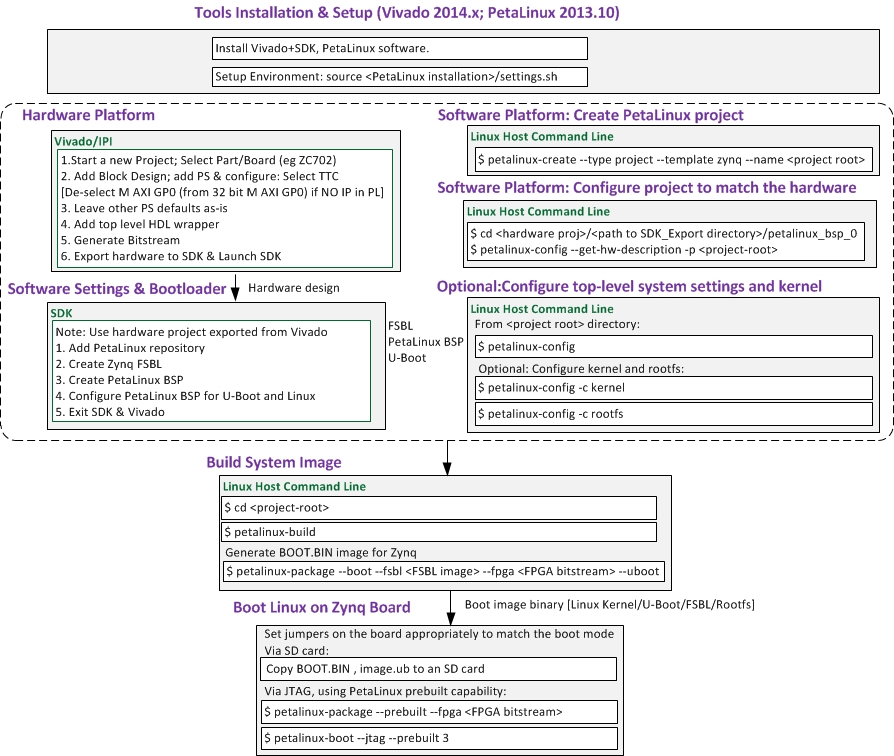
Tools Installation & Setup
The Xilinx Vivado (with SDK) and PetaLinux tools must be installed prior to any design development. Download and Install Vivado and PetaLinux SDK.Refer to the PetaLinux SDK Installation Guide for more information.
Hardware Platform
Create a hardware platform from within a Vivado/IPI project.For Xilinx development boards (e.g. ZC702, ZC706, ZedBoard), predefined "Presets" are provided.Ensure that the hardware and software platform configurations are properly set to make the system Linux ready.
Create programmable logic design as well; and generate a complete hardware design bitstream.
The design is now ready to be exported to SDK. Launching SDK from within this environment ensures that the correct hardware platform is used for the next stage.
Refer to the" Hardware Platform" section of the PetaLinux SDK Board Bringup Guide for more detailed information.
Software Settings and Bootloader
The Linux BSP for the hardware platform previously designed (and exported from Vivado IPI) is configured to automate the Linux board bringup.At this stage a PetaLinux BSP is created and configured for U-Boot,and the Zynq FSBL is generated.
Refer to the "Configuring Software Settings and Bootloader" section of the PetaLinux SDK Board Bringup Guide for more detailed information.
Software Platform
Create a new PetaLinux SDK software platform, ready to build a Linux system customised to the new hardware platform.This software platform is then customised to precisely match the hardware system developed previously, by copying and merging platform configuration files.
PetaLinux provided commands are used to accomplish this.
Build the System Image to generate the kernel image using the PetaLinux "petalinux-build" command.
A bootable "BOOT.BIN" image is generated which can be used to boot the system image on the board.
Boot Linux on Zynq
After the hardware bitstream and software images have been built, test the new PetaLinux platform by booting the Zynq kernel.This can be done using JTAG or SD card.
Refer to the "Boot System Image on Board" section of the PetaLinux SDK Board Bringup Guide for more detailed information.
Related Links
- Title 1 & Link 1
- Title 1 & Link 1