Yocto 2017.1 Linux Image creation for ZCU102
This article is a complete flow to create a Linux image for the ZCU102 using Yocto 2017.1. This is aimed to fast-track novices to Linux, as the article details all the steps from
setting up the Virtual Machine, installing Ubuntu 16.04, installing all the libraries, and tools needed to use Yocto.Table of Contents
Introduction
There are some files mentioned in this article. These can be found here
yocto_ubuntu.zip
yocto_ubuntu.zip
- This flow has been validated in Yocto 2018.1
- Note: The installation of the Virtual Machine is given as a guide only. Users will need to check with their IT dept on installation guidelines.
Download the 16.04 Ubuntu ISO:
This can be obtained from hereInstalling and configuring Virtualbox:
Virtualbox can be downloaded from here.Launch Virtualbox, and select New:
In Settings -> Storage -> Optical drives. Select the disk icon and point to the ISO downloaded in the previous step.
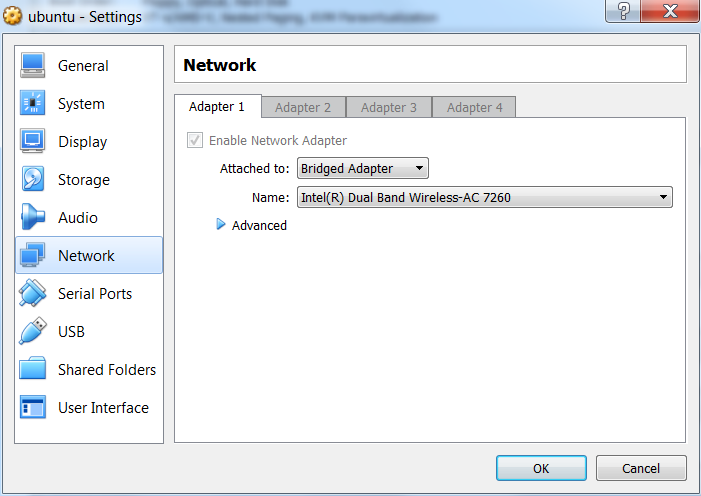
In Settings -> Network, change to Bridged Adapter. This will send all the packets to the VM:
Install Ubuntu:
Boot, and Install Ubuntu. The user will need to choose the storage size. 100G is recommended.Network Setup:
Once installed, go to Settings -> Network and under the Network Proxy, set the HTTP Proxy and the HTTPS Proxy.Note: you may need to contact your IT dept for help here.
To verify if your proxy is set correctly, you can run a "wget www.xilinx.com" (or any website) from the terminal.
Shared folder Setup:
We need to be able to share files from Host to the Guest OS. So we need to add the Guest Additions.Devices -> Insert Guest Additions ..
Reboot
Next, go to Devices -> Shared Folders, and point to your shared folder to Transient Folders.
Note the Folder Name as this will be used later.
From Terminal:
- mkdir shared_folder
- sudo ln -f -s /opt/VBoxGuestAdditions-5.1.xx/lib/VBoxGuestAdditions/mount.vboxsf /sbin/mount.vboxsf
- sudo mount -t vboxsf -o uid=1000,gid=1000 Folder Name /home/<USER>/shared_folder
SDK 2017.1 install:
Users need to install SDK, as Yocto needs to use XSCT and BootGenOpen Firefox and go to Xilinx.com and go to the Support -> Downloads & Licensing. Click on the Embedded Development tab and install the
SDK 2017.1 web install for Linux 64
- cd ~/Downloads
- chmod +x Xilinx_SDK_2017.1_XXXX_Lin64.bin
- ./Xilinx_SDK_2017.1_XXXX_Lin64.bin
Note: To remove SDK, use the command below:
- sudo /opt/Xilinx/.xinstall/SDK_2017.1/xsetup -uninstall
If you want to launch the SDK GUI, you will need to call the command here:
- source /opt/Xilinx/SDK/2017.1/settings64.sh
- Make sure you can launch XSDK, as this is used to create the PMUFW/FSBL
- You may need to chown -R <USER> /home/<USER>
You can also add the tools to the path:
- export PATH=$PATH:/opt/Xilinx/SDK/2017.1/bin
Note: you will need the libs mentioned here to compile a Microblaze app:
- sudo apt-get update
- sudo apt-get install libc6-i386
- sudo apt-get install lib32z1
- sudo apt-get install lib32stdc++6
Install Required Packages:
Open a terminal, and use the commands below:
- sudo apt-get update
- sudo apt-get install git
- sudo apt-get install chrpath
- sudo apt-get install texinfo
- sudo apt-get install gawk
- sudo apt-get install curl
- sudo apt-get install xvfb
- sudo chown <USER> /bin
- sudo curl -k http://commondatastorage.googleapis.com/git-repo-downloads/repo > /bin/repo
- You can add this to the PATH
- export PATH=$PATH:/bin
- repo --help
- sudo chmod a+x /bin/repo
- sudo apt-get install socat
- sudo apt-get install dos2unix
- sudo apt-get install libc6-i386
- sudo apt-get install lib32z1
- sudo apt-get install lib32stdc++6
GIT proxy setup:
git config --global user.email name@email.comgit config --global user.name "Name Surname"
If you are behind a firewall, then the proxy settings should be setup similar to below. However, it is recommended
that you work with your company IT dept if this is the case.
Create a git_source.sh file:
- mkdir yocto
- cd yocto
- cat > git_source.sh
- export http_proxy=http://proxy:<port>
- export https_proxy=https://proxy:<port>
- export ftp_proxy=ftp://proxy
- export GIT_PROXY_COMMAND=/home/<USER>/yocto/git_proxy
- git config --global core.gitproxy /home/<USER>/yocto/git_proxy
- Ctrl + d
- chmod 777 git_source.sh
Create a git_proxy file
- cat > git_proxy
- exec socat STDIO SOCKS4A:proxy.example.com:$1:$2,socksport=1080
- Ctrl + d
- chmod 777 git_proxy
Users should reference this page here for help on setting this up
Source the commands below on the terminal:
- source git_source.sh
Download Yocto 2017.1:
- repo init -u git://github.com/Xilinx/yocto-manifests.git -b rel-v2017.1
- repo sync
- repo start rel-v2017.1 --all
- source setupsdk
- we need to update the build/conf/local.conf to include the following:
- HDF_BASE = "file://"
- HDF_PATH = "/home/<USER>/shared_folder/design_1_wrappper.hdf"
- XILINX_VER_MAIN = "2017.1"
- EXTERNAL_TOOLCHAIN_microblaze = "/opt/Xilinx/SDK/2017.1/microblaze/linux_toolchain/lin64_le"
- XILINX_SDK_TOOLCHAIN = "/opt/Xilinx/SDK/2017.1"
- MACHINE = "zcu102-zynqmp"
- You can use the local.conf as reference in the folder delivered with this tutorial here
- You will need to convert this to unix using dos2unix.
- cp -f /home/<USER>/shared_folder/local.conf conf
- bitbake petalinux-image-minimal
- You can run a specific task such as the fsbl using the command
- bitbake virtual/fsbl
- you can get these commands by looking in the respective recipe .bb for the “PROVIDES”
- If "bitbake petalinux-image-minimal" command fails for whatever reason and the logs don’t help, try to run the last task manually to get a better idea of the issue.
Create Flattened Image Tree:
Next, we can create a FIT (Flattened Image Tree) Image with the Kernel, devicetree, and the rootfs created in Yocto. These can be found in the deploy folder (/tmp/yocto/2018.1/zcu102-es2/deploy/images/zcu102-zynqmp).User can copy these to a local directory. For example:
- mkdir complete_images
- cd complete_images
- cp (/tmp/yocto/2017.1/zcu102-es2/deploy/images/zcu102-zynqmp/Image .
- cp (/tmp/yocto/2017.1/zcu102-es2/deploy/images/zcu102-zynqmp/zcu102-zynqmp-system.dtb .
- cp (/tmp/yocto/2017.1/zcu102-es2/deploy/images/zcu102-zynqmp/petalinux-image-minimal-zcu102-zynqmp.cpio.gz .
- cp (/tmp/yocto/2017.1/zcu102-es2/deploy/images/zcu102-zynqmp/BOOT.bin .
A template FIT (fitImage.its) is delivered with this tutorial, it can be copied here too (remember to change to unix)
We need to use the mkimage delivered in u-boot-tools package to build the ITB:
- sudo apt-get update
- sudo apt-get install u-boot-tools
- sudo apt install device-tree-compiler
- cd complete_images
- mkimage -f fitImage.its image.ub
- Note: If you are copying fit from Windows machine, make sure that it is converted to Unix format.
Boot from SD Card:
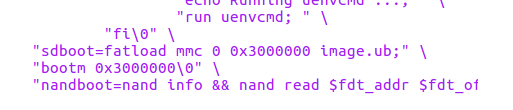
Place the BOOT.bin and image.ub onto the SD card and boot u-boot. You will then need to use the command below to boot the kernel:- fatload mmc 0 0x3000000 image.ub
- bootm 0x3000000
- We can also add this to the uboot (/tmp/yocto/2017.1/zcu102-es2/work/zcu102_zynqmp-xilinx-linux/u-boot-xlnx/v2017.1…./git/include/configs/zilinx_zynqmp.h)
Then do a recompile:
- bitbake -c compile virtual/bootloader
- bitbake petalinux-image-minimal
Place the updated BOOT.bin from the deploy/images/zcu102-zynqmp folder onto the SD card, and boot. Here, the kernel will autoboot.
Update Recipe to add Patch for Uboot:
Instead of manually hacking the u-boot as I did, a better way would be to create a git patch, and add this to the recipe. To do so, you need to create the patch first using git diff against the tag.For example:
- cd /tmp/yocto/2017.1/zcu102-es2/work/zcu102_zynqmp-xilinx-linux/u-boot-xlnx/v2017.1¡K./git
- Make the changes mentioned above to the xilinx_zynqmp.h
- To see the tag, use the command git describe --tags
- To see the changes against the tag, use the command git diff xilinx-v2017.1
- To create the patch, use the command git diff xilinx-v2017.1 > sdboot_mod.patch
- cd /home/<USER>/yocto/sources/meta-xilinx/recipes-bsp/u-boot
- mkdir files
- cp sdboot_mod.patch /home/<USER>/yocto/sources/meta-xilinx/recipes-bsp/u-boot/files
- cat > u-boot-xlnx_%.bbappend
- SRC_URI_append = " file://sdboot_mod.patch"
- FILESEXTRAPATHS_prepend := "${THISDIR}/files"
- Ctrl + d
- bitbake -c clean virtual/bootloader
- bitbake -c compile virtual/bootloader
- bitbake -c clean petalinux-image-minimal
- bitbake petalinux-image-minimal
Place the BOOT.bin and image.ub onto the SD card and boot.
Booting ZCU102 on QEMU:
Go to the Local.conf and un-comment the lines below:#XILINX_QEMUBOOT = "1" #XILINX_QEMUBOOT_MULTI = "1" #QB_OPT_XILINX_PMU_ROM = "/home/$USER/Yocto/pmu_rom_qemu_sha3.elf"
This can be copied to the Yocto folder.
Rebuild image:
- bitbake petalinux-image-minimal
To boot QEMU, use the command below:
- runqemu zcu102_zynqmp
To kill the QEMU, use the command:
- Ctrl A +x
Execute Baremetal Hello World on CortexA53 on QEMU:
To boot QEMU, use the command below:- runqemu zcu102_zynqmp qemuparams="-gdb tcp::1137"
To Launch SDK, use the commands below:
- source /opt/Xilinx/SDK/2017.1/settings64.sh
- xsdk
Create a workspace. Select Application Project. In the Hardware Platform, select New, and Browse to the HDF file in /home/$USER/shared_folder.
Create a Hello World Application from the templates, and Finish.
Launch XSCT from a terminal (xsct), and use the command below:
- gdbremote connect:1137
- connect -l
- connect -l is to get the connection info
In SDK, under Target Connection. Drop down the QEMU TcfGdbClient Server, and either create a new connect, or edit the existing one.
set the Host to localhost, and the Port is the port obtained from connect -l is previous step:
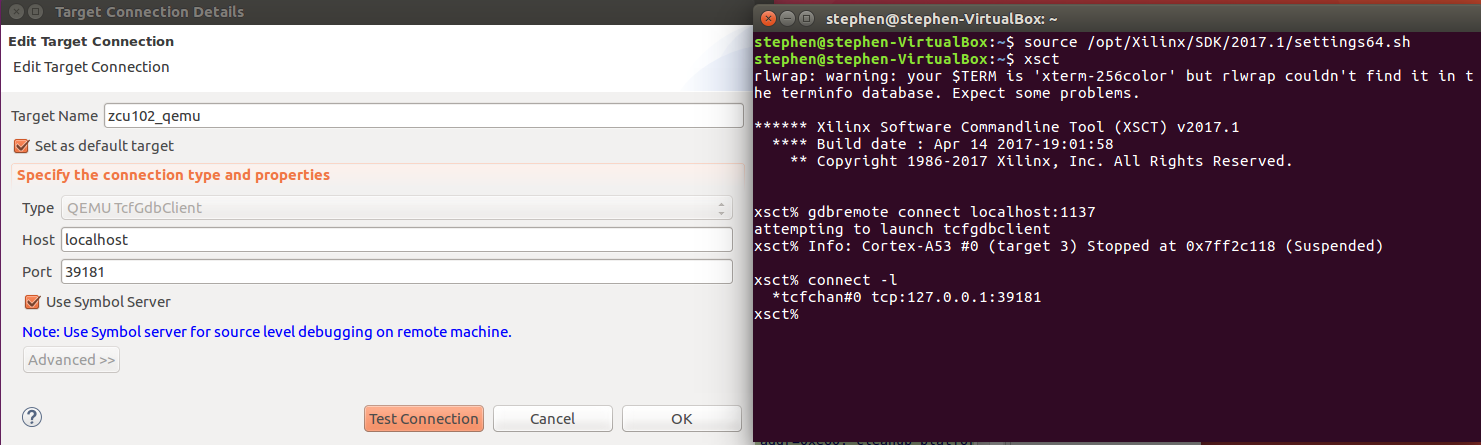
Use the Test Connection to verify that this is setup correctly
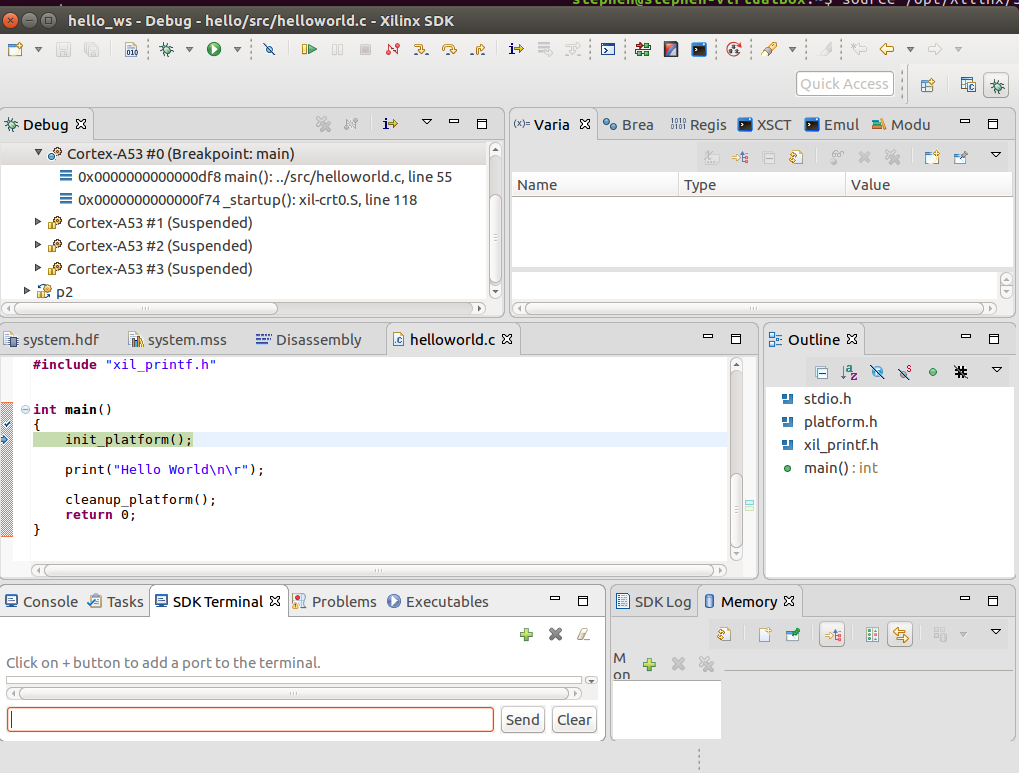
Right Click on the Hello World application in SDK Project Explorer, and select Debug -> launch on Hardware (System Debugger on QEMU).
This will launch the debug perspective and allow the user to debug:
© Copyright 2019 - 2022 Xilinx Inc. Privacy Policy