This page provides all the information related to Design Module 7 - VCU TRD Xilinx low latency(LLP2) PS DDR NV12 HDMI design.
Table of Contents
1 Overview
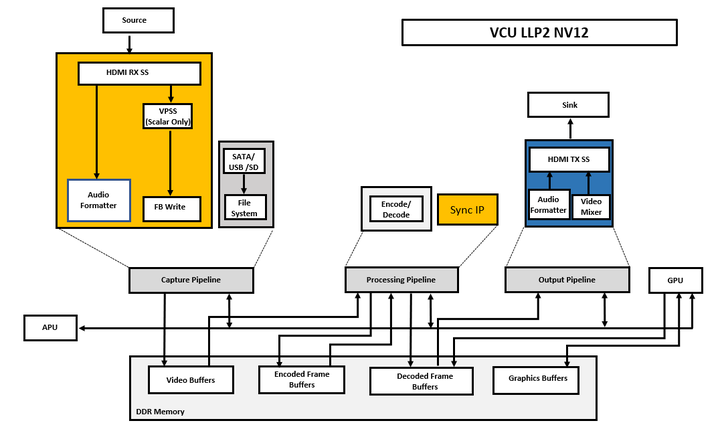
This module enables capture of video and audio data from an HDMI-Rx subsystem implemented in the PL. The video and audio data can be displayed through the HDMI-Tx subsystem implemented in the PL. The module can stream-out and stream-in live captured video and audio through an Ethernet interface at ultra-low latencies using Sync IP. This module supports four video streams using AXI broadcaster at capture side and mixer at display side for NV12 pixel format. It also supports single-stream audio.
The VCU encoder and decoder operate in slice mode. An input frame is divided into multiple slices (8 or 16) horizontally. The encoder generates a slice_done interrupt at every end of the slice. Generated NAL unit data can be passed to a downstream element immediately without waiting for the frame_done interrupt. The VCU decoder also starts processing data as soon as one slice of data is ready in its circular buffer instead of waiting for complete frame data. The Sync IP does an AXI transaction-level tracking so that the producer and consumer can be synchronized at the granularity of AXI transactions instead of granularity at the video buffer level. Sync IP is responsible for synchronizing buffers between Capture DMA and VCU encoder as both work on same buffer.
The capture element (FB write DMA) writes video buffers in raster-scan order. SyncIP monitors the buffer level while the capture element is writing into DRAM and allows the encoder to read input buffer data if the requested data is already written by DMA, otherwise it blocks the encoder until DMA completes its writes. On the decoder side, the VCU decoder writes decoded video buffer data into DRAM in block-raster scan order and displays reads data in raster-scan order. To avoid display under-run problems, software ensures a phase difference of "~frame_period/2", so that decoder is ahead compare to display.
This design supports the following video interfaces:
Sources:
HDMI-Rx capture pipeline implemented in the PS.
Stream-In from network or internet.
Sinks:
HDMI-Tx display pipeline implemented in the PS.
VCU Codec:
Video Encode/Decode capability using VCU hard block in PS
AVC/HEVC encoding
Encoder/decoder parameter configuration.
Video format:
NV12
Supported Resolution:
The table below provides the supported resolution from command line app only in this design.
Resolution | Command Line | |
Single Stream | Multi-stream | |
4kp60 | √ | NA |
4kp30 | √ | √ (Max 2) |
1080p60 | √ | √ (Max 4 for encoder) (Max 2 for decoder) |
√ - Supported
NA – Not applicable
x – Not supported
When using Low Latency mode (LLP1/LLP2), The encoder and decoder are limited by the number of internal cores. The encoder has maximum of four streams and the decoder has maximum of two streams.
The below table gives information about the features supported in this design.
Pipeline | Video Input | Audio Input | Video Format | Video Output | Audio Output | Resolution | VCU codec |
|---|---|---|---|---|---|---|---|
Serial pipeline | HDMI-Rx | HDMI-Rx | NV12 | HDMI-Tx | HDMI-Tx | 4kp60/4kp30/1080p60 | HEVC/AVC |
Stream-Out pipeline | HDMI-Rx | HDMI-Rx | NV12 | Stream-Out | Stream-Out | 4kp60/4kp30/1080p60 | HEVC/AVC |
Stream-in pipeline | Stream-In | Stream-In | NV12 | HDMI-Tx | HDMI-Tx | 4kp60/4kp30/1080p60 | HEVC/AVC |
The below figure shows the Xilinx Low Latency PS DDR NV12 HDMI design hardware block diagram.
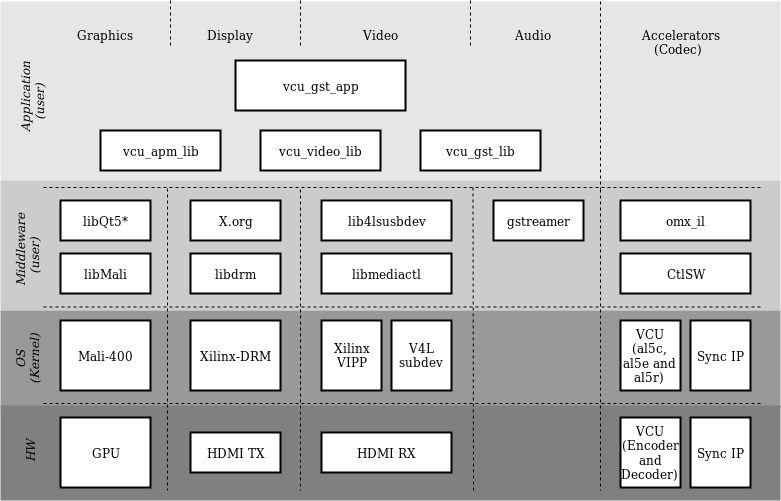
The below figure shows the Xilinx Low Latency PS DDR NV12 HDMI design software block diagram.
1.1 Board Setup
Refer below link for Board Setup
1.2 Run Flow
The TRD package is released with the source code, Vivado project, Petalinux BSP, and SD card image that enables the user to run the demonstration. It also includes the binaries necessary to configure and boot the ZCU106 board. Prior to running the steps mentioned in this wiki page, download the TRD package and extract its contents to a directory referred to as TRD_HOME, which is the home directory.
Refer Section 4.1 : Download the TRD of
Zynq UltraScale+ MPSoC VCU TRD 2020.2wiki page to download all TRD contents.
TRD package contents are placed in the following directory structure. The user needs to copy all the files from the $TRD_HOME/images/vcu_llp2_hdmi_nv12/ to FAT32 formatted SD card directory.
rdf0428-zcu106-vcu-trd-2020.2/
├── apu
│   └── vcu_petalinux_bsp
├── images
│   ├── vcu_10g
│   ├── vcu_audio
│   ├── vcu_hdr10_hdmi
│   ├── vcu_llp2_hdmi_nv12
│   ├── vcu_llp2_hdmi_nv16
│   ├── vcu_llp2_hdmi_xv20
│   ├── vcu_llp2_sdi_xv20
│   ├── vcu_multistream_nv12
│   ├── vcu_pcie
│   ├── vcu_quad_sensor
│   └── vcu_sdi_xv20
├── pcie_host_package
│   ├── COPYING
│   ├── include
│   ├── LICENSE
│   ├── readme.txt
│   ├── RELEASE
│   ├── tests
│   ├── tools
│   └── xdma
├── pl
│   ├── constrs
│   ├── designs
│   ├── prebuild
│   ├── README.md
│   └── srcs
└── README.txt
TRD package contents specific to Xilinx Low Latency PS DDR NV12 HDMI design are placed in the following directory structure.
rdf0428-zcu106-vcu-trd-2020-2
├── apu
│   └── vcu_petalinux_bsp
│       └── xilinx-vcu-zcu106-v2020.2-final.bsp
├── images
│   ├── vcu_llp2_hdmi_nv12
│   │   ├── autostart.sh
│   │   ├── BOOT.BIN
│   │   ├── boot.scr
│   │   ├── config
│   │   ├── image.ub
│   │   ├── system.dtb
│   │   └── vcu
├── pcie_host_package
├── pl
│   ├── constrs
│   ├── designs
│   │   ├── zcu106_llp2_audio_nv12
│   ├── prebuild
│   │   ├── zcu106_llp2_audio_nv12
│   ├── README.md
│   └── srcs
│       ├── hdl
│       └── ip
└── README.txt
Configuration files(input.cfg) for various resolutions are placed in the following directory structure in /media/card.
The single streams configs (
1-1080p60, 1-4kp30 and 1-4kp60) supports Audio and Video both.As llp2 stream-in is not supported with vcu-gst-app, we have added sample shell scripts containing relevant GStreamer commands for all Stream-in use-cases. User can modify the scripts as per convenience, or can directly use GStreamer pipelines provided in this wiki page.
config/
├── 1-1080p60
│   ├── Display
│   ├── Stream-in
│   └── Stream-out
├── 1-4kp30
│   ├── Display
│   ├── Stream-in
│   └── Stream-out
├── 1-4kp60
│   ├── Display
│   ├── Stream-in
│   └── Stream-out
├── 2-1080p60
│   ├── Display
│   ├── Stream-in
│   └── Stream-out
├── 2-4kp30
│   ├── Display
│   ├── Stream-in
│   └── Stream-out
├── 4-1080p60
│   ├── Display
│   ├── Stream-in
│   └── Stream-out
└── input.cfg

24 directories, 1 file
1.2.1 GStreamer Application (vcu_gst_app)
The vcu_gst_app is a command line multi-threaded linux application. The command line application requires an input configuration file (input.cfg) to be provided in the plain text.
Run below modetest command to set CRTC configurations for 4kp60:
$ modetest -D a0070000.v_mix -s 39:3840x2160-60@BG24
Run below modetest command to set CRTC configurations for 4kp30:
$ modetest -D a0070000.v_mix -s 39:3840x2160-30@BG24
Execution of the application is shown below:
$ vcu_gst_app /media/card/config/<path to *.cfg file>
Example:
Make sure HDMI-Rx should be configured to 4kp60 mode, while running below example pipelines.
Low latency(LLP1/LLP2) video and audio+video stream-in pipelines are not supported in vcu_gst_app.
The vcu_gst_app uses RTP+RTCP streaming and opus encoder for LLP1/LLP2 audio+video stream-out use-cases.
All single-stream serial/streaming pipelines have audio configuration ON by default. To execute only display pipeline, change the
Audio Enableproperty toFALSEin the configuration file.
4kp60 NV12 HEVC_25Mbps ultra low-latency(LLP2) audio+video serial pipeline execution.
$ vcu_gst_app /media/card/config/1-4kp60/Display/Single_4kp60_HEVC_25_Mbps.cfg
4kp60 NV12 HEVC_25Mbps ultra low-latency(LLP2) stream-out pipeline execution.
$ vcu_gst_app /media/card/config/1-4kp60/Stream-out/Single_4kp60_HEVC_25_Mbps.cfg
4kp60 NV12 HEVC ultra low-latency(LLP2) video stream-in pipeline execution.
$ sh /media/card/config/1-4kp60/Stream-in/Single_4kp60_HEVC_25_Mbps.sh
OR
$ gst-launch-1.0 udpsrc port=5004 buffer-size=60000000 caps="application/x-rtp, media=video, clock-rate=90000, payload=96, encoding-name=H265" ! rtpjitterbuffer latency=7 ! rtph265depay ! h265parse ! video/x-h265, alignment=nal ! omxh265dec low-latency=1 internal-entropy-buffers=5 ! video/x-raw\(memory:XLNXLL\) ! queue max-size-bytes=0 ! fpsdisplaysink name=fpssink text-overlay=false 'video-sink=kmssink bus-id=a0070000.v_mix hold-extra-sample=1 show-preroll-frame=false sync=true ' sync=true -v
4kp60 NV12 HEVC ultra low-latency(LLP2) audio+video stream-in pipeline execution. where, 192.168.25.90 is server’s IP address.
$ sh /media/card/config/1-4kp60/Stream-in/Single_4kp60_HEVC_Audio_Enabled_25_Mbps.sh
OR
$ gst-launch-1.0 rtpbin latency=7 name=rtpbin udpsrc name=udpsrc_video buffer-size=60000000 caps="application/x-rtp, media=(string)video, clock-rate=(int)90000, encoding-name=(string)H265" port=5004 ! rtpbin.recv_rtp_sink_0 rtpbin. ! rtph265depay ! h265parse ! video/x-h265, alignment=nal ! omxh265dec low-latency=1 ! video/x-raw\(memory:XLNXLL\) ! queue max-size-bytes=0 ! fpsdisplaysink name=fpssink text-overlay=false 'video-sink=kmssink bus-id=a0070000.v_mix hold-extra-sample=1 show-preroll-frame=false sync=true ' sync=true -v udpsrc port=5005 ! rtpbin.recv_rtcp_sink_0 rtpbin.send_rtcp_src_0 ! udpsink host=192.168.25.90 port=5006 sync=false async=false udpsrc name=udpsrc_audio port=5008 caps="application/x-rtp, media=(string)audio, clock-rate=(int)48000, encoding-name=(string)OPUS" ! rtpbin.recv_rtp_sink_1 rtpbin. ! rtpopusdepay ! opusdec ! audioconvert ! alsasink device="hw:1,0" latency-time=5000 buffer-time=10000 udpsrc port=5009 ! rtpbin.recv_rtcp_sink_1 rtpbin.send_rtcp_src_1 ! udpsink host=192.168.25.90 port=5010 sync=false async=false
Above RTP+RTCP audio+video stream-in pipeline is applicable for streaming port = 5004 only. If the streaming port has changed, the respective port changes should be made in the pipeline to work. Refer to port description in streaming configuration parameters to understand how video and audio rtp/rtcp port numbers are assigned in LLL1/LLP2 audio+video stream-out pipelines.
For LLP1/LLP2 Multi-stream HEVC serial and stream-out use-cases (2-4kp30, 2-1080p60, 4-1080p60), use ENC_EXTRA_OP_BUFFERS=10 variable before vcu_gst_app command. The sample pipeline is given below:
$ ENC_EXTRA_OP_BUFFERS=10 vcu_gst_app /media/card/config/2-4kp30/Display/2_4kp30_HEVC_12_5_Mbps.cfg
The above macro is recommended to use for LLP1/LLP2 multi-stream HEVC use-cases only.
To measure the latency of the pipeline, run the below command. The latency data is huge, so dump it to a file.
$ GST_DEBUG="GST_TRACER:7" GST_TRACERS="latency" GST_DEBUG_FILE=/run/latency.log vcu_gst_app /media/card/config/<path to *.cfg file>
Use GST_TRACERS="interlatency" in case of Xilinx’s ultra low-latency NV12 audio+video stream-out pipelines.
Refer below link for detailed run flow steps
1.3 Build Flow
Refer below link for detailed build flow steps
2 V4l2 Capture Control Software Encoder Application
2.1 Overview
The primary goal of v4l2 capture control software encoder application is to demonstrate the Xilinx’s Ultra Low-Latency feature using the VCU ctrlsw APIs. This application (v4l2_capture_ctrlsw_enc) is an enhanced version of normal VCU ctrlsw app (ctrlsw_encoder). Normal ctrlsw_encoder application is only capable for file-based encoding, while this app captures data from the HDMI source and does stream-out using Gstreamer libraries.
The v4l2 capture ctrlsw encoder application has following features:
Stream out encoded data captured from HDMI source using RTP streaming.
Record encoded data captured from HDMI source to a file.
Supports various encoding options, can be set by config file as an input to the application, similar as how config file is used for ctrlsw_encoder.
Supports various latency modes e.g. Xilinx’s Ultra Low Latency (LLP2) mode via
--xlnx-slicelatand Low Latency (LLP1) mode via--slicelat, can be set via command line
The following figure shows one of the use cases (Xilinx Low-Latency streaming):
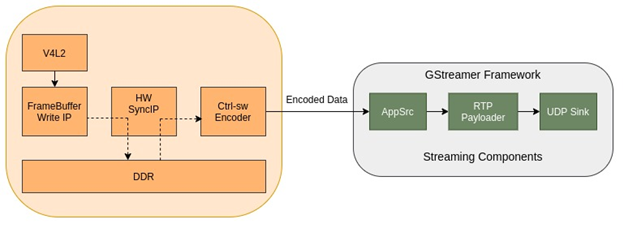
As shown in the above figure, the app performs the below list of operations in case of Xilinx’s Ultra Low Latency (LLP2) mode:
Application enables syncip and programs address ranges as per input video format and resolution.
Application calls VIDIOC_DQBUF and sends empty input buffer to encoder using early dequeue mechanism.
Encoder receives this empty buffer and starts generating read request.
Start DMA command is issued to v4l2 capture driver and capture starts filling the buffer.
SyncIP blocks the encoder until framebuffer-write is done writing data corresponding to read request made by encoder.
Once encoder is unblocked, it starts encoding data and generating output slices corresponding to unblocked input read requests.
Encoded data is feed to Gstreamer AppSrc, and it passed to UDP sink through RTP payloader to stream-out the encoded data.
Similarly, for consecutive buffers v4l2 programs SyncIP, submits buffer to encoder using VIDIOC_DQBUF and syncip block the encoder until v4l2 has written sufficient data. This way syncip maintains the synchronization between producer (v4l2) and consumer (encoder).
In case of --slicelat (llp1) there will by no syncip in the input path to encoder and application gets the input frame filled by v4l2 using VIDIOC_DQBUF which is passed to encoder. The encoder then reads the input frame and generates output slices as per the number of slices set in the configuration file which are then streamed out as depicted in above section.
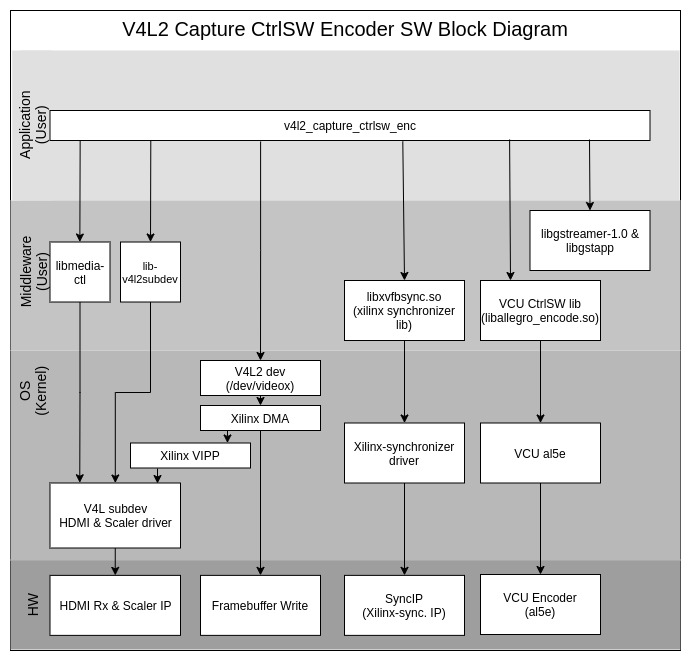
The below figure shows the v4l2 capture control software encoder application software block diagram:
2.2 Downloads
Download AR package for V4l2 Control Software Encoder Application from below AR link:
You can download VCU TRD 2020.2 rdf package - containing VCU TRD bsp and designs from below link:
2.3 Build Flow
This tutorial shows how to build the above v4l2 control software encoder application’s AR package to generate Linux and boot image using the PetaLinux build tool. It assume that the $TRD_HOME environment variable is set as given below.
It is recommended to follow the build steps in sequence.
$ export TRD_HOME=</path/to/downloaded/zipfile>/rdf0428-zcu106-vcu-trd-2020-2 |
Source the Petalinux tool-chain using below command
$ source <path/to/petalinux-installer>/tool/petalinux-v2020.2-final/settings.sh $ echo $PETALINUX |
Post PetaLinux installation $PETALINUX environment variable should be set.
Create a PetaLinux project.
$ cd $TRD_HOME/apu/vcu_petalinux_bsp $ petalinux-create -t project -s xilinx-vcu-zcu106-v2020.2-final.bsp |
Configure the PetaLinux project.
$ cd xilinx-vcu-zcu106-v2020.2-final $ petalinux-config --get-hw-description=$TRD_HOME/pl/prebuild/zcu106_llp2_audio_nv12/ |
If the Vivado project is modified, the user is expected to configure the bsp with the modified .xsa file and build. e.g.
$ petalinux-config --get-hw-description=$TRD_HOME/pl/build/zcu106_llp2_audio_nv12/ |
Extract the downloaded AR package in the petalinux project (
xilinx-vcu-zcu106-v2020.2-final/) directory using below command
$ unzip -o <path-to-AR-package>/vcu_trd_v4l2_ctrlsw_enc_AR76096.zip |
By default, the GStreamer support is enabled in v4l2 control software application. To Disable the GStreamer support, Update the ENABLE_GST = "1" flag to ENABLE_GST = "0" in project-spec/meta-user/recipes-apps/v4l2-ctrlsw-enc/v4l2-ctrlsw-enc.bb. GStreamer support is required to run stream-out use-cases using v4l2 control software application, on disabling the GStreamer support, application will be forced to run record use-case.
Create a soft link of llp2 psddr nv12 design dtsi file to
system-user.dtsiusing below command
$ cd project-spec/meta-user/recipes-bsp/device-tree/files/ $ ln -sf vcu_llp2_psddr_hdmi.dtsi system-user.dtsi $ cd ../../../../../ |
Build the PetaLinux project
$ petalinux-build |
Build SDK components to use it as sysroot for application development (Optional).
$ petalinux-build --sdk $ petalinux-package --sysroot |
Create a boot image (BOOT.BIN) including FSBL, ATF, bitstream, and u-boot.
$ cd images/linux $ petalinux-package --boot --fsbl zynqmp_fsbl.elf --u-boot u-boot.elf --pmufw pmufw.elf --fpga system.bit |
Copy the generated boot image and Linux image to the SD card directory.
$ cp BOOT.BIN image.ub boot.scr $TRD_HOME/images/vcu_llp2_hdmi_nv12/ |
2.4 Run Flow
Following section assume that user has already done board-setup, prepared sd-card with built images and boot the board.
The v4l2_capture_ctrlsw_enc is a command-line Linux application. It requires an input configuration file to be provided in the plain text with the necessary encoder configuration options.
Run below command to check all available configuration options:
$ v4l2_capture_ctrlsw_enc --help-cfg OR $ v4l2_capture_ctrlsw_enc --help-cfg-json |
Using above configuration options, create a required configuration file according to your use-case. You can also use sample configuration files from /usr/local/etc/v4l2-capture-ctrlsw-enc/sample_cfg/ and tweak parameters as required.
Below are some example pipelines using v4l2_capture_ctrlsw_enc.
The stream-out pipeline will only run if application is compiled with
ENABLE_GST = “1“The
v4l2_capture_ctrlsw_encuses hard-coded port value 5004 for stream-out use-case, and it only supports single stream use-case.
Run following
v4l2_capture_ctrlsw_enccommand to run Low-Latency (LLP1) stream-out use-case. where 192.168.25.89 is host/client ip address.
$ v4l2_capture_ctrlsw_enc -cfg /usr/local/etc/v4l2-capture-ctrlsw-enc/sample_cfg/4kp60_HEVC.cfg --slicelat --hostip 192.168.25.89
Run following gst-launch-1.0 command on client to display stream-in NV12 video on HDMI-Tx using Low-Latency(LLP1) GStreamer pipeline.
$ gst-launch-1.0 udpsrc port=5004 buffer-size=60000000 caps="application/x-rtp, media=video, clock-rate=90000, payload=96, encoding-name=H265" ! rtpjitterbuffer latency=7 ! rtph265depay ! h265parse ! video/x-h265, alignment=nal ! omxh265dec low-latency=1 ! video/x-raw ! queue max-size-bytes=0 ! fpsdisplaysink name=fpssink text-overlay=false 'video-sink=kmssink bus-id=a0070000.v_mix hold-extra-sample=1 show-preroll-frame=false sync=true ' sync=true -v
Run following
v4l2_capture_ctrlsw_enccommand to run Xilinx’s Ultra Low-Latency (LLP2) stream-out use-case. where 192.168.25.89 is host/client ip address.
$ v4l2_capture_ctrlsw_enc -cfg /usr/local/etc/v4l2-capture-ctrlsw-enc/sample_cfg/4kp60_HEVC.cfg --xlnx-slicelat --hostip 192.168.25.89
Run following gst-launch-1.0 command on client to display stream-in NV12 video on HDMI-Tx using Xilinx’s Ultra Low-Latency(LLP2) GStreamer pipeline.
$ gst-launch-1.0 udpsrc port=5004 buffer-size=60000000 caps="application/x-rtp, media=video, clock-rate=90000, payload=96, encoding-name=H265" ! rtpjitterbuffer latency=7 ! rtph265depay ! h265parse ! video/x-h265, alignment=nal ! omxh265dec low-latency=1 ! video/x-raw\(memory:XLNXLL\) ! queue max-size-bytes=0 ! fpsdisplaysink name=fpssink text-overlay=false 'video-sink=kmssink bus-id=a0070000.v_mix hold-extra-sample=1 show-preroll-frame=false sync=true ' sync=true -v
Run following
v4l2_capture_ctrlsw_enccommand to run Xilinx’s Ultra Low-Latency (LLP2) record use-case.
$ v4l2_capture_ctrlsw_enc -cfg /usr/local/etc/v4l2-capture-ctrlsw-enc/sample_cfg/4kp60_HEVC.cfg --xlnx-slicelat --record
3 Other Information
3.1 Known Issues
For Petalinux related known issues please refer: PetaLinux 2020.2 - Product Update Release Notes and Known Issues
For VCU related known issues please refer AR# 66763: LogiCORE H.264/H.265 Video Codec Unit (VCU) - Release Notes and Known Issues and Xilinx Zynq UltraScale+ MPSoC Video Codec Unit.
To reduce performance issues with llp2 4x serial pipelines, please refer to chapter# 40 of Section VI: Appendices for IRQ Balancing scheme in PG252.
For Out of Memory(OOM) killer error on UART console in long run, please refer to AR# 75900: Why do I see out of memory messages in UART console in long run of VCU TRD multi-stream designs?
3.2 Limitations
For Petalinux related limitations please refer: PetaLinux 2020.2 - Product Update Release Notes and Known Issues
For VCU related limitations please refer AR# 66763: LogiCORE H.264/H.265 Video Codec Unit (VCU) - Release Notes and Known Issues , Xilinx Zynq UltraScale+ MPSoC Video Codec Unit and PG252.
3.3 Optimum VCU Encoder parameters for use-cases
Video streaming:
Video streaming use-case requires very stable bitrate graph for all pictures.
It is good to avoid periodic large Intra pictures during the encoding session
Low-latency rate control (hardware RC) is the preferred control-rate for video streaming, it tries to maintain equal amount frame sizes for all pictures.
Good to avoid periodic Intra frames instead use low-delay-p (IPPPPP…)
VBR is not a preferred mode of streaming.
Performance: AVC Encoder settings:
It is preferred to use 8 slices only for better AVC encoder performance.
AVC standard does not support Tile mode processing which results in the processing of MB rows sequentially for entropy coding.
Quality: Low bitrate AVC encoding:
Enable profile=high and use qp-mode=auto for low-bitrate encoding use-cases.
The high profile enables 8x8 transform which results in better video quality at low bitrates.
4 Appendix A - Input Configuration File (input.cfg)
The example configuration files are stored at /media/card/config/ folder.
Configuration Type | Configuration Name | Description | Available Options | NOTE |
|---|---|---|---|---|
Common | Common Configuration | It is the starting point of common configuration | ||
Num of Input | Number of input | 1, 2, 3, 4 | ||
Output | Select the video interface. | HDMI | ||
Out Type | Type of output | display, stream | ||
Display Rate | Pipeline frame rate | 30, 60 | ||
Exit | It indicates to the application that the configuration is over | |||
Input | Input Configuration | It is the starting point of the input configuration | ||
Input Num | Starting Nth input configuration | 1, 2, 3, 4 | ||
Input Type | Input source type | HDMI | ||
Raw | To tell the pipeline is processed or pass-through | FALSE | Raw use-case is not supported for LLP2 use-case. It is supported for non-LLP2 use-case. | |
Width | The width of the live source | 3840,1920 | ||
Height | The height of the live source | 2160, 1080 | ||
Format | The format of input data | NV12 | ||
Enable LLP2 | To enable LLP2 configuration. | TRUE, FALSE | Set Enable LLP2 equals to False for non-LLP2 use-case. | |
Exit | It indicates to the application that the configuration is over | |||
Encoder | Encoder Configuration | It is the starting point of encoder configuration | ||
Encoder Num | Starting Nth encoder configuration | 1,2,3,4 | ||
Encoder Name | Name of the encoder | AVC, HEVC | ||
Profile | Name of the profile | high for AVC, | ||
Rate Control | Rate control options | low_latency | ||
Filler Data | Filler Data NAL units for CBR rate control | False | ||
QP | QP control mode used by the VCU encoder | Uniform, Auto | ||
L2 Cache | Enable or Disable L2Cache buffer in encoding process. | True, False | ||
Latency Mode | Encoder latency mode. | sub_frame | ||
Low Bandwidth | If enabled, decrease the vertical search range used for P-frame motion estimation to reduce the bandwidth. | True, False | ||
Gop Mode | Group of Pictures mode. | Basic, low_delay_p, low_delay_b | ||
Bitrate | Target bitrate in Kbps | 1-25000 | ||
B Frames | Number of B-frames between two consecutive P-frames | 0 | ||
Slice | The number of slices produced for each frame. Each slice contains one or more complete macroblock/CTU row(s). Slices are distributed over the frame as regularly as possible. If slice-size is defined as well more slices may be produced to fit the slice-size requirement. |
| The recommended slice for LLP2 use-case is 8. | |
GoP Length | The distance between two consecutive I frames | 1-1000 | ||
GDR Mode | It specifies which Gradual Decoder Refresh(GDR) scheme should be used when gop-mode = low_delay_p | Horizontal/Vertical/Disabled | GDR mode is currently supported with LLP1/LLP2 low-delay-p use-cases only | |
Entropy Mode | It specifies the entropy mode for H.264 (AVC) encoding process | CAVLC/CABAC/Default | ||
Max Picture Size | It is used to curtail instantaneous peak in the bit-stream using this parameter. It works in CBR/VBR rate-control only. When it is enabled, max-picture-size value is calculated and set with 10% of AllowedPeakMargin. i.e. | TRUE/FALSE | ||
Preset | Custom | |||
Exit | It indicates to the application that the configuration is over | |||
Streaming | Streaming Configuration | It is the starting point of streaming configuration. | ||
Streaming Num | Starting Nth Streaming configuration | 1, 2, 3, 4 | ||
Host IP | The host to send the packets to | 192.168.25.89 or Windows PC IP | ||
Port: | The port to send the packets to. In case of LLP1/LLP2 audio+video rtp stream-out pipelines, rtp/rtcp audio and video port numbers are assigned in below pattern in vcu_gst_app: | 5004, 5008, 5012, 5016 | ||
Exit | It indicates to the application that the configuration is over. | |||
Audio Configuration | Audio Configuration | It is the starting point of the audio configuration. | ||
Audio Enable | Enable or Disable audio in pipeline. | True, False | ||
Audio Format | The format of the audio | S24_32LE (for serial use-cases) | ||
Sampling Rate | To set the audio sampling rate. | 48000 | ||
Num Of Channel | The number of audio channels. | 2 | ||
Source | It should be HDMI, as currently only HDMI audio capture is supported. | |||
Renderer | It should be HDMI, as currently only HDMI audio renderer is supported. | |||
Exit | It indicates to the application that the configuration is over. | |||
Trace | Trace Configuration | It is the starting point of trace configuration. | ||
FPS Info | To display fps info on the console. | True, False | ||
APM Info | To display APM counter number on the console. | True, False | ||
Pipeline Info | To display pipeline info on console. | True, False | ||
Exit | It indicates to the application that the configuration is over. |
5 Appendix B - HDMI-Rx/Tx Link-up and GStreamer Commands
This section covers configuration of HDMI-Rx using media-ctl utility and HDMI-Tx using modetest utility, along with demonstrating HDMI-Rx/Tx link-up issues and steps to switch HDMI-Rx resolution. It also contains sample GStreamer Low-Latency NV12 and Xilinx’s Ultra Low-Latency NV12 Audio+Video pipelines for Display, Stream-In and Stream-Out use-cases.
HDMI source can be locked to any resolution. Run the below command for all media nodes to print media device topology where
mediaXrepresents different media nodes. In the topology, log look for thev_hdmi_rx_ssstring to identify the HDMI input source media node.
$ media-ctl -p -d /dev/mediaX
To check the link status, resolution and video node of the HDMI input source, run below
media-ctlcommand wheremediaXindicates media node for the HDMI input source.
$ media-ctl -p -d /dev/mediaX
When HDMI source is connected to 4kp60 resolution, it shows:
root@zcu106_vcu_llp2_audio_nv12:/media/card# media-ctl -p -d /dev/media0  -----> media node for HDMI input source
Media controller API version 5.4.0

Media device information
------------------------
driver          xilinx-video
model           Xilinx Video Composite Device
serial
bus info
hw revision     0x0
driver version  5.4.0

Device topology
- entity 1: vcapaxis_broad_out1hdmi_input_a (1 pad, 1 link)
            type Node subtype V4L flags 0
            device node name /dev/video0  -----> Video node for HDMI-Rx source
        pad0: Sink
                <- "amba_pl@0:axis_broadcasterhdmi_":1 [ENABLED]

- entity 5: vcapaxis_broad_out1hdmi_input_a (1 pad, 1 link)
            type Node subtype V4L flags 0
            device node name /dev/video1  -----> Video node for HDMI-Rx source
        pad0: Sink
                <- "amba_pl@0:axis_broadcasterhdmi_":2 [ENABLED]

- entity 9: vcapaxis_broad_out1hdmi_input_a (1 pad, 1 link)
            type Node subtype V4L flags 0
            device node name /dev/video2  -----> Video node for HDMI-Rx source
        pad0: Sink
                <- "amba_pl@0:axis_broadcasterhdmi_":3 [ENABLED]

- entity 13: vcapaxis_broad_out1hdmi_input_a (1 pad, 1 link)
             type Node subtype V4L flags 0
             device node name /dev/video3  -----> Video node for HDMI-Rx source
        pad0: Sink
                <- "amba_pl@0:axis_broadcasterhdmi_":4 [ENABLED]

- entity 17: amba_pl@0:axis_broadcasterhdmi_ (5 pads, 5 links)
             type V4L2 subdev subtype Unknown flags 0
             device node name /dev/v4l-subdev0
        pad0: Sink
                [fmt:RGB888_1X24/7680x7680 field:none colorspace:srgb]
                <- "a0080000.v_proc_ss":1 [ENABLED]
        pad1: Source
                [fmt:RGB888_1X24/7680x7680 field:none colorspace:srgb]
                -> "vcapaxis_broad_out1hdmi_input_a":0 [ENABLED]
        pad2: Source
                [fmt:RGB888_1X24/7680x7680 field:none colorspace:srgb]
                -> "vcapaxis_broad_out1hdmi_input_a":0 [ENABLED]
        pad3: Source
                [fmt:RGB888_1X24/7680x7680 field:none colorspace:srgb]
                -> "vcapaxis_broad_out1hdmi_input_a":0 [ENABLED]
        pad4: Source
                [fmt:RGB888_1X24/7680x7680 field:none colorspace:srgb]
                -> "vcapaxis_broad_out1hdmi_input_a":0 [ENABLED]

- entity 23: a0080000.v_proc_ss (2 pads, 2 links)
             type V4L2 subdev subtype Unknown flags 0
             device node name /dev/v4l-subdev1
        pad0: Sink
                [fmt:VYYUYY8_1X24/1280x720 field:none colorspace:srgb]
                <- "a0000000.v_hdmi_rx_ss":0 [ENABLED]
        pad1: Source
                [fmt:VYYUYY8_1X24/1920x1080 field:none colorspace:srgb]
                -> "amba_pl@0:axis_broadcasterhdmi_":0 [ENABLED]

- entity 26: a0000000.v_hdmi_rx_ss (1 pad, 1 link)
             type V4L2 subdev subtype Unknown flags 0
             device node name /dev/v4l-subdev2
        pad0: Source
                [fmt:RBG888_1X24/3840x2160 field:none]
                [dv.caps:BT.656/1120 min:0x0@25000000 max:4096x2160@297000000 stds:CEA-861,DMT,CVT,GTF caps:progressive,reduced-blanking,custom]
                [dv.detect:BT.656/1120 3840x2160p60 (4400x2250) stds:CEA-861 flags:CE-video]   -----> Resolution and Frame-rate of HDMI-Rx source
                -> "a0080000.v_proc_ss":0 [ENABLED]
Check resolution and frame-rate of dv.detect under v_hdmi_rx_ss node.
When the HDMI source is not connected, it shows:
root@zcu106_vcu_llp2_audio_nv12:/media/card# media-ctl -p -d /dev/media0  -----> media node for HDMI input source
Media controller API version 5.4.0

Media device information
------------------------
driver          xilinx-video
model           Xilinx Video Composite Device
serial
bus info
hw revision     0x0
driver version  5.4.0

Device topology
- entity 1: vcapaxis_broad_out1hdmi_input_a (1 pad, 1 link)
            type Node subtype V4L flags 0
            device node name /dev/video0  -----> Video node for HDMI-Rx source
        pad0: Sink
                <- "amba_pl@0:axis_broadcasterhdmi_":1 [ENABLED]

- entity 5: vcapaxis_broad_out1hdmi_input_a (1 pad, 1 link)
            type Node subtype V4L flags 0
            device node name /dev/video1  -----> Video node for HDMI-Rx source
        pad0: Sink
                <- "amba_pl@0:axis_broadcasterhdmi_":2 [ENABLED]

- entity 9: vcapaxis_broad_out1hdmi_input_a (1 pad, 1 link)
            type Node subtype V4L flags 0
            device node name /dev/video2  -----> Video node for HDMI-Rx source
        pad0: Sink
                <- "amba_pl@0:axis_broadcasterhdmi_":3 [ENABLED]

- entity 13: vcapaxis_broad_out1hdmi_input_a (1 pad, 1 link)
             type Node subtype V4L flags 0
             device node name /dev/video3  -----> Video node for HDMI-Rx source
        pad0: Sink
                <- "amba_pl@0:axis_broadcasterhdmi_":4 [ENABLED]

- entity 17: amba_pl@0:axis_broadcasterhdmi_ (5 pads, 5 links)
             type V4L2 subdev subtype Unknown flags 0
             device node name /dev/v4l-subdev0
        pad0: Sink
                [fmt:RGB888_1X24/7680x7680 field:none colorspace:srgb]
                <- "a0080000.v_proc_ss":1 [ENABLED]
        pad1: Source
                [fmt:RGB888_1X24/7680x7680 field:none colorspace:srgb]
                -> "vcapaxis_broad_out1hdmi_input_a":0 [ENABLED]
        pad2: Source
                [fmt:RGB888_1X24/7680x7680 field:none colorspace:srgb]
                -> "vcapaxis_broad_out1hdmi_input_a":0 [ENABLED]
        pad3: Source
                [fmt:RGB888_1X24/7680x7680 field:none colorspace:srgb]
                -> "vcapaxis_broad_out1hdmi_input_a":0 [ENABLED]
        pad4: Source
                [fmt:RGB888_1X24/7680x7680 field:none colorspace:srgb]
                -> "vcapaxis_broad_out1hdmi_input_a":0 [ENABLED]

- entity 23: a0080000.v_proc_ss (2 pads, 2 links)
             type V4L2 subdev subtype Unknown flags 0
             device node name /dev/v4l-subdev1
        pad0: Sink
                [fmt:VYYUYY8_1X24/1280x720 field:none colorspace:srgb]
                <- "a0000000.v_hdmi_rx_ss":0 [ENABLED]
        pad1: Source
                [fmt:VYYUYY8_1X24/1920x1080 field:none colorspace:srgb]
                -> "amba_pl@0:axis_broadcasterhdmi_":0 [ENABLED]

- entity 26: a0000000.v_hdmi_rx_ss (1 pad, 1 link)
             type V4L2 subdev subtype Unknown flags 0
             device node name /dev/v4l-subdev2
        pad0: Source
                [fmt:RBG888_1X24/1280x720 field:none colorspace:srgb]
                [dv.caps:BT.656/1120 min:0x0@25000000 max:4096x2160@297000000 stds:CEA-861,DMT,CVT,GTF caps:progressive,reduced-blanking,custom]
                [dv.query:no-link]  -----> HDMI-Rx Link Status
                -> "a0080000.v_proc_ss":0 [ENABLED]
dv.query:no-link under v_hdmi_rx_ss node shows HDMI-Rx source is not connected or HDMI-Rx source is not active (Try waking up the device by pressing a key on remote).
Notes for gst-launch-1.0 commands:
Video node for HDMI-Rx source can be checked using
media-ctlcommand. Run below media-ctl command to check video node for HDMI-Rx source wheremedia0indicates media node for HDMI input source.
$ media-ctl -p -d /dev/media0
Make sure HDMI-Rx media pipeline is configured for 4kp60 resolution and source/sink have the same color format for connected nodes. For NV12 format, run below
media-ctlcommands to set resolution and format of HDMI scaler node wheremedia0indicates media node for HDMI input source.When HDMI Input Source is NVIDIA SHIELD
$ media-ctl -d /dev/media0 -V "\"a0080000.v_proc_ss\":0 [fmt:RBG888_1X24/3840x2160 field:none]"
$ media-ctl -d /dev/media0 -V "\"a0080000.v_proc_ss\":1 [fmt:VYYUYY8_1X24/3840x2160 field:none]"
Make sure NVIDIA SHIELD is configured for 4K resolution and RBG888_1X24 format.
Follow the below steps to switch the HDMI-Rx resolution from 1080p60 to 4kp60.
Check current HDMI input source resolution (1080p60) by following the steps mentioned earlier to check HDMI resolution using
media-ctlcommandRun vcu_gst_app for current HDMI resolution (1080p60) by executing the following command.
$ vcu_gst_app /media/card/config/input.cfg
Below configurations needs to be set in input.cfg for non-LLP2 HDMI-1080p60 use-case.
Common Configuration    : START
Num Of Input            : 1
Output                  : HDMI
Out Type                : Display
Frame Rate              : 60
Exit

Input Configuration     : START
Input Num               : 1
Input Type              : hdmi_1
Raw                     : FALSE
Width                   : 1920
Height                  : 1080
Format                  : NV12
Enable LLP2             : FALSE
Exit

Encoder Configuration   : START
Encoder Num             : 1
Encoder Name            : HEVC
Profile                 : Main
Rate Control            : Low_Latency
Filler Data             : False
QP                      : Auto
L2 Cache                : TRUE
Latency Mode            : Sub_Frame
Low Bandwidth           : FALSE
Gop Mode                : Basic
Bitrate                 : 25000
B Frames                : 0
Slice                   : 8
GoP Length              : 60
GDR Mode                : Horizontal
Preset                  : Custom
Exit
Change Resolution of HDMI Input Source from 1080p60 to 4kp60 by following below steps.
Set the HDMI source resolution to 4kp60 (Homepage → Settings → Display & Sound → Resolution → change to 4kp60).
Save the configuration to take place the change.
Verify the desired HDMI Input Source Resolution (4kp60) by following the above-mentioned steps.
If HDMI-Tx link-up issue is observed after Linux booting, use the following command to get the blue screen on HDMI-Tx for 4kp60.
$ modetest -D a0070000.v_mix -s 39:3840x2160-60@BG24
The table below lists the parameters of the pixel format.
Pixel Format | GStreamer Format | Media Bus Format | GStreamer HEVC Profile | GStreamer AVC Profile | Kmssink Plane-id |
|---|---|---|---|---|---|
NV12 | NV12 | VYYUYY8_1X24 | main | high | 34 and 35 |
Video0in the each gst-launch pipelines indicates a video node for the input source.Make sure HDMI-Rx should be configured to 4kp60 mode, while running below example pipelines.
LLP1/LLP2 video / audio+video stream-in pipelines are not supported using vcu_gst_app.
For LLP1/LLP2 Multi-stream HEVC serial and stream-out use-cases (2-4kp30, 2-1080p60, 4-1080p60), use
ENC_EXTRA_OP_BUFFERS=10variable before gst-launch-1.0 command.For LLP1/LLP2 Multi-stream serial and stream-in use-cases (2-4kp30, 2-1080p60, 4-1080p60), use
internal-entropy-buffers=3property in decoder.latency-timeandbuffer-timein Audio+Video serial and streaming pipelines are very aggressive here compared to upstream GStreamer default values to get optimize latency for LLP2 Audio+Video pipeline. You can tune and experiment these parameters in case of any issue with audio/video sync, audio/video packet drop and audio distortion for your use-case.
Run the following gst-launch-1.0 command to display NV12 video on HDMI-Tx using low-latency(LLP1) GStreamer pipeline.
$ gst-launch-1.0 -v v4l2src io-mode=dmabuf device=/dev/video0 ! video/x-raw, width=3840, height=2160, format=NV12, framerate=60/1 ! omxh265enc num-slices=8 control-rate=low-latency gop-mode=low-delay-p target-bitrate=25000 cpb-size=500 gdr-mode=horizontal initial-delay=250 periodicity-idr=240 filler-data=0 prefetch-buffer=true ! video/x-h265, alignment=nal ! queue max-size-buffers=0 ! omxh265dec low-latency=1 internal-entropy-buffers=5 ! video/x-raw ! queue max-size-bytes=0 ! fpsdisplaysink name=fpssink text-overlay=false 'video-sink=kmssink bus-id=a0070000.v_mix hold-extra-sample=1 show-preroll-frame=false sync=true' sync=true -v
Run the following gst-launch-1.0 command to display NV12 video on HDMI-Tx using Xilinx's ultra low-latency(LLP2) GStreamer pipeline..
$ gst-launch-1.0 -v v4l2src io-mode=dmabuf device=/dev/video0 ! video/x-raw\(memory:XLNXLL\), width=3840, height=2160, format=NV12, framerate=60/1 ! omxh265enc num-slices=8 control-rate=low-latency gop-mode=low-delay-p target-bitrate=25000 cpb-size=500 gdr-mode=horizontal initial-delay=250 periodicity-idr=240 filler-data=0 prefetch-buffer=true ! video/x-h265, alignment=nal ! queue max-size-buffers=0 ! omxh265dec low-latency=1 internal-entropy-buffers=5 ! video/x-raw\(memory:XLNXLL\) ! queue max-size-bytes=0 ! fpsdisplaysink name=fpssink text-overlay=false 'video-sink=kmssink bus-id=a0070000.v_mix hold-extra-sample=1 show-preroll-frame=false sync=true' sync=true -v
Run the following gst-launch-1.0 command to capture and play Xilinx's ultra low-latency(LLP2) HDMI video and raw HDMI audio using the Gstreamer pipeline.
$ gst-launch-1.0 -v v4l2src io-mode=dmabuf device=/dev/video0 ! video/x-raw\(memory:XLNXLL\), width=3840, height=2160, format=NV12, framerate=60/1 ! omxh265enc gop-length=60 gop-mode=low-delay-p low-bandwidth=FALSE target-bitrate=25000 b-frames=0 num-slices=8 control-rate=low-latency qp-mode=auto prefetch-buffer=true cpb-size=500 initial-delay=250 gdr-mode=horizontal periodicity-idr=240 ! video/x-h265, alignment=nal, profile=main ! queue max-size-buffers=0 ! omxh265dec low-latency=1 internal-entropy-buffers=5 ! video/x-raw\(memory:XLNXLL\) ! queue max-size-bytes=0 ! fpsdisplaysink name=fpssink text-overlay=false 'video-sink=kmssink bus-id=a0070000.v_mix hold-extra-sample=1 show-preroll-frame=false sync=true ' sync=true -v alsasrc device="hw:1,1" latency-time=5000 buffer-time=10000 provide-clock=false ! audio/x-raw, channels=2, rate=48000, format=S24_32LE ! queue max-size-bytes=0 ! alsasink device="hw:1,0" latency-time=5000 buffer-time=10000
Run the following gst-launch-1.0 command to stream-out NV12 video using low-latency(LLP1) GStreamer pipeline. where, 192.168.25.89 is host/client IP address and 5004 is a port number.
$ gst-launch-1.0 -v v4l2src device=/dev/video0 io-mode=4 ! video/x-raw, format=NV12, width=3840, height=2160, framerate=60/1 ! omxh265enc num-slices=8 periodicity-idr=240 cpb-size=500 gdr-mode=horizontal initial-delay=250 control-rate=low-latency prefetch-buffer=true target-bitrate=25000 gop-mode=low-delay-p ! video/x-h265, alignment=nal ! rtph265pay ! udpsink buffer-size=60000000 host=192.168.25.89 port=5004 async=false max-lateness=-1 qos-dscp=60 max-bitrate=120000000 -v
Run the following gst-launch-1.0 command to display stream-in NV12 video on HDMI-Tx using low-latency(LLP1) GStreamer pipeline. where, 5004 is port number.
$ gst-launch-1.0 udpsrc port=5004 buffer-size=60000000 caps="application/x-rtp, media=video, clock-rate=90000, payload=96, encoding-name=H265" ! rtpjitterbuffer latency=7 ! rtph265depay ! h265parse ! video/x-h265, alignment=nal ! omxh265dec low-latency=1 internal-entropy-buffers=5 ! video/x-raw ! queue max-size-bytes=0 ! fpsdisplaysink name=fpssink text-overlay=false 'video-sink=kmssink bus-id=a0070000.v_mix hold-extra-sample=1 show-preroll-frame=false sync=true ' sync=true -v
Run the following gst-launch-1.0 command to stream-out NV12 video using Xilinx's ultra low-latency(LLP2) GStreamer pipeline. where, 192.168.25.89 is host/client IP address and 5004 is a port number.
$ gst-launch-1.0 -v v4l2src device=/dev/video0 io-mode=4 ! video/x-raw\(memory:XLNXLL\), format=NV12, width=3840, height=2160, framerate=60/1 ! omxh265enc num-slices=8 periodicity-idr=240 cpb-size=500 gdr-mode=horizontal initial-delay=250 control-rate=low-latency prefetch-buffer=true target-bitrate=25000 gop-mode=low-delay-p ! video/x-h265, alignment=nal ! rtph265pay ! udpsink buffer-size=60000000 host=192.168.25.89 port=5004 async=false max-lateness=-1 qos-dscp=60 max-bitrate=120000000 -v
Run the following gst-launch-1.0 command to display NV12 stream-in video on HDMI-Tx using Xilinx's ultra low-latency(LLP2) GStreamer pipeline. where, 5004 is a port number.
$ gst-launch-1.0 udpsrc port=5004 buffer-size=60000000 caps="application/x-rtp, media=video, clock-rate=90000, payload=96, encoding-name=H265" ! rtpjitterbuffer latency=7 ! rtph265depay ! h265parse ! video/x-h265, alignment=nal ! omxh265dec low-latency=1 internal-entropy-buffers=5 ! video/x-raw\(memory:XLNXLL\) ! queue max-size-bytes=0 ! fpsdisplaysink name=fpssink text-overlay=false 'video-sink=kmssink bus-id=a0070000.v_mix hold-extra-sample=1 show-preroll-frame=false sync=true ' sync=true -v
Run the following gst-launch-1.0 command to capture, encode and stream-out Xilinx's ultra low-latency(LLP2) HDMI NV12 video and opus encoded HDMI audio using the GStreamer pipeline. It enables transmission and reception of both RTP and RTCP packets. RTP packets are sent on ports 5004(for video) and 5008(for audio). sender RTCP packets are sent on ports 5005(for video) and 5009(for audio). The receiver RTCP packets are received on ports 5006(for video) and 5010(for audio). Here, 192.168.25.89 is client’s IP address.
$ gst-launch-1.0 rtpbin name=rtpbin v4l2src device=/dev/video0 io-mode=4 ! video/x-raw\(memory:XLNXLL\), format=NV12, width=3840, height=2160, framerate=60/1 ! omxh265enc gop-length=60 gop-mode=low-delay-p low-bandwidth=FALSE target-bitrate=25000 b-frames=0 num-slices=8 control-rate=low-latency qp-mode=auto prefetch-buffer=true cpb-size=500 initial-delay=250 gdr-mode=horizontal periodicity-idr=240 ! video/x-h265, alignment=nal, profile=main ! queue ! rtph265pay ! rtpbin.send_rtp_sink_0 rtpbin.send_rtp_src_0 ! udpsink port=5004 buffer-size=60000000 host=192.168.25.89 qos-dscp=60 max-bitrate=120000000 async=false max-lateness=-1 rtpbin.send_rtcp_src_0 ! udpsink host=192.168.25.89 port=5005 sync=false async=false udpsrc port=5006 ! rtpbin.recv_rtcp_sink_0 alsasrc device="hw:1,1" provide-clock=false latency-time=5000 buffer-time=10000 ! audioconvert ! audio/x-raw, channels=2, rate=48000, format=S16LE ! opusenc ! rtpopuspay pt=97 ! rtpbin.send_rtp_sink_1 rtpbin.send_rtp_src_1 ! udpsink port=5008 host=192.168.25.89 sync=false async=false rtpbin.send_rtcp_src_1 ! udpsink host=192.168.25.89 port=5009 sync=false async=false udpsrc port=5010 ! rtpbin.recv_rtcp_sink_1
Run the following gst-launch-1.0 command to stream-in, decode and play Xilinx's ultra low-latency(LLP2) HDMI NV12 video and opus encoded HDMI audio using the GStreamer pipeline. It enables transmission and reception of both RTP and RTCP packets. RTP packets are received on ports 5004(for video) and 5008(for audio). sender RTCP packets are received on ports 5005(for video) and 5009(for audio). The receiver RTCP packets are sent on ports 5006(for video) and 5010(for audio). Here, 192.168.25.90 is server’s IP address.
$ gst-launch-1.0 -v rtpbin latency=7 name=rtpbin udpsrc name=udpsrc_video buffer-size=60000000 caps="application/x-rtp, media=(string)video, clock-rate=(int)90000, encoding-name=(string)H265" port=5004 ! rtpbin.recv_rtp_sink_0 rtpbin. ! rtph265depay ! h265parse ! video/x-h265, alignment=nal ! omxh265dec low-latency=1 ! video/x-raw\(memory:XLNXLL\) ! queue max-size-bytes=0 ! fpsdisplaysink name=fpssink text-overlay=false 'video-sink=kmssink bus-id=a0070000.v_mix hold-extra-sample=1 show-preroll-frame=false sync=true ' sync=true -v udpsrc port=5005 ! rtpbin.recv_rtcp_sink_0 rtpbin.send_rtcp_src_0 ! udpsink host=192.168.25.90 port=5006 sync=false async=false udpsrc name=udpsrc_audio port=5008 caps="application/x-rtp, media=(string)audio, clock-rate=(int)48000, encoding-name=(string)OPUS" ! rtpbin.recv_rtp_sink_1 rtpbin. ! rtpopusdepay ! opusdec ! audioconvert ! alsasink device="hw:1,0" latency-time=5000 buffer-time=10000 udpsrc port=5009 ! rtpbin.recv_rtcp_sink_1 rtpbin.send_rtcp_src_1 ! udpsink host=192.168.25.90 port=5010 sync=false async=false
Run the following gst-launch-1.0 command to capture, encode and stream-out Xilinx's ultra low-latency(LLP2) HDMI NV12 video and opus encoded HDMI audio using the GStreamer pipeline. It enables transmission of only RTP packets. RTP packets are sent on ports 5004(for video) and 5005(for audio).
$ gst-launch-1.0 rtpbin name=rtpbin v4l2src device=/dev/video0 io-mode=4 ! video/x-raw\(memory:XLNXLL\), format=NV12, width=3840, height=2160, framerate=60/1 ! omxh265enc gop-length=60 gop-mode=low-delay-p low-bandwidth=FALSE target-bitrate=25000 b-frames=0 num-slices=8 control-rate=low-latency qp-mode=auto prefetch-buffer=true cpb-size=500 initial-delay=250 gdr-mode=horizontal periodicity-idr=240 ! video/x-h265, alignment=nal, profile=main ! queue ! rtph265pay ! rtpbin.send_rtp_sink_0 rtpbin.send_rtp_src_0 ! udpsink port=5004 buffer-size=60000000 host=192.168.25.89 qos-dscp=60 max-bitrate=120000000 async=false max-lateness=-1 alsasrc device="hw:1,1" latency-time=5000 buffer-time=10000 provide-clock=false ! audioconvert ! audio/x-raw, channels=2, rate=48000, format=S16LE ! opusenc ! rtpopuspay pt=97 ! rtpbin.send_rtp_sink_1 rtpbin.send_rtp_src_1 ! udpsink port=5005 host=192.168.25.89 sync=false async=false
Run the following gst-launch-1.0 command to stream-in, decode and play Xilinx's ultra low-latency(LLP2) HDMI NV12 video and opus encoded HDMI audio using the GStreamer pipeline. It enables reception of only RTP packets. RTP packets are received on ports 5004(for video) and 5005(for audio).
$ gst-launch-1.0 -v rtpbin latency=7 name=rtpbin udpsrc name=udpsrc_video buffer-size=60000000 caps="application/x-rtp, media=(string)video, clock-rate=(int)90000, encoding-name=(string)H265" port=5004 ! rtpbin.recv_rtp_sink_0 rtpbin. ! rtph265depay ! h265parse ! video/x-h265, alignment=nal ! omxh265dec low-latency=1 ! video/x-raw\(memory:XLNXLL\) ! queue max-size-bytes=0 ! fpsdisplaysink name=fpssink text-overlay=false 'video-sink=kmssink bus-id=a0070000.v_mix hold-extra-sample=1 show-preroll-frame=false sync=true ' sync=true -v udpsrc name=udpsrc_audio port=5005 caps="application/x-rtp, media=(string)audio, clock-rate=(int)48000, encoding-name=(string)OPUS" ! rtpbin.recv_rtp_sink_1 rtpbin. ! rtpopusdepay ! opusdec ! audioconvert ! alsasink device="hw:1,0" latency-time=5000 buffer-time=10000