Table of Contents
...
Design Components
This module requires the following components:
- petainux_bsp
- video_qt2
Build Flow Tutorials
This tutorial uses both XSDK and PetaLinux tools. It is recommended to use separate shells for each of the tools.
PetaLinux BSP
This tutorial shows how to build the Linux image and boot image using the PetaLinux build tool. This step assumes you have run through the PetaLinux config in DM1 previously.
Select the device-tree matching design module 5 and build all Linux image components. If you have run
petalinux-buildin a previous module, the build step will be incremental.Code Block language bash theme Midnight % cd $TRD_HOME/petalinux/bsp/project-spec/meta-user/recipes-bsp/device-tree/files % cp zcu102-base-dm5.dtsi system-user.dtsi % petalinux-build
Create a boot image.
Code Block language bash theme Midnight % cd $TRD_HOME/petalinux/bsp/images/linux % petalinux-package --boot --bif=../../project-spec/boot/dm5.bif --force
Copy the generated boot image and Linux image to the dm5 SD card directory.
Code Block theme Midnight % mkdir -p $TRD_HOME/sd_card/dm5 % cp BOOT.BIN image.ub $TRD_HOME/sd_card/dm5
PetaLinux SDK
This tutorial shows how to use the PetaLinux build tool to generate and install an SDK for application development in XSDK or SDx.
Install the pre-built SDK or skip this step to generate your own SDK
Code Block language bash theme Midnight % $TRD_HOME/petalinux/sdk.sh -y -d $TRD_HOME/petalinux/sdk
Generate and install an SDK for Linux application development.
Note 1: This step can be skipped and the pre-built SDK installer can be used instead.
Note 2: You don't have to run this step for subsequent modules. It is sufficient to generate and install the SDK once and then re-use it for other modules.Code Block language bash theme Midnight % petalinux-build -s % petalinux-package --sysroot -d $TRD_HOME/petalinux/sdk
Video Qt Application
This tutorial shows how to build the video Qt application. It is by default built as part of the meta-user layer of the PetaLinux BSP. The corresponding yocto recipe and source files are located at
$TRD_HOME/petalinux/bsp/project-spec/meta-user/recipes-apps/video-qt2 and the generated binary is located at /usr/bin/video_qt2 on the target rootfs.- Make sure you have sourced the SDX
settings64.shscript before executing the below steps. This will add the ARM cross-compile toolchain to yourPATHand set theXILINX_SDXenvironment variable. Source the PetaLinux SDK environment setup script which sets the
SDKTARGETSYSROOTenvironment variable which contains the target and host sysroot for building this application. This requires that you have previously completed the PetaLinux SDK installation step.
Note 1: Make sure you source the script in the same shell that is used to launch XSDK. Make sure you source the script before starting XSDK, otherwise close and re-start XSDK.
Note 2: The below command might ask you execute theunset LD_LIBRARY_PATHcommand. Go ahead and follow those steps and then source the script again.Code Block language bash theme Midnight % source $TRD_HOME/petalinux/sdk/environment-setup-aarch64-xilinx-linux
Copy and extract the source files into a new workspace.
Code Block language bash theme Midnight % mkdir -p $TRD_HOME/workspaces/ws_video % cd $TRD_HOME/workspaces/ws_video % cp $TRD_HOME/petalinux/bsp/project-spec/meta-user/recipes-apps/video-qt2/files/video-qt2.zip . % unzip video-qt2.zip % mkdir build work
Configure the project using
cmakeand generate eclipse project files. Build the project usingmakefrom the command line.Code Block language bash theme Midnight % cd build % CC=aarch64-linux-gnu-gcc CXX=aarch64-linux-gnu-g++ \ cmake -G"Eclipse CDT4 - Unix Makefiles" -DCMAKE_ECLIPSE_EXECUTABLE=${XILINX_SDX}/eclipse/lnx64.o/eclipse \ -DUSER_INTERFACE=GUI ../src % make -jAlternatively you can build the project through the XSDK GUI.
Code Block language bash theme Midnight % cd ../work % xsdk -workspace . &
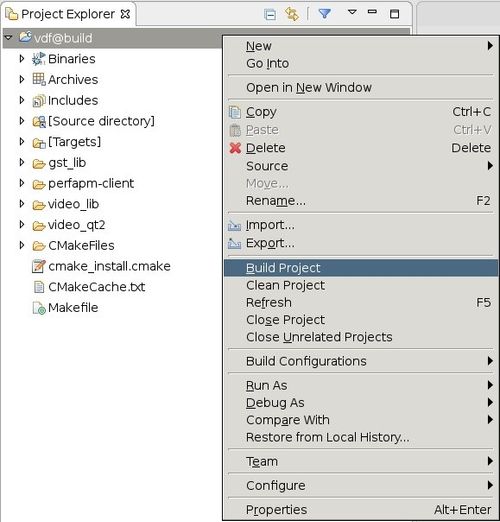
- Click 'Import Project' from the welcome screen, browse to the
$TRD_HOME/workspaces/ws_video/builddirectory and make sure the listed project is selected. Click 'Finish'. - Right-click the project and select 'Build Project'.
Copy the generated
video_qt2executable to the dm5 SD card directory.Code Block language bash theme Midnight % cp $TRD_HOME/workspaces/ws_video/build/video_qt2/video_qt2 $TRD_HOME/sd_card/dm5
Run Flow Tutorial
- See here for board setup instructions. Please note that we cant use HDMI monitors in this design
- Copy all the files from the
$TRD_HOME/sd_card/dm5SD card directory to a FAT formatted SD card. - Power on the board to boot the images; make sure all power rail LEDs are lit green (Note: DS1 / FPGA_INIT_B LED remains Red as there is no bit stream to configure the FPGA).
- After ~30 seconds, the display will turn on and the application will start automatically, targeting the max supported resolution of the monitor (one of 3840x2160 or 1920x1080 or 1280x720).
To re-start the TRD application with the max supported resolution, run
Code Block language bash theme Midnight % run_video.sh
To re-start the TRD application with a specific supported resolution use the -r switch e.g. for 1920x1080, run
Code Block language bash theme Midnight % run_video.sh -r 1920x1080
- The user can now control the application from the GUI's control bar (bottom) displayed on the monitor.

- The following video sources are available:
- TPG (SW): virtual video device that emulates a USB webcam purely in software
- USB: USB webcam using the universal video class (UVC) driver
- File: Raw video file supplied by user in YUYV format and in the same resolution as mentioned in above "run_video.sh" command
- The user can select from the following accelerator options:
- Passthrough (no accelerator)
- The video info panel (top left) shows essential settings/statistics.
- The CPU utilization graph (top right) shows CPU load for each of the four A53 cores.
...