Table of Contents
| Table of Contents | ||||||||
|---|---|---|---|---|---|---|---|---|
|
Design Overview
This module demonstrates:
- Boot RPU1 from APU master via remoteproc
- Inter Process Communication (IPC)
- APU master: RPMsg
- RPU1 remote: OpenAMP
- RPU1 Bare-metal application (server)
- Reads performance counters and sends to APU
- APU Linux application (client)
- Receives performance counters from RPU1 and prints to UART0

...
- Make sure you have sourced the SDX
settings64.shscript before executing the below steps. This will add the ARM cross-compile toolchain to yourPATHand set theXILINX_SDXenvironment variable. Copy and extract the source files into a new workspace.
Code Block theme Midnight % mkdir -p $TRD_HOME/workspaces/ws_perfapm-client % cd $TRD_HOME/workspaces/ws_perfapm-client % cp $TRD_HOME/petalinux/bsp/project-spec/meta-user/recipes-apps/perfapm-client/files/perfapm-client.zip . % unzip perfapm-client.zip % mkdir build work
Configure the project using
cmakeand generate eclipse project files. Build the project usingmakefrom the command line.Code Block language bash theme Midnight % cd build % CC=aarch64-linux-gnu-gcc CXX=aarch64-linux-gnu-g++ \ cmake -G"Eclipse CDT4 - Unix Makefiles" -DCMAKE_ECLIPSE_EXECUTABLE=${XILINX_SDX}/eclipse/lnx64.o/eclipse \ ../src % make -jAlternatively you can build the project through the XSDK GUI.
Code Block language bash theme Midnight % cd ../work % xsdk -workspace . &
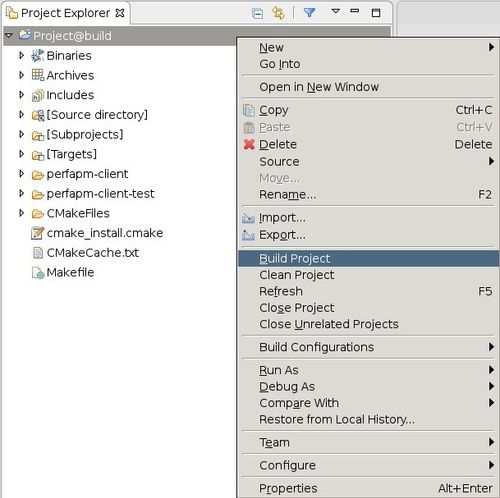
- Click 'Import Project' from the welcome screen, browse to the
$TRD_HOME/workspaces/ws_perfapm-client/builddirectory and make sure the listed project is selected. Click 'Finish'. - Right-click the project and select 'Build Project'.
Copy the generated
perfapm-client-testexecutable to the dm4 SD card directory.Code Block language bash theme Midnight % cp $TRD_HOME/workspaces/ws_perfapm-client/build/perfapm-client-test/perfapm-client-test $TRD_HOME/sd_card/dm4
PetaLinux BSP
This tutorial shows how to build the Linux image and boot image using the PetaLinux build tool. This step assumes you have run through the PetaLinux config in DM1 previously.
Select the device-tree matching design module 4 and build all Linux image components. If you have run
petalinux-buildin a previous module, the build step will be incremental.Code Block language bash theme Midnight % cd $TRD_HOME/petalinux/bsp/project-spec/meta-user/recipes-bsp/device-tree/files/ % cp zcu102-base-dm4.dtsi system-user.dtsi % petalinux-build
Create a boot image
Code Block language bash theme Midnight % cd $TRD_HOME/petalinux/bsp/images/linux % petalinux-package --boot --bif=../../project-spec/boot/dm4.bif --force
Copy the generated images to the dm4 SD card directory
Code Block language bash theme Midnight % cp BOOT.BIN image.ub $TRD_HOME/sd_card/dm4
Run Flow Tutorial
- See here for board setup instructions.
- Copy all the files from the
$TRD_HOME/sd_card/dm4SD card directory to a FAT formatted SD card. - Power on the board to boot the images; make sure all power rail LEDs are lit green (Note: DS1 / FPGA_INIT_B LED remains Red as there is no bit stream to configure the FPGA).
Run the
perfapm-client-testapplication:Code Block language bash theme Midnight % perfapm-client-test
Below is a sample output of the application on the serial console:
Code Block language bash theme Midnight |----------------------------------------------------------------------| | Performance Monitor APP | |----------------------------------------------------------------------| |Slot |Write Byte Cnt |Read Byte Cnt |Total RW Byte Cnt | |----------------------------------------------------------------------| |DDR Slot1 | 62614 | 231056 | 293670 | |DDR Slot2 | 70966 | 327328 | 398294 | |DDR Slot3 | 0 | 994784128 | 994784128 | |DDR Slot4 | 0 | 0 | 0 | |DDR Slot5 | 0 | 0 | 0 | |OCM APM | 64 | 0 | 64 | |LPD_FPD | 1472 | 69728 | 71200 | |----------------------------------------------------------------------| DDRAPM_SLOT_DP+HP0 throughput = 7.958273 gigabits/sec DDRAPM_SLOT_HP1+HP2 throughput = 0.000000 gigabits/sec DDRAPM_SLOT_HP3+FPDDMA throughput = 0.000000 gigabits/sec
...