Table of Contents
Overview
| Table of Contents |
|---|
The purpose of this page is to describe the build and execution of the Hello World EL1 Baremetal application as a DomU on Zynq UltraScale+ MPSoC ,
using PetaLinux and Xilinx SDK Tools.
Table of Contents
| Table of Contents | ||
|---|---|---|
|
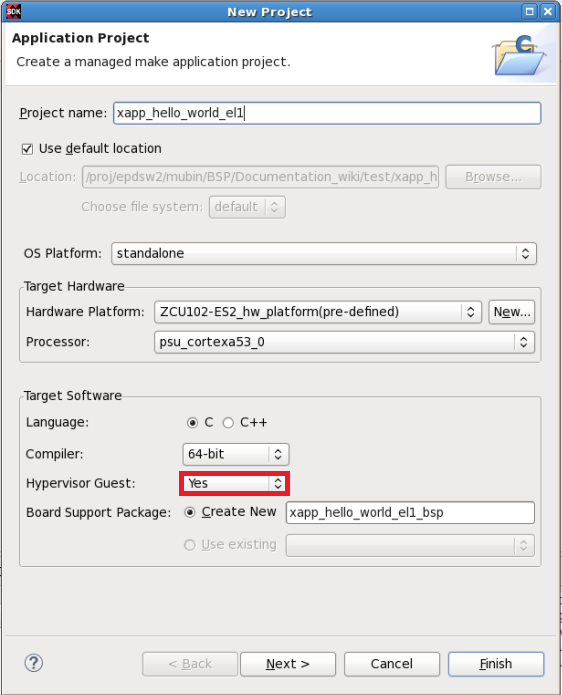
Build EL1 Baremetal Application Using SDK
- Create Hello World standalone application in SDK by selecting Hypervisor Guest as "yes", Refer image given below,
- Once application is created, please confirm following changes in application/BSP
- BSP settings: stdin/stout has to pointed at psu_uart_1
- Application linker file:Application has to be built with starting address: 0x40000000
- Build the application if settings mentioned above are configured correctly. Bin file will be created in the "<app_project>/Debug/" directory, after successful compilation of application.
- If Bin file is not generated automatically, execute this command from the SDK application project Debug directory: aarch64-none-elf-objcopy -O binary --gap-fill 0 <elf file name> <bin file name>
Changes Required in XEN DTS Using Petalinux
Before starting you need to create a PetaLinux project. It is assumed that a default PetaLinux reference design is used unchanged in these instructions.- The peripheral devices used as part of EL1 Baremetal application need to be passthrough in xen-overlay.dtsi (<petalinux_project>/project-spec/meta-user/recipes-bsp/device-tree/files/xen-overlay.dtsi)
- For example , The "Hello world" standalone application uses uart1 to print messages, so passthrough the uart1 device in xen-overlay.dtsi, as shown below,
Code Block theme Midnight &&uart1 { xen,passthrough = <0x1>; };- Build the images for XEN with above change using the petalinux. Please refer section "Configuring and building XEN from source using PetaLinux 2017.1" in XEN Hypervisor for steps.
Xen Config file
- XEN needs xl configuration file, which describes the DomU guest.
- Here is a content of hello_world.cfg, an configuration file used to run Hello World application as an domU guest
Code Block theme Midnight #Guest name name = "hello_world" # Kernel image to boot kernel = "xapp_hello_world_el1.bin" # Kernel command line options - Allocate 8MB memory = 8 # Number of VCPUS vcpus = 1 # Pin to CPU 0 cpus = [1] irqs = [ 54 ] iomem = [ "0xff010,1" ]- As shown in configuration file, bin file generated through SDK (i.e. xapp_hello_world_el1.bin generated through SDK in previous steps)
has to be mentioned as kernel image in "kernel" field of xen guest configuration file. Also, "irqs" and "iomem" fields are updated
with uart1 interrupt id and base address receptively. Similar way these fields in config needs to be updated for the other peripherals
as well, if application is using any. - More information on config file can be found at
https://xenbits.xen.org/docs/unstable/man/xl.cfg.5.html
How to Execute an EL1 DomU Baremetal Application
- Copy the bin file xapp_hello_world_el1.bin generated in previous steps and hello_world.cfg to SD card or else use tftp to get them
in dom0's files system after booting dom0. - Boot XEN dom0 with the images built in earlier steps. Refer section "TFTP Booting Xen and Dom0 2017.1" in XEN Hypervisor, for dom0 boot up steps.
- Once XEN dom0 is up and running, copy the config file hello_world.cfg and bin file xapp_hello_world_el1.bin from SD card to dom0 file system/use tftp to get them in dom0 file system
- Go to that path in dom0 file system and Execute below command
- xl create hello_world.cfg
- You'll see hello world baremetal application running as XEN domU , prints in bare metal application would be available on uart1 console
- More detail on xl command can be found at https://xenbits.xen.org/docs/unstable/man/xl.1.html