Table of Contents
| Table of Contents |
|---|
Document History
| Date | Version | Author | Description of Revisions |
| 05/12/2016 | 1.0 | Rutuja Chavan & Rajesh Gugulothu | Initial version |
| 02/15/2017 | 1.1 | Rutuja Chavan | 1. Updated to 2016.4 tool version 2. Designed for ZCU102 Rev1.0 and RevB/C/D Boards |
| 05/17/2017 | 2.0 | Rajesh Gugulothu | 1. Updated to 2017.1 tool version 2. Designed for ZCU102 Rev1.0 and RevB/C/D Prod silicon Boards |
| 12/06/2018 | 2.1 | Surender Polsani | 1. Updated to 2018.1 tool version 2. Designed for ZCU102 Rev1.0 and RevB/C/D Prod silicon Boards |
Summary
The Zynq® UltraScale+™ MPSoC USB 3.0 controller consists of two independent dual-role device (DRD) controllers. Both can be individually configured to work as host or device at any given time. The USB 3.0 DRD controller provides an eXtensible host controller interface (xHCI) to the system software through the advanced eXtensible interface (AXI) slave interface. An internal DMA engine is present in the controller and it utilizes the AXI master interface to transfer data. There are four primary types of communication defined by the USB protocol, based on which any required application can be built without changing the firmware or underlying hardware for different applications. These transfer types are Control Transfer, Bulk Transfer, Isochronous transfer and Interrupt transfer. Zynq® UltraScale+™ MPSoC USB3.0 controller supports all four types of transfers.This Tech Tip explains how to enable all the configuration options, step by step procedure to use the Zynq® UltraScale+™ MPSoC USB 3.0 controller in device mode and make use of bulk transfer type for a serial communication device abstraction using the USB 3.0. The CDC (ACM) class in the USB Component is used for data communication. You can typically use it in applications like serial COM or UART communicationThis design covers:- The CDC design example block diagram and overview
- How to configure all the Zynq® ultrascale +™ MPSoC Linux kernel and dependent files for the CDC class reference
- Setup to test the CDC functionality with Windows as well as Linux host machine
Implementation
| Implementation Details | |
| Design Type | PS Only |
| SW Type | Zynq® UltraScale+™ MPSoC Linux OS |
| CPUs | ARM Cortex A53 Core 0 running at 1.1 GHz |
| PS Features |
|
| Boards/Tools | ZCU102 Rev1.0 board, ZCU102 Rev B/C/ D Prod silicon boards |
| Xilinx Tools Version | Xilinx SDK 2018.1, Petalinux 2018.1 |
| Other Details | -- |
| Files Provided | |
| Zynqmp_CDC_design_files_2018_1.zip | See Appendix A for the descriptions of the files |
Block Diagram
The design explained in the below figure shows how to use Zynq® UltraScale+™ MPSoC USB 3.0 controller as a communication class device. ZCU102 board (running Linux OS) connection with host machine. Windows/Linux PC/laptop USB host controller is used for all host functionality.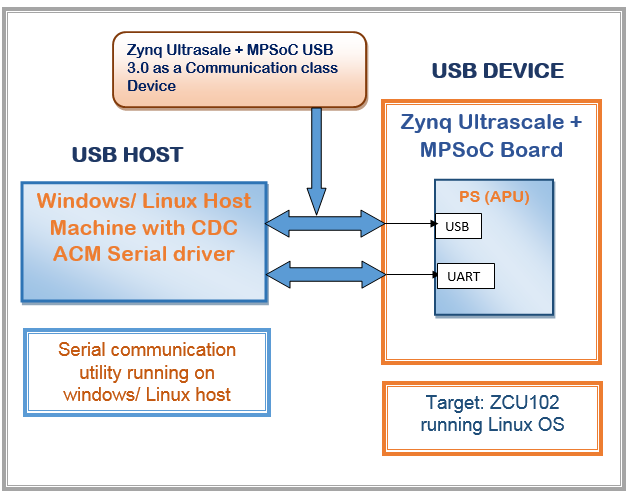 |
| Figure 1: Zynq ultrascale + MPSoC USB 3.0 CDC reference block diagram |
Linux: Step by Step procedure for creating Zynq® UltraScale+™ MPSoC USB 3.0 controller’s communication device class functionality
This section explains the CDC Abstract Control Model (ACM) Linux gadget driver details, how to configure the Linux source to support serial gadget driver for Zynq® UltraScale+™ MPSoC USB 3.0. and, also step by step procedure to test the Zynq® UltraScale+™ MPSoC USB 3.0 communication device class functionality on windows/Linux host machines.
CDC ACM Linux gadget driver:
The gadget serial driver is a Linux USB gadget driver, a USB device side driver. It runs on a Linux system that has USB device side hardware; for example, a PDA, an embedded Linux system, or a PC with a USB development card. The gadget serial driver talks over USB to either a CDC ACM driver or a generic USB serial driver running on a host PC. On the device-side Linux system, the gadget serial driver looks like a serial device. On the host-side system, the gadget serial device looks like a CDC ACM compliant class device or a simple vendor specific device with bulk in and bulk out endpoints, and it is treated similarly to other serial devices.The host side driver can potentially be any ACM compliant driver or any driver that can talk to a device with a simple bulk in/out interface. With the gadget serial driver and the host side ACM or generic serial driver running, you should be able to communicate between the host and the gadget side systems as if they were connected by a serial cable.Configuring and building the Linux Operating System for Zynq Ultrascale + MPSoC
- Follow the PetaLinux SDK installation user guide in this document. Execute the steps till the PetaLinux Working Environment Setup section for installing PetaLinux SDK to your Linux machine.
- After installing PetaLinux SDK create a project in the PetaLinux installed directory by executing $ petalinux-create –t project –n <project_name> -s <path-to-bsp> command
- Above command will create a project with the user provided name under the PetaLinux installed directory. Change the directory to project directory which is created above. $ cd <project_name>
- Configure the Linux source to support communication device class driver by executing PetaLinux command $ petalinux-config -c kernel
- Go to Device Drivers -->
- USB Support -->
- USB Gadget Support-->
enable required drivers as shown in figure below
- USB Gadget Support-->
- USB Support -->
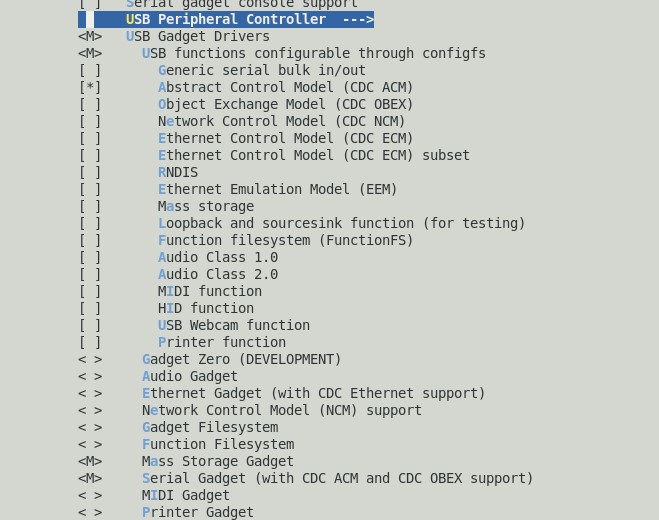 |
| Figure 2: Linux kernel configuration withUSB 3.0 device mode CDC ACM support |
- Go to File Systems -->
- Pseudo filesystems --> enable Userspace-driven configuration filesystems as shown in figure below.
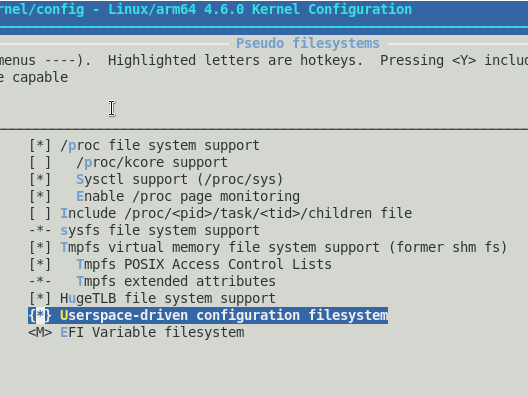 |
| Figure 3: Linux kernel configuration for Userspace-driven configuration filesystem |
- Ensure that parameters shown in the below figure are selected in the kernel source tree and save & exit the configuration file.
- As this Tech Tip is intends to configure the Zynq® UltraScale+™ MPSoC USB 3.0 controller in device mode. Add below mentioned node at end of system-user.dtsi file present at "<project_name>/project-spec/meta-user/recipes-dt/device-tree/files"
- &dwc3_0 {
dr_mode = "peripheral";
status = "okay";
}; - With the above changes in kernel configuration and device tree, build petalinux using command "$ petalinux-build". This builds the image.ub executable and some other USB communication device class gadget driver support modules.
- Create BOOT.BIN using petalinux SDK tool, change to images/linux (cd images/linux) directory and run below command
- $ petalinux-package --boot --fsbl zynqmp_fsbl.elf --fpga design_1_wrapper.bit --u-boot u-boot.elf. This will create BOOT.BIN under images/linux
copy the following files into the SD card
- BOOT.BIN which is created in the above section.
- configfs.ko file from following path "<project_name>/build/tmp/work/zcu102_zynqmp-xilinx-linux/linux-xlnx/4.14-xilinx-v2018.1+gitAUTOINC+4ac76ffacb-r0/image/lib/modules/4.14.0-xilinx-v2018.1/kernel/fs/configfs/"
- libcomposite.ko file from following path "<project_name>/build/tmp/work/zcu102_zynqmp-xilinx-linux/linux-xlnx/4.14-xilinx-v2018.1+gitAUTOINC+4ac76ffacb-r0/image/lib/modules/4.14.0-xilinx-v2018.1/kernel/drivers/usb/gadget/”
- u_serial.ko file from following path "<project_name>/build/tmp/work/zcu102_zynqmp-xilinx-linux/linux-xlnx/4.14-xilinx-v2018.1+gitAUTOINC+4ac76ffacb-r0/image/lib/modules/4.14.0-xilinx-v2018.1/kernel/drivers/usb/gadget/function"
- usb_f_serial.ko from following path "<project_name>/build/tmp/work/zcu102_zynqmp-xilinx-linux/linux-xlnx/4.14-xilinx-v2018.1+gitAUTOINC+4ac76ffacb-r0/image/lib/modules/4.14.0-xilinx-v2018.1/kernel/drivers/usb/gadget/function"
- usb_f_acm.ko from following path "<project_name>/build/tmp/work/zcu102_zynqmp-xilinx-linux/linux-xlnx/4.14-xilinx-v2018.1+gitAUTOINC+4ac76ffacb-r0/image/lib/modules/4.14.0-xilinx-v2018.1/kernel/drivers/usb/gadget/function"
- g_serial.ko from following path "<project_name>/build/tmp/work/zcu102_zynqmp-xilinx-linux/linux-xlnx/4.14-xilinx-v2018.1+gitAUTOINC+4ac76ffacb-r0/image/lib/modules/4.14.0-xilinx-v2018.1/kernel/drivers/usb/gadget//legacy"
- Image.ub from “<project_name>/images/linux”
ZCU102 Board Setup:
- Connect the power supply to the ZCU102 board(Rev1.0 /B/C/D). Do not switch the power on.
- Connect the Micro USB cable into the ZCU102 Board Micro USB port J83, and the other end into an open USB port on the host Machine as shown in figure below.
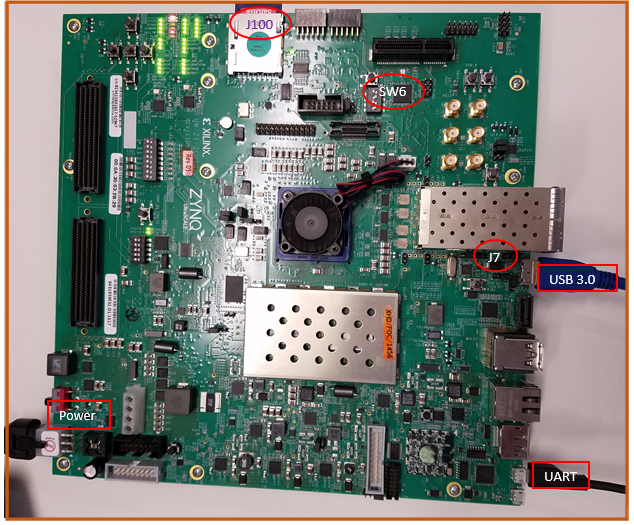 |
| Figure 4: ZCU102 board setup for Communication device class |
- Make sure the switches are set as shown in figure below. which allows the ZCU102 board to boot from the SD-MMC card.
- Figure 5 shows SD boot mode settings for ZCU102 Rev-B/C/D board
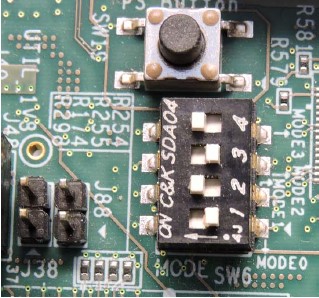 |
| Figure 5: SD boot mode switch setting for ZCU102 Rev B/C/D Board |
- Figure 6 shows SD boot mode settings for ZCU102 Rev1.0 baord
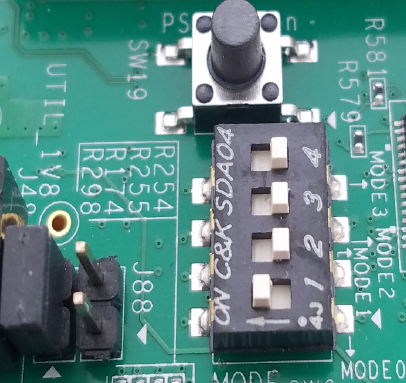 |
| Figure 6: SD boot mode settings for ZCU102 Rev1.0 board |
- To operate board in device mode, OFF J7 jumper as shown in board figure 4 (ZCU102 board setup in device mode).
Testing Linux Zynq® UltraScale+™ MPSoC USB 3.0 communication device class functionality on Windows host PC:
- Load the SD card into the ZCU102 board, in the J100 connector
- Power on the board.
- Start the installed UART terminal program on your host PC (e.g.. Tera Term on a Windows PC).
- Use the following UART configuration: Baud rate = 115200, bits=8, parity=none, and stop bits =1. For UART-0, select COM port with interface-0
- Board will start booting with Linux and after few seconds Linux prompt will be appeared on the UART terminal program running on your host PC.
- Petalinux console login details.
- user : root
- password: root
- Use below command to mount the SD card onto target board.
- $mount /dev/mmcblk0p1 /mnt/
- cd /mnt/
- Insert the following modules in the Linux kernel which enables Communication class device gadget support in the Linux kernel and configures Zynq® UltraScale+™ MPSoC USB 3.0 as serial communication device.
- insmod configfs.ko
- insmod libcomposite.ko
- insmod u_serial.ko
- insmod usb_f_serial.ko
- insmod usb_f_acm.ko
- insmod g_serial.ko
- Now the Zynq® UltraScale+™ MPSoC USB 3.0 gadget serial device is ready.
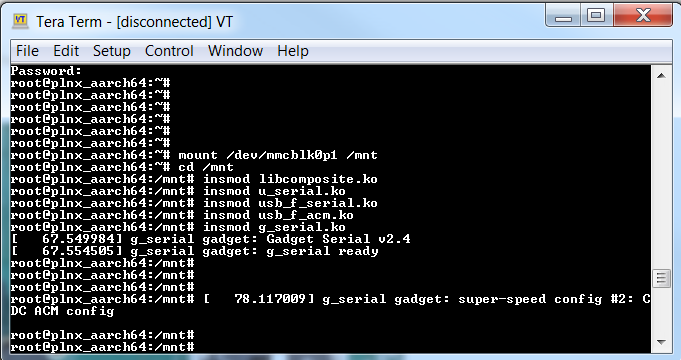 |
| Figure 7: Zynqmp linux console after successful installation |
- Now connect USB 3.0 cable between board and host machine. Connect type A male side end to host machine USB3.0 port and Micro B male side end of cable to USB3.0 connector (J96) on ZCU102 board as shown in figure 4 ZCU102 board setup.
- Host PC tries to enumerate the Zynq® UltraScale+™ MPSoC USB 3.0 as a communication class device and try to install the appropriate windows driver from network.
Installation steps for windows CDC ACM driver
- In the windows host machine, click on the start button and Search for Device Manager and click on it to select.
- This will open Device manager wizard window. Check for other devices. Right click on Gadget Serial v2.4 and click to Update Driver Software as shown in figure below. Make sure that host machine is connected over network.
- After installing the driver software successfully the Zynq® UltraScale+™ MPSoCUSB 3.0device is detected as a virtual communication port (PI USB to Serial Port) at the host PC side and on the other side i.e. target side. USB serial gadget driver is registered as /dev/ttyGS0.
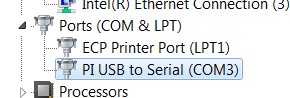 |
| Figure 8: Gadget driver after successful installation> |
- Start the installed UART terminal program on your host PC (e.g. Tera Term on a Windows PC) with this newly detected virtual COM port.
- Use the UART configuration as: Baud rate = 115200, bits = 8=, parity =none, and stop bits =1.
- In order to send data from the target device we need to use the USB serial gadget drive device file ‘/dev/ttyGS0’. We can use echo command as shown below to send the data from the device to the windows PC.
- $ echo Hello >/dev/ttyGS0
- After that you should see the Hello on the virtual communication port (ex: COM9) as shown below figure.
 |
| Figure 9: Serial terminal shows successful transfer of data from target board to host machine |
- In the similar way if we want to send data from the host computer to the device write some string (ex: Hello) on the virtual terminal (ex: COM9) opened on the host computer. Read the data at the device side by opening the serial gadget driver device file using "cat /dev/ttyGS0" command as shown in figure below
 |
| Figure 10: Serial terminal shows successful transfer of data from host machine to target board |
The CDC ACM only driver that comes with the Linux kernel is supported on Linux host PC.
- Once the device is attached inspect the log to obtain the device file names used on the host by entering the following command on the terminal window of Linux (Red hat/ Ubuntu) machine.
- $ dmesg | tail -n 20
 |
| Figure 11: Inspecting log for successful device installation |
- The serial communication port get registered as 'ttyACM0' meaning it will show up as '/dev/ttyACM0'.
- In order to send data from the target device we need to use the USB serial gadget driver device file '/dev/ttyGS0'. We can echo command to send data from the device to the Linux host computer.
 |
| Figure 12: Sending data over USB 3.0 ttyGS0 |
- Use the following command to display data received over the USB serial connection from the USB device on the Linux host machine
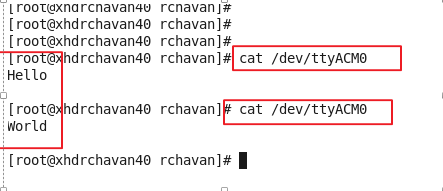 |
| Figure 13: Reading data on ttyACM0 |
- In the similar way if we want to send data from the host computer to the device we should first send the data from host by running following command
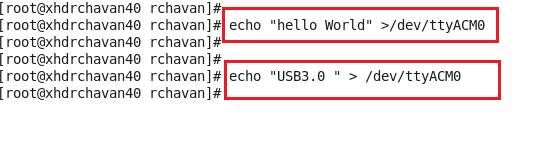 |
| Figure 14: Sending data over ttyACM0 |
- Read it on the device using "$cat /dev/ttyGS0" command.
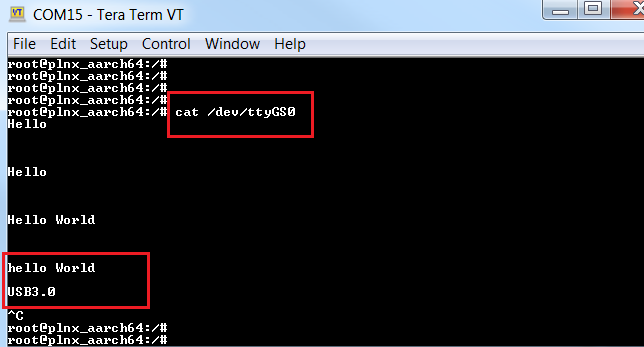 |
| Figure 15: Reading data on target at ttyGS0 |
Zynqmp_CDC_design_files_2018_1.zip
- Design_files
- Rev_1_0_prebuilt_images
- BOOT.BIN
- image.ub
- configfs.ko
- libcomposite.ko
- u_serial.ko
- usb_f_serial.ko
- usb_f_acm.ko
- g_serial.ko
- Rev_BCD_prebuilt_images : Image for Rev-B/Rev-C/Rev-D Prod silicon boards
- BOOT.BIN
- image.ub
- configfs.ko
- libcomposite.ko
- u_serial.ko
- usb_f_serial.ko
- usb_f_acm.ko
- g_serial.ko
- Rev_1_0_prebuilt_images