Testing Fixed Link support in U-Boot
In this brief demo we shall be testing the fixed link support in uboot. To this this, the GEM2 is routed to the GEM3 as shown below. There will be an echo_server application running on the CortexR5
using GEM2, and uboot running on CortexA53 using GEM3
Create the Hardware:
The user should create the hw design in Vivado 2018.1, and connect as shown above.Generate Block Design, Create HDL wrapper, and Generate Bitstream and export to SDK
Create the Software:
Create the Echo Server:
Note: Here, we shall be making a local copy of the LwIP. Please see the wiki here for help.Open the lwip202_v1_0\src\contrib\ports\xilinx\netif\xemacpsif_physpeed.c, and fix the link_speed to 1000:

Update the SDK Repositories with this modified version of the LwIP, and do a rescan.
Launch SDK, and create the LwIP Echo Server Application template targeting the CortexR5:


We want the echo server to use the GEM2. To do this, open the platform_config.h file in the echo_server src folder
and make sure that this is set to the GEM2 Base Address. To a F3 on the address, and this will show you in the xparameters.h
what this is set to.
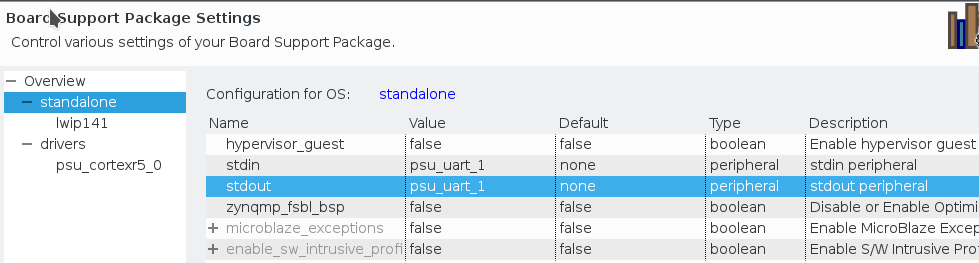
Also, make sure that the STDIN/OUT is set to ps_uart_1, as the u-boot will be using ps_uart_0:
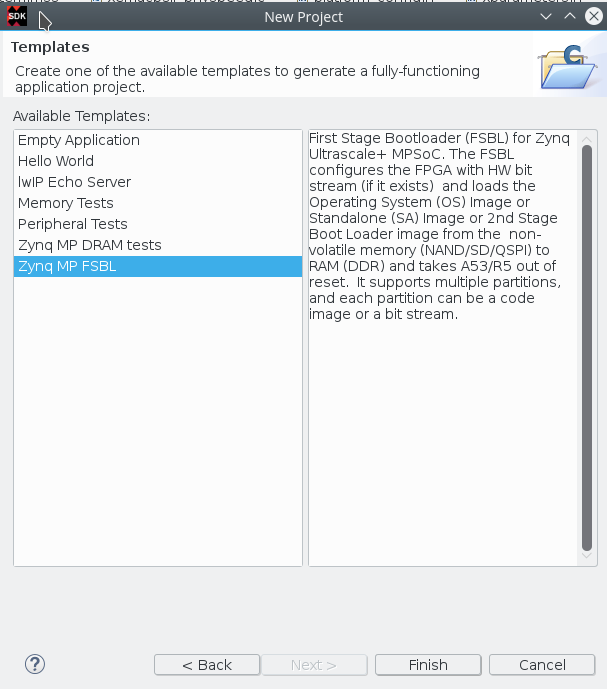
Create the FSBL:
User can create the FSBL using the Template in SDK:
Create the PMU Firmware:
User can create the PMU Firmware using the Template in SDK:

Building the U-boot:
- git clone https://github.com/Xilinx/u-boot-xlnx.git
- cd u-boot-xlnx
- git checkout xilinx-v2018.1 (Or master if this doesnt exist yet)
- export CROSS_COMPILE=aarch64-linux-gnu-
- export ARCH=aarch64
- Update the GEM node to add fixed link support:
- Open arch/arm/dts/zynqmp-zcu102-revA.dts

- git clone https://git.kernel.org/pub/scm/utils/dtc/dtc.git
- cd dtc
- make
- export PATH=$PATH:/<Your Path>/dtc
- cd u-boot-xlnx
- make xilinx_zynqmp_zcu102_rev1_0_defconfig
- make
Build the ATF:
- git clone https://github.com/Xilinx/arm-trusted-firmware.git
- cd arm-trusted-firmware
- git checkout xilinx-v2018.1 (Or master if this doesnt exist yet)
- export CROSS_COMPILE=aarch64-linux-gnu-
- export ARCH=aarch64
- make DEBUG=0 RESET_TO_BL31=1 PLAT=zynqmp bl31
Create the SD boot-able Image:
First we need to create the BIF. There is a template below which can be used:
| Code Block | ||
|---|---|---|
| ||
the_ROM_image:
{
[fsbl_config] a53_x64
[bootloader] zynqmp_fsbl.elf
[pmufw_image] pmufw.elf
[destination_device=pl] design_1_wrapper.bit
[, destination_cpu=a53-0,exception_level=el-3,trustzone] bl31.elf
[, destination_cpu=a53-0,exception_level=el-2] u-boot.elf
[, desinationdestination_cpu=r5-0] echo_server.elf
} |
| Code Block | ||
|---|---|---|
| ||
bootgen -image bootgen.bif -arch zynqmp -w -o i BOOT.bin |
Test on Hardware:
Place the BOOT.bin created above onto the SD card and power on the board. Open the two serial ports.Then set the IP address, and ping the GEM2:
