Zynq UltraScale+ MPSoC Graphics - 3D Vehicle Model
Table Of Contents
| Table of Contents |
|---|
Document History
| Date | Version | Author | Description of Releases |
| 4/10/2016 | 1.0 | Rajesh Gugulothu | Initial Release |
| 24/2/2017 | 2.0 | Rajesh Gugulothu | Updated with 2016.4 tools Release and Added design files to support zcu102 Rev-B/Rev-D ,Rev-1.0 boards |
Summary:
- Zynq® UltraScale+™ MPSoC delivers unprecedented levels of heterogeneous multi-processing and combines seven user programmable processors including Quad-core ARM® Cortex™-A53 Application Processing Unit (APU), Dual-core 32-bit ARM® Cortex™-R5 Real Time Processing Unit (RPU), and ARM® Mali™-400 MP2 Graphics Processing Unit (GPU). It is Industry’s First Multi-Processor SoC delivering 5x system level performance-per-watt and any-to-any connectivity.
- The main aim of this tech tip is to provide the step by step procedure to compile and build the OpenSceneGraph high performance 3D graphics toolkit for Zynq® UltraScale+™ MPSoC target, on Linux host machine and also walks through the steps to run a opensource OSG based 3D car model on the ZCU102 board.
Implementation
| Implementation Details | |
| Design Type | PS only |
| SW Type | Linux. |
| CPUs | Quad-core ARM® Cortex™-A53 Application Processing Unit,ARM® Mali-400 MP2 Graphics Processing Unit. |
| PS Features | DDR controller,UART,SD/eMMC interface, USB 3.0,DisplayPort |
| Boards/Tools | zcu102 Rev-B,Rev-D |
| Xilinx Tools Version | SDK 2016.4 |
| Other Details | 1080p /4K display. |
| Host Type | Ubuntu Linux 16.04 LTS |
| Files Provided | |
| ZynqMPSoC_3D_Graphics_Model | Archive |
Description:
- The OpenSceneGraph is an OpenSource, cross-platform graphics toolkit for the development of high-performance graphics applications such as flight simulators, games, virtual reality and scientific visualization. It is based around the concept of a SceneGraph, providing an object-oriented framework on top of OpenGL. This frees the developer from implementing and optimizing low-level graphics calls and provides many additional utilities for rapid development of graphics applications.
- This Tech tip showcases 3D graphics rendering capabilities of ARM® Mali™-400 MP2 GPU integrated in Zynq® UltraScale+™ MPSoC. It executes OpenSceneGraph (OSG) based 3D graphics application on GPU. Executing OSG based graphics application requires OSG middleware layer which runs on top of the GPU software stack. OSG middle-ware layer is configured to support OpenGL ES 2.0 in order with communicate with GPU software stack. At the application side, it provides the open source 3D graphics application programming interface to develop and execute graphics application.
Highlights of the demo Execution:
- Boots SMP Linux on APU subsystem.
- Executes 3D graphics application (OSG format) using OSG middle-ware which executes on top of the GPU software stack.
- X-server windowing system is used to display the rendered graphics application on to Sink device (Monitor) using Processing System DisplayPort controller
- GPU offloads the APU for the OpenGL ES2 API based applications, rendering a 3D vehicle graphics model written in OSG format.
Requirements:
- Linux Host machine
- Xilinx ZCU102 evaluation kit with power supply.
- Class 10 SD card (4GB or more).
- Micro USB to Standard USB cable
- 1080p Monitor or Full HD Monitor and DisplayPort Cable.
- USB 3.0 connector or USB 2.0 micro cable to standard USB female adapter, USB Hub to connect USB mouse and USB keyboard or connect USB keyboard with mouse integrated etc.
Block Diagram:
- Below Block diagram depicts the Zynq® UltraScale+™ MPSoC based OSG graphics application execution software flow diagram.
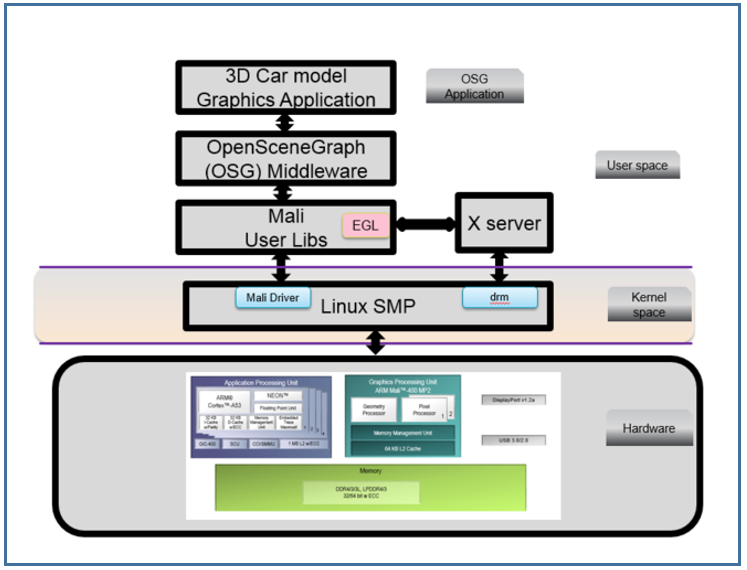 |
| Fig: OSG graphics application execution software flow diagram |
This Tech Tip covers below sections as follows
- Running a 3D vehicle model using prebuilt images.
- Compiling and building complete software for Running a 3D vehicle model.
- ZCU102 board setup.
- Demo Execution.
Running a 3D vehicle model using prebuilt images:
- The fastest way to execute the demo is using prebuild images supplied with this tech tip. This section explains step by step procedure to execute the demo with prebuilt images.
- Note: If you want to build the complete software from the sources , skip this section and follow from the next section on wards.
- Download the supplied ZynqMPSoC_3D_Graphics_Model.zip file and extract it to the windows machine local directory.It will get extracted as
- Rev_1_0_Design_Files -It has boot-able images for Rev-1.0 board.
- Rev_D_Design_Files-It has boot-able images for Rev-B/Rev-C/Rev-D boards.
- OSG_Files-It has OSG prebuilt binaries and card model executable.
- Copy the boot-able images ( According to the board ) and OSG prebuilt binaries on to a SD card.
- Make sure that , SD card has below listed images before going to execute on the target.
- BOOT.bin
- image.ub
- lib.tar.gz
- bin.tar.gz
- run_osg.sh
- F612_mod.osg
- Boot the images by following the "ZCU102 board setup" section.
- Once the board boots up, login username and password as "root".
- mount the SD card boot partition and copy the OSG prebuilt images to /home/ directory.
- $mount /dev/mmcblk0p1 /media
- $cp lib.tar.gz bin.tar.gz run_osg F612_mod.osg /home
- change the directory to /home and extract the OSG libraries and binaries
- $ tar -xvf lib.tar.gz
- $ tar -xvf bin.tar.gz
- and below command to run a OSG based 3D card model.
$ ./run_osg.sh
Observe the car model appears on the monitor like as shown in the figure "Fig: OSG based 3D card model" at the end of the document.Try to rotate the model with the mouse connected to the board.
Compiling and building complete software for Running a 3D vehicle model:
- This section walks through the step by step procedure to build the OSG source for Zynq® UltraScale+™ MPSoC target on Linux host machine.And also has the procedure to build the Linux images ,preparing the SD card for execution.
Procedure to compile and build OSG:
- 1.Download the ZCU102_3D_Graphics.zip attached here with this Tech tip and Extract it to the local directory of Linux host machine.
- 2.Create a directory ( Example : Rootfs ) and go to that directory to extract the root.cpio file using below command.
- $cd <Local_directroy_path>Rootfs
- $cpio -idmv<<Design_files_extracted_directory>/root.cpio
- This root.cpio archive file contains the rootfile system of a X11 based match-box desktop and also has mali user libraries, other required libraries to compile the OSG for Zynq® UltraScale+™ MPSoC target.
- 3.Now Download the OpenSceneGraph source archive file from http://www.openscenegraph.org/index.php/download-section/stable-releases/206-openscenegraph-3-4-0-released path.
- Note:As per this tech tip , we have compiled version-3.4.0 ( OpenSceneGraph-3.4.0.zip ) of OSG source and same procedure has to be followed for >compiling remaining versions.
- 4.Copy the above downloaded OSG OpenSceneGraph-3.4.0.zip file to the local directory of your Linux host machine and Unzip it to the same directory.
- 5.There are few modifications has to be done in the source, to support Zynq® UltraScale+™ MPSoC target. Follow the steps mentioned in the Appendix A to do these changes.
- 6.Now set the OSG source with the required Mali user libraries and include paths, from the extracted match-box rootfile system.To do this, create a configure.sh ( like as shown below ) file under the extracted OSG source directory and make sure that below mentioned option's paths are set properly in the configuration file.
- Note: Find the configuration.sh file in shared design files as a reference.
- DCMAKE_C_COMPILER
- DCMAKE_CXX_COMPILER
- DCMAKE_LIBRARY_PATH
- DCMAKE_INCLUDE_PATH
- DOPENGL_egl_LIBRARY
- DOPENGL_gl_LIBRARY
- DOPENGL_INCLUDE_DIR
- 7.Set the proper cross compilation path from the installed location of the SDK/Petalinux tool.
- Note: This tech tip assumes that latest xilinx SDK or petalinux tool is installed on the Linux host system.
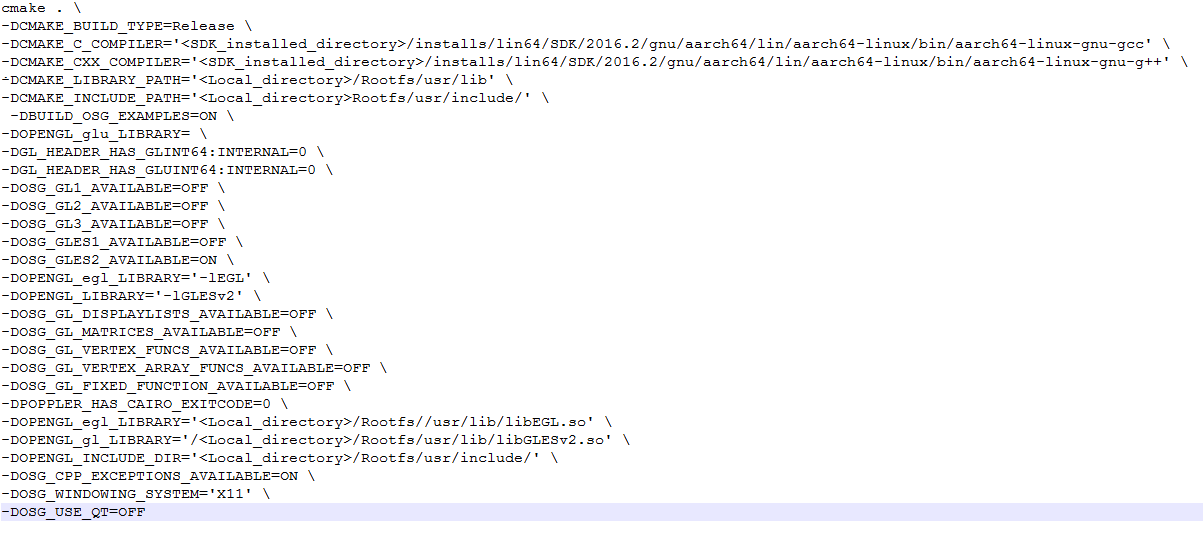 |
| Fig: Configuration file |
- 7.save the above created configuration file and give the appropriate execution permissions.
- 8.Now run the configuration file to by below command.
- $ ./configure.sh
- 9.Once the configuration is done , run the make command to build the OSG source.
- $ make
- 10.Make command will take some time to build the OSG . Once the build is done 100%, you can find the generated bin and lib directories under OSG source.These two directories need to copy to the SD in coming steps.
- 11. Compressing the OSG lib directory is required before copying to SD card, to preserve the soft links. Follow below command to compress OSG lib directory.
- $tar -cvzf lib.tar.gz lib/
- 12. Now create the Linux boot images by following below section "Procedure to build Linux Images".
- Note:For quick reference , use the prebuilt Linux boot images released with this tech tip under Design_files/BOOT directory.
- 13.In case of using prebuilt Linux boot images ,skip the "Procedure to build Linux Images" section.
Procedure to build Linux Images
This section describes how to build the Linux boot images for Zynq® UltraScale+™ MPSoC. This section covers the following topics
- Preparing the Linux Kernel using the Petalinux 2016.4
- BSP Creation
- Kernel Configuration
- Device Tree Configuration
- Building the kernel and device tree blob
- Preparing the FSBL
- Preparing the BOOT.bin file
- 1.Follow the http://www.wiki.xilinx.com/Zynq+UltraScale%EF%BC%8BMPSoC+Graphics-+GPU+Profiling+using+ARM+Streamline+performance+analyzer Tech Tip "compiling and building the Linux images " section and create the below images and copy them on to the SD card.
- BOOT.bin
- image.ub
- 2.make sure that , final SD card contains fallowing images.
- BOOT.bin
- image.ub
- lib.tar.gz
- bin
- run_osg.sh
- F612_mod.osg
ZCU102 Board Setup:
- Below steps explains about ZCU102 board setup.
- 1. Connect the Micro USB cable into the ZCU102 Board Micro USB port J83, and the other end into an open USB port on the windows PC. This cable will be used for UART over USB communication.
- 2. Insert SD card into the SD card slot J100.
- 3. Set the SW6 switches as shown for the different boards. This configures board boot mode as SD boot mode.

- 4. Connect 12V Power to the ZCU102 6-Pin Molex connector.
- 5. Connect the Display monitor using DisplayPort cable to U50 connector of the board.
- 6. Connect a USB hub to the j96 connector on the board and connect a mouse to the USB hub.
- 6. The following figure shows the ZCU102 board with all the required connections
 |
| Fig: zcu102 board setup |
Demo Execution:
- 1.Switch on the ZCU102 Board at SW1 (red switch).
- Note: Make sure that any one of the serial console utility ( Example: Tera term , putty ) is installed on the the windows machine to which UART cable is connected.This Tech tip exercises with Tera Term.
- 2.connect the Tera Term with the interface 0 of the UART bridge like as shown in the below figure
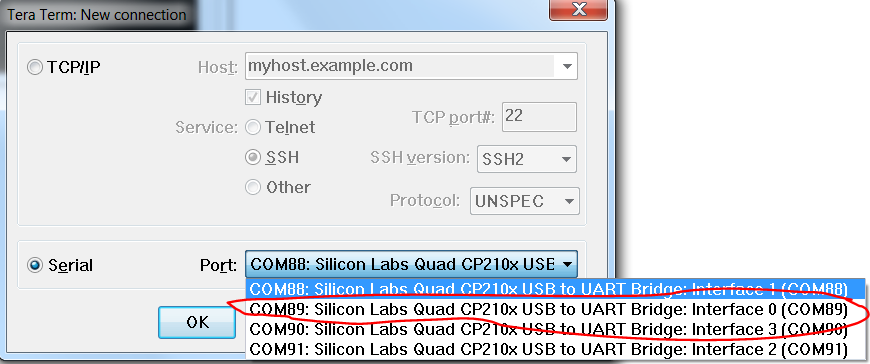 |
| Fig: Serial communication port selection |
- 3.After the Linux is boots up ,Login prompt appears.enter the login with the username as "root".
- 4.Copy the lib.tar.gz ,bin directory ,run_osg.sh, F612_mod.osg files to the /home directory.
- 5.Extrac the lib.tar.gz file in the same directory.
- $tar -xvf lib.tar.gz
- 6.Now run the script run_osg.sh present at the same directory and observe a 3D car model is running on the monitor.
- $ ./run_osg.sh
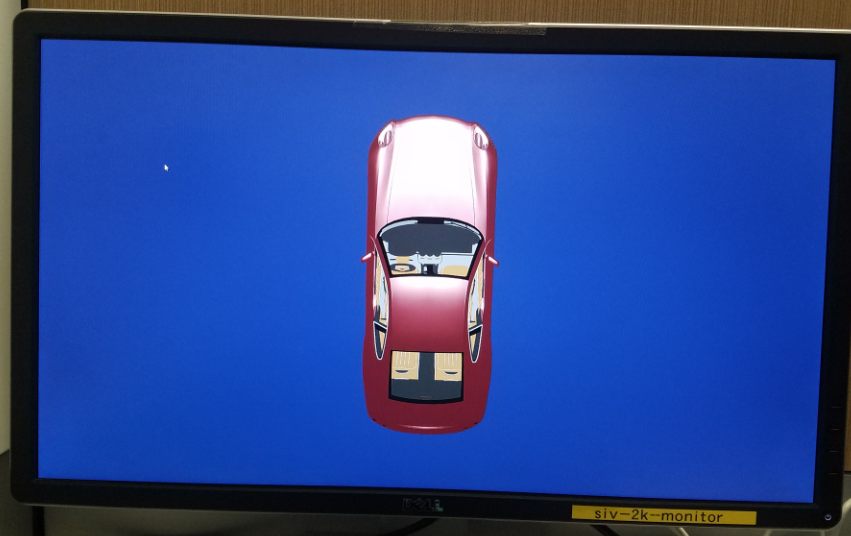 |
| Fig: OSG based 3D car model |
Appendix A:Modification in OSG source
- Follow the below steps to make few required changes in OSG source to support current target.
- 1.Change the directory to extracted OSG source.
- 2.change the color format to RGB565 In the file <extracted OSG source directory>/src/osg/GraphicsContext.cpp like as follows
- Replace the below lines a,b,c
- a-> red(8),
- b-> blue(8),
- c->green(8),
- with d,e,f
- d-> red(5),
- e-> blue(5),
- f->green(6),
- 3.comment the below line in <extracted OSG source directory>/examples/osgframerenderer/osgframerenderer.cpp file.
- glReadBuffer(camera->getDrawBuffer());
- 4.Replace the line " #ifndef HAVE_BOOLEAN " with #ifdef HAVE_BOOLEAN in the <extracted OSG source directory>/src/osgPlugins/jpeg/ReaderWriterJPEG.cpp
Appendix B:File Description in Design directory
- ZynqMPSoC_3D_Graphics_Model.zip
- Rev_1_0_Design_Files
- BOOT.bin: Boot-able image
- image.ub: kernel image and Device tree blob
- Rev_D_Design_Files
- BOOT.bin: Boot-able image
- image.ub: kernel image and Device tree blob
- OSG_Files
- lib.tar.gz: osg libraries
- bin.tar.gz: osg binaries
- F612_mod.osg:osg card model
- configuration.sh:osg configuration file
- Rootfs
- rootfs.cpio: Root file-system for compiling the OSG.