Zynq UltraScale+ MPSoC VCU TRD 2019.2 - PCIe
...
The DMA/Bridge Subsystem for PCI Express provides protocol conversion between PCIe transaction layer packets (TLPsTLPs(Transaction Layer Packets) and AXI transactions. The hardware scatterSGL(Scatter-gather list (SGLList) DMA interface is exercised to handle buffer management at the Endpoint to enable the memory-mapped interface.
...
In the system to card direction, the DMA block moves data from the host memory to the PL-side through PCIe and then writes the data to PS-DDR via the AXI-MM interface. Then VCU IP reads data from PS-DDR, performs Video encoding/decoding and writes it back to the same memory. Lastly, in card to system direction, DMA reads PS-DDR via the AXI-MM interface and writes to host system memory through PCIe.

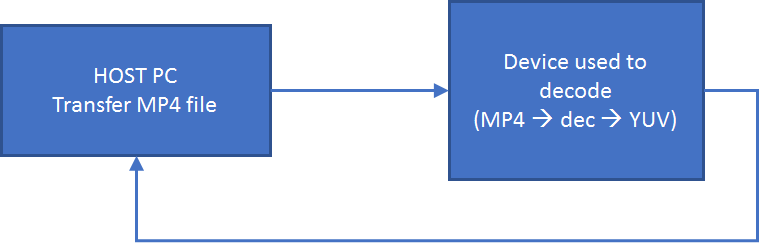
Figure 1: VCU PCIe Hardware Block Diagram
Components, Features, and Functions
4-lane integrated PCIe block with a maximum link speed of 8 GT/s (GT/s is Giga transfers Transfers per second)
- 128-bit at 250 MHz
...
1.2 Run Flow
The TRD package is released with the source code, Vivado project, Petalinux BSP, host software required for PCIe and SD card image that enables the user to run the demonstration. It also includes the binaries necessary to configure and boot the ZCU106 board. Prior to running the steps mentioned in this wiki page, download the TRD package and extract its contents to a directory referred to as ‘TRD_HOME' which is the home directory.
Refer below link to download all TRD contents.
TRD package contents are placed in the following directory structure.
| Code Block | ||
|---|---|---|
| ||
rdf0428-zcu106-vcu-trd-2019-2 ├── apu │ └── vcu_petalinux_bsp ├── images │ ├── vcu_10g │ ├── vcu_audio │ ├── vcu_hdmi_multistream_xv20 │ ├── vcu_hdmi_rx │ ├── vcu_hdmi_tx │ ├── vcu_llp2_hdmi_nv12 │ ├── vcu_llp2_hdmi_nv16 │ ├── vcu_llp2_hdmi_xv20 │ ├── vcu_llp2_sdi_xv20 │ ├── vcu_multistream_nv12 │ ├── vcu_pcie │ ├── vcu_sdirx │ ├── vcu_sditx │ └── vcu_sdi_xv20 ├── pcie_host_package │ ├── COPYING │ ├── etc │ ├── include │ ├── libxdma │ ├── LICENSE │ ├── README.md │ ├── tools │ └── xdma ├── pl │ ├── constrs │ ├── designs │ ├── prebuild │ ├── README.md │ └── srcs └── README.txt |
The user needs to copy all the files from the $TRD_HOME/images/vcu_pcie/ to FAT32 formatted SD card directory.
Insert the board into the PCIe slot of the HOST machine and switch onboard. Board bootup will take around 15-secs.
HOST PACKAGE
The PCIe HOST application(pcie_host_app) supports transcodesupports Transcode, encode Decode and decode Encode use cases.
Transcode
The host application will read an input file(.yuv, .mp4 , or .ts) data file from the HOST machine and sends it to the zcu106 board; which is connected as an endpoint device to the PCIe slot of HOST machine. The data received from the HOST will be decoded; then again encoded with provided encoder type and mpegtsmux using VCU hardware. Transcoded data are written back to the HOST machine in .ts file format.

We support NV12 and NV16 formats. No need to mention format decoder will take care the format. Encoder will take the HOST machine PCIe slot default profile for given YUV format.
Decode
The host application will read an input(.mp4 or .ts) file from the HOST machine and sends it to the zcu106 board which is connected as an endpoint device to the PCIe slot of HOST machine. The data received from the HOST will be processed(transcode, encode, decode) according to provided use case type decoded using VCU hardware; then writes the decoded data back to the HOST machine in .yuv file format.
We support NV12 and NV16 formats. No need to mention formats to decoder, decoder will take care.
Encode
The host application will read an input(.yuv) file from the HOST machine and sends it to the zcu106 board which is connected as an endpoint device to the PCIe slot of HOST machine. The data received from the HOST will be encoded with provided encoder type; then mpegtsmux using VCU hardware and writes the encoded data back to the HOST machine in ( .ts , .yuv, .mp4) file format.file format.

We support only NV12 format. Application only supports one format and user need to provide YUV file with that format only. The main aim of this design was to show case the VCU capability, that’s the reason we don’t have mux options.
The files in pcie_host_package directory provides Xilinx PCIe DMA drivers, for example, software , to be used to exercise file transfer over the Xilinx PCIe DMA IP and perform run the transcode, encode or decode use case using Xilinx VCU IP on zcu106 board.
Directory and file description:===============================
- xdma/: This directory contains
| Directory | File description |
|---|---|
| xdma/ | Contains the Xilinx PCIe DMA kernel module driver files |
...
...
| libxdma/ |
...
| Contains support files for the kernel driver module, which interfaces directly with the XDMA IP |
...
...
| include/ |
...
| Contains all include files |
...
| required for compiling drivers |
...
...
| etc/ |
...
Contains rules for the Xilinx PCIe DMA kernel module and software. The files in this directory should be copied to the /etc/ directory on your Linux system. |
...
| tools/ |
...
| Contains example application software to exercise the provided kernel module driver and Xilinx PCIe DMA IP |
...
Steps to run use cases
- The user needs to copy all the files from the $TRD_HOME/images/vcu_pcie/ to FAT32 formatted SD card directory
- Insert the ZCU106 board into the PCIe slot of the HOST machine and power on the board; then power on the HOST machine
NOTE: Make sure, the ZCU106 board is powered on before booting the HOST machine to enumerate ZCU106 board as PCIe endpoint device successfully
- Execute "lspci" command on HOST machine's terminal and make sure that "Processing accelerators: Xilinx Corporation Device a883" and "Processing accelerators: Xilinx Corporation Device a884" entries are listed; otherwise XDMA driver will not be able to recognized PCIe endpoint device. It throws an error like "Error: The Kernel module installed correctly, but no devices were recognized"
- Copy the hosting package on to UBUNTU-18.04 machine
...
- Run the below commands to Install the XDMA driver and compile the Host application(pcie_host_app)
...
NOTE: Root permissions will be required to install xdma driver.
...
The Host software consists of the XDMA module with the following user access devices.
| Devices | Access |
|---|
...
| xdma0_control |
...
| To access XDMA registers |
...
| xdma0_xvc |
...
| To access userspace registers from HOST |
...
| xdma0_user |
...
| To access AXI-Lite Master interface |
...
| xdma0_bypass |
...
| To access DMA-Bypass interface |
...
| xdma0_h2c_0, xdma0_c2h_0 |
...
| To access each channel |
Finally, run the pcie_host_app on HOST machine then run pcie_transcode device application on ZCU106 board target to initiate the transfer.
HOST APPLICATION
Run the below command to initiate a file transfer from the HOST machine and transcode, encode or decode it from the ZCU106 device. After running the application on HOST user need to start device application(pcie_transcode) on the zcu106 target to initiate the transfer.
...