Zynq UltraScale MPSoC Base TRD 2017.2 - Design Module 3
Zynq UltraScale MPSoC Base TRD 2017.2 - Design Module 3
Table of Contents
Design Overview
This module demonstrates:
- Boot RPU1 only
- RPU1 OS: Bare-metal
- Bare-metal performance monitor application
- Reads PS APM counters to measure CCI, Core Switch and DDR throughput and latency, then prints them to UART1

Design Components
This module requires the following components:
- petalinux_bsp
- zynqmp_fsbl
- pmufw
- perfapm-ctl + perfapm
Build Flow Tutorials
This tutorial uses both SDx and PetaLinux tools. It is recommended to use separate shells for each of the tools.
Note: For consistency the SDx tool is used for all design modules. However, the SDx compiler is not called in this tutorial. SDx is just an eclipse profile that can call the ARM C/C++ compiler, just like XSDK. It is possible to use XSDK to perform the steps in this tutorial. To do so, replace sdx with xsdk in the below code snippet
Perfapm-ctl Application
- Create a new SDx workspace.
% cd $TRD_HOME/rpu1/perfapm-server
% sdx -workspace . &&
- Click 'Import Project' from the welcome screen, browse to the current working directory and make sure the perfapm, perfapm_bsp, perfapm-ctl and zcu102_base_trd_wrapper_hw_platform_0 projects are selected. Click Finish.
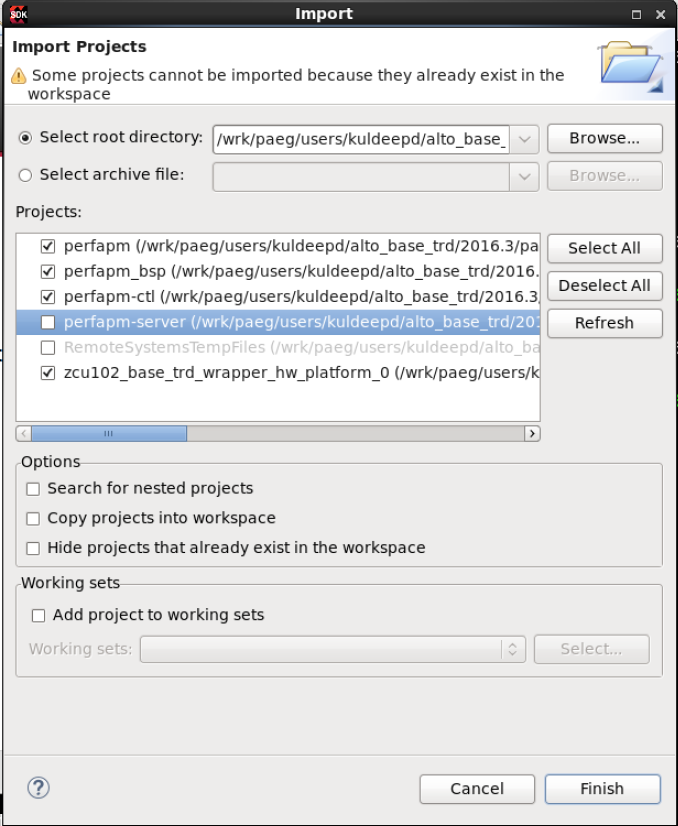
- Right-click on the perfapm-ctl project and select 'Build Project'.
- Copy the generated perfapm-ctl executable into the PetaLinux BSP.
% cp perfapm-ctl/Debug/perfapm-ctl.elf $TRD_HOME/apu/petalinux_bsp/images/linux
PetaLinux BSP
This tutorial shows how to build the first stage bootloader (FSBL), PMU-firmware and boot image using the PetaLinux build tool.
- The petalinux-config step can be skipped if this was already done in a previous module.
% cd $TRD_HOME/apu/petalinux_bsp
% petalinux-config --oldconfig
- Build the FSBL. This step can be skipped if this was already done in a previous module.
petalinux-build -c fsbl
- Build the PMU firmware. This step can be skipped if this was already done in a previous module.
petalinux-build -c pmu-firmware
- Create a boot image
% cd images/linux
% petalinux-package --boot --bif=dm3.bif --force
- Copy the generated boot image to the dm3 SD card directory
% mkdir -p $TRD_HOME/images/dm3
% cp BOOT.BIN $TRD_HOME/images/dm3
Run Flow Tutorial
- See here for board setup instructions.
- Copy all the files from the $TRD_HOME/images/dm3 SD card directory to a FAT formatted SD card.
- Power on the board to boot the images; make sure all power rail LEDs are lit green.
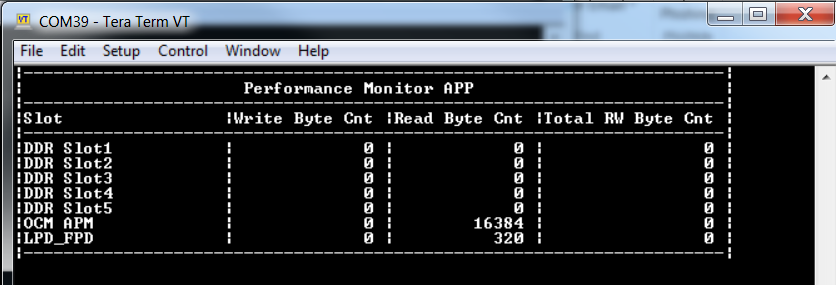
- The user can now see FSBL prints on UART-0 and prints from bare-metal perfapm-ctl application can be viewed on UART-1.
- When prompted, user need to press 'Y' to turn on a dummy traffic generator that reads from OCM
Turn on traffic generator? Enter 'Y' or 'N':
- View the application prints on UART-1 as shown in the pictures:
Return to the Design Tutorials Overview.
© Copyright 2019 - 2022 Xilinx Inc. Privacy Policy